DIY: Load Leveler Air Bags - 3rd Gen 4runner
 03-28-2010, 05:17 PM
#1
Registered User
Thread Starter

Join Date: Mar 2008
Posts: 35
Likes: 0
Received 0 Likes
on
0 Posts
DIY: Load Leveler Air Bags - 3rd Gen 4runner
Well, I've been looking at these for a while since I tow a trailer and car with my '97. I put them on this weekend. I took a little extra time, but it took about 2 hours to do both sides. I never saw a DIY on this here so I wanted to contribute. Overall, it was easier than I initially thought. I took some time to check on other things too while I had the back of the car up. This can easily be done in an afternoon.
I bought them from Suspension Connection. They got here in a few days.
Toyota Air Spring Kits - 1996-2002 Toyota 4Runner - "Air Lift 1000" Air Helper Spring Kit (Rear)
Tools I used:
Cordless impact wrench
21mm socket (wheels)
17mm socket (shock bolt)
Cordless Drill
1/2" drill bit (for air line at axle)
1/4" drill bit (for fill plug at running board)
needle nose pliers (line clamps)
Hack Saw (spring rubber stops)
Yuengling Beer (well, you know)
Here's the final view under the back.
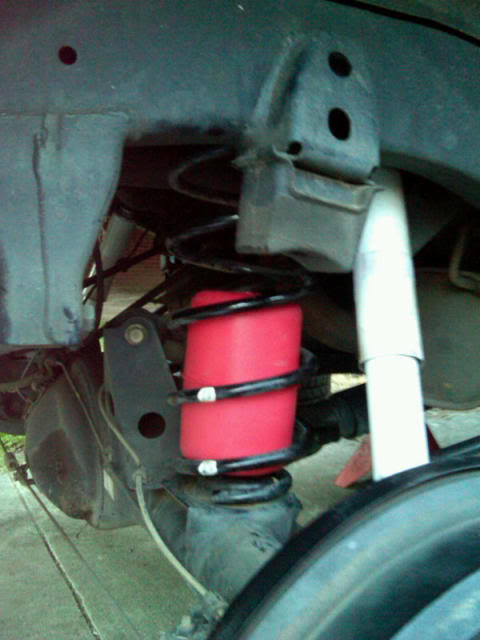
After jacking the back up, supporting with jack stands, and removing the rear tires, I had to unbolt the bottom of the shock (17mm bolt) to let the axle drop a little more. I was able to wiggle the spring out without much trouble once it dropped this low.
After removing the spring, cut the rubber stop to make room for the airbag.
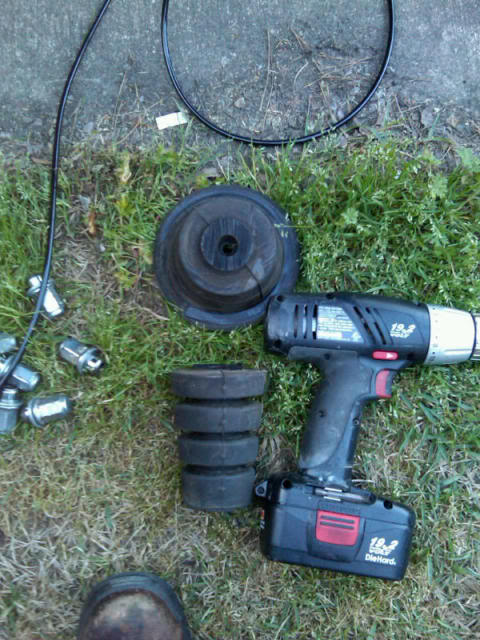
You'll reuse the top portions of course. The bottom parts that are cut off will not be used.
Then with 1/2" drill, drill out the hole already at the spring seat. It's a little but smaller than the nipple on the air bag. I made it 1/2" to allow for enough room and also used a finishing bit to deburr. The air line goes down for our type of axle/spring assembly.
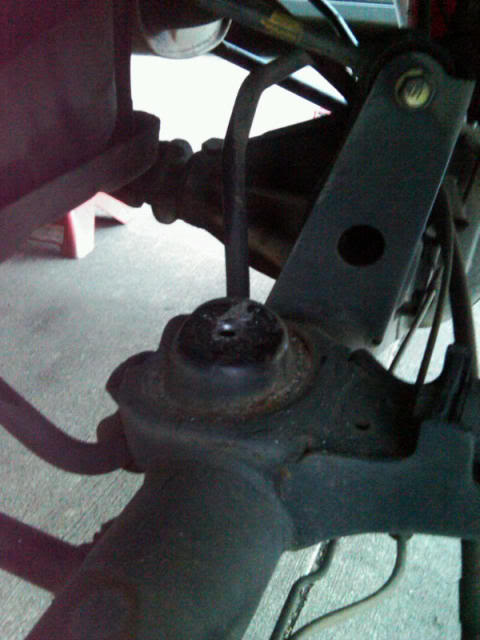
Then I crimped the air hose provided with the hardware, put the airbag in the spring and routed the air line through the hole. the springs (with the air bag inside) and the top mount fit back in place like before. Make sure to take up the slack in the air line so it doesn't get crimped at the spring seat on the axle.
I then routed the air hose loosely up the control arm and secured it with a couple of tie wraps (also provided in their kit).
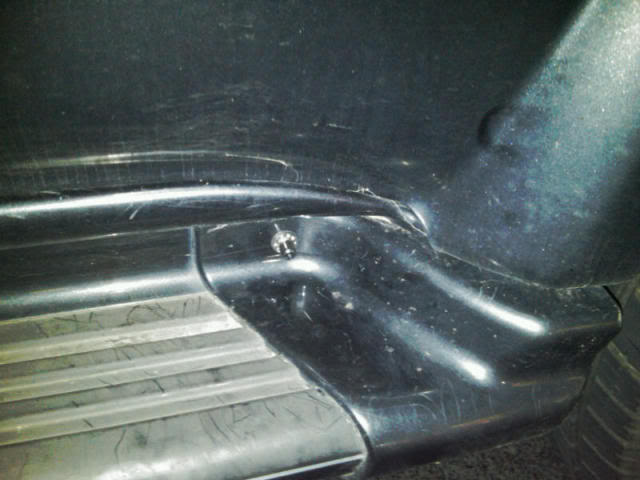
I decided to keep the lines separate instead of using a T-fitting. I pulled the lines on the rear end of the side steps. I drilled a small hole in each and routed the nozzles here and used the nuts proved to secure them in place. They are out of the way, but also easy to get to in order to fill. Just cut the line to the length desired. I had a lot of line left over after the install so there was more than enough. Also the blocks which also came with the pack were not used.
Then I remounted the wheels and lowered the truck. The original springs were sagging a little, and with 17psi of air in each back, I gained a inch in the rear. I was trying different things to see what it would be. The ride without a trailer is good. Can't really tell anything different is there. I'll have a race in April and will let everyone know how it is with a trailer. I'll take pics of with and without leveling. You can't tell they are there from the outside either so I liked that.
Again, installed pic. If anyone has any questions/comments, please let me know. Thanks.
I bought them from Suspension Connection. They got here in a few days.
Toyota Air Spring Kits - 1996-2002 Toyota 4Runner - "Air Lift 1000" Air Helper Spring Kit (Rear)
Tools I used:
Cordless impact wrench
21mm socket (wheels)
17mm socket (shock bolt)
Cordless Drill
1/2" drill bit (for air line at axle)
1/4" drill bit (for fill plug at running board)
needle nose pliers (line clamps)
Hack Saw (spring rubber stops)
Yuengling Beer (well, you know)
Here's the final view under the back.
After jacking the back up, supporting with jack stands, and removing the rear tires, I had to unbolt the bottom of the shock (17mm bolt) to let the axle drop a little more. I was able to wiggle the spring out without much trouble once it dropped this low.
After removing the spring, cut the rubber stop to make room for the airbag.
You'll reuse the top portions of course. The bottom parts that are cut off will not be used.
Then with 1/2" drill, drill out the hole already at the spring seat. It's a little but smaller than the nipple on the air bag. I made it 1/2" to allow for enough room and also used a finishing bit to deburr. The air line goes down for our type of axle/spring assembly.
Then I crimped the air hose provided with the hardware, put the airbag in the spring and routed the air line through the hole. the springs (with the air bag inside) and the top mount fit back in place like before. Make sure to take up the slack in the air line so it doesn't get crimped at the spring seat on the axle.
I then routed the air hose loosely up the control arm and secured it with a couple of tie wraps (also provided in their kit).
I decided to keep the lines separate instead of using a T-fitting. I pulled the lines on the rear end of the side steps. I drilled a small hole in each and routed the nozzles here and used the nuts proved to secure them in place. They are out of the way, but also easy to get to in order to fill. Just cut the line to the length desired. I had a lot of line left over after the install so there was more than enough. Also the blocks which also came with the pack were not used.
Then I remounted the wheels and lowered the truck. The original springs were sagging a little, and with 17psi of air in each back, I gained a inch in the rear. I was trying different things to see what it would be. The ride without a trailer is good. Can't really tell anything different is there. I'll have a race in April and will let everyone know how it is with a trailer. I'll take pics of with and without leveling. You can't tell they are there from the outside either so I liked that.
Again, installed pic. If anyone has any questions/comments, please let me know. Thanks.
 03-28-2010, 08:00 PM
#2
Registered User

Join Date: Feb 2010
Location: Temecula, SoCal
Posts: 4
Likes: 0
Received 0 Likes
on
0 Posts
Great Timing! Sonoran Steel is building my system 1.2 kit right now. THe website says this is the way to go to eliminate sway on the hwy. I just ordered a set of these airbags, so I'll put them in at the same time as my new suspension.
Thanks for the write up!
Thanks for the write up!

 05-02-2010, 12:06 PM
#6
Registered User
Join Date: Nov 2005
Location: SouthWest Littleton, Colorado
Posts: 1,205
Likes: 0
Received 1 Like
on
1 Post
I had these for a while. They are great because you can lift the rear to handle loads.
If you are using these with a longer coil, you will not cut off the 4 donuts that they tell you to do. You'll have to figure out the length. Measure the space in the coil with the vehicle on the ground.
FYI After you drop the vehicle back down on the ground the air bag will center itself in the coil. You do have to leave enough slack in the air line because when you flex, the bag will stay centered and WILL pull the air line off the bag. (It happened to me a few times, I know) It's a balance between enough line so this doesn't happen and too much that it gets caught on things while wheeling.
Last edited by Gerdo; 05-02-2010 at 12:09 PM.
Trending Topics
05-03-2010, 07:09 AM
#9
Registered User
Thread Starter
Join Date: Mar 2008
Posts: 35
Likes: 0
Received 0 Likes
on
0 Posts
I didn't use a T. I hooked them up individually. I also didn't use the black spacer included because the diagram in the instructions for how ours in hooked up told me now to use it.
05-03-2010, 07:27 AM
#10
Contributing Member
Its weird because the Air Lift I installed for my dad on his Tundra, the bags were really high quality material. The bags I got for the 4runner seem like they are made out of a child's Toy plastic. Its bizzare. I hope they last a while.
05-04-2010, 10:58 AM
#11
Registered User
Join Date: Aug 2003
Location: San Diego, CA
Posts: 987
Likes: 0
Received 0 Likes
on
0 Posts
I got the same bags. I routed them differently though. I put the bags and airline up and through the bumpstop. The from there I routed the airline through the frame. The valves sit into two small holes on the back bumper.
10-27-2010, 07:45 AM
#13
Registered User
i am using the ss1.2 kit. it has land cruiser coils. Think this will work for me or should i look for a land cruiser model?
Thanks,
10-27-2010, 08:07 AM
#14
Registered User

I also have the SS1.2 kit, but I used the Firestone Airbag kit, it is basically the same but the firestone airbag is taller, and works better with the tall coils. Even with the stock coils it looks like the Air lift bags are really short. I routed the hose through the top bumpstop, as it supports the bag also. The LC coils are from the front of the LC, so I belive that the Airbags for them wont fitm, but I am not 100% sure on the diameter of the front and rear coils, if they are the same then the bags should work.
I love these airbags, I found the SS 1.2 lift to be a little on the soft side, on highway trips esspecially when loaded, I run about 8-10 psi on the street normally and it stiffened up the ride a tiny bit, which I feel is now perfect. Now when loaded with 20-25 psi in the bags it is much more stable. I highly reccomend these!!
I was also thinking of T'ing the two bags togeather for consistant pressure between the two, any done this?
10-27-2010, 09:34 AM
#15
Registered User
Join Date: Apr 2006
Location: TX
Posts: 503
Likes: 0
Received 0 Likes
on
0 Posts
I ended up keeping the valve separately, independently. There was no holes to be drilled.
The method of OP is NOT the best method. I recommend routing the hose up and route if to the back of the bumper where there are predrilled hole.
The method of OP is NOT the best method. I recommend routing the hose up and route if to the back of the bumper where there are predrilled hole.
10-27-2010, 04:03 PM
#16

One of the best mods I've made to my 99 runner ! Without question!
I left 2 bumps in the bumper so as to use lower air pressure to raise the vehicle where I needed while preserving a nice ride.
. Worked perfect. About 1.5 lift with 16-18 lbs.
20lbs when loaded with people.
I left the stock springs in there as well.
been perfect for 5 yrs now.....Kenny >S
I left 2 bumps in the bumper so as to use lower air pressure to raise the vehicle where I needed while preserving a nice ride.
. Worked perfect. About 1.5 lift with 16-18 lbs.
20lbs when loaded with people.
I left the stock springs in there as well.
been perfect for 5 yrs now.....Kenny >S
Last edited by sharrack; 10-27-2010 at 04:04 PM.
10-10-2013, 09:30 PM
#17
Registered User

Join Date: Apr 2013
Posts: 3
Likes: 0
Received 0 Likes
on
0 Posts
Black puck spacers
99 limited. Stock.
Installed today.
I used the puck spacers on the bottom but realize this is incorrect. I called the Airlift co. and the guy said yes, use them but he is wrong, imho. When installed they they leave no vertical space between the top and bottom of coil and thus limit travel even when inflated at only 5lbs.
I mounted mine nipple up. Routed lines through frame, air valve mounted (pointed down) through pre existing holes in bumper. Each bag with its own line. Plan to cover air line with abrasion sleeve. My handheld bike pump works great. 15 pumps gives me +5lbs.
Last edited by slapdappy; 10-12-2013 at 11:07 AM. Reason: Was wrong about puck spacers

Thread
Thread Starter
Forum
Replies
Last Post
RedRunner_87
95.5-2004 Tacomas & 96-2002 4Runners (Build-Up Section)
84
06-01-2021 01:51 PM
FS[SouthEast]: Mercury Villager Fan & DCC Fan Controller
coryc85
Misc Stuff (Vehicle Related)
6
09-09-2015 06:24 AM
Steezy96yota
86-95 Trucks & 4Runners (Build-Up Section)
1
07-06-2015 10:00 AM


