
2001 4Runner ARB Safari Snorkel install (3rd Gen. 4Runner write-up) PICTURES!!!
 Mar 20, 2010 | 07:31 AM
#1
Thread Starter
Registered User
Joined: Nov 2005
Posts: 548
Likes: 0
From: Toronto, ON
2001 4Runner ARB Safari Snorkel install (3rd Gen. 4Runner write-up) PICTURES!!!
There is a ton of information regarding ARB Safari Snorkels, but I didn't find any good and full write-ups, so I've decided while I'm installing mine I should make one. Plus I was asked by few members here to do so. So here its is.
First of all a few facts and details:
This is my personal experience and not an official ARB installation guide, so please treat it as it is. I tried to put as much information as possible and document every step for easy reading and following. You may choose different approach at your install and its your call to follow my steps or go your way. I hope that my experience will be helpful for people performing this install.
Vehicle: 2001 Toyota 4Runner Limited 3.4L V6
ARB Safari Snorkel: SS170HF ('00-'04 Toyota Tacoma 3.4L V6)
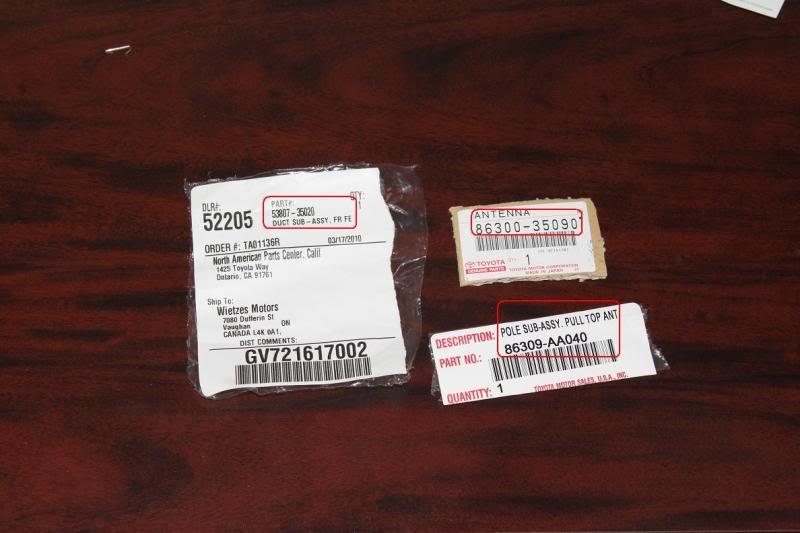
You may consider a few Toyota parts required for this install:
- 53807-35020 Tacoma Intake Tube "DUCT SUB-ASSY, FR FE" (Note - 4Runner intake tube will not work)
- 86300-35090 4Runner non-Motorized Antenna "ANTENNA" (Note - Limited 4Runner Motorized Antenna may not work. I didn't try it, as my was broken, but as envelope is very tight I'd assume it not going to work or it will be very challenge to make it work)
- 86309-AA040 Tacoma Antenna Wip "POLE SUB-ASSY, PULL TOP ANT" (Note - 4Runner non-Motorized Antenna has stainless steel whip, but as many mentioned before and dealership agrees, it's very low performance. Highly recommended to upgrade to Tacoma Wip)
Installation Time: It took me ~3 hour to install the snorkel. About 20 minutes to swap antenna and ~40 minutes to route a new cable to the radio. This brings the total install time to ~4hr.
First of all a few facts and details:
This is my personal experience and not an official ARB installation guide, so please treat it as it is. I tried to put as much information as possible and document every step for easy reading and following. You may choose different approach at your install and its your call to follow my steps or go your way. I hope that my experience will be helpful for people performing this install.
Vehicle: 2001 Toyota 4Runner Limited 3.4L V6
ARB Safari Snorkel: SS170HF ('00-'04 Toyota Tacoma 3.4L V6)
You may consider a few Toyota parts required for this install:
- 53807-35020 Tacoma Intake Tube "DUCT SUB-ASSY, FR FE" (Note - 4Runner intake tube will not work)
- 86300-35090 4Runner non-Motorized Antenna "ANTENNA" (Note - Limited 4Runner Motorized Antenna may not work. I didn't try it, as my was broken, but as envelope is very tight I'd assume it not going to work or it will be very challenge to make it work)
- 86309-AA040 Tacoma Antenna Wip "POLE SUB-ASSY, PULL TOP ANT" (Note - 4Runner non-Motorized Antenna has stainless steel whip, but as many mentioned before and dealership agrees, it's very low performance. Highly recommended to upgrade to Tacoma Wip)
Installation Time: It took me ~3 hour to install the snorkel. About 20 minutes to swap antenna and ~40 minutes to route a new cable to the radio. This brings the total install time to ~4hr.
Last edited by AlexJet; Mar 20, 2010 at 08:54 AM.
Mar 20, 2010 | 07:32 AM
#2
Thread Starter
Registered User
Joined: Nov 2005
Posts: 548
Likes: 0
From: Toronto, ON
WARNING!
Make sure you have all parts ready before you start. You don't want to get to position of having run to the store or dealer for some parts while your vehicle is partially disassembled.
You'd need:
- Philips screwdriver
- a few flat screwdrivers
- 1/8" drill bit for pilot holes
- 5/16" drill bit
- Step-Drill
- 3-1/2" bi-metal hole saw
- Drill (better cordless)
- hummer
- puncher
- metric socket set
- wire cutters
- Washers + screws - not necessary (described application further in write-up)
- Good quality paint
- Matching truck colored touch-up pen from Toyota
First of all align all parts on the flow and make sure you have everything:

Open the Snorkel box and check the parts are not missing.
WARNING! Do not use knife to open it as it has template attached to the inside of the box. I used my hand to open it from staples on one end.

Park your truck in comfortable position for you to work around. You'd need a space to work and walk around.
Make sure you have all parts ready before you start. You don't want to get to position of having run to the store or dealer for some parts while your vehicle is partially disassembled.
You'd need:
- Philips screwdriver
- a few flat screwdrivers
- 1/8" drill bit for pilot holes
- 5/16" drill bit
- Step-Drill
- 3-1/2" bi-metal hole saw
- Drill (better cordless)
- hummer
- puncher
- metric socket set
- wire cutters
- Washers + screws - not necessary (described application further in write-up)
- Good quality paint
- Matching truck colored touch-up pen from Toyota
First of all align all parts on the flow and make sure you have everything:
Open the Snorkel box and check the parts are not missing.
WARNING! Do not use knife to open it as it has template attached to the inside of the box. I used my hand to open it from staples on one end.
Park your truck in comfortable position for you to work around. You'd need a space to work and walk around.
Last edited by AlexJet; Mar 21, 2010 at 12:01 PM.
Mar 20, 2010 | 07:32 AM
#3
Thread Starter
Registered User
Joined: Nov 2005
Posts: 548
Likes: 0
From: Toronto, ON
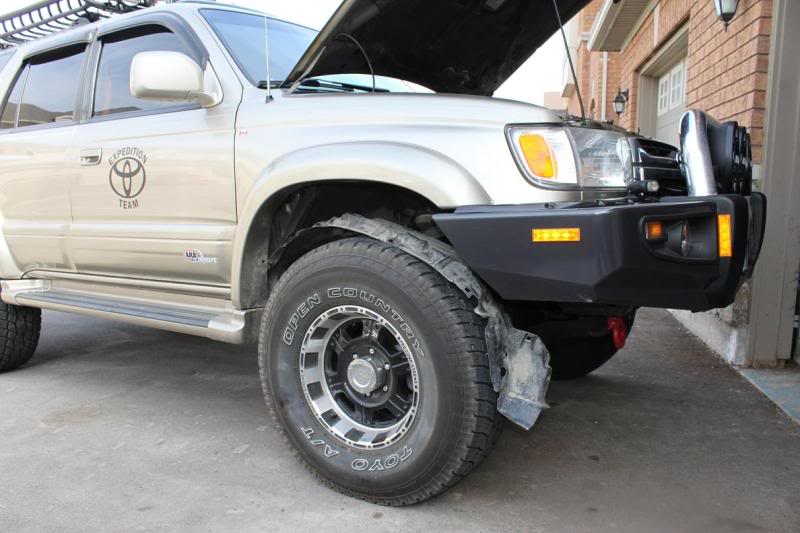
Open the hood as it will help you with locating a few clips holding the inner fender. You do not need to remove the air box as it stated in ARB instructions. Those instructions are for Tacoma. On 4Runner you are skipping this step.
Remove the inner fender. You can either remove it completely or partially. To do so you'd need to take square plastic clips off from the fender. Some of them have an easy access from the engine compartment. Be aware that front end has 3 clips (one hidden from the view), I spend 2-3 minutes trying to get my head down there to find it. It's facing inside of the vehicle and located right between the 1st and second clip visible from wheel well. To remove the clips from under the Limited flares you need to unscrew several bolts from the flares. Those are 10mm socket screws. You do not have to remove the Limited flares. Continue and remove all clips from inner fender. If you did remove all, then take it off. In my case I left the last rear one on and just drop the inner fender to the wheel.
Some of you may find that removing the wheel will help with access. In my particular case with 3" lift its not necessary as you have enough room.
Next thing would be removing the mast from your motorized antenna. If you have non-motorized antenna, procedures are similar, but much easier. You still need to remove the antenna for future access to the snorkel bolts and safety while drilling the fender. In case of motorized antenna, have a second person with you. Unscrew the top nut holding antenna base. Have your help person switch the radio. While motor is running pull the mast completely off the assembly.
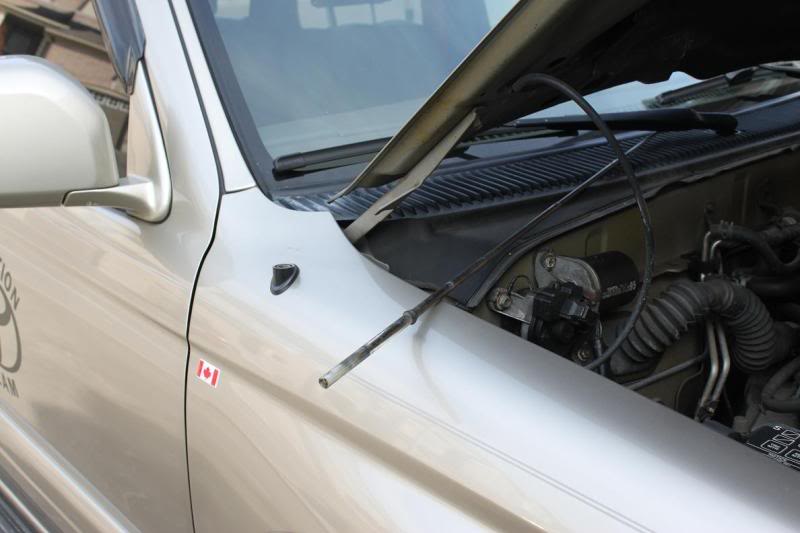
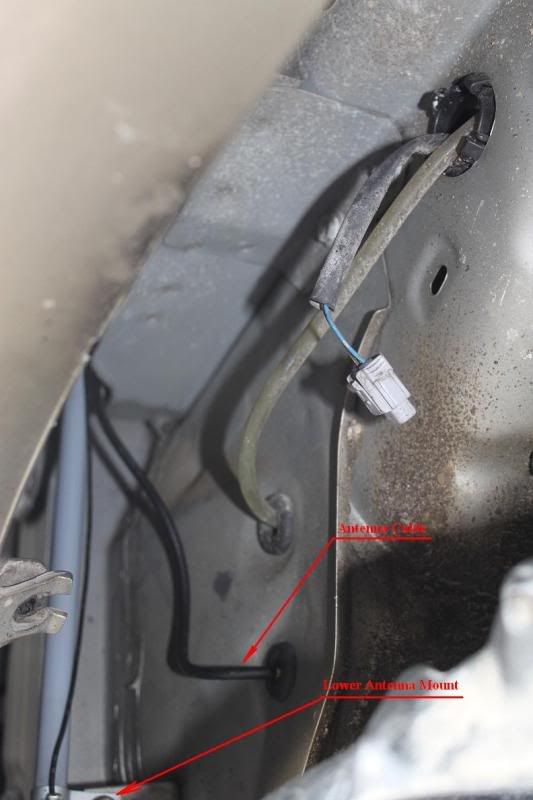
Look inside the fender and locate your antenna unit. Spray some penetrating oil on the bolt and using 10mm socket unscrew the lower mount (just 1 bolt holding the antenna). As you already unscrew the top base mount, your antenna should slide off really easy. Pull it out. Locate the grommet where antenna cable going into the cabin. Pull it out with some antenna cable. Don't pull too hard as not much of a free loop antenna cable has on other side. When you pulled the grommet out, just cut the cable with cutters. Now remove the the antenna off the vehicle.
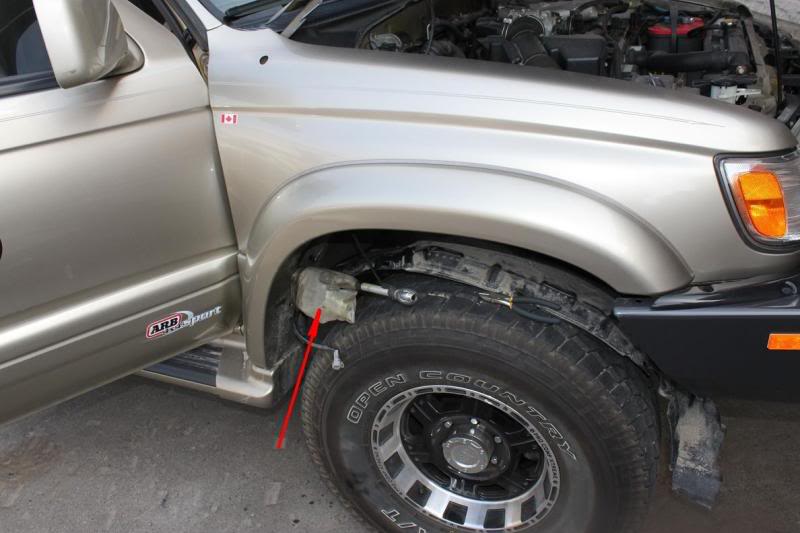
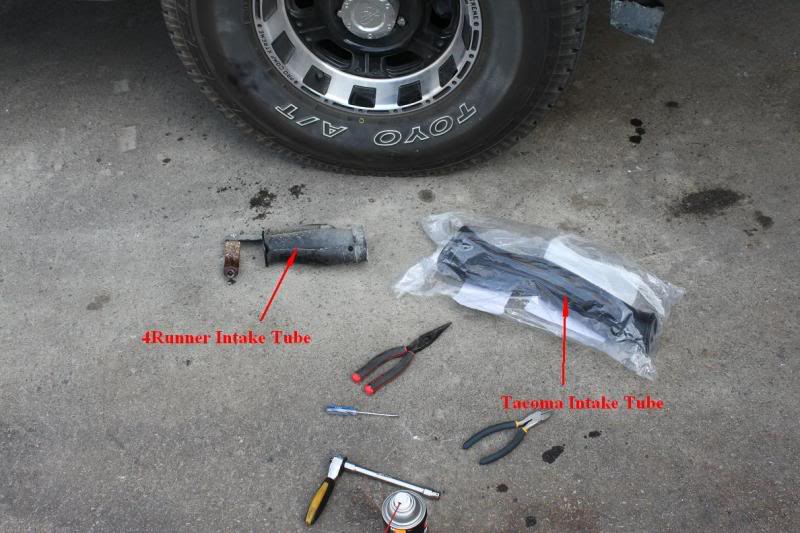
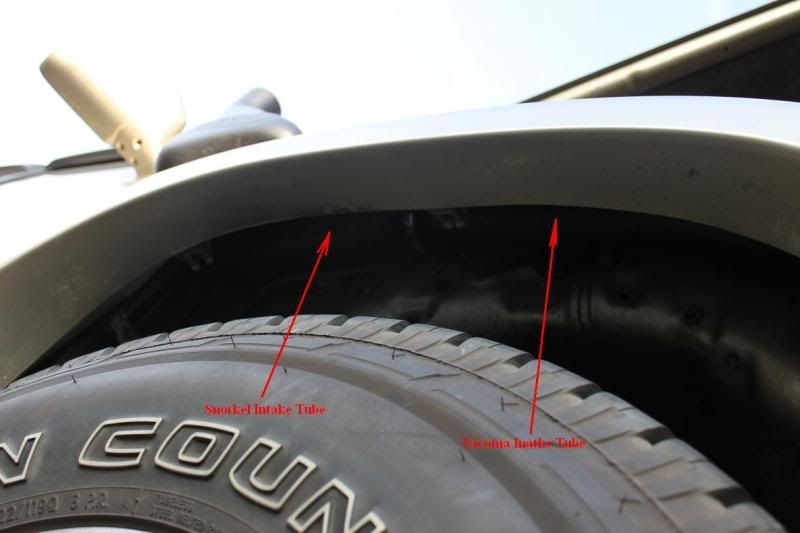
Look under the fender and locate the stock 4Runner Intake tube. It holds by single bolt. Spray some penetration and remove the bolt using 10mm socket. Ba careful as brackets are very gentle and if you have corroded bolt you may break the bracket off. You'd need this bracket for the new tube. Remove the 4Runner tube off the vehicle. On the image bellow you can see the comparison of 4Runner and Tacoma tube. You'd need to install Tacoma Tube instead of 4Runner for the snorkel connection. Your 4Runner tube will not work.
Remove the inner fender. You can either remove it completely or partially. To do so you'd need to take square plastic clips off from the fender. Some of them have an easy access from the engine compartment. Be aware that front end has 3 clips (one hidden from the view), I spend 2-3 minutes trying to get my head down there to find it. It's facing inside of the vehicle and located right between the 1st and second clip visible from wheel well. To remove the clips from under the Limited flares you need to unscrew several bolts from the flares. Those are 10mm socket screws. You do not have to remove the Limited flares. Continue and remove all clips from inner fender. If you did remove all, then take it off. In my case I left the last rear one on and just drop the inner fender to the wheel.
Some of you may find that removing the wheel will help with access. In my particular case with 3" lift its not necessary as you have enough room.
Next thing would be removing the mast from your motorized antenna. If you have non-motorized antenna, procedures are similar, but much easier. You still need to remove the antenna for future access to the snorkel bolts and safety while drilling the fender. In case of motorized antenna, have a second person with you. Unscrew the top nut holding antenna base. Have your help person switch the radio. While motor is running pull the mast completely off the assembly.
Look inside the fender and locate your antenna unit. Spray some penetrating oil on the bolt and using 10mm socket unscrew the lower mount (just 1 bolt holding the antenna). As you already unscrew the top base mount, your antenna should slide off really easy. Pull it out. Locate the grommet where antenna cable going into the cabin. Pull it out with some antenna cable. Don't pull too hard as not much of a free loop antenna cable has on other side. When you pulled the grommet out, just cut the cable with cutters. Now remove the the antenna off the vehicle.
Look under the fender and locate the stock 4Runner Intake tube. It holds by single bolt. Spray some penetration and remove the bolt using 10mm socket. Ba careful as brackets are very gentle and if you have corroded bolt you may break the bracket off. You'd need this bracket for the new tube. Remove the 4Runner tube off the vehicle. On the image bellow you can see the comparison of 4Runner and Tacoma tube. You'd need to install Tacoma Tube instead of 4Runner for the snorkel connection. Your 4Runner tube will not work.
Last edited by AlexJet; Mar 20, 2010 at 09:25 AM.
Mar 20, 2010 | 07:32 AM
#4
Thread Starter
Registered User
Joined: Nov 2005
Posts: 548
Likes: 0
From: Toronto, ON
WARNING!
Most important stage as you'll be drilling your fender. If you do it wrong and your snorkel will not align in worse case scenario you'd need a new fender. At this stage use the phrase: "7 times measure and 1 time cut".
Locate the template form the package. It was initially taped to the side of the box (inside). If you carefully opened the box without a knife you should have it intact.
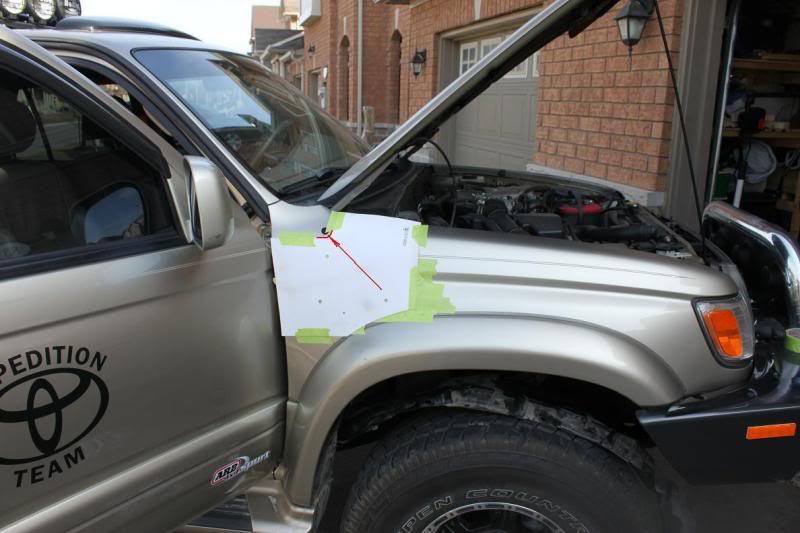
Having your antenna removed giving you a start point. Disregard ARB instructions as it designed for Tacoma. You need to alight the template to your antenna opening hole leaving ~1/4" gap between template and the hole.
Before attaching the template use painters masking tape to cover the fender under the template. You can use masking tape as well to help you hold the template in place when you align it as was shown bellow.
PAY ATTENTION that edges of the template do not align with your fender and flares. Remember template is made for Tacoma. You mast have edge of the template parallel to the fender, but not match exactly.
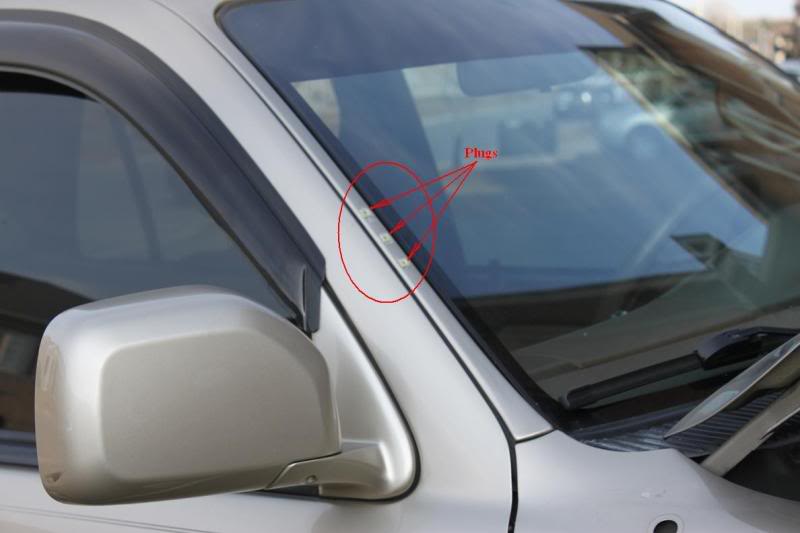
On the template you'll see 3 mounting holes and intake tube hole. Make sure you pointed which is which one.
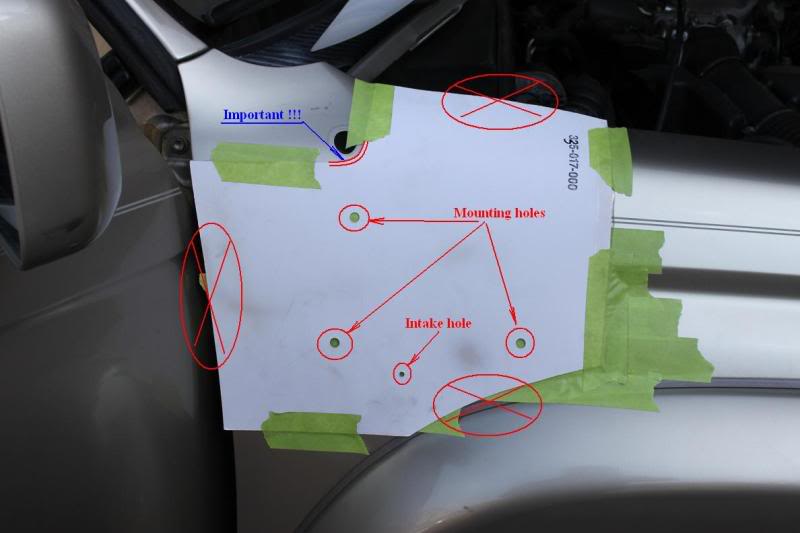
Using pencil or marker mark out center of those holes. Remove the template and drill using 1/8" drill bit pilot holes in all 4 locations (3 mounting and 1 intake)
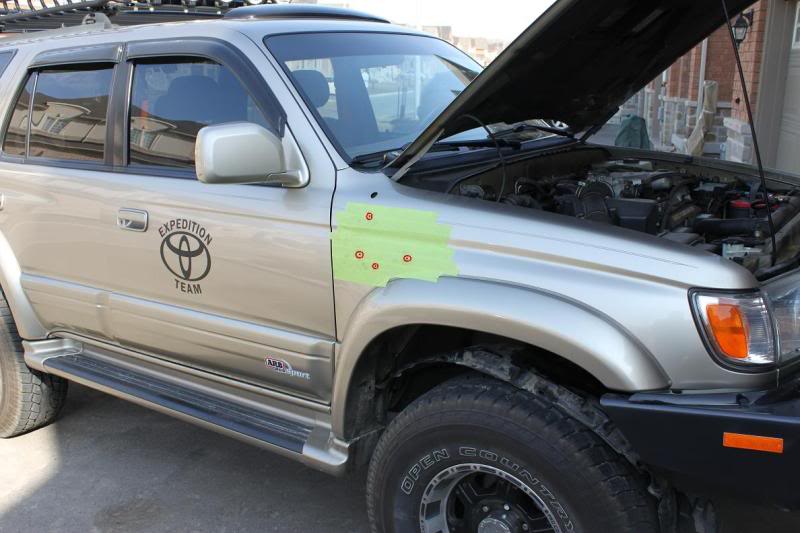
Now using step drill enlarge previously drilled 1/8" holes to 16mm or 5/8". This is important to use a step drill instead of regular drill bit. Step drill will give perfect round shape hole while regular drill bit will make uneven hole due to very thin metal used in body panels. I've tested this on a few previous snorkel installs and Step-drill is the way to go.
Make sure you did not drill out the intake hole with step drill for now.
Take 85mm or 3-1/2 bi-metal hole saw and carefully (without pressure) drill out the intake hole using intake pilot hole (see images above).
When you'll drill all necessary holes, carefully clean them up with small round shape file.
Most important stage as you'll be drilling your fender. If you do it wrong and your snorkel will not align in worse case scenario you'd need a new fender. At this stage use the phrase: "7 times measure and 1 time cut".
Locate the template form the package. It was initially taped to the side of the box (inside). If you carefully opened the box without a knife you should have it intact.
Having your antenna removed giving you a start point. Disregard ARB instructions as it designed for Tacoma. You need to alight the template to your antenna opening hole leaving ~1/4" gap between template and the hole.
Before attaching the template use painters masking tape to cover the fender under the template. You can use masking tape as well to help you hold the template in place when you align it as was shown bellow.
PAY ATTENTION that edges of the template do not align with your fender and flares. Remember template is made for Tacoma. You mast have edge of the template parallel to the fender, but not match exactly.
On the template you'll see 3 mounting holes and intake tube hole. Make sure you pointed which is which one.
Using pencil or marker mark out center of those holes. Remove the template and drill using 1/8" drill bit pilot holes in all 4 locations (3 mounting and 1 intake)
Now using step drill enlarge previously drilled 1/8" holes to 16mm or 5/8". This is important to use a step drill instead of regular drill bit. Step drill will give perfect round shape hole while regular drill bit will make uneven hole due to very thin metal used in body panels. I've tested this on a few previous snorkel installs and Step-drill is the way to go.
Make sure you did not drill out the intake hole with step drill for now.
Take 85mm or 3-1/2 bi-metal hole saw and carefully (without pressure) drill out the intake hole using intake pilot hole (see images above).
When you'll drill all necessary holes, carefully clean them up with small round shape file.
Last edited by AlexJet; Mar 21, 2010 at 11:58 AM.
Mar 20, 2010 | 07:33 AM
#5
Thread Starter
Registered User
Joined: Nov 2005
Posts: 548
Likes: 0
From: Toronto, ON
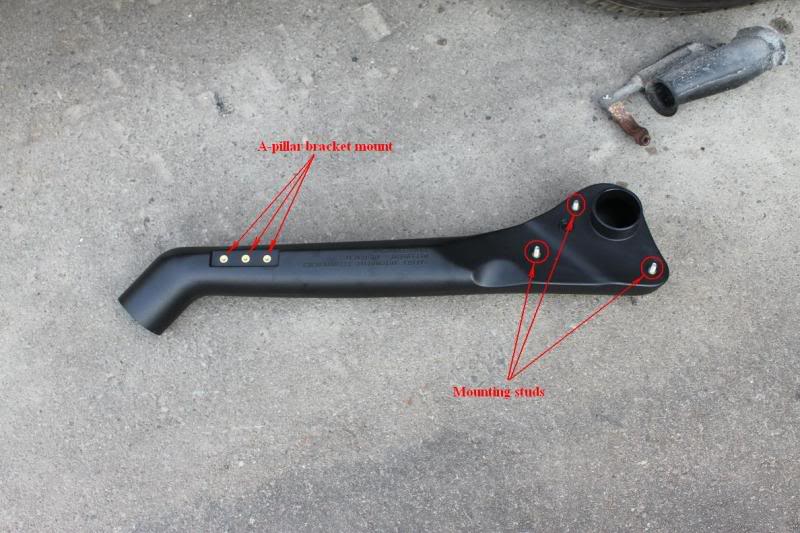
Locate the hardware bag in the Snorkel package. Remove 3 studs from the bag and thread them into the snorkel body. Use Blue Lock-Tite to secure them in place.
Take the upper tube bracket from the hardware bag and install it on the Snorkel body using supplied hardware. Do not tight them down.
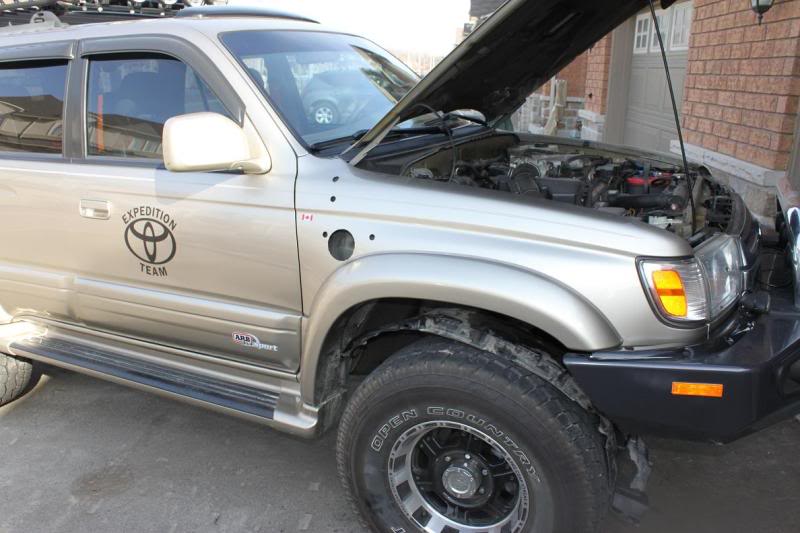
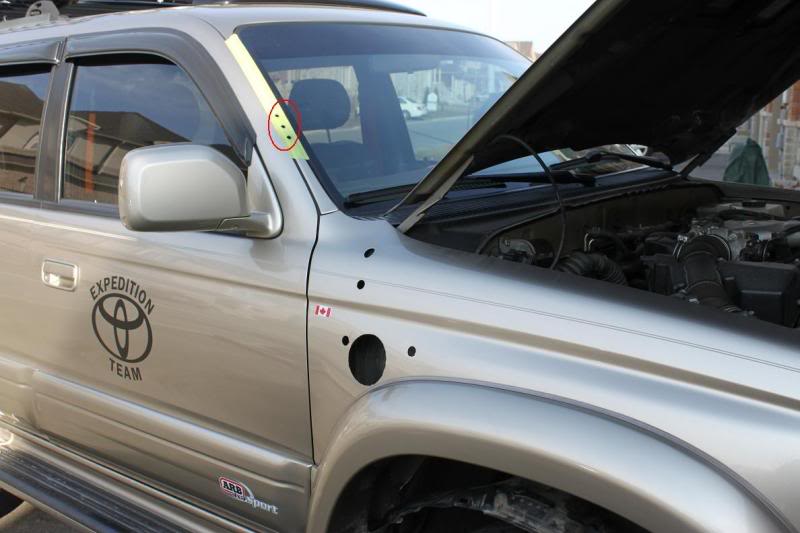
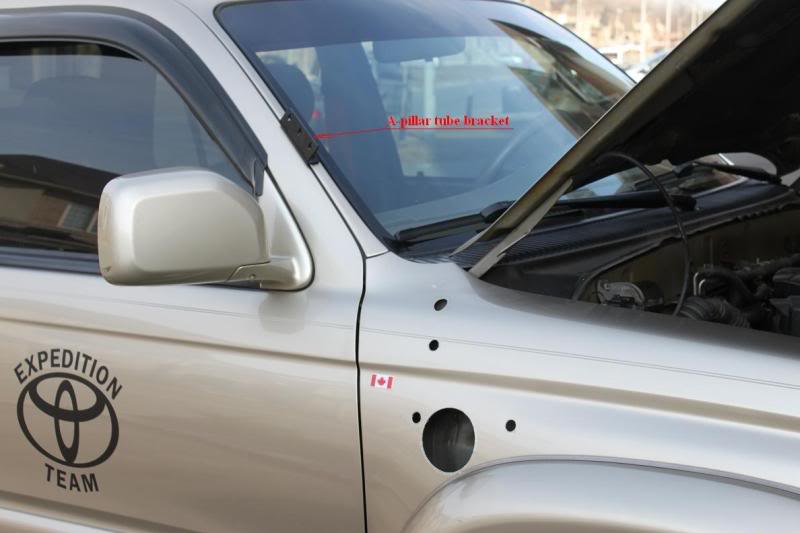
Use painters tape to cover the outside of the A-pillar.
Pre-install the Snorkel into the intake hole and mounting holes. Align it that the upper tube bracket (A-pillar mount side) is sitting in the middle of the A-pillar between the door and the windshield.
Using pencil or marker marked out 3 A-pillar holes.
Remove the snorkel.
Using 1/8" drill bit drill out the pilot holes.
Use step drill to enlarge them to 8mm or 5/16"
Remove the painters tape.
I highly recommend you to paint the edges of all holes drilled before as bare metal will rust unless you live in the area with 0 humidity. I've used rubberized compound paint for high durability and quick dry time. Then I've painted the holes to color matching the truck.
Let the paint dry out.
Locate 3 plastic inserts in the hardware bag and using silicone (for sealing purposes - highly recommended) push them into the A-pillar holes. Do not use much of the force as you can either make a dent or push the insert through.
Remove the A-pillar bracket from the snorkel body and install it using supplied hardware on the A-pillar.
Take the upper tube bracket from the hardware bag and install it on the Snorkel body using supplied hardware. Do not tight them down.
Use painters tape to cover the outside of the A-pillar.
Pre-install the Snorkel into the intake hole and mounting holes. Align it that the upper tube bracket (A-pillar mount side) is sitting in the middle of the A-pillar between the door and the windshield.
Using pencil or marker marked out 3 A-pillar holes.
Remove the snorkel.
Using 1/8" drill bit drill out the pilot holes.
Use step drill to enlarge them to 8mm or 5/16"
Remove the painters tape.
I highly recommend you to paint the edges of all holes drilled before as bare metal will rust unless you live in the area with 0 humidity. I've used rubberized compound paint for high durability and quick dry time. Then I've painted the holes to color matching the truck.
Let the paint dry out.
Locate 3 plastic inserts in the hardware bag and using silicone (for sealing purposes - highly recommended) push them into the A-pillar holes. Do not use much of the force as you can either make a dent or push the insert through.
Remove the A-pillar bracket from the snorkel body and install it using supplied hardware on the A-pillar.
Last edited by AlexJet; Mar 21, 2010 at 12:05 PM.
Mar 20, 2010 | 07:34 AM
#6
Thread Starter
Registered User
Joined: Nov 2005
Posts: 548
Likes: 0
From: Toronto, ON
Carefully install the snorkel back to the truck pushing all 3 studs and intake tube into the appropriate holes. Now using ARB hardware attach the upper Snorkel tube the the A-pillar bracket you installed earlier. Do not tighten the bolts.
Locate 3 lock-nuts with plastic inserts and 3 washers in the hardware bag and install them to the Snorkel studs passing them through the fender gap. I suggest you install the bottom 2 first, but not tight them. The upper one is the hardest. Due to the fender design to accommodate motorized antenna there is very narrow passage to the upper stud location. If you have some helper with smaller hands, you can use their help. It took me ~10-15 minutes to get it in that spot.
After you placed all hardware in place tight the A-pillar bolts first using 10mm wrench as the lower fender mounts have much more room to adjust. After tight the bottom fender nuts with 13mm wrench.

Take non-motorized antenna from the package it should look like the one on the image below. Note that I also prepared rubber intake transition tube which will go after.
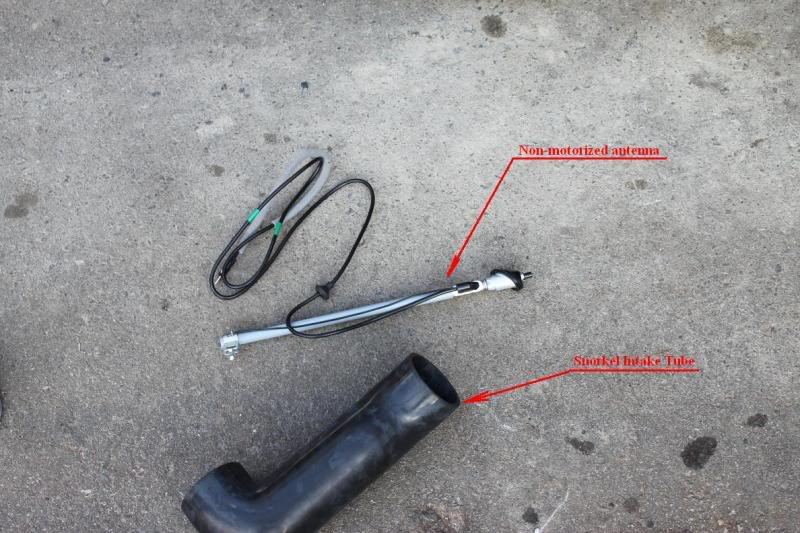
Push the antenna through the fender and the hole on the top of the fender. Using Antenna hardware slightly tight the upper mount.
Using previously removed OEM bolt holding your old antenna attach the bottom mount of the new antenna. Tight the bottom bolt using 10mm socket.
Now you can easily tight the upper antenna mount. Your antenna should be secured by now.
Remove the plastic door seal on the front passenger side using Philips screwdriver. Carefully pull the kick-panel out. It holding by a few clips. Do not to try to pull it out completely. First pull the aft end slightly off towards the shifter, then gently slide the panel towards the rear of the vehicle.
Locate the hole in the inner fender to the cabin from outside and guide the antenna cable through. Get someone to help you guide it from inside.
Carefully install the rubber grommet into the hole. Note that antenna cable has metal washer permanently attached to the cable. It helps of not over stressing the cable when you pulling it from inside the vehicle.
Locate 3 lock-nuts with plastic inserts and 3 washers in the hardware bag and install them to the Snorkel studs passing them through the fender gap. I suggest you install the bottom 2 first, but not tight them. The upper one is the hardest. Due to the fender design to accommodate motorized antenna there is very narrow passage to the upper stud location. If you have some helper with smaller hands, you can use their help. It took me ~10-15 minutes to get it in that spot.
After you placed all hardware in place tight the A-pillar bolts first using 10mm wrench as the lower fender mounts have much more room to adjust. After tight the bottom fender nuts with 13mm wrench.
Take non-motorized antenna from the package it should look like the one on the image below. Note that I also prepared rubber intake transition tube which will go after.
Push the antenna through the fender and the hole on the top of the fender. Using Antenna hardware slightly tight the upper mount.
Using previously removed OEM bolt holding your old antenna attach the bottom mount of the new antenna. Tight the bottom bolt using 10mm socket.
Now you can easily tight the upper antenna mount. Your antenna should be secured by now.
Remove the plastic door seal on the front passenger side using Philips screwdriver. Carefully pull the kick-panel out. It holding by a few clips. Do not to try to pull it out completely. First pull the aft end slightly off towards the shifter, then gently slide the panel towards the rear of the vehicle.
Locate the hole in the inner fender to the cabin from outside and guide the antenna cable through. Get someone to help you guide it from inside.
Carefully install the rubber grommet into the hole. Note that antenna cable has metal washer permanently attached to the cable. It helps of not over stressing the cable when you pulling it from inside the vehicle.
Last edited by AlexJet; Mar 21, 2010 at 12:24 PM.
Mar 20, 2010 | 07:34 AM
#7
Thread Starter
Registered User
Joined: Nov 2005
Posts: 548
Likes: 0
From: Toronto, ON
Take the rubber Snorkel intake tube and slide it over the Snorkel Intake end under the fender. Use of Sensor Free silicone is not mandatory, but recommended for sealing purposes in joining rubber and plastic tubes. It will help if you locate the clamp in the hardware package and slide it over the rubber tube before you start installing it, but it can be done after as the tube is flexible. Do not push the tube completely into the fender inside as of now.

Now remove the Tacoma Intake tube from the package and carefully install the forward end into the airbox end under the fender.
Locate the second clamp in hardware bag and slide it over the open end of the rubber Snorkel tube.
Carefully with a help of a flat screwdriver slide the rubber tube over the Tacoma tube and push the hole assembly up into the fender. It should look like a scissor jack operation if I can refer it to this kind.
Locate the OEM 10mm bolt from your original 4Runner tube and use it to attach the Tacoma tube to the fender bracket. Tight it down with 10mm socket.
When everything is securely sits on the fender, tight down both clamps on the rubber tube.
Now having all in-fender components installed, inner plastic fender can be placed back.
In my personal case for future easy of serviceability I went with an alternative route of securing the inner fender.
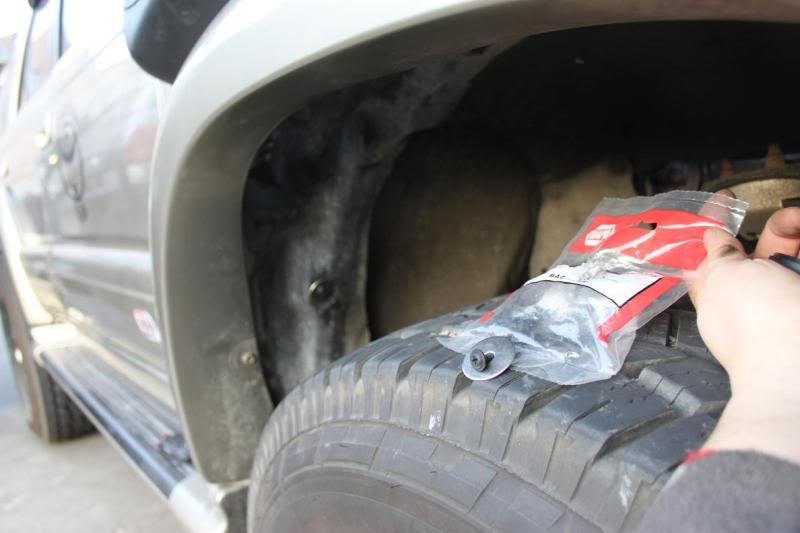
Locate all previously removed square plastic clips which were holding the inner fender in place and push them into their original locations on the fender. Starting from either front or back start aligning the inner fender and use oversize washers with treated screws attach the inner fender into place. Remember to use OEM 10mm screws for attach points of the Limited flares. This option will give you easy access to either snorkel or antenna in case you need to service it as it will take 1/10 of a time to remove the screw rather the the clip.
Image bellow shows you the NAPA treated #10 screws I used and oversize stainless steel washers I pick-up from local hardware store.
Now remove the Tacoma Intake tube from the package and carefully install the forward end into the airbox end under the fender.
Locate the second clamp in hardware bag and slide it over the open end of the rubber Snorkel tube.
Carefully with a help of a flat screwdriver slide the rubber tube over the Tacoma tube and push the hole assembly up into the fender. It should look like a scissor jack operation if I can refer it to this kind.
Locate the OEM 10mm bolt from your original 4Runner tube and use it to attach the Tacoma tube to the fender bracket. Tight it down with 10mm socket.
When everything is securely sits on the fender, tight down both clamps on the rubber tube.
Now having all in-fender components installed, inner plastic fender can be placed back.
In my personal case for future easy of serviceability I went with an alternative route of securing the inner fender.
Locate all previously removed square plastic clips which were holding the inner fender in place and push them into their original locations on the fender. Starting from either front or back start aligning the inner fender and use oversize washers with treated screws attach the inner fender into place. Remember to use OEM 10mm screws for attach points of the Limited flares. This option will give you easy access to either snorkel or antenna in case you need to service it as it will take 1/10 of a time to remove the screw rather the the clip.
Image bellow shows you the NAPA treated #10 screws I used and oversize stainless steel washers I pick-up from local hardware store.
Last edited by AlexJet; Mar 21, 2010 at 12:53 PM.
Trending Topics
Mar 20, 2010 | 07:34 AM
#8
Thread Starter
Registered User
Joined: Nov 2005
Posts: 548
Likes: 0
From: Toronto, ON
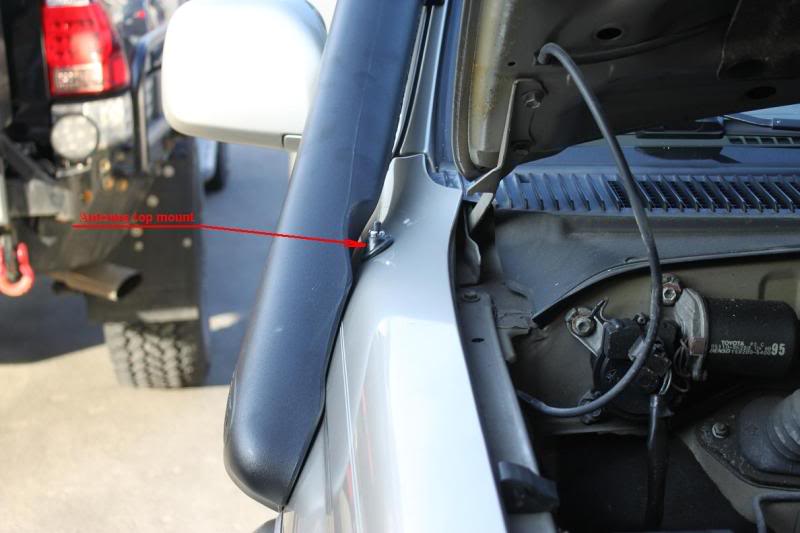
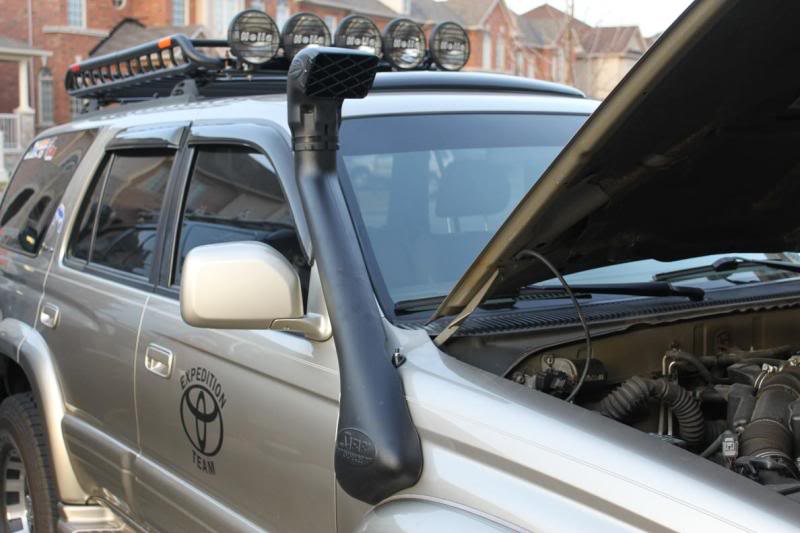
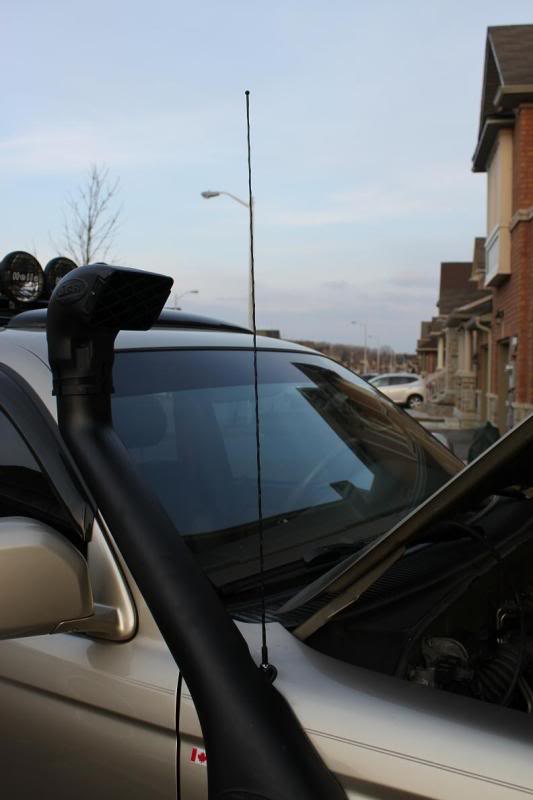
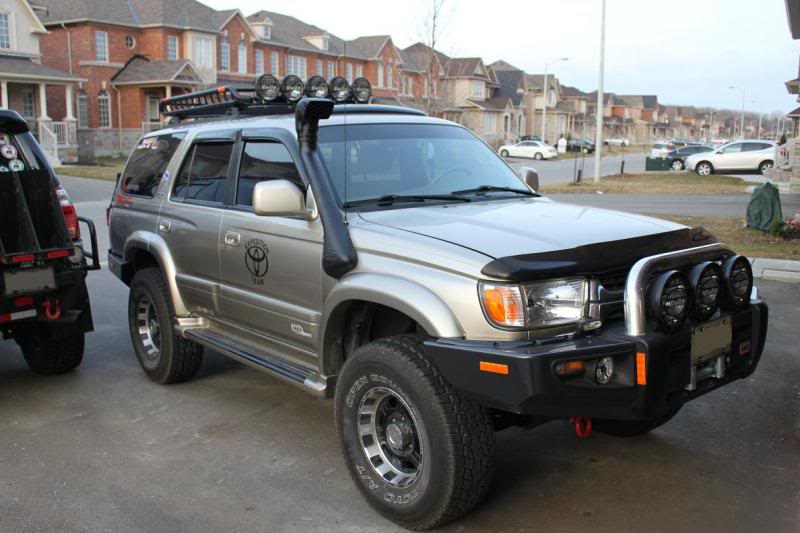
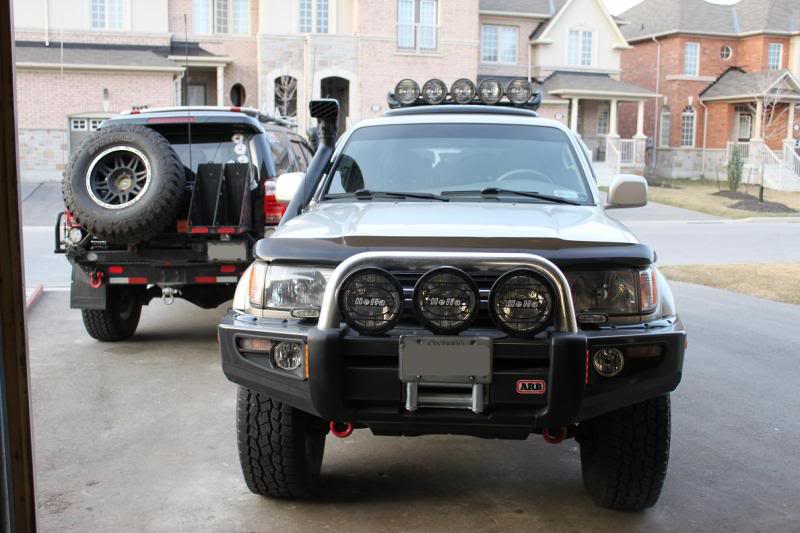
Locate the scoop and matching black clamp in the Snorkel hardware bag.
Position the scoop in the way that you have ~1/4" gap between the end of the A-pillar Snorkel tube and end of the slide cut of the scoop. Turn the scoop, so it faces front of the vehicle parallel to the driving lane. Tighten the clamp.
[Detail picture to follow]
Take Tacoma Wip from its package and screw it to the antenna mount. Slightly tighten it with a wrench. Do not use pliers as you'll destroy the coating and it may rust on scratches.
Last edited by AlexJet; Mar 21, 2010 at 12:59 PM.
 Mar 20, 2010 | 04:08 PM
#16
Thread Starter
Registered User
Joined: Nov 2005
Posts: 548
Likes: 0
From: Toronto, ON


