Project Chronic - 92 Pickup RCSB 4x4
 03-08-2015, 06:01 AM
#1
Registered User
Thread Starter

Project Chronic - 92 Pickup RCSB 4x4

92 22re 5 speed
Gonna run some 33x10.5's with bjs and either aal or longer shackles (gotta check the sag first). I had a 94 xcab 2wd years ago so im not new to yotas but new to the 4wd. Been around them forever but never owned one myself.
Plans upfront are
Ball Joint spacers, aal or possible new springs, Toyo Open Country MT 33-10 not sure on rim size yet, light bar across windshield.
I will be using this as my DD for 2 reasons, #1 - I work 2 miles from home and usually dont venture far on weekends maybe 30 mins 1 way to town. #2 - Hunting and Fishing truck since the S10 i use now gets stuck everywhere i go being its 2wd.
We dont crawl or trail around here unless its full of deep water and mud.
Last edited by Regency; 03-08-2015 at 06:10 AM.
 03-08-2015, 06:01 AM
#2
Registered User
Thread Starter
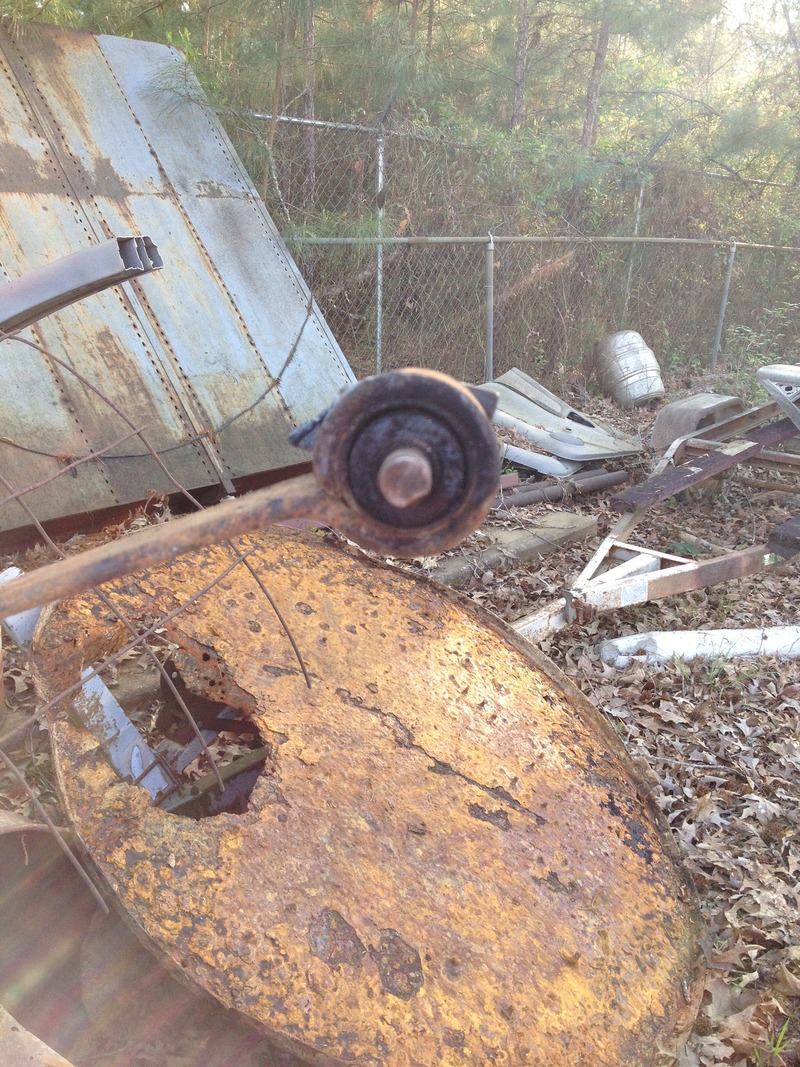
Started working and cleaning on it today i knew of a few problems but 1 turned out worse than i originally thought. Dang stealership got me with the itll be here tomorrow so no fuel pump hanger today. A few pics since we all like pics!
This was a truck from Illinois as you can tell by the rust everywhere!

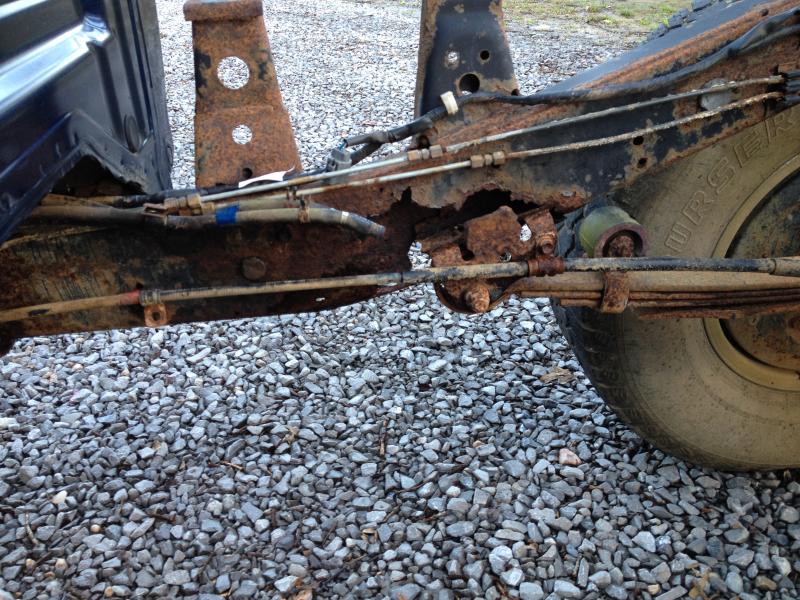

This was a truck from Illinois as you can tell by the rust everywhere!


 03-08-2015, 06:49 AM
#3
Registered User
iTrader: (2)

Join Date: Jan 2010
Location: GORHAM,MAINE
Posts: 163
Likes: 0
Received 0 Likes
on
0 Posts
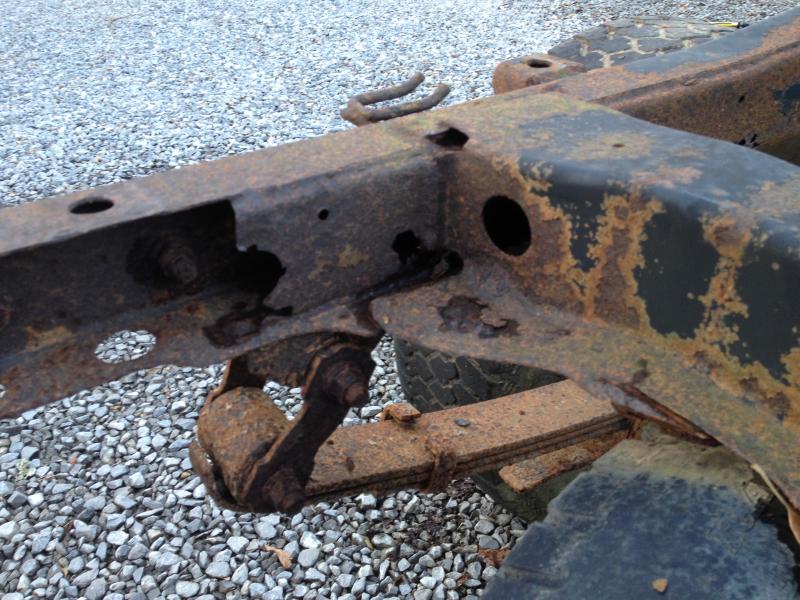
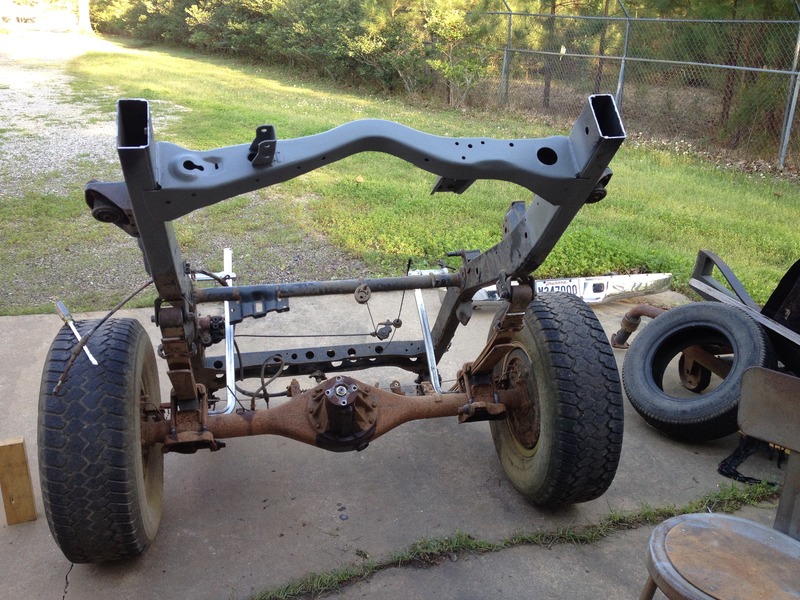
Wow man that frame has got some rot.Looks like a truck getting eaten by the Maine winters.Nothing a lot of time and some metal and a welder and grinder can't fix.Should be a great project,i have fixed much worse.Also please redo those sketchy looking rear brake lines with the compression fittings on them.Just flare them properly and run all new lines,you will thank yourself.Also make sure the rear spring hangers are both in the same location on each side so your truck goes down the road straight.Personally i would use 1/8 plate and cut out the rot and weld that plate in in the same spot as the piece you cut out so it looks factory.Just get some cardboard and use that to make a template by putting it against the frame and tracing it and then transfering that to your plate.It really isn't that bad and really a piece of cake if you're lucky enough to have a plasma cutter which i don't so i use my angle grinder with a cutoff wheel which will get the job done just takes a little longer.Just take your time and fit your pieces so they fit tight before welding.Then when done patching cleanup the frame and coat it with Master Series Silver,2 or 3 coats,followed by Master Series Ag111 Black.This stuff is inexpensive and is a moisture cured urethane and seems to work great.Pm me if you need the info on where to buy this stuff i get mine from a guy in connecticut that personally uses this stuff everyday.Hope this helps you.
03-08-2015, 07:59 AM
#4
Registered User
Thread Starter
Thats exactly what i plan to do if i cant find a good frame section to put in. I have paint that has Zinc in it i plan to base coat or prime with.
03-08-2015, 08:52 AM
#5
Registered User
iTrader: (2)
Join Date: Jan 2010
Location: GORHAM,MAINE
Posts: 163
Likes: 0
Received 0 Likes
on
0 Posts
You probably have a better chance of finding a usable frame where you're located,but in Maine it would be almost impossible.And to have one shipped in wouldn't be cost effective to me.I have seen many good frames out west selling for around $100.Wish i could get one of those.Here we are limited to repairing unless you have deep pockets which unfortunately i do not have.I wish you luck on your rebuild and take care man.Hopefully it will start warming up here and melt this snow so i can get back on my build.
03-08-2015, 09:50 AM
#6
Registered User
Thread Starter
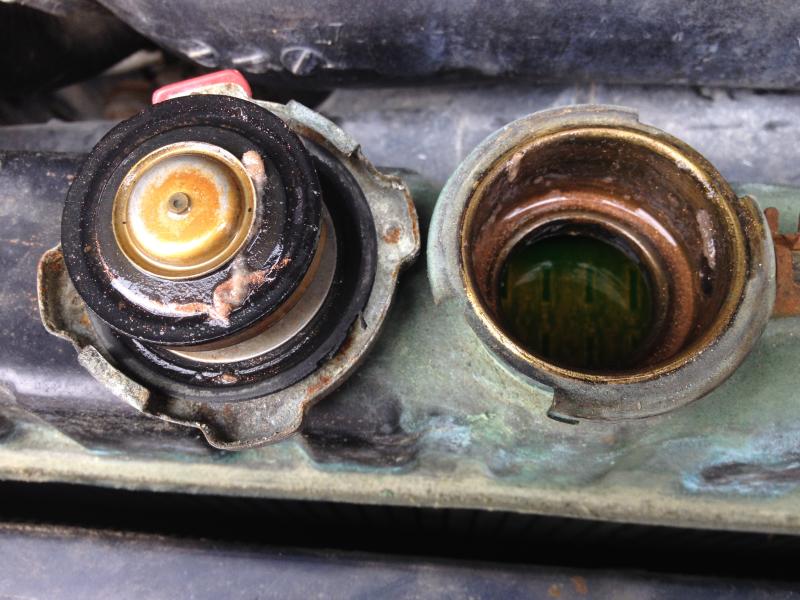
Gave it a little PM this morning. Checked the water and found this copper colored stuff in the rad cap, i hope its just anti-seize on the cap.


Trending Topics
 03-13-2015, 11:24 AM
#9
Registered User
Thread Starter
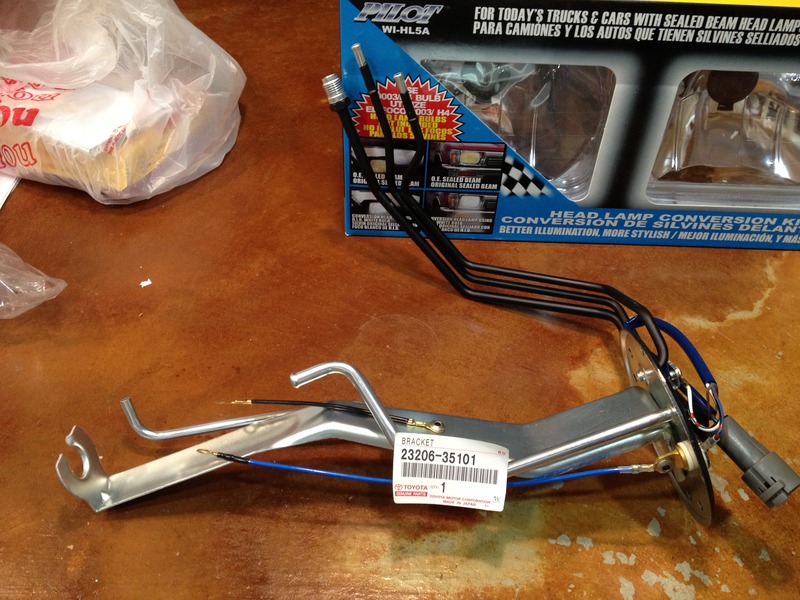
Picked up the hanger today and this week while i was gone my headlights came in so i can get ready for the retro. I tried to get part #'s in the pics and where the lights came from if anyone is interested in doing a retro. These are the perferred housings.


 03-15-2015, 11:21 AM
#10
Registered User
Thread Starter
Tank is soaking in vinegar. Been 24 hrs now and still looks rough on the bottom. Hopefully it will get cleaned up before more parts start coming in. Checked fuel pump and no operation so I installed the jumper and checked voltage (11.9) and ground (9.7ohm). Through the pump while on the starter voltage was 6.7. Got on Rockauto and ordered new pump, filter, pump gasket with screws, sender gasket with screws. The sender works properly but the metal flange rusted off the plastic top of the sender.
Went ahead while I had the battery in it and checked as much electrical as I could and so far everything looks good. The engine turned over great without odd sounds.
Went ahead while I had the battery in it and checked as much electrical as I could and so far everything looks good. The engine turned over great without odd sounds.
03-19-2015, 04:19 PM
#11
Registered User
Thread Starter
Wheels have been ordered!
http://www.4wheelparts.com/Wheels/Se...FYQCaQodDkgANg
Just trying to decide between 2 tires now.
The parts pile just keeps getting larger as i wait for the patch panels to be cut out so i can repair the frame section beside the tank. Hopefully tomorrow i will have them and get it on the road this weekend.
03-19-2015, 04:22 PM
#12
Registered User
Thread Starter
Also trying to decide wether to go with longer shackles or aal. I will occasionally have a load pulling my boat is why im thinking of going aal.
 03-21-2015, 07:23 PM
#15
Registered User
Thread Starter
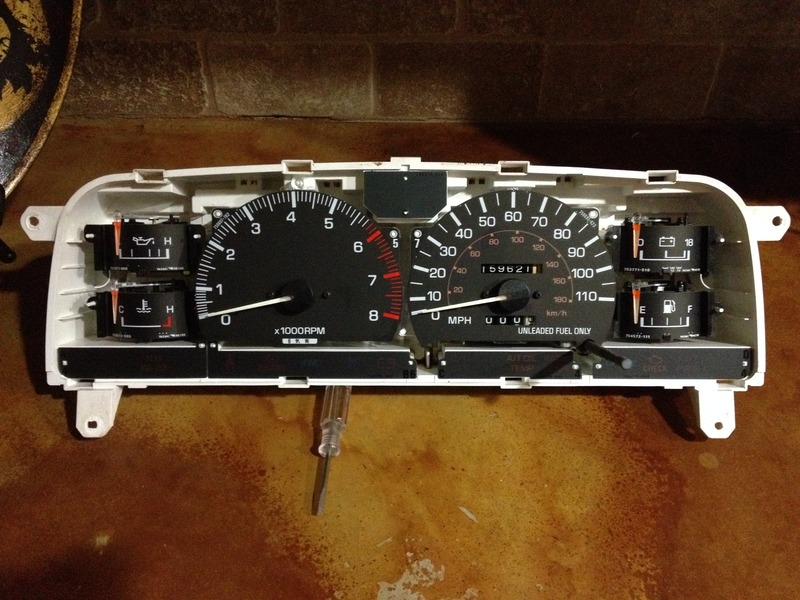
Also snagged a SR5 cluster. Got it calibrated and mileage set. Im thinking about removing old paint from the needles and repainting before i install it.
 03-22-2015, 03:08 PM
#16
Registered User
Thread Starter
Well i guess i shoulda checked before i bought!!
Anybody want to trade a cluster? SR5 cable cluster, i need an electric. Or i need the 2 center dash vents and the radio mounts with under tray.

Anybody want to trade a cluster? SR5 cable cluster, i need an electric. Or i need the 2 center dash vents and the radio mounts with under tray.
Last edited by Regency; 03-22-2015 at 03:14 PM.
03-22-2015, 06:23 PM
#17
Registered User
Thread Starter
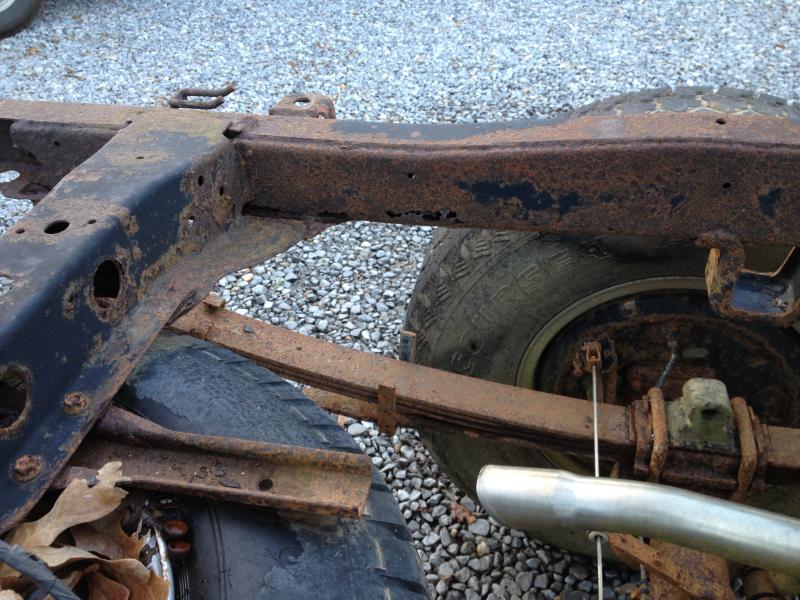
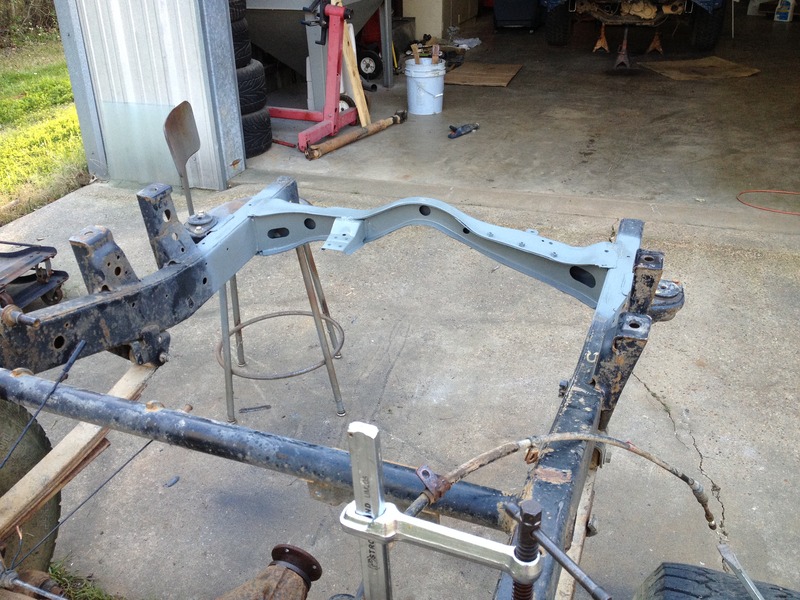
So comparing the new rear frame section theres a few minor differences. First let me say this section came from a 94 reg cab auto truck.
Frame rails are bent the same, all body mounts for the bed, 2 rear crossmembers (round tube and spare tire) are the same, drivers shock mount, leaf spring mounts. Are all the same.
However the crossmember under the rear of the cab is pushed further to the rear on the 2wd for the smaller gas tank, the passenger side shock mount is top mounted rather than being mounted on the side of the frame as the 4wd.
Tomorrow evening after work im going to get started moving the crossmember to the correct location and relocating the passenger shock mount in prep for the sectioning.

 03-27-2015, 12:35 PM
#19
Registered User
Thread Starter
The crossmember under the rear of the cab is not the same about 2 inch difference in height. Being the 2wd is higher than the 4wd. The emergency brake is differenet also, 2wd has a Y or splitter and 2 cables one for each wheel.
03-27-2015, 08:28 PM
#20
Registered User
Thread Starter
The 4wd main leaf front bushing point, see the leaf comes from the center of the roll, the 2wd comes from the bottom which in turn will give a small amount of lift by itself. Im not sure how much though.
The 2wd frame on the frankenstein leaf pack with gm factory 1.25" blocks. I removed the lower section of the leaf pack factory clamp whatever it was called, so i had to make a bushing to fit the large hole in the perch because the 3/8 bolt head wasnt large enough and had too much slop.
So im unsure of what kind of lift im actually giving it on the rear, im hoping for 1.5" but i feel its going to be a little more.
And of course the crossmember that was moved several times

The 2wd frame on the frankenstein leaf pack with gm factory 1.25" blocks. I removed the lower section of the leaf pack factory clamp whatever it was called, so i had to make a bushing to fit the large hole in the perch because the 3/8 bolt head wasnt large enough and had too much slop.
So im unsure of what kind of lift im actually giving it on the rear, im hoping for 1.5" but i feel its going to be a little more.

And of course the crossmember that was moved several times


