BamaYota1 93 DLX Buld Up
 02-17-2013, 05:50 PM
#1
Registered User
Thread Starter
Join Date: Aug 2012
Location: Gadsden, AL
Posts: 266
Likes: 0
Received 0 Likes
on
0 Posts
BamaYota1 93 DLX 4x4 Build Up
Finally getting around to starting my build thread. First I wanted to start with some Yota porn.


I bought the truck last August. Truck had a decent shade tree paint job, and nothing else. Bought it with a code 52. Once that was fixed, found out motor was pretty much shot. The timing advanced, and the motor sounded like it was trying to rip itself into shreds. I was getting about 10 mpg and burning a quart of oil every 100 miles. Had to back off the timing to hold it together while I figured out a plan. Removed the pan and replaced worn out bearings to buy time. The crank had a bad journal on number 3 rod, so I used emory cloth and sanded for what seemed like hours to get a .040 bearing to show any clearance. (Rest were .030),
One morning on way to work, I got a horrible rattling and vibration. I thought for sure the crank was going out, so I turned around and headed home. I actually dropped the ifs and pulled the pan only to find bearings exactly how I had left them. While crawling out from truck, I happened to grab the front propeller shaft which moved like it was coming apart. Front cardan joint had exploded. I took out the front shaft, and vibrations got better.
Driving to Birmingham the next morning, I started thinking about why that shaft was turning in the first place. I pulled into the parking lot and had one of my buddies watch the front cv shafts. Sure enough, they were turning while disengaged. Pulled it into the shop, took off the hubs, and realized a spring and fowler pawl was missing from each side, so hubs were staying locked. I removed the locking cog from each side and finally freed the cvs.
Current plans include front axle shaft, hubs, fender flares, topper, new carpet, new mirrors, bed liner and more. Need some ideas for exterior. I am not into the black out fad. I have tried to come to grips with it, but I just can't. I'd rather stick with chrome or polished aluminum.
More to come when I get a free minute to write.
Last edited by BamaYota1; 02-25-2013 at 03:56 PM.
 02-17-2013, 11:14 PM
#2

Looks really nice man, you shined up them tires just for us admit it  Your interior looks cherry, didn't even notice the slightly crushed carpet till I went back and looked a few times. Your parking lights make mine look like trash, might be time for some new ones, are those factory original cause mine are white not clear. Same goes for the signals in the bumper those almost have to be aftermarket safety spec sasy the shouldn't be white/clear. Looks like the interior has maybe beeen refurb'd the window handles are in the wrong place they should point to about 10&2 or 11&1. Ok one more, the tail gate looks to be the wrong size and color.
Yeah I'm jealous and looking for things to complain about Oh there is a crumb on your seat get it get it now!
Chrome is good you can get armor done or redone in chrome, it's just not the norm cause you can't hide the damage with paint. If you want to spend the dough you can get it in chromoly probably, that woud hide the bruises better than Ht-steel with chrome plate.
Those are power mirrors right, there was a chrome option on the 4runners I think for those. The ones I saw might have been aftermarket not sure, I didn't want to deal with the stickers guy had on them or i'd maybe of picket them up.
Rollbar, offroad backup lights, CB w/ dual rubber ducks
Your interior looks cherry, didn't even notice the slightly crushed carpet till I went back and looked a few times. Your parking lights make mine look like trash, might be time for some new ones, are those factory original cause mine are white not clear. Same goes for the signals in the bumper those almost have to be aftermarket safety spec sasy the shouldn't be white/clear. Looks like the interior has maybe beeen refurb'd the window handles are in the wrong place they should point to about 10&2 or 11&1. Ok one more, the tail gate looks to be the wrong size and color.Yeah I'm jealous and looking for things to complain about
Oh there is a crumb on your seat get it get it now! Chrome is good you can get armor done or redone in chrome, it's just not the norm cause you can't hide the damage with paint. If you want to spend the dough you can get it in chromoly probably, that woud hide the bruises better than Ht-steel with chrome plate.
Those are power mirrors right, there was a chrome option on the 4runners I think for those. The ones I saw might have been aftermarket not sure, I didn't want to deal with the stickers guy had on them or i'd maybe of picket them up.
Rollbar, offroad backup lights, CB w/ dual rubber ducks
02-18-2013, 12:50 AM
#3
Super Moderator
Staff
iTrader: (1)
Join Date: Aug 2008
Location: Anderson Missouri
Posts: 11,788
Likes: 0
Received 21 Likes
on
19 Posts
I could always tell in your avatar that you had a great looking little truck. Now that I can see it in a larger picture, it looks even better. It is nice seeing an older truck in a good clean condition. Carpet looks great. I have replaced carpet before from stockinteriors.com and liked the quality of it but if you get it from them, there is some trimming that will be involved but it isnt a bad job to do at all. I am sure there are other companies that make a better fit.
Glad to see I am not the only one that isnt necessarily a fan of blacked out trim. I like the chrome and shiney stuff alot better. Think I should of been a kid in the 50s. Great looking truck all the way around and by seeing some of the help you have given others I am sure you will get the motor and hub situation straightened out in no time. Looking forward to your build.
Glad to see I am not the only one that isnt necessarily a fan of blacked out trim. I like the chrome and shiney stuff alot better. Think I should of been a kid in the 50s. Great looking truck all the way around and by seeing some of the help you have given others I am sure you will get the motor and hub situation straightened out in no time. Looking forward to your build.
02-18-2013, 08:12 AM
#4
Registered User
Thread Starter
Join Date: Aug 2012
Location: Gadsden, AL
Posts: 266
Likes: 0
Received 0 Likes
on
0 Posts
Looks really nice man, you shined up them tires just for us admit it Your interior looks cherry, didn't even notice the slightly crushed carpet till I went back and looked a few times. Your parking lights make mine look like trash, might be time for some new ones, are those factory original cause mine are white not clear. Same goes for the signals in the bumper those almost have to be aftermarket safety spec sasy the shouldn't be white/clear. Looks like the interior has maybe beeen refurb'd the window handles are in the wrong place they should point to about 10&2 or 11&1. Ok one more, the tail gate looks to be the wrong size and color.
Yeah I'm jealous and looking for things to complain about Oh there is a crumb on your seat get it get it now!
Your interior looks cherry, didn't even notice the slightly crushed carpet till I went back and looked a few times. Your parking lights make mine look like trash, might be time for some new ones, are those factory original cause mine are white not clear. Same goes for the signals in the bumper those almost have to be aftermarket safety spec sasy the shouldn't be white/clear. Looks like the interior has maybe beeen refurb'd the window handles are in the wrong place they should point to about 10&2 or 11&1. Ok one more, the tail gate looks to be the wrong size and color.Yeah I'm jealous and looking for things to complain about
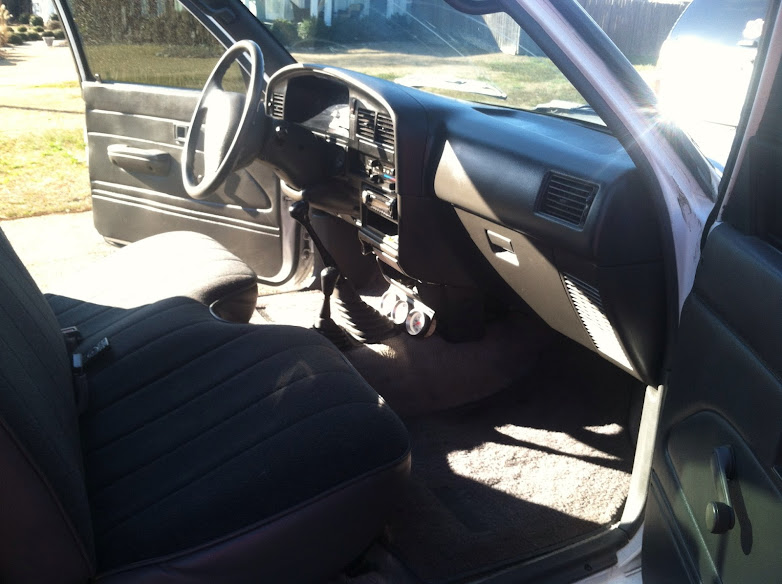
Oh there is a crumb on your seat get it get it now!The dash, even though it had no cracks, was in horrible condition. As a whole, it was just completely dry and starting to turn brittle. I broke out my Meguiars Natural shine and continually coated the dash for a couple of days to try and bring a modicum of finish back. To do this, I just sprayed it on thick without wiping. I wasn't worried about a uniform coat, I just wanted it to be thick so that as some was absorbed, there would be more available. After two or three applications, I took a dry cloth and wiped it back down. It worked! Instead of feeling super dry, it started to feel like newer vinyl/plastic. Now, I just coat the dash and let it stay uniformly wet, and when it cures, it looks really good.
If anyone tries this at home, control the shine with the type of protectant you use. They make flat, natural and gloss, depending on your taste. Spray on whatever shine you want and let it cure on its own without wiping off. Resist the urge to start wiping. You need the extra to stay on there for a while. In a day or two, the dash will absorb as much as it can, and you will notice drops where parts of the dash have reached capacity. Then take a dry lint free cloth and lightly wipe the dash. When you do this, your dash should look pretty much like new, and will only need to be lightly sprayed and coated as long as you keep up with it.
The carpet itself is carpet from pull a part. I pulled it out of a truck and it was so nasty, I draped it over the rest of my parts in the wheel barrow and the lady at the register thought it was a tarp. Ended up getting it for free, and it really wasnt worth much more. After spending a couple hours with a scrub brush, water hose, and tide soap mixed with water, it came as clean as it was going to get. I let it dry in the summer sun for a day before I went to install it.
When I removed the rubber mat, there was tons of nastiness on the pans. I spent a good hour washing out the pan removing grime.
After I got the new to me carpet test fitted, I had to cut out for the shifters. The carpet was out of an auto 2wd, so shifter holes weren't correct. Unfortunately, when I went to make cuts, the old dry rotted carpet just ripped further than I wanted. I was a little aggravated, but I did the best I could to make it look ok. I coated the lighter parts of the carpet with Meguiars to make it look as good as possible, but it doesn't suit me.
The tranny hump is a lot lighter than the rest of the carpet from years and years of sunlight. Also, when it gets damp outside, the truck kind of gets a musty smell emanating from the carpet. So, it will be getting replaced soon. Besides, I want new carpet with the mass backing to try and cut down on heat and road noise. My days of wanting my vehicles to be loud are long past. I do a lot of business by phone, and I really want to be able to talk on the phone going down the road.
I scored the factory correct floor mats off of craigslist for $10.00. I was thrilled to find them.
I got both door panels for $50.00 out of a more Yota specific junkyard. The vinyl is perfect, but there is a bit of a wave in the card. Its funny because the original cards had junk vinyl, but straight cards. Once it gets warm out and the vinyl becomes pliable, I may try and combine the two to get a good set. At the same time though, I am keeping a lookout for an SR5 set with the fabric upholstery, and I still may take the good cards to an upholstery shop. I plan on snagging the next set of buckets I find at pull a part, and I will be taking them straight to an upholstery shop to have them recovered, so I think it would be nice to have door panels with the same type fabric as the seats.
Its funny you said something about door handles. Before the photo shoot yesterday, I installed a new to me drivers door handle with the chrome handle I got off a 95 4Runner. When I was sliding the circlip off the post on the handle, somehow the damn thing flew inside my door panel between the vinyl and the card. I tried everything I could think of to get it out, but nothing worked. I guess I will have to visit the yard again to snag a new clip, but until then, my handle will keep falling off. When I get a new clip, I will be sure to adjust to the right angle for ya.
Chrome is good you can get armor done or redone in chrome, it's just not the norm cause you can't hide the damage with paint. If you want to spend the dough you can get it in chromoly probably, that would hide the bruises better than Ht-steel with chrome plate.
Those are power mirrors right, there was a chrome option on the 4runners I think for those. The ones I saw might have been aftermarket not sure, I didn't want to deal with the stickers guy had on them or i'd maybe of picket them up.
Rollbar, offroad backup lights, CB w/ dual rubber ducks
Rollbar, offroad backup lights, CB w/ dual rubber ducks
I need a chrome rollbar for lights! That sounds like a great idea. I dunno about the cb and whips though.
02-19-2013, 12:03 AM
#6
rubber duck's are little stubby antenna, not the big whip type that are a big hassle with clearence issues and such. A CB radio would be of lesser use if your not in a pack. They are still around however and give a means for emergency communication, IE no cell phone coverage. In some(most?) states the highway patrol/troopers have a channel they monitor. Not trying to talk you into it just clear up the what and why.
One of the coolest modifications for a camp truck, hot water on demand.
http://www.4crawler.com/4x4/CheapTricks/Shower.shtml, which was a Duh how simply brilliant experience when I saw that. Throw in an inflatable pool and curtain, maybe a chem toilet and some potpourri and even girlie chicks would dig camping! Ok maybe thats a stretch.
Of course I went poking around and that kit isn't available anymore, but I did find a cheap heat exchanger for 75$, just needs pump and plumbing. I Imagine it could be done for under 150$ total, 4showers a day over a 7day trip ~5$ a shower. And no more crawling into the sack grungy.
One of the coolest modifications for a camp truck, hot water on demand.
http://www.4crawler.com/4x4/CheapTricks/Shower.shtml, which was a Duh how simply brilliant experience when I saw that. Throw in an inflatable pool and curtain, maybe a chem toilet and some potpourri and even girlie chicks would dig camping!
Ok maybe thats a stretch.Of course I went poking around and that kit isn't available anymore, but I did find a cheap heat exchanger for 75$, just needs pump and plumbing. I Imagine it could be done for under 150$ total, 4showers a day over a 7day trip ~5$ a shower. And no more crawling into the sack grungy.
02-19-2013, 08:45 AM
#7
Registered User
Thread Starter
Join Date: Aug 2012
Location: Gadsden, AL
Posts: 266
Likes: 0
Received 0 Likes
on
0 Posts
Thank you!
The tires are 31x10.5r15. I traded the wheels and tires that came with my truck for these. I had 30x9.5r15 Firestone Destination MT on a late model Tacoma wheel, but I was tired of listening to the tires sing.
Old

New

I ended up losing a bunch of unsprung weight that has helped my truck tremendously.
The tires are 31x10.5r15. I traded the wheels and tires that came with my truck for these. I had 30x9.5r15 Firestone Destination MT on a late model Tacoma wheel, but I was tired of listening to the tires sing.
Old
New
I ended up losing a bunch of unsprung weight that has helped my truck tremendously.
Trending Topics
02-19-2013, 08:50 AM
#8
Registered User
Thread Starter
Join Date: Aug 2012
Location: Gadsden, AL
Posts: 266
Likes: 0
Received 0 Likes
on
0 Posts
rubber duck's are little stubby antenna, not the big whip type that are a big hassle with clearence issues and such. A CB radio would be of lesser use if your not in a pack. They are still around however and give a means for emergency communication, IE no cell phone coverage. In some(most?) states the highway patrol/troopers have a channel they monitor. Not trying to talk you into it just clear up the what and why.
One of the coolest modifications for a camp truck, hot water on demand.
http://www.4crawler.com/4x4/CheapTricks/Shower.shtml, which was a Duh how simply brilliant experience when I saw that. Throw in an inflatable pool and curtain, maybe a chem toilet and some potpourri and even girlie chicks would dig camping! Ok maybe thats a stretch.
Of course I went poking around and that kit isn't available anymore, but I did find a cheap heat exchanger for 75$, just needs pump and plumbing. I Imagine it could be done for under 150$ total, 4showers a day over a 7day trip ~5$ a shower. And no more crawling into the sack grungy.
http://www.4crawler.com/4x4/CheapTricks/Shower.shtml, which was a Duh how simply brilliant experience when I saw that. Throw in an inflatable pool and curtain, maybe a chem toilet and some potpourri and even girlie chicks would dig camping!
Ok maybe thats a stretch.Of course I went poking around and that kit isn't available anymore, but I did find a cheap heat exchanger for 75$, just needs pump and plumbing. I Imagine it could be done for under 150$ total, 4showers a day over a 7day trip ~5$ a shower. And no more crawling into the sack grungy.
02-19-2013, 02:15 PM
#9
Super Moderator
Staff
iTrader: (1)
Join Date: Aug 2008
Location: Anderson Missouri
Posts: 11,788
Likes: 0
Received 21 Likes
on
19 Posts
That is a neat little shower trick. Some of the ideas that you can find on here. I am going to be trading my tires as well as I dont like the whine that knobby tires make. One of my biggest frustrations as well. They may look good but is one area that I will settle for a little less on.
02-25-2013, 12:47 PM
#10
Registered User
Thread Starter
Join Date: Aug 2012
Location: Gadsden, AL
Posts: 266
Likes: 0
Received 0 Likes
on
0 Posts
So I finally got around to installing my new mirrors. I already know that quite a few members will not like them at all, so please don't bother telling me that I shouldn't have bought them. I like them, and quite frankly, that's all that matters.
I had intended on doing an installation writeup, but it turned out to be so easy, I didn't bother. Here's the pics:
Before:

After:


I also found the time to finally paint my valance. After much thought and debating, I finally decided to paint it gloss black. I was between white and black. My wife said black, and after searching for it seemed like hours, I found iamsuperbleeder's truck, and decided to go black.
My valance was still in primer, so I just hit it with some 400 sandpaper, cleaned it real well, and sprayed. Turned out pretty good, I think.
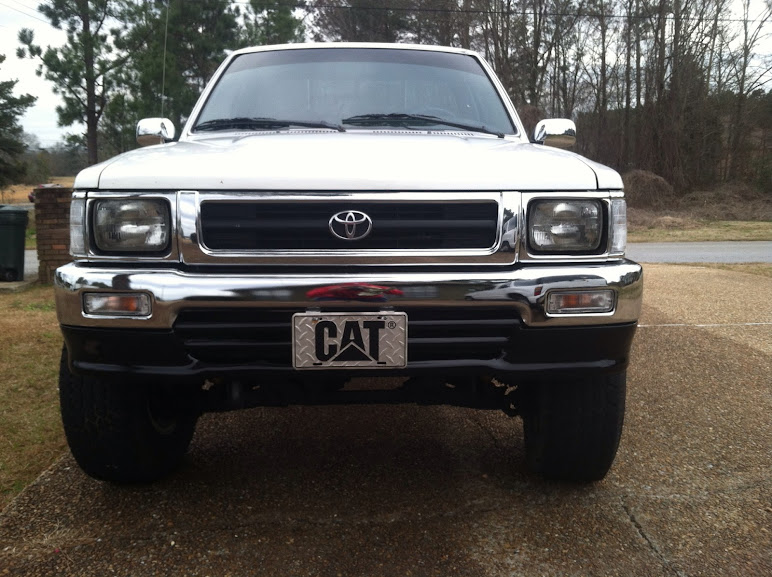

I can still pull it back off and paint it white later if I change my mind. I'm thinking I will pull the Cat license plate off and paint the license plate brackets flat black so they will blend into the dark behind them. The plate itself made boogers on the valance where it vibrates from the massive speed of my truck.
While I was waiting for the valance to dry, I pulled my wheels off and polished again with my new Mother's ball and metal polish. They are starting to come around, but I am not satisfied with the shine. In a couple weeks, I will pull them off and give them a real polish with steel wool and rouges. I will do a full write up on those, because the difference will be amazing. Until then, this is what they look like now. The reflections and surface are getting clearer every step.
When I got the wheels:

Now:

I had intended on doing an installation writeup, but it turned out to be so easy, I didn't bother. Here's the pics:
Before:
After:
I also found the time to finally paint my valance. After much thought and debating, I finally decided to paint it gloss black. I was between white and black. My wife said black, and after searching for it seemed like hours, I found iamsuperbleeder's truck, and decided to go black.
My valance was still in primer, so I just hit it with some 400 sandpaper, cleaned it real well, and sprayed. Turned out pretty good, I think.
I can still pull it back off and paint it white later if I change my mind. I'm thinking I will pull the Cat license plate off and paint the license plate brackets flat black so they will blend into the dark behind them. The plate itself made boogers on the valance where it vibrates from the massive speed of my truck.
While I was waiting for the valance to dry, I pulled my wheels off and polished again with my new Mother's ball and metal polish. They are starting to come around, but I am not satisfied with the shine. In a couple weeks, I will pull them off and give them a real polish with steel wool and rouges. I will do a full write up on those, because the difference will be amazing. Until then, this is what they look like now. The reflections and surface are getting clearer every step.
When I got the wheels:
Now:
Last edited by BamaYota1; 02-25-2013 at 12:54 PM.
 02-25-2013, 02:37 PM
#15
Registered User
Thread Starter
Join Date: Aug 2012
Location: Gadsden, AL
Posts: 266
Likes: 0
Received 0 Likes
on
0 Posts
02-26-2013, 12:24 AM
#16
Super Moderator
Staff
iTrader: (1)
Join Date: Aug 2008
Location: Anderson Missouri
Posts: 11,788
Likes: 0
Received 21 Likes
on
19 Posts
I think the chrome mirror was an improvement. The rims are shining up quite abit then what they were before.
Since your truck has been repainted, it looks like they used the newer model paint. I am thinking your orginal paint was a little more of a yellowish white. From what it looks like on my screen they may have painted it the Toyota Super White and the paint code that is fairly common is 041 if I recall right. I will look it up and edit this post if I got the code wrong. For the valance, they came in black or body color if I recall right. I always liked each one.
Since your truck has been repainted, it looks like they used the newer model paint. I am thinking your orginal paint was a little more of a yellowish white. From what it looks like on my screen they may have painted it the Toyota Super White and the paint code that is fairly common is 041 if I recall right. I will look it up and edit this post if I got the code wrong. For the valance, they came in black or body color if I recall right. I always liked each one.
02-26-2013, 12:16 PM
#17
Those mirros are the same style I saw at the yard and passed on because they had fox stickers, and a different mounting type. My single driver side is door mounted those are window mounted. I'd love to have the remote adjustments, power or manual, rolling down the window and trying to adjust, because I bumped it and forgot, isn't a lot of fun when it's snowing and your rolling down the hwy.
Th valance looks really good, the black would have been my choice but maybe in a flat to hide any warping due to curb strikes but your a 4wd and don't sit as low as me. My lower is a charcoal(ish) black/grey with metal flake, I can't pick it out on the color chart since the colors aren't great.
Toyota factory code: S10M, "Dark grayish silver" , PPG#: 35684. Not sure if that was the painted bumper or the valance for mine.
White(on trucks): T code: 045, PPG 90547. Super white II: T code: 040, PPG 90288. Tcode 041, PPG 90274 is the previa white.
Your valence close up shows the gap I've been spending so much time trying to get tight, again I sit lower and it was likely pulled down at some point so you can/could see air inbetween.
I'd prefer the old bilet AL look personally on the rims, but man them babies are really starting to shine keep it up and no one but us will know they're not chromed

Thread
Thread Starter
Forum
Replies
Last Post
kcaudill
86-95 Trucks & 4Runners
19
10-10-2015 02:39 PM


