3VZE - EGR / PAIR valve removal and engine simplification.
 03-16-2012, 02:52 AM
#1
Registered User
Thread Starter

3VZE - EGR / PAIR valve removal and engine simplification.
This is a write-up to delete the EGR and PAIR valves on a 3VZE engine. I’m not going to get into why you would want to do this, but this is how.
I DO NOT BELIEVE WILL NOT BE ABLE TO PASS ANY KIND OF EMISSIONS INSPECTION WITH THESE SYSTEMS REMOVED, you may be able to pass a regular check if you have a really good catalytic converter but you would definitely fail visual inspection.
I ASSUME NO RESPONSIBILITY TO DAMAGE THAT MAY OCCUR TO YOUR ENGINE IN ANY FORM FROM PERFORMING THIS MODIFICATION, DUE TO THE FACT THAT THIS INVOLVES THE REMOVAL OF EMISSIONS SYSTEMS, IT SHOULD BE FOR OFFROAD USE ONLY.
I have been running like this for 2 months with zero issues. I may have left something out, this IS from memory. If anyone has any problems let me know.
Bare Minimum Required Parts:
- Various sized vacuum caps
- Vacuum hose (good time to change)
- 10k ohm resistor
- Basic tools
Step 1:
Remove all vacuum hoses on the passenger side of the engine.
Step 2:
Remove the EGR and PAIR valve system piping from the passenger side exhaust manifold (these are the 2 smaller diameter tubes attached to the manifold). You will have to plug up the holes that they leave; you can do this by cutting the flanges off the tubes, and cutting up a soda can to make some plates that were the same size as the flange/gaskets. I then bolted it back up to the manifold going flange-plate-gasket.
Step 3:
If you want, you can remove the box that is bolted below the main air box. It is for reducing intake noise or something along those lines; removing it simply frees up engine space, I do not notice a difference in sound level. If you do this you will have to plug the empty hole it leaves in the intake. I used a PVC cap that fit in.
Step 4:
It is optional to remove the two vacuum lines that go to the PS pump; their function is to speed up engine idle slightly when the pump is activated so that your engine doesn’t die when you turn the wheels to full lock while idling. If you remove them, simply plug the holes on the intake side. My truck has never stalled from turning the wheels while idling, though I am mindful that it could happen. They are a point of failure and when the valve that is on the steering pump breaks it can end up pumping PS fluid into your intake.
Step 5:
The three valves that all the vacuum lines connect to on the passenger side of the motor need to be addressed. THE RED VALVE NEEDS TO STAY INTACT for the fuel pressure regulator to work properly. The green valve is for the EGR and the blue valve is for the PAIR system, they can both be removed, you will need to buy a 10k ohm resistor (this should be the correct resistance but I cannot verify because my check engine light is on for other reasons right now) and stick it in the green connector so that your check engine light doesn’t come on.
Step 6:
Re-install the vacuum lines; the ones that you still need are the ones in green in the picture below. All the black lines should be removed/plugged. You don’t need to cap the holes that are on the hard lines, they are open on the other side as well. Just cap the holes on the manifold and throttle body. There is also a line not shown in the diagram that goes from the brake booster cylinder on the driver’s side of the firewall to the passenger side of the intake; it needs to be reconnected.
Step 7:
The return fuel line from the fuel pressure regulator also routes through the hard lines under the manifold, it needs to be reconnected. Also reconnect the coolant lines that flow through the hard lines.
Some notes:
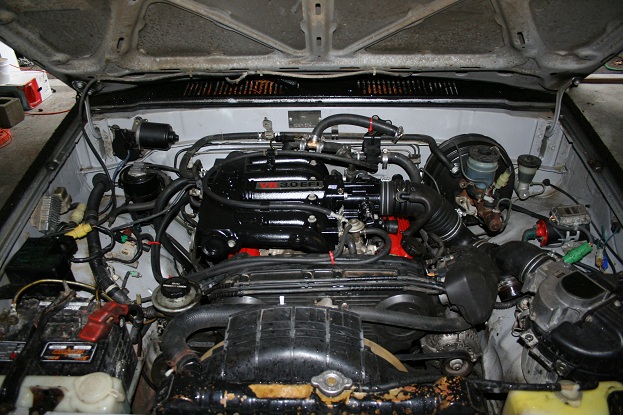
You can take these deletes one step further and completely eliminate the hard lines that go under the manifold. This involves simply routing new lines that connect the remaining components in green. You would also need to reroute the fuel return line and the coolant lines that flow through those hard lines. I have done this and it really simplifies the engine bay.
Vacuum Lines GREEN
Coolant BLUE
Holes to plug outlined in RED
Picture of my engine bay with complete hard line delete.
I DO NOT BELIEVE WILL NOT BE ABLE TO PASS ANY KIND OF EMISSIONS INSPECTION WITH THESE SYSTEMS REMOVED, you may be able to pass a regular check if you have a really good catalytic converter but you would definitely fail visual inspection.
I ASSUME NO RESPONSIBILITY TO DAMAGE THAT MAY OCCUR TO YOUR ENGINE IN ANY FORM FROM PERFORMING THIS MODIFICATION, DUE TO THE FACT THAT THIS INVOLVES THE REMOVAL OF EMISSIONS SYSTEMS, IT SHOULD BE FOR OFFROAD USE ONLY.
I have been running like this for 2 months with zero issues. I may have left something out, this IS from memory. If anyone has any problems let me know.
Bare Minimum Required Parts:
- Various sized vacuum caps
- Vacuum hose (good time to change)
- 10k ohm resistor
- Basic tools
Step 1:
Remove all vacuum hoses on the passenger side of the engine.
Step 2:
Remove the EGR and PAIR valve system piping from the passenger side exhaust manifold (these are the 2 smaller diameter tubes attached to the manifold). You will have to plug up the holes that they leave; you can do this by cutting the flanges off the tubes, and cutting up a soda can to make some plates that were the same size as the flange/gaskets. I then bolted it back up to the manifold going flange-plate-gasket.
Step 3:
If you want, you can remove the box that is bolted below the main air box. It is for reducing intake noise or something along those lines; removing it simply frees up engine space, I do not notice a difference in sound level. If you do this you will have to plug the empty hole it leaves in the intake. I used a PVC cap that fit in.
Step 4:
It is optional to remove the two vacuum lines that go to the PS pump; their function is to speed up engine idle slightly when the pump is activated so that your engine doesn’t die when you turn the wheels to full lock while idling. If you remove them, simply plug the holes on the intake side. My truck has never stalled from turning the wheels while idling, though I am mindful that it could happen. They are a point of failure and when the valve that is on the steering pump breaks it can end up pumping PS fluid into your intake.
Step 5:
The three valves that all the vacuum lines connect to on the passenger side of the motor need to be addressed. THE RED VALVE NEEDS TO STAY INTACT for the fuel pressure regulator to work properly. The green valve is for the EGR and the blue valve is for the PAIR system, they can both be removed, you will need to buy a 10k ohm resistor (this should be the correct resistance but I cannot verify because my check engine light is on for other reasons right now) and stick it in the green connector so that your check engine light doesn’t come on.
Step 6:
Re-install the vacuum lines; the ones that you still need are the ones in green in the picture below. All the black lines should be removed/plugged. You don’t need to cap the holes that are on the hard lines, they are open on the other side as well. Just cap the holes on the manifold and throttle body. There is also a line not shown in the diagram that goes from the brake booster cylinder on the driver’s side of the firewall to the passenger side of the intake; it needs to be reconnected.
Step 7:
The return fuel line from the fuel pressure regulator also routes through the hard lines under the manifold, it needs to be reconnected. Also reconnect the coolant lines that flow through the hard lines.
Some notes:
You can take these deletes one step further and completely eliminate the hard lines that go under the manifold. This involves simply routing new lines that connect the remaining components in green. You would also need to reroute the fuel return line and the coolant lines that flow through those hard lines. I have done this and it really simplifies the engine bay.
Vacuum Lines GREEN
Coolant BLUE
Holes to plug outlined in RED
Picture of my engine bay with complete hard line delete.

The following 3 users liked this post by mattz604:

Thread
Thread Starter
Forum
Replies
Last Post
RedRunner_87
95.5-2004 Tacomas & 96-2002 4Runners (Build-Up Section)
84
06-01-2021 01:51 PM


