


 Feb 10, 2016, 09:27 AM
Last edit by: IB Advertising
See related guides and technical advice from our community experts:
Browse all: Steering & Suspension Guides
- Toyota 4Runner 1984-1995 Rear Axle Upgrades
Overview of popular modifications to customize your 4Runner
Browse all: Steering & Suspension Guides

Rear Toyota axle swaps
Jul 15, 2010 | 05:40 AM
#1
Thread Starter
Registered User
Joined: Jun 2010
Posts: 18
Likes: 0
Rear Toyota axle swaps
Just found out the rear axle seal went in my 1991 Toyota pickup 4x4 and they want $350 to fix. Said they had to pull it and press the seals in it. But I want to know if there is any other rearends that I could swap in for a cheaper fix. Someone told me the samuri rearend was the same as the Toyota and I have a buddy that has one in good shape. Anyone know the truth to this. Also if that don't work what year toyota rears fit in 91s. Thanks
Jul 15, 2010 | 05:41 AM
#2
Registered User
Joined: Aug 2009
Posts: 13,574
Likes: 72
From: Wilkes-Barre, PA, USA
gonna need to know if it's a 22r or 3vze motor to help. And do you mean inner or outer axle seal or pinion seal. By the sound of it you mean pinion seal not axle seal.
Last edited by xxxtreme22r; Jul 15, 2010 at 05:53 AM.
Jul 15, 2010 | 05:53 AM
#3
Registered User
Joined: Aug 2009
Posts: 13,574
Likes: 72
From: Wilkes-Barre, PA, USA
oh and you don't need a press for either one. the shop is blowing smoke.
Toyota Pinion Seal Replacement
A gear oil leak around the base of the pinion flange on the front or rear differential (or even the transfer case) is a sign of a leaking seal. You should first check the the axle breather tube is free and clear, if not it can allow pressure to build up inside the axle and force oil out past the seal.
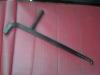
First step in removal is to loosen the four "companion flange" bolts that hold the driveshaft to the pinion flange. Use a pair of long handled 14mm wrenches to break the nuts free and remove the 4 bolts. Set the end of the driveshaft to the side, being careful not to let it separate at the slip yoke.
Check that the pinion flange nut is tight, if not, it can cause the pinion flange to move around under load and cause the seal to leak. If it is loose, tighten to ~90 ft.lbs. torque with a 30mm socket and torque wrench. This is easiest to do with the 3rd member still installed in the axle housing. Then you can use the e-brake and vehicle weight on the tires to resist the loosening torque on the pinion flange nut.
If the above checks are fine, then proceed to replace the pinon seal, see below for the replacement steps:
Toyota Pinion Seal Replacement
A gear oil leak around the base of the pinion flange on the front or rear differential (or even the transfer case) is a sign of a leaking seal. You should first check the the axle breather tube is free and clear, if not it can allow pressure to build up inside the axle and force oil out past the seal.
First step in removal is to loosen the four "companion flange" bolts that hold the driveshaft to the pinion flange. Use a pair of long handled 14mm wrenches to break the nuts free and remove the 4 bolts. Set the end of the driveshaft to the side, being careful not to let it separate at the slip yoke.
Check that the pinion flange nut is tight, if not, it can cause the pinion flange to move around under load and cause the seal to leak. If it is loose, tighten to ~90 ft.lbs. torque with a 30mm socket and torque wrench. This is easiest to do with the 3rd member still installed in the axle housing. Then you can use the e-brake and vehicle weight on the tires to resist the loosening torque on the pinion flange nut.
If the above checks are fine, then proceed to replace the pinon seal, see below for the replacement steps:
Jul 15, 2010 | 05:59 AM
#4

Just found out the rear axle seal went in my 1991 Toyota pickup 4x4 and they want $350 to fix. Said they had to pull it and press the seals in it. But I want to know if there is any other rearends that I could swap in for a cheaper fix. Someone told me the samuri rearend was the same as the Toyota and I have a buddy that has one in good shape. Anyone know the truth to this. Also if that don't work what year toyota rears fit in 91s. Thanks
Jul 15, 2010 | 06:03 AM
#5
Registered User
Joined: Aug 2009
Posts: 13,574
Likes: 72
From: Wilkes-Barre, PA, USA
Toyota Inner Axle Seal Replacement
When a rear axle seal goes bad, it's typically noticeable by gear oil leaking all over a rear wheel, and it may get into the brake drum and reduce rear brake feel. In my case, I was fortunate to notice it while doing some other work under the truck.
One of the more common causes of Toyota rear axle seal failure is a plugged differential breather. When the stock breather is unable to vent the diff, the internal pressure will find relief somewhere in the system: usually at the axle seal. So, if you have a leaking seal, be sure to check the breather for proper operation.
There can be other causes of seal failure, among them a worn wheel bearing or a bent housing or axle shaft. In this case, my wheel bearing was shot at 90,000 miles. (Due to having the bearing removed and a new one pressed on at a machine shop, that operation is not covered here.)
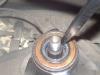
The brake assembly and axle/backing plate prior to removal. The e-brake cable is off, and the hydraulic line is "gravity bleeding".
To replace a rear seal, the rear axle should be placed securely on jackstands, and the tire removed. Place a drain pan under the end of the tube to catch any gear oil which may drip. Once the tire is off the vehicle, remove the retaining pin from the emergency brake lever mechanism at the backing plate and move the cable out of the way. Then, the hydraulic brake line can be removed from the backing plate. If you don't have a flare tool, remember the line fitting nut is soft and subject to rounding off, so be cautious.
Next, the axle shaft is removed from the housing by loosening the four 14mm hex-head bolts from behind the backing plate. Once the bolts are off, grasp the backing plate and carefully pull the entire brake and axle assembly from the housing.
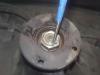
With the brake/axle assembly out of the way, the old seal can be pulled from the housing end. Using your favorite seal puller, pop the old one out.
Once you have the old seal out, check the seal surface and clean, if necessary. Also, clean any old gasket material from the axle flange, assuring none gets in to the axle tube.
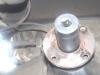
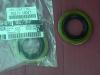
The new seal is greased and seated, ready to be driven in.
The new seal should be prepared with a coat of grease on its outer surface, to help drive it in smoothly. Place the new seal into the axle end, and carefully drive it in. For this seal, I found the front hub 2 1/8" socket with a towel on the end was the perfect size to drive the new seal. Once the seal is seated, coat the inner surface with grease as well.
With the new seal in place, clean up the brake and backing plate assembly. Saturation of gear oil on the various parts will determine the cleanup effort, but at a minimum a healthy application of brake cleaner should be a good start. The brake shoes and drum, along with all of the brake actuation mechanism, should be scrutinized.
With everything cleaned up, place a new gasket on the axle flange, or use your preferred gasket-maker. Very carefully guide the axleshaft back into the housing, taking care not to ride it in on your new seal (which can deform the seal instantly).
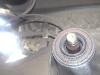
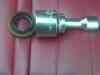
The front hub socket, padded with a towel, is perfect for driving in a rear axle seal.
The backing plate bolts should be torqued down to 51 ft. lbs. The emergency brake cable is reattached, and the brake line threaded into the backing plate. At this point, the rear brakes are bled, the differential oil level is checked and topped off, and the repair is complete.
When a rear axle seal goes bad, it's typically noticeable by gear oil leaking all over a rear wheel, and it may get into the brake drum and reduce rear brake feel. In my case, I was fortunate to notice it while doing some other work under the truck.
One of the more common causes of Toyota rear axle seal failure is a plugged differential breather. When the stock breather is unable to vent the diff, the internal pressure will find relief somewhere in the system: usually at the axle seal. So, if you have a leaking seal, be sure to check the breather for proper operation.
There can be other causes of seal failure, among them a worn wheel bearing or a bent housing or axle shaft. In this case, my wheel bearing was shot at 90,000 miles. (Due to having the bearing removed and a new one pressed on at a machine shop, that operation is not covered here.)
The brake assembly and axle/backing plate prior to removal. The e-brake cable is off, and the hydraulic line is "gravity bleeding".
To replace a rear seal, the rear axle should be placed securely on jackstands, and the tire removed. Place a drain pan under the end of the tube to catch any gear oil which may drip. Once the tire is off the vehicle, remove the retaining pin from the emergency brake lever mechanism at the backing plate and move the cable out of the way. Then, the hydraulic brake line can be removed from the backing plate. If you don't have a flare tool, remember the line fitting nut is soft and subject to rounding off, so be cautious.
Next, the axle shaft is removed from the housing by loosening the four 14mm hex-head bolts from behind the backing plate. Once the bolts are off, grasp the backing plate and carefully pull the entire brake and axle assembly from the housing.
With the brake/axle assembly out of the way, the old seal can be pulled from the housing end. Using your favorite seal puller, pop the old one out.
Once you have the old seal out, check the seal surface and clean, if necessary. Also, clean any old gasket material from the axle flange, assuring none gets in to the axle tube.
The new seal is greased and seated, ready to be driven in.
The new seal should be prepared with a coat of grease on its outer surface, to help drive it in smoothly. Place the new seal into the axle end, and carefully drive it in. For this seal, I found the front hub 2 1/8" socket with a towel on the end was the perfect size to drive the new seal. Once the seal is seated, coat the inner surface with grease as well.
With the new seal in place, clean up the brake and backing plate assembly. Saturation of gear oil on the various parts will determine the cleanup effort, but at a minimum a healthy application of brake cleaner should be a good start. The brake shoes and drum, along with all of the brake actuation mechanism, should be scrutinized.
With everything cleaned up, place a new gasket on the axle flange, or use your preferred gasket-maker. Very carefully guide the axleshaft back into the housing, taking care not to ride it in on your new seal (which can deform the seal instantly).
The front hub socket, padded with a towel, is perfect for driving in a rear axle seal.
The backing plate bolts should be torqued down to 51 ft. lbs. The emergency brake cable is reattached, and the brake line threaded into the backing plate. At this point, the rear brakes are bled, the differential oil level is checked and topped off, and the repair is complete.
Last edited by xxxtreme22r; Jul 15, 2010 at 07:33 AM.
Jul 15, 2010 | 06:43 AM
#7
Registered User
Joined: Aug 2009
Posts: 13,574
Likes: 72
From: Wilkes-Barre, PA, USA
so your gonna swap an entire rear end hub to hub because of a $5 seal that almost anyone could replace? If you can swap out an entire rear end, I would hope you can replace a simple axle seal.
Trending Topics
Jul 15, 2010 | 07:26 AM
#9
Contributing Member
Joined: Nov 2005
Posts: 8,875
Likes: 3
From: Longmont, CO
xtreme22r please stop posting misinformation
The outer seal does require a large throat press to replace. You pretty much have to do the wheel bearing while you're at it too. While $350 seems steep to me, if that includes the seals, bearings, and new brake shoes for both sides, it's probably not too bad.
The other option is to get a half shaft axle from a junkyard complete with brake, etc and just swap it out.
... and, yes, Samurai axles are MUCH narrower than Toyota axles.
Jul 15, 2010 | 07:29 AM
#10
Registered User
Joined: Aug 2009
Posts: 13,574
Likes: 72
From: Wilkes-Barre, PA, USA
Wheel Bearing Removal
Replacing the wheel bearing and outer seal is the more difficult part since the wheel bearing and its retaining collar are a press-fit onto the axle shaft and you must remove the wheel bearing and backing plate in order to replace the outer seal.
The first step is to remove the snap ring. A pair of heavy-duty "lock ring" pliers and maybe a pick or small screwdriver should do the job.
Now the bearing and retaining collar can be removed and there are a few different ways to go about it.
The "proper" method is to use a SST (Special Service Tool) and a press. SST's are generally pretty expensive, however if you can cut and weld steel, this one can be made fairly easily. You can fabricate one from scratch from some flat bar and a tube, or an even easier way is to make one out of an old axle housing, which is what I did.
The SST bolts to the bearing retainer/brake backing plate assembly using the original studs and nuts and then the whole thing is placed in the press. A few pumps later, the bare axle shaft should drop free from the rest of the assembly. It is a good idea to place a block of wood or something under the axle to prevent damage to the threads on the wheel studs when it drops. Now the SST can be removed from the backing plate, and the bearing can be tapped out of the retainer.
Many people do not have access to a press or the means to build a SST, so there is also the "shade-tree mechanic" method of separating the wheel bearing from the axle shaft. This method can also be a little faster than using a press. You basically hold the assembly by the backing plate with the axle shaft pointing down (brake drum removed), raise it above your head, and slam the end of the axle shaft down on the concrete as hard and fast as you can until the backing plate falls free of the shaft. This may take quite a few hard hits, or if you are lucky, sometimes just a few. You should leave all the brake parts assembled to the backing plate so that their weight is what is hammering down on the bearing and not just your hands. The more weight on the backing plate, the easier the bearing will come off.
When using this method, be sure to wear some thick or padded gloves to protect your hands from the shock. Something also needs to be placed on the concrete to prevent damage to the end of the axle shaft. I like to use Masonite since it is hard and dense enough to not absorb too much of the hammering force, but still soft enough to prevent mushrooming the end of the axle shaft. If you mushroom the shaft, you will have to spend some time with a triangle file getting the splines back to where they'll fit into the differential again.

Another way to get the retainer off is the way some factory service manuals show to do it, which is by cutting most of the way through it with a grinder, and then using a chisel to split it open and get it to release. You then still have to press or hammer the bearing off. If you use this method, you have to be very careful not to nick the axle shaft. A nick on the axle shaft causes what engineers call a "stress riser," and can eventually lead to axle shaft failure.
I have also heard that some people use a torch to cut off the bearing retainer. The heat from the torch can undo the heat treat in the axle shaft, which weakens it. It is also very difficult to keep from nicking the axle shaft with the torch. For these reasons, using a torch is not recommended.
Replacing the wheel bearing and outer seal is the more difficult part since the wheel bearing and its retaining collar are a press-fit onto the axle shaft and you must remove the wheel bearing and backing plate in order to replace the outer seal.
The first step is to remove the snap ring. A pair of heavy-duty "lock ring" pliers and maybe a pick or small screwdriver should do the job.
Now the bearing and retaining collar can be removed and there are a few different ways to go about it.
The "proper" method is to use a SST (Special Service Tool) and a press. SST's are generally pretty expensive, however if you can cut and weld steel, this one can be made fairly easily. You can fabricate one from scratch from some flat bar and a tube, or an even easier way is to make one out of an old axle housing, which is what I did.
The SST bolts to the bearing retainer/brake backing plate assembly using the original studs and nuts and then the whole thing is placed in the press. A few pumps later, the bare axle shaft should drop free from the rest of the assembly. It is a good idea to place a block of wood or something under the axle to prevent damage to the threads on the wheel studs when it drops. Now the SST can be removed from the backing plate, and the bearing can be tapped out of the retainer.
Many people do not have access to a press or the means to build a SST, so there is also the "shade-tree mechanic" method of separating the wheel bearing from the axle shaft. This method can also be a little faster than using a press. You basically hold the assembly by the backing plate with the axle shaft pointing down (brake drum removed), raise it above your head, and slam the end of the axle shaft down on the concrete as hard and fast as you can until the backing plate falls free of the shaft. This may take quite a few hard hits, or if you are lucky, sometimes just a few. You should leave all the brake parts assembled to the backing plate so that their weight is what is hammering down on the bearing and not just your hands. The more weight on the backing plate, the easier the bearing will come off.
When using this method, be sure to wear some thick or padded gloves to protect your hands from the shock. Something also needs to be placed on the concrete to prevent damage to the end of the axle shaft. I like to use Masonite since it is hard and dense enough to not absorb too much of the hammering force, but still soft enough to prevent mushrooming the end of the axle shaft. If you mushroom the shaft, you will have to spend some time with a triangle file getting the splines back to where they'll fit into the differential again.
Another way to get the retainer off is the way some factory service manuals show to do it, which is by cutting most of the way through it with a grinder, and then using a chisel to split it open and get it to release. You then still have to press or hammer the bearing off. If you use this method, you have to be very careful not to nick the axle shaft. A nick on the axle shaft causes what engineers call a "stress riser," and can eventually lead to axle shaft failure.
I have also heard that some people use a torch to cut off the bearing retainer. The heat from the torch can undo the heat treat in the axle shaft, which weakens it. It is also very difficult to keep from nicking the axle shaft with the torch. For these reasons, using a torch is not recommended.
Jul 15, 2010 | 07:31 AM
#11
Registered User
Joined: Aug 2009
Posts: 13,574
Likes: 72
From: Wilkes-Barre, PA, USA
xtreme22r please stop posting misinformation
The outer seal does require a large throat press to replace. You pretty much have to do the wheel bearing while you're at it too. While $350 seems steep to me, if that includes the seals, bearings, and new brake shoes for both sides, it's probably not too bad.
The other option is to get a half shaft axle from a junkyard complete with brake, etc and just swap it out.
... and, yes, Samurai axles are MUCH narrower than Toyota axles.
The outer seal does require a large throat press to replace. You pretty much have to do the wheel bearing while you're at it too. While $350 seems steep to me, if that includes the seals, bearings, and new brake shoes for both sides, it's probably not too bad.
The other option is to get a half shaft axle from a junkyard complete with brake, etc and just swap it out.
... and, yes, Samurai axles are MUCH narrower than Toyota axles.
http://www.4x4wire.com/toyota/mainte...wheel_bearing/
Last edited by xxxtreme22r; Jul 15, 2010 at 07:47 AM.
Jul 15, 2010 | 07:35 AM
#13
Contributing Member
Joined: Nov 2005
Posts: 8,875
Likes: 3
From: Longmont, CO
Sorry, the part you posted originally was talking about the inner axle seal, which is easy. As you can see from reading the rest dealing with the bearing, it ain't exactly easy if you don't have a press (and not really easy even if you DO have a press)
Jul 15, 2010 | 07:37 AM
#14
Registered User
Joined: Aug 2009
Posts: 13,574
Likes: 72
From: Wilkes-Barre, PA, USA
Outer Seal Replacement and Axle Shaft Reassembly
Now that everything is apart, we can finally access the outer seal to replace it and start putting things back together. You should be able to remove and install this seal by hand. Just pop it out, push the new one in, and apply grease to the seal lip.
To begin reassembly, place the backing plate onto the axle shaft, then the new wheel bearing, and then the bearing retainer. Some bearings come with a new retainer, however mine did not, so I just re-used the old one.
You can use a press to push the bearing and retainer back onto the axle shaft, but it can be just as quick and easy to hammer them on. I've found that 2" steel tubing with a 3/16" wall (2x2, 2x3, round, etc.), fits the bearing retainer and axle shaft just right. Other people have found that common sizes of fence posts or steel pipe from the local hardware store work as well. You just need something big enough to fit over the bearing surface on the axle shaft and small enough not to slide past the retainer. I prefer to use a small piece of this material to hold against the bearing and retainer to keep them in place, and a larger, heavier piece over that as my hammer. It is a good idea to place the axle flange on top of a vise or in a wheel laying on the ground so that you are not pounding against the wheel studs. Pound the bearing and retainer until they are fully seated and then install the snap ring.
Take the axle shaft and brake assembly and carefully guide the axle back into the housing, making sure not to ride the shaft on the seal in the housing (which could ruin the seal). To get the axle all the way in, you may need to turn the axle shaft slightly to get the axle splines to line up with the splines in the differential. Install the 4 nuts on the inside of the backing plate and torque them to 51 ft/lbs. If your brakes were contaminated with gear oil, clean them thoroughly with brake cleaner and consider replacing contaminated brake shoes. Apply new grease to the brake adjuster and contact points between the brake shoes and backing plate (for more information on rear brake maintenance, see the article linked below). Also be sure to clean the brake drum before installing it. Reinstall the emergency brake cable and the brake line. Bleed the brakes, check the differential oil level, and the repair is complete.
Jul 15, 2010 | 07:39 AM
#15
Registered User
Joined: Aug 2009
Posts: 13,574
Likes: 72
From: Wilkes-Barre, PA, USA

I changed it from inner to outer seal. Got mixed up when copy/pasting from 4x4wire.
The only think with doing it without the press is that you have to make sure you don't damage the splines on the axle shaft. But he does mention that and what to use on the ground when pounding it out.
Even if you do mess the splines up and you have to find a replacement from a junk yard or something, your still ahead of what you would have paid in the first place if you had a shop do it.
Last edited by xxxtreme22r; Jul 15, 2010 at 07:46 AM.
Jul 15, 2010 | 07:42 AM
#16
Registered User
Joined: Aug 2009
Posts: 13,574
Likes: 72
From: Wilkes-Barre, PA, USA
I have yet to do this, however all of the info I have posted is what I found doing a google search and knowing about the 4x4wire and 4crawlers websites. the above mentioned pinion seal replacement is from 4crawler.
Jul 15, 2010 | 09:30 AM
#17
Thread Starter
Registered User
Joined: Jun 2010
Posts: 18
Likes: 0
Alot of good info guys. I just picked up my truck and it is the right rear axle bearing and they want $350 to do the one side plus $167 to do rear brakes which the brakes I can do myself. Obviously I still need to check around but overall would it be easier to get another reared if i can for a lot cheaper.
 Jul 15, 2010 | 09:42 AM
#19
Alot of good info guys. I just picked up my truck and it is the right rear axle bearing and they want $350 to do the one side plus $167 to do rear brakes which the brakes I can do myself. Obviously I still need to check around but overall would it be easier to get another reared if i can for a lot cheaper.
Jul 15, 2010 | 09:47 AM
#20
Registered User
Joined: Oct 2009
Posts: 172
Likes: 0
From: San Diego, CA
Personally I would take this seal problem as a time to try fixing it myself. If you do not have the time to do that and some money to spend I would look for another Toyota axle as an upgrade. Something like an E-Locker rear end. Axles with good stuff in them aren't cheap.


