
Stanprophets Beater 89 Build
 04-04-2013, 07:19 PM
#21
Registered User
iTrader: (2)
Join Date: Dec 2009
Location: Pleasanton, CA - SF Bay Area
Posts: 2,159
Likes: 0
Received 7 Likes
on
5 Posts
If you do that you may as well clean injectors, hot tank manifolds, swap battery and afm, and upgrade your alternator.. wait, that's just me 
He is right about the HG....while you are there you might as well...
He is right about the HG....while you are there you might as well...
 04-04-2013, 07:52 PM
#22
Registered User
Thread Starter
Join Date: Feb 2013
Location: Hampton VA
Posts: 167
Likes: 0
Received 0 Likes
on
0 Posts
Not going to worry about the head gasket right now.
One of the things when doing heavy mechanical work to an engine is doing too much at one time. It makes it harder to pinpoint problems when you run into problems.
The timing chain is just buying some more time. This engine has a lot of mileage left, but I will find a nice block soon and slowly start building an engine for it. I miss building engines!
04-04-2013, 08:04 PM
#23
Registered User
I only say because it's almost impossible to get the timing cover between the oil pan and the head without crimping the head gasket near the hidden bolt. To get a good seal, either the oil pan needs to come off or the head needs to come off. Then it's either bringing the timing cover up to the gasket or the head coming down to the gasket.
I've done a few of these over the years, and I've tried...I'm 0 for all. The only fix at that point is to glob a bunch of FIPG around that junction to prevent the oil from pouring out.
Either way...carry on. The truck is progressing nicely.
I've done a few of these over the years, and I've tried...I'm 0 for all. The only fix at that point is to glob a bunch of FIPG around that junction to prevent the oil from pouring out.
Either way...carry on. The truck is progressing nicely.
04-08-2013, 05:58 PM
#24
Registered User
Thread Starter
Join Date: Feb 2013
Location: Hampton VA
Posts: 167
Likes: 0
Received 0 Likes
on
0 Posts
A nice little present came in to work today for me!
Got it on during my lunch break and got a coat of paint on it. I will post some pictures of it tomorrow when I get the new mirrors on.
Other things on the way:
SR5 Gauge Cluster
D Ring Hitch
Tow Strap
Trail Gear Bumper Reinforcement
Weld on light tabs for Antenna mount
Soon Add ons:
Soft Top
Possible Swing out tire carrier
Last edited by stanprophet; 04-08-2013 at 06:42 PM.
04-10-2013, 04:44 PM
#25
Registered User
Thread Starter
Join Date: Feb 2013
Location: Hampton VA
Posts: 167
Likes: 0
Received 0 Likes
on
0 Posts
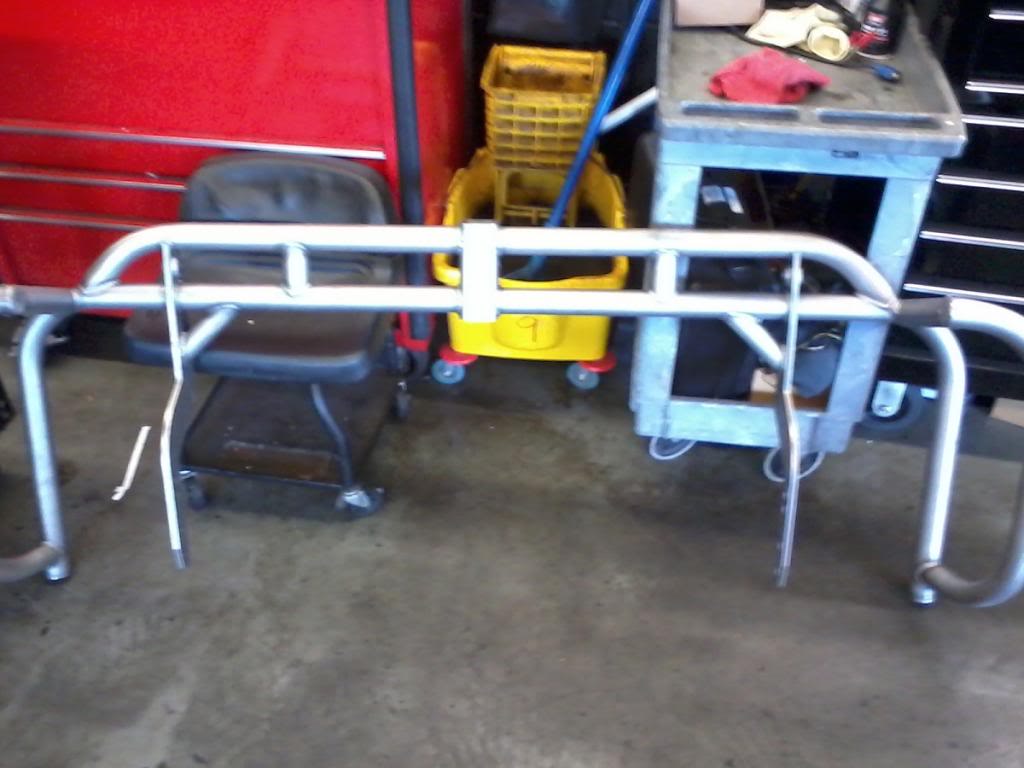
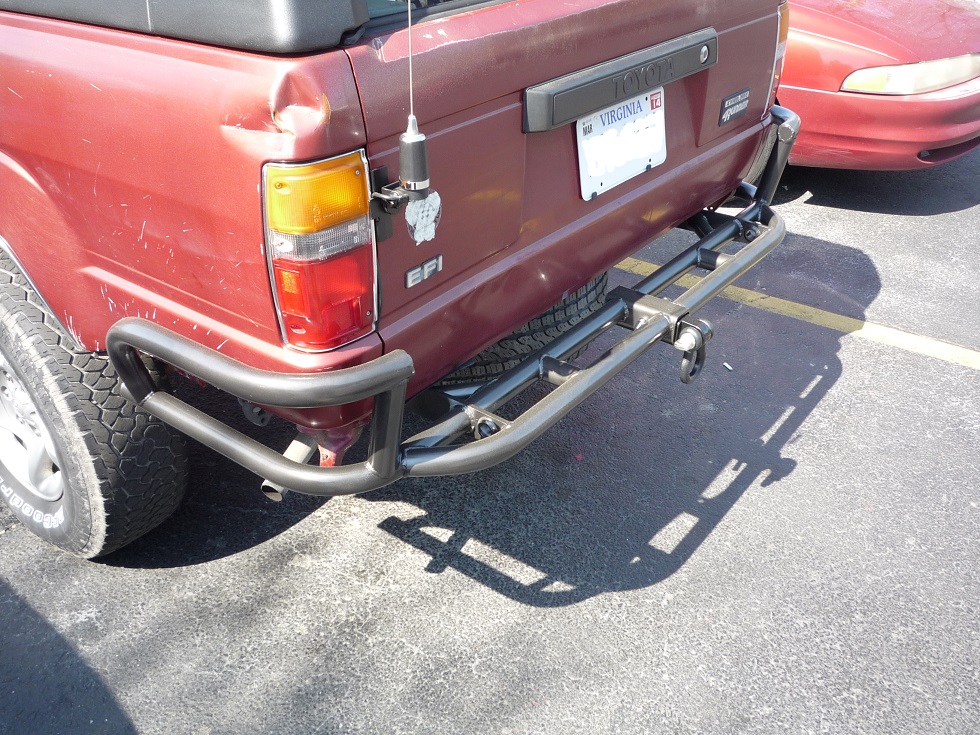
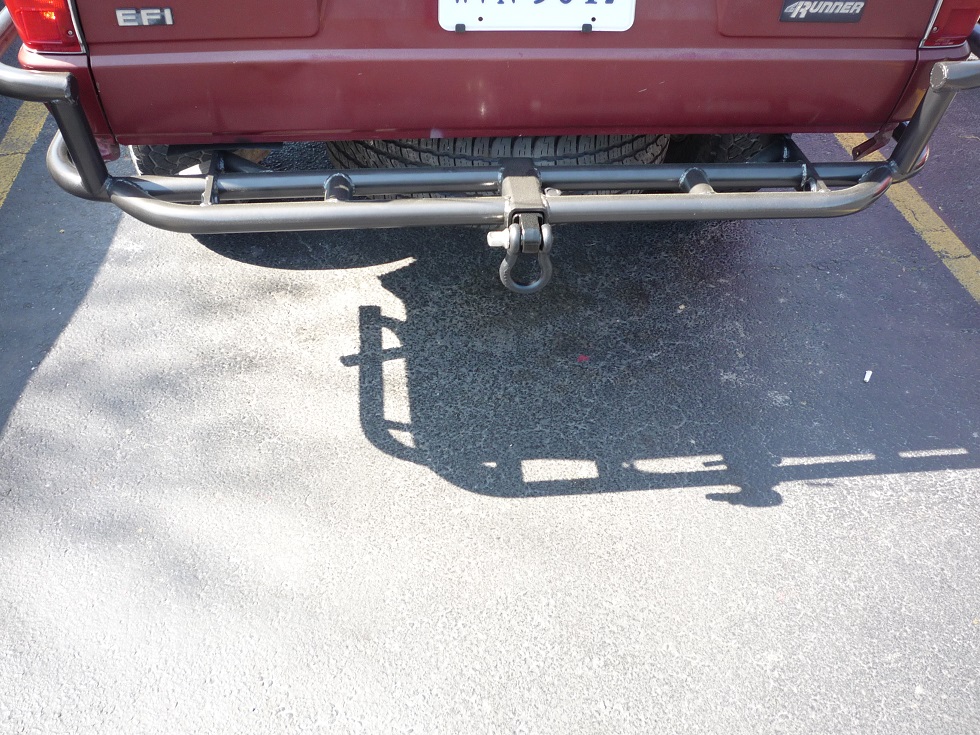
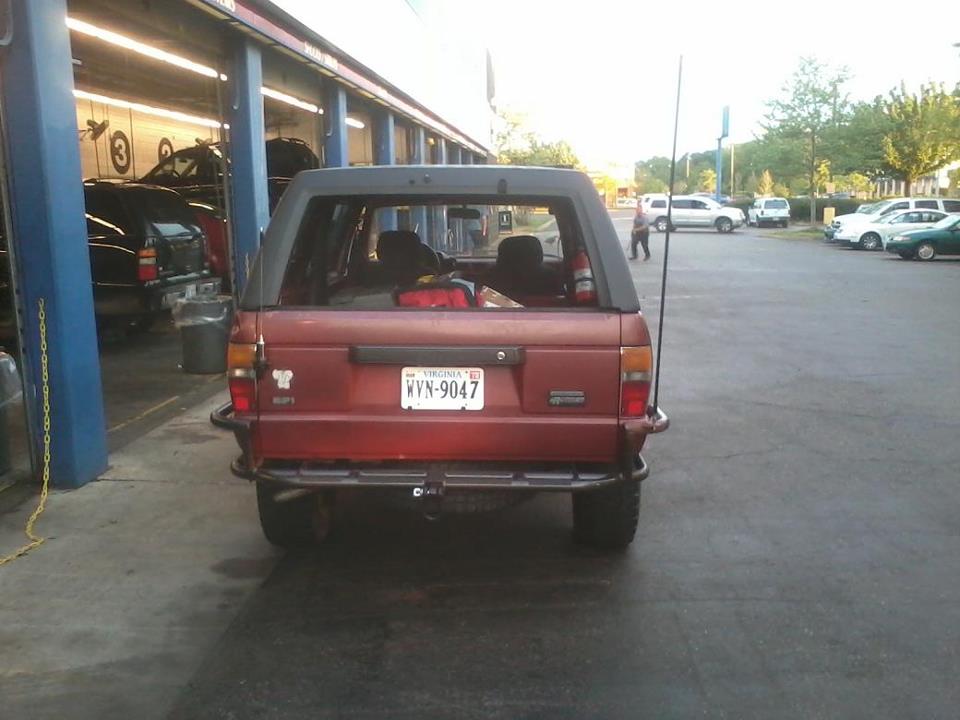
Here is the bumper mounted up with one coat of primer and paint. I have some more work to do on the bumper. I still have to mount and weld the upper supports, and weld a light bracket on the corner for an antenna mount. Got my first parts today for the swing out tire carrier, but it will be a couple of weeks before I can get to work on the welding.
Got a bunch of parts and work to do but not enough time!
I am going to use a 2x4 box steel for the swing arm, welded to a 1.5 inch dome tube uses for the hinge. The tube will have bronze flange bushings reducing the ID to 1 inch. I will use a 1 inch grade 8 bolt in a double sheer configuration.
I think the idea I have will be a little different, but not crazy. There will be some design aspects to prevent oscillating loads and hopefully make this thing like a tank.
Oh and I got a decent set of 32x11.50-15 BFG AT's for free, so I have to decide if I want to put the 15's back on and run them, and get the soft top. Or just get a good set of MT's for the 16" rims. I have some plans for the suspension so I really do not want to put the new tires on until I get it where I want it.
Last edited by stanprophet; 04-10-2013 at 04:46 PM.
04-10-2013, 06:03 PM
#27
Registered User
Thread Starter
Join Date: Feb 2013
Location: Hampton VA
Posts: 167
Likes: 0
Received 0 Likes
on
0 Posts
I normally would not be able to, but I am liquidating some hobby assets to fund this build. I work too much and need to get out a little more, and going wheeling will be good!
Yea the door is a little bent, but thanks to Yotatech I found one at a good price.
 04-16-2013, 02:52 PM
#30
Registered User
Thread Starter
Join Date: Feb 2013
Location: Hampton VA
Posts: 167
Likes: 0
Received 0 Likes
on
0 Posts
I guess it is time for an update.
I got a set of decent BFG AT's in 32x11.50-r15 so I decided to put them on the Outlaw II rims the truck had when I bought it. They have a little dry rot, but a bunch of tread, so hopefully I can run them the rest of the summer and upgrade them later.
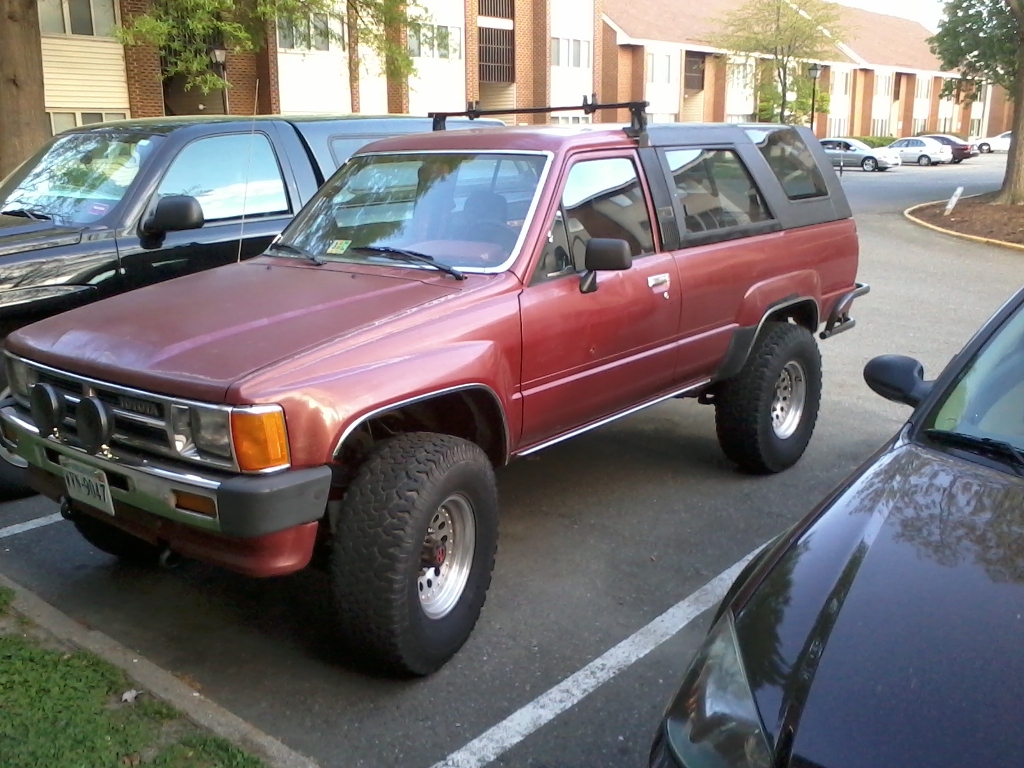
I think they look better than the Taco rims I had on it. Of course the mirrors have been replaced now, and I added a couple of cheap offroad lights to the front bumper. Still need to run some wiring. Have a bunch of parts here waiting for the time to be put on.
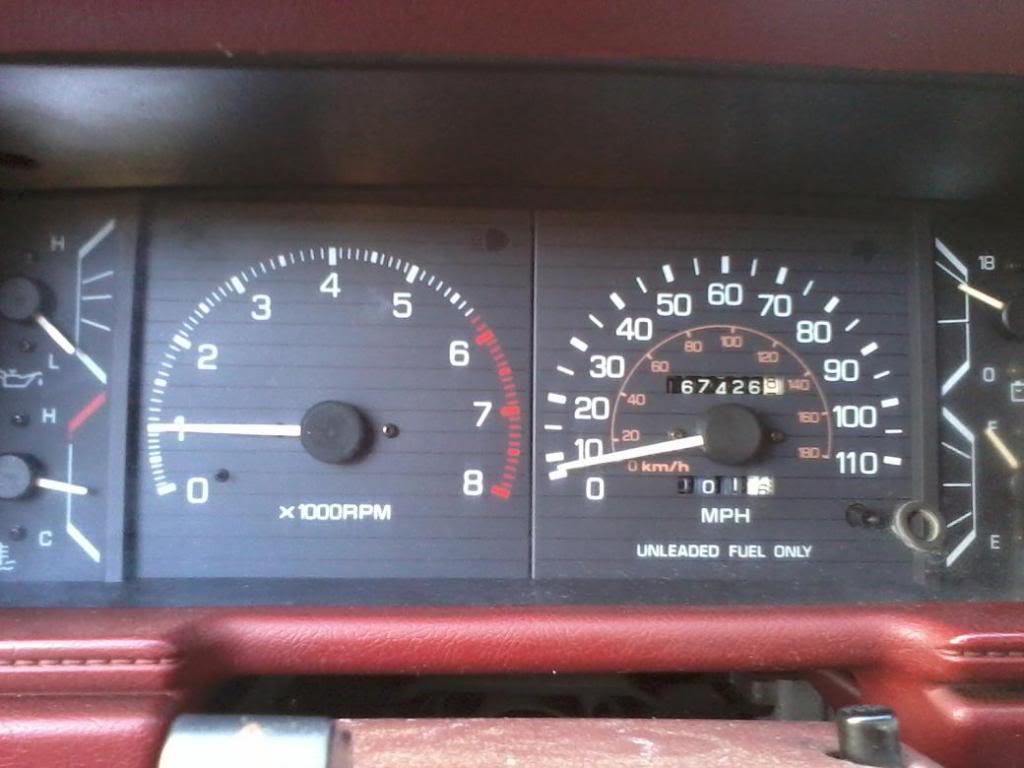
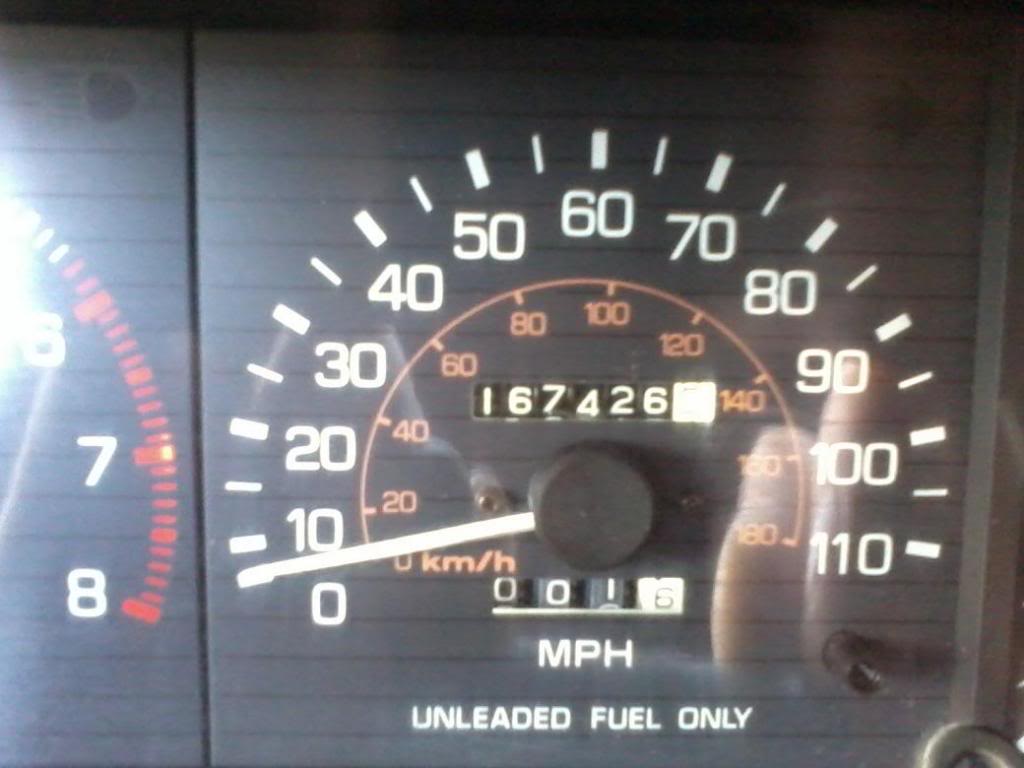
Also got the SR5 Cluster today, it was in rough shape but for 45 bucks shipped from the west coast I cannot complain. I tore it down and swapped my odometer into the SR5 cluster, adjusted the tach, and added some LED backlights.
Overall I love the guages now, much better than putting a little crappy tach in there.
I got a set of decent BFG AT's in 32x11.50-r15 so I decided to put them on the Outlaw II rims the truck had when I bought it. They have a little dry rot, but a bunch of tread, so hopefully I can run them the rest of the summer and upgrade them later.
I think they look better than the Taco rims I had on it. Of course the mirrors have been replaced now, and I added a couple of cheap offroad lights to the front bumper. Still need to run some wiring. Have a bunch of parts here waiting for the time to be put on.
Also got the SR5 Cluster today, it was in rough shape but for 45 bucks shipped from the west coast I cannot complain. I tore it down and swapped my odometer into the SR5 cluster, adjusted the tach, and added some LED backlights.
Overall I love the guages now, much better than putting a little crappy tach in there.
 04-16-2013, 04:22 PM
#32
Registered User
Thread Starter
Join Date: Feb 2013
Location: Hampton VA
Posts: 167
Likes: 0
Received 0 Likes
on
0 Posts
That is how you know it is time for an oil change, when the needle goes to zero right?
I am just kidding, but you would be surprised what I see as a Technician.
Here is a night shot of my elchepo truck stop 194 LED's
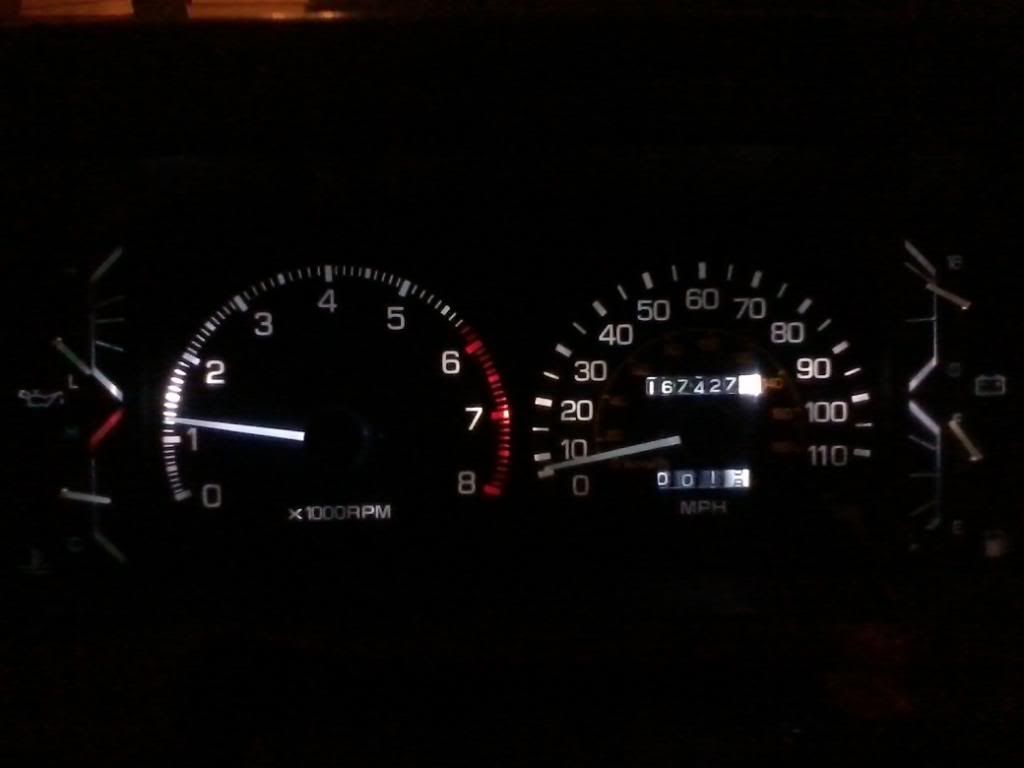
It is brighter on camera, there hot spots, and the dimmer will not work at the moment. But overall I am very happy!
I am just kidding, but you would be surprised what I see as a Technician.
Here is a night shot of my elchepo truck stop 194 LED's
It is brighter on camera, there hot spots, and the dimmer will not work at the moment. But overall I am very happy!
 subbed for sure. keep up the great work!
04-17-2013, 01:32 PM
subbed for sure. keep up the great work!
04-17-2013, 01:32 PM
#34
Registered User
Nice progress. I have an 89 too! I PM'd you.
04-18-2013, 08:14 AM
#35
Registered User
Join Date: Mar 2013
Location: Jacksonville, NC
Posts: 15
Likes: 0
Received 0 Likes
on
0 Posts
What color are those 194 led bulbs i was thinking of getting some blue ones, but not sure, whatever color those are they look good
Last edited by crankyster_01; 04-18-2013 at 08:15 AM.
04-18-2013, 11:27 AM
#36
Registered User
Thread Starter
Join Date: Feb 2013
Location: Hampton VA
Posts: 167
Likes: 0
Received 0 Likes
on
0 Posts
They are white, or so the packed said. They do look white in person, and I really like them.
Well I got to use the bumper today!
I was driving down a rural road after I left school this afternoon, and I see an older gentleman that had his Dodge Ram 2500 diesel with the LF tire in the ditch in his driveway. The RR tire was off the ground and he was almost high centered. So I pulled over to give him a hand. We hooked his tow strap up to his hitch and to the D-Ring on the bumper. Locked the hubs and put it into 4lo and pulled him right out. Wasn't a difficult pull, but it is a heavy truck.
Only reason I even put it in 4 low.... 32's on 4:10 gears, figured the extra torque of the low gear would help, and it did. So he is thanking me, then asked if it was possible to pull out his tractor?
Aparently he was mowing the lawn with his midsize tractor with a rear mower attachment, he was on the edge of about 5 foot deep drainage ditch and slid in. Well his wife grabbed the Dodge to pull out the tractor and she slid in with the LF tire. I did not even see the tractor. It was buried to the axle with about 40" tractor tires.
He was at a right angle to the driveway, so I backed down the grade just a bit, and angled the best I could. We hooked up and I started pulling, it was pulling the tractor out sideways. This was was straining a bit, but when it came out far enough he was able to cut the front wheels towards the yota and she came out with little more effort. I wish I had some pictures this tractor was deep in the ditch.
He offered to pay me, but I refused. He complemented on the truck, and the bumper. He was telling me that I probably did not need to lock the hubs and kick it into low. But when I responded that it was only a little 4 banger he was shocked. Anyways him and his wife were great people and I was glad I could help.
Bumper is good to go! Oh and for the truck
 05-03-2013, 08:23 PM
#37

Subbed to watch the build. I'm in Virginia Beach. I acquired an '87 Pickup with a dead 22R for free from a coworker about a month ago, but it's still sitting in his front yard in Newport News because I was at the end of my lease and moving. I just got in the new house this past weekend, so I'm thinking about finally getting the truck towed down here perhaps next weekend.
I'm kind of on the fence on what to do with the truck. From what my coworker told me, the truck has some sort of bottom end failure, which is why it's sat in his front yard for almost two years. I won't know until I pull the engine if even the head is salvageable.
I was planning to just try and pick up a cheap used 22R or 22RE and throw it in there just to get it on the road asap, because the clutch is starting to slip in my current beater Escort, and my 2005 GTO has a pretty bad misfire on cylinder #7 (I just can't catch a break). However, if you can find a functional used 22R around Hampton Roads, they're priced like gold.
I'm having a hard time stomaching paying as much for a used 22R as I could, say, a used LS 4.8L. But if I decide to buy a different motor, getting the truck on the road cheaply has just gone out the window...
Last edited by slimbobaggins; 05-03-2013 at 08:25 PM.
05-05-2013, 02:37 PM
#38
Registered User
Thread Starter
Join Date: Feb 2013
Location: Hampton VA
Posts: 167
Likes: 0
Received 0 Likes
on
0 Posts
Subbed to watch the build. I'm in Virginia Beach. I acquired an '87 Pickup with a dead 22R for free from a coworker about a month ago, but it's still sitting in his front yard in Newport News because I was at the end of my lease and moving. I just got in the new house this past weekend, so I'm thinking about finally getting the truck towed down here perhaps next weekend.
I'm kind of on the fence on what to do with the truck. From what my coworker told me, the truck has some sort of bottom end failure, which is why it's sat in his front yard for almost two years. I won't know until I pull the engine if even the head is salvageable.
I was planning to just try and pick up a cheap used 22R or 22RE and throw it in there just to get it on the road asap, because the clutch is starting to slip in my current beater Escort, and my 2005 GTO has a pretty bad misfire on cylinder #7 (I just can't catch a break). However, if you can find a functional used 22R around Hampton Roads, they're priced like gold.
I'm having a hard time stomaching paying as much for a used 22R as I could, say, a used LS 4.8L. But if I decide to buy a different motor, getting the truck on the road cheaply has just gone out the window...
I'm kind of on the fence on what to do with the truck. From what my coworker told me, the truck has some sort of bottom end failure, which is why it's sat in his front yard for almost two years. I won't know until I pull the engine if even the head is salvageable.
I was planning to just try and pick up a cheap used 22R or 22RE and throw it in there just to get it on the road asap, because the clutch is starting to slip in my current beater Escort, and my 2005 GTO has a pretty bad misfire on cylinder #7 (I just can't catch a break). However, if you can find a functional used 22R around Hampton Roads, they're priced like gold.
I'm having a hard time stomaching paying as much for a used 22R as I could, say, a used LS 4.8L. But if I decide to buy a different motor, getting the truck on the road cheaply has just gone out the window...
Also with the GTO if you need help with that also let me know. I am an ASE Certified Master Technician and Advance Engine Performance Specialist. I would be happy to look at it for you when I am across the water. Be carefull driving it, the late model GM's like to burn up the converters with a small misfire. I should be in chesapeake Thursday and Friday doing the Timing chain on the truck.
05-05-2013, 02:53 PM
#39
Registered User
Thread Starter
Join Date: Feb 2013
Location: Hampton VA
Posts: 167
Likes: 0
Received 0 Likes
on
0 Posts
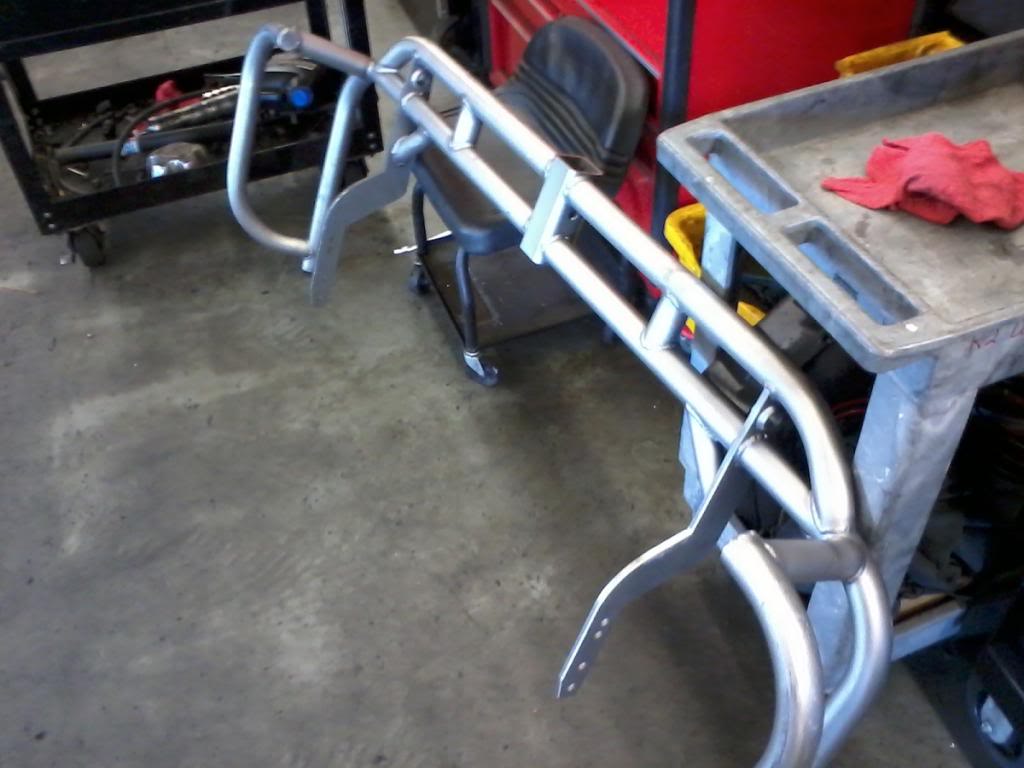
Ok so I have made some progress. Made it to my buddies house to weld on an antenna mount and the front supports for the bumper. He had a nice Mig machine, and I had not welded in about 10 years. Well I caught the bug again. I was saving my penny's for the soft top but the timing chain is needed ASAP, so I splurged a little to get this thing trail worthy for now.
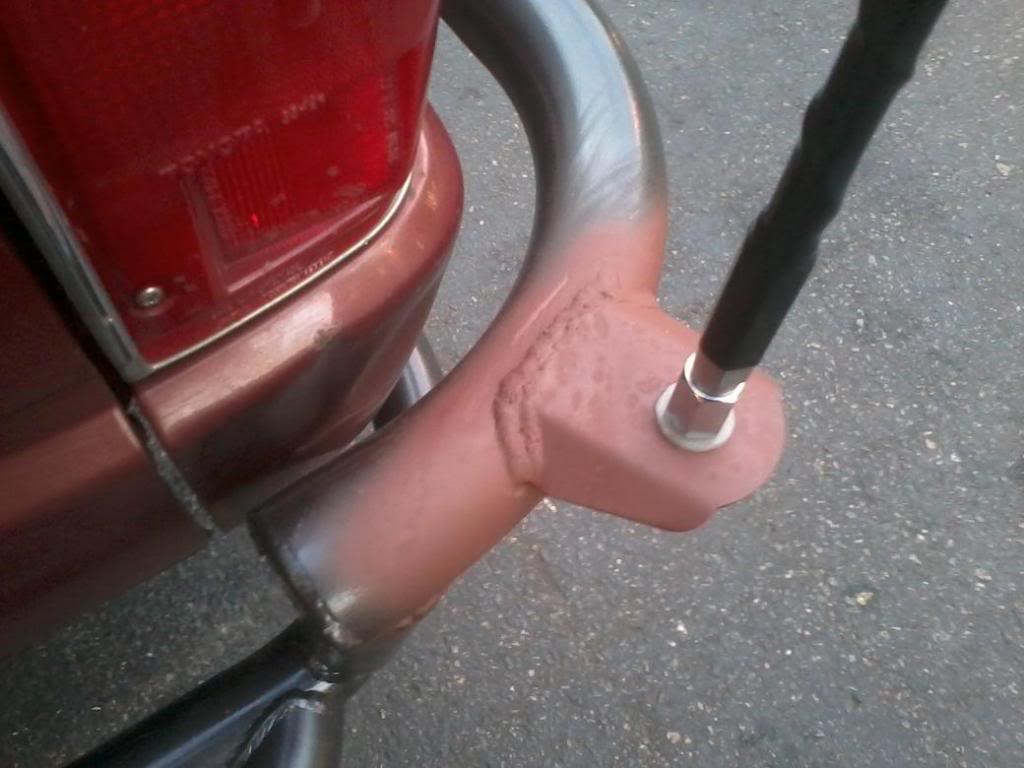
So had to do 2 passes to get the light mount solid, not the nicest welds but they have full penetration. So I purchase a little stick welder!
I ordered a small Northern Tool ST80I stick and Tig welder. This thing is small but it is powerful for a 110v welder. So I started to work on a piece of scrap to get the swing out tire carrier fabed up.
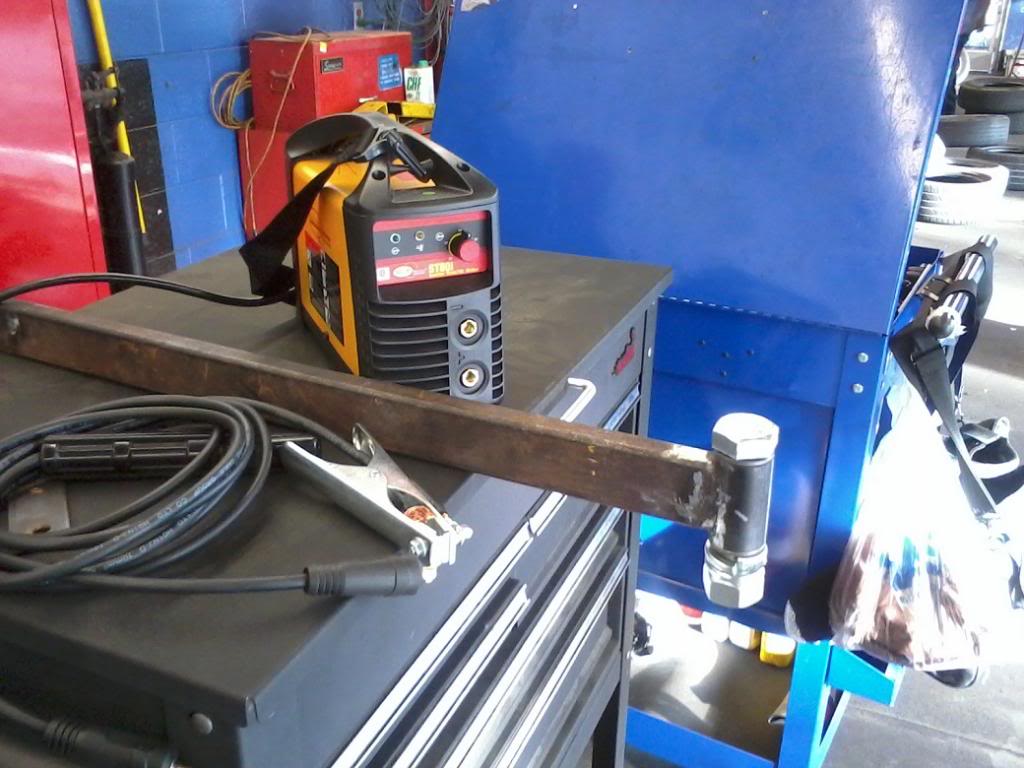
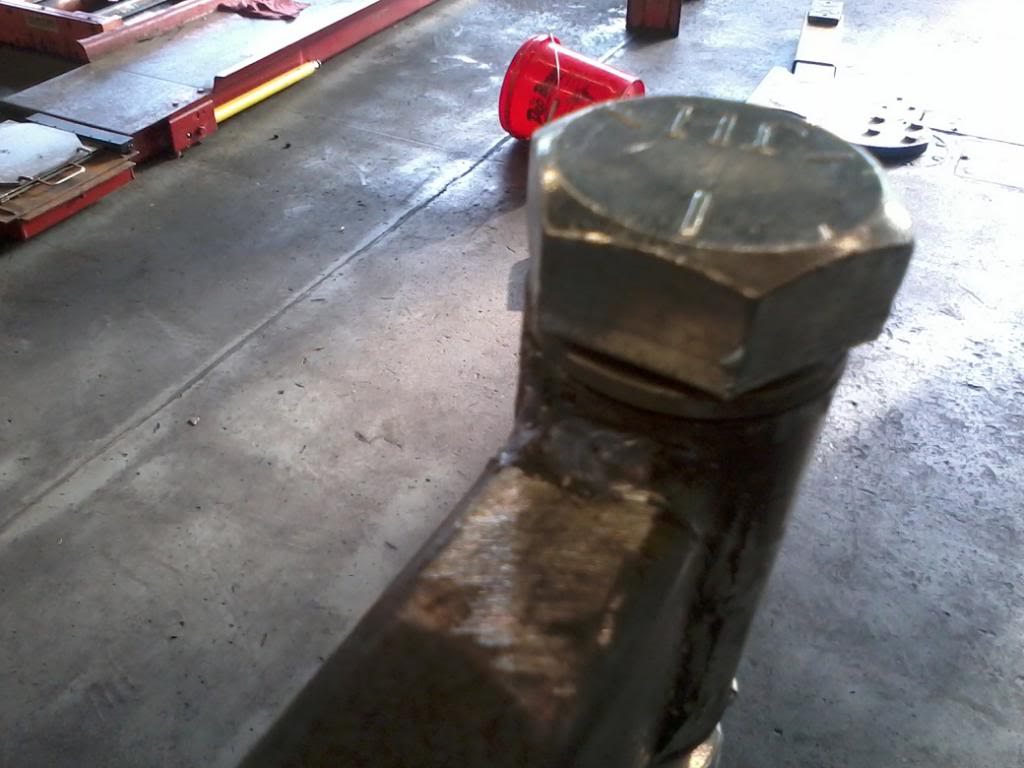
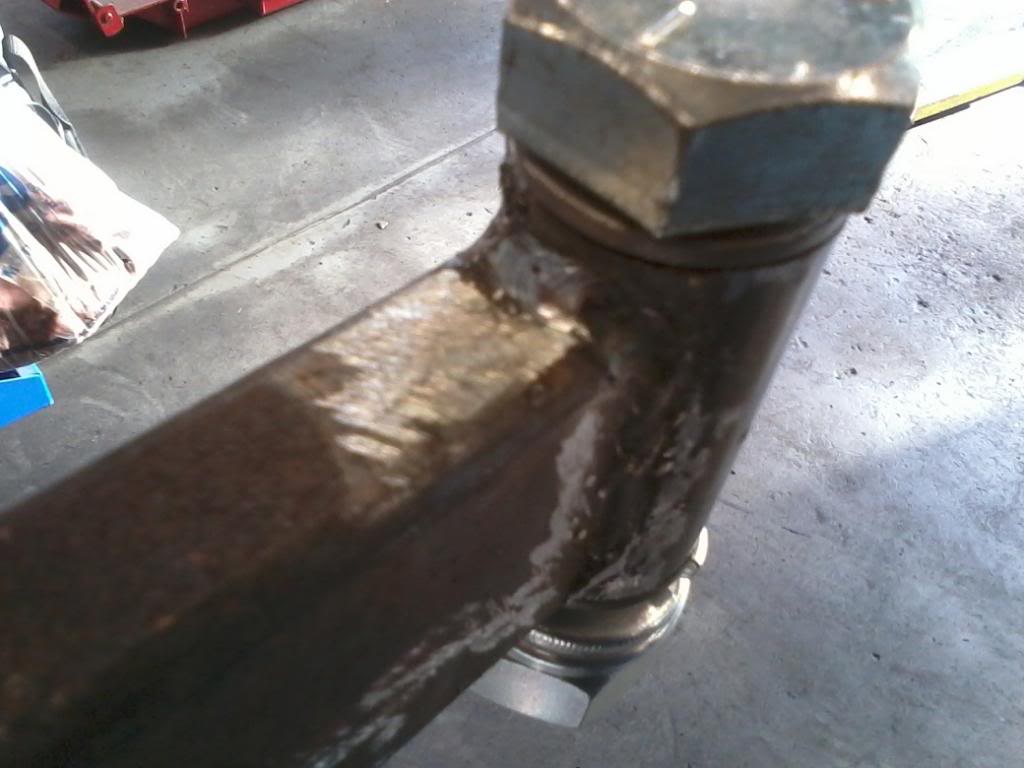
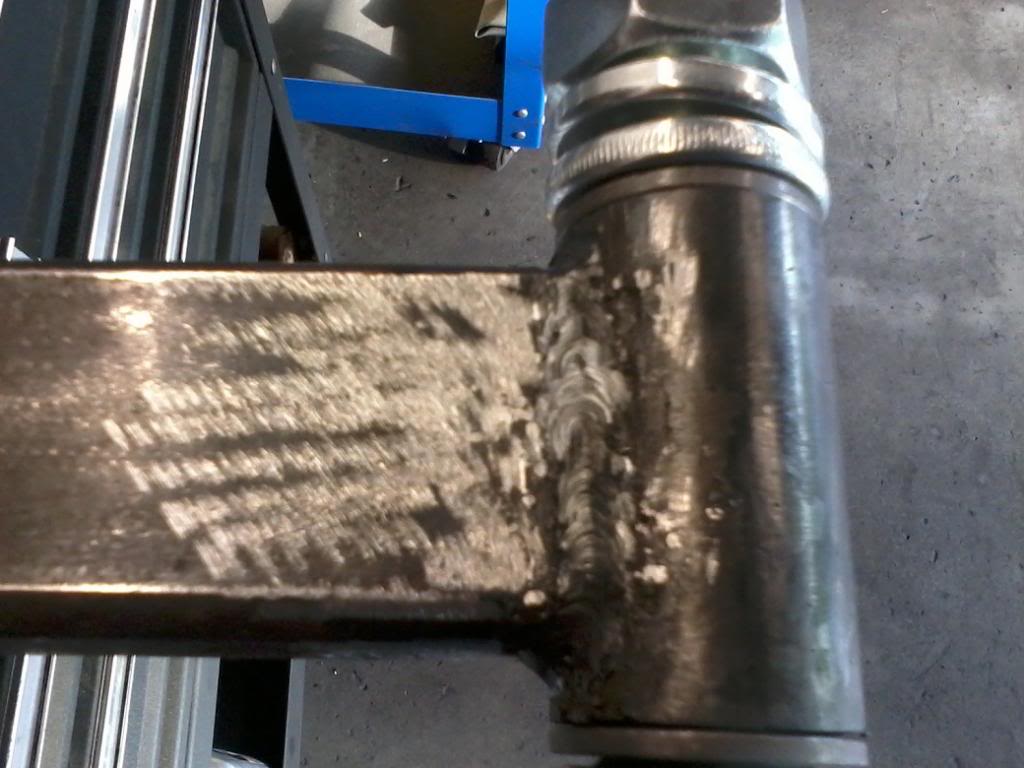
This was the first time ever stick welding, I jumped in with only 3 practice beads before this, well and a lot of you tube instruction video's! I am happy with the results. I hope to get the steel I need this week and begin the fabrication of the carrier.
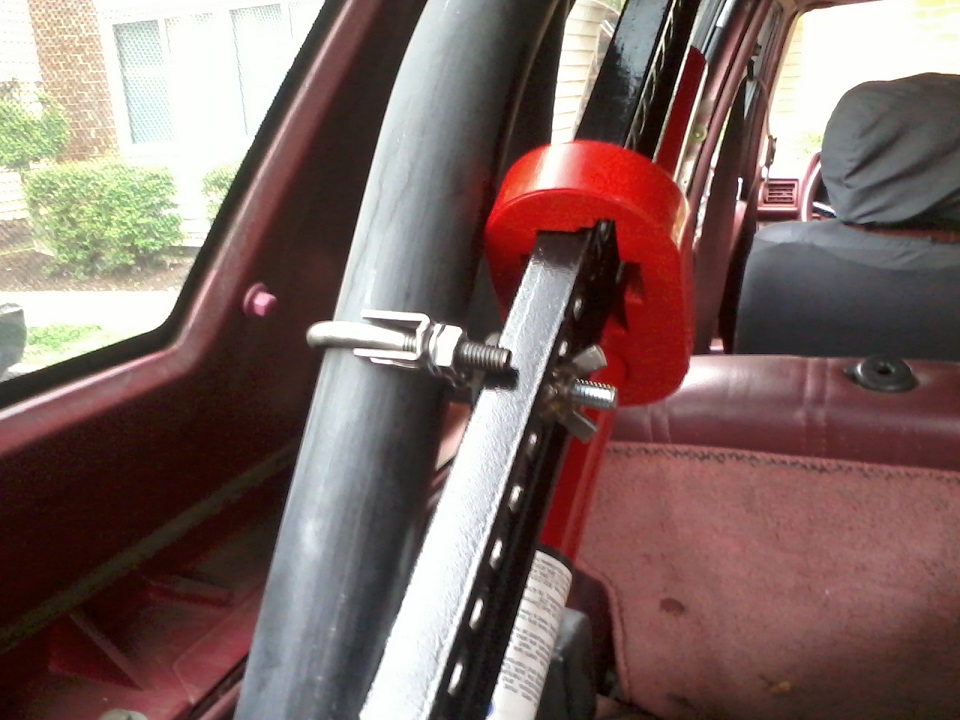
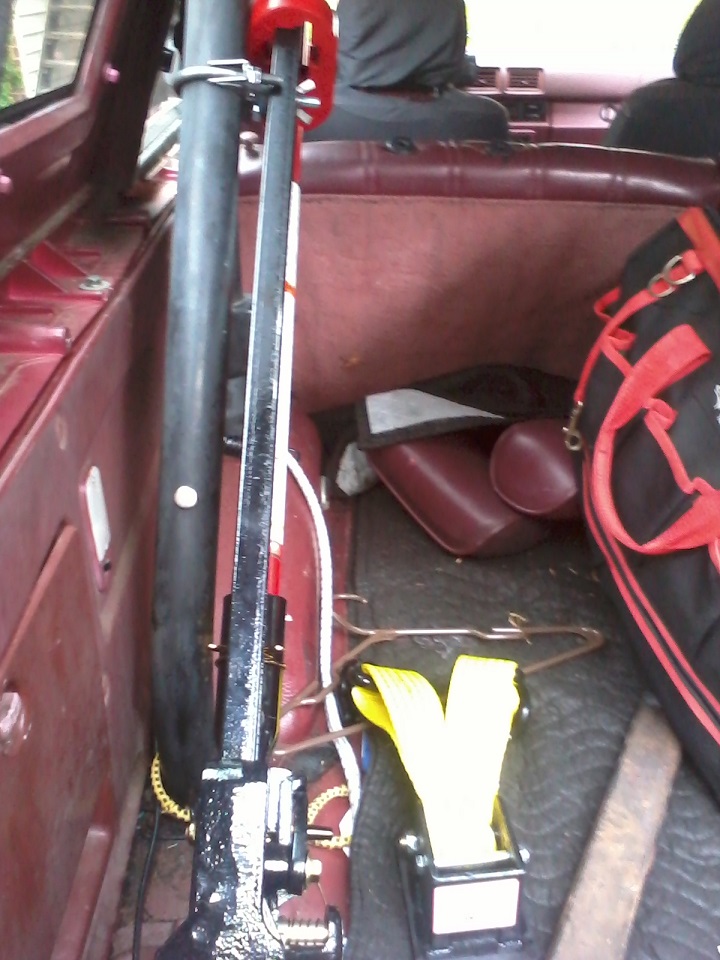
Today I picked up a high lift and build a mount for the roll bar. Very simple, used a 2" exhaust clamp, and a 3/8 2" bolt welded to the clamp. I then used an old sway bar end link bushing as an insulator. I then welded a washer on a wing nut. I plan on finding a nice large plastic wing nut to replace the small one, and use a neoprene washer on the back side of a fender washer.
Well hope to have some pictures later this week when the front end kit comes in, and I get the front half of the motor torn apart.


So had to do 2 passes to get the light mount solid, not the nicest welds but they have full penetration. So I purchase a little stick welder!
I ordered a small Northern Tool ST80I stick and Tig welder. This thing is small but it is powerful for a 110v welder. So I started to work on a piece of scrap to get the swing out tire carrier fabed up.
This was the first time ever stick welding, I jumped in with only 3 practice beads before this, well and a lot of you tube instruction video's! I am happy with the results. I hope to get the steel I need this week and begin the fabrication of the carrier.
Today I picked up a high lift and build a mount for the roll bar. Very simple, used a 2" exhaust clamp, and a 3/8 2" bolt welded to the clamp. I then used an old sway bar end link bushing as an insulator. I then welded a washer on a wing nut. I plan on finding a nice large plastic wing nut to replace the small one, and use a neoprene washer on the back side of a fender washer.
Well hope to have some pictures later this week when the front end kit comes in, and I get the front half of the motor torn apart.
Last edited by stanprophet; 05-05-2013 at 03:08 PM.


