
My 22RE Rebuild + Prettification effort
 10-12-2009, 07:36 AM
#1
Registered User
Thread Starter
Join Date: Jul 2009
Location: Pollock Pines, CA
Posts: 134
Likes: 0
Received 0 Likes
on
0 Posts
My 22RE Rebuild + Prettification effort
Hi, long time lurker, newbie poster.
I have been (slowly) rebuilding my 89 Pickup's 22RE, here is a catalogue of how it has been going through photos:
http://www.facebook.com/album.php?ai...9&l=422292ffd4
Aside from the machine shop screwups, the only real issue encountered thus far while reassembling is stripping the thread on one of the throttle blade mounting screws when disassembling to clean it up.
Hope the throttle blade arbor + blade can be replaced individually w/o having to buy a whole new TB...
Other than that, have noticed the "full" gasket kit I picked up isn't quite complete in that it is missing some PAIR system gaskets and has nothing for the TB/upper intake assembly (e.g., the grid-like rubber gasket used for the TB air bypass channels).

 10-12-2009, 09:17 AM
#5
Contributing Member
I like that light blue where did you find it ? I was looking for something like that for my manual hubs to match my body paint. Your motor looks good as well wish I had found the color to match my body but then again I really like my red and silver combo just as much.
10-12-2009, 09:43 AM
#6
Registered User
Thread Starter
Join Date: Jul 2009
Location: Pollock Pines, CA
Posts: 134
Likes: 0
Received 0 Likes
on
0 Posts
I have not tabulated total costs yet, I want to get it running first and there have been a few unexpected costs along the way (various sundries like replacement fasteners). I would hazard a guess at around $2k including all services and tooling, but keep in mind I have replaced quite a few parts in the process rather than re-using when I *could have* if I was trying to pinch pennies.
I actually painted TWO blocks with one can, that's a bit of a long story as the machine shop buggered up my original block. Everything painted has a coat of primer, two colour coats, and two clear coats, so it does look quite pretty. Probably ~$60 in paint all up. The blue is "Pontiac Metallic Blue", a Dupli-Color 500degF paint. The other colours are "Cast Iron" (block), "Aluminum", and a white and black stove paint (1200degF) for the exhaust, PAIR, and EGR related parts.
Basic parts list so far is:
* New camshaft
* New head w/ os valves, springs, etc
* Timing chain kit
* Timing cover
* Water pump
* Oil pump
* Full gasket kit
* ARP head stud kit
* Full replacement bearings (mains, conrods both ends)
* Total Seal ring set with gapless top
* Block cleaned, bored 0.020" over, decked, helicoil fixes for two threads, honed
* 0.020 Pistons with wrist pins etc
* Flywheel machined
* Zoom clutch + pressure plate
* Studs for all intake and exhaust port fastener locations
* All new rubber lines (water hoses, vacuum)
* Injector servicing @ Witchdoctor
Last edited by mcm375; 10-12-2009 at 09:45 AM.
10-12-2009, 10:58 AM
#7
Registered User
Nice Work!! It looks GREAT!!! Makes me feel like a slacker for not having the time to clean up and paint my buddies engine when I rebuilt it for him last year. But he wanted to be able to drive to work. lol
Trending Topics
10-12-2009, 03:33 PM
#8
Contributing Member
wow man, looks GOOD!
yeah gasket sets, for whatever reason, gasket kits never come with that gasket for the PAIR system tube... which I find kinda stupid...
but it looks really good man! what's the specs? is that a stock replacement head and cam?
I like to see when people spend as much time on their motor as olharley and I did on ours
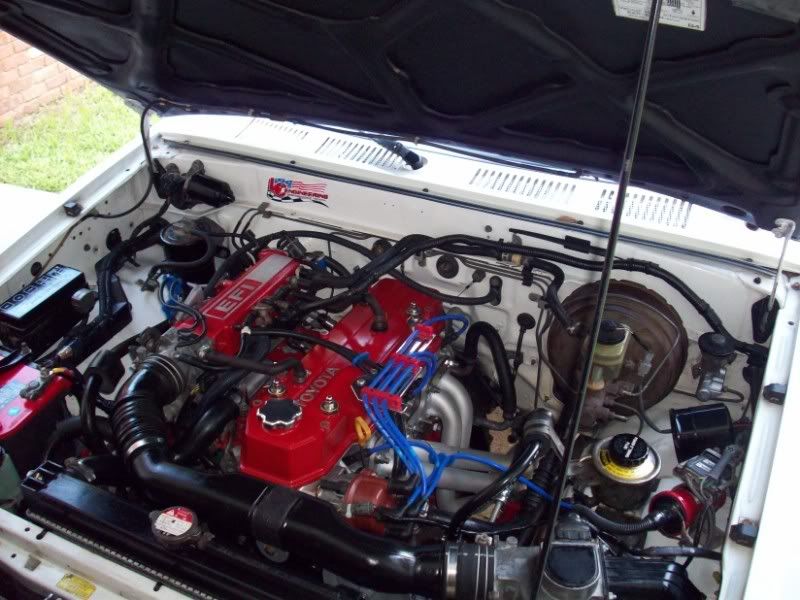
10-12-2009, 04:14 PM
#10
Registered User

Looks far prettier than mine will.
I'm impressed how nicely your rocker assembly cleaned up. Any tips for doing that?
What, if anything, did you do to the rocker arm faces? Or were they still ok despite the worn down lobes?
I'm impressed how nicely your rocker assembly cleaned up. Any tips for doing that?
What, if anything, did you do to the rocker arm faces? Or were they still ok despite the worn down lobes?
10-12-2009, 04:29 PM
#11
Registered User
Join Date: Oct 2009
Location: Downtown Heckronto, Ontario, Soviet Canuckistan
Posts: 1,499
Likes: 0
Received 1 Like
on
1 Post
I was just going to paint everything in the cheapest one-colour high-temp rust paint I could find when doing my rebuild next summer, that beautiful engine is making me seriously reconsider going that route.
10-12-2009, 07:08 PM
#13
Registered User
Thread Starter
Join Date: Jul 2009
Location: Pollock Pines, CA
Posts: 134
Likes: 0
Received 0 Likes
on
0 Posts
The wear on the rocker lobes wasn't terribly bad, and with the valve lash adjusters on this motor wear doesn't present a clearance problem that can't be adjusted out so I just figured re-use.
peow130: See above for guesstimate.
10-12-2009, 08:56 PM
#14
Registered User
I've been wishing I had such a setup, particularly now that I'm into the cleaning phase of my rebuild. I hate to think how much your cleaner cost, but ultrasonic does as well as I had imagined. Maybe someday...
10-16-2009, 04:55 AM
#16
Registered User
Thread Starter
Join Date: Jul 2009
Location: Pollock Pines, CA
Posts: 134
Likes: 0
Received 0 Likes
on
0 Posts
http://www.facebook.com/photo.php?pi...8&id=824175749
Getting closer... it will breathe life this weekend for sure!
Getting closer... it will breathe life this weekend for sure!
10-16-2009, 06:15 PM
#17
Registered User
Join Date: Sep 2009
Location: Sarasota, Florida
Posts: 126
Likes: 0
Received 0 Likes
on
0 Posts
Looks really good
Hello
You, Superbleeder, and OldHarleyman really set the bar HIGH ...I only hope I can live up to the standards that you guys have set in "prefection" of engine rebuilds..

You, Superbleeder, and OldHarleyman really set the bar HIGH
...I only hope I can live up to the standards that you guys have set in "prefection" of engine rebuilds..
10-16-2009, 06:39 PM
#19
Registered User
there should be a YotaTech calendar..each month having a different COMPLETED 22R/RE motor that's all prettied up..lol
my vote goes to this guy for the bet looking 22RE..lol..for some reason i LOVE the color scheme
my vote goes to this guy for the bet looking 22RE..lol..for some reason i LOVE the color scheme

Thread
Thread Starter
Forum
Replies
Last Post
shadowbirdie
General Vehicle Related Topics (Non Year Related)
2
07-21-2015 10:38 PM


