93YotaGuy '93 2WD Build Up 'Back from the grave"
 06-26-2011, 06:29 PM
#61
Registered User
Thread Starter
Join Date: Jul 2009
Location: Denver, Colorado
Posts: 319
Likes: 0
Received 0 Likes
on
0 Posts
Chef,
I really appreciate all of the info and everything you wrote got me thinking a bit.
I researched again which bolt needed the sealant and I remember putting it on there. Unfortunately it is leaking out of one of the side bolts.
When I put the oil pump gasket on, the motor was sitting in the truck. I may have pinched the gasket a bit or in some way kept it from getting an equal seal. Either way I will have to pull the pump and put on a new seal.
Like I mentioned the seal is so minimal that I don't even have a change in oil even after putting about 1000 miles on it. Although I could probably just leave it alone and deal with the small oil leak I'd rather have it fixed the right way and not have to worry when I park it in my driveway.
I don't plan on changing it until my next oil change or the next time I get bored. I'll be sure to post up some pics to show where the leak was coming from when I fix it. So stay tuned!
Oh and I've also edited the post above and added pictures of the work we did.
 06-26-2011, 06:43 PM
#62
Well that changes things, now doesn't it? hehe. .... Ok, and YES, by no means would I say "do it half assed" or anything like that, ... no way!
So, you're saying it's leaking from a bolt that's OUTSIDE the o'ring or inside the boundaries of it? Just curious... yeah, post some pics up when you get it, man, sounds good!
Gosh I hate these STUPID LIL THINGS that hinder progress, don't you? lol. But, good you caught it now instead of on some long road trip or something, ..... as it ran dry or something like that. Didn't sound like it would from what you said, but NO WAY would I let it go, just ask anyone! hahaha. Don't want it leaking when you've JUST DONE IT! lol... Plus, leaks can lead to other damage of components, belts whatever, ya know?
Yeah, that's a pretty quick repair, ...just take your time and have a fine tip pick on hand to push the spline, CAREFULLY, in the oil pump, to line up with the oil pump drive spline on the crank, ya know? And, I KNOW you know this, but when you pull it off, ...tilt it straight back, not forgetting that the gears can fall right out on the ground.
PS> Again,....don't forget to lube that main seal, either, eh? haha. (Shhh, don't tell anyone I did that one time! Lol)
07-02-2011, 07:07 AM
#63
Registered User
Thread Starter
Join Date: Jul 2009
Location: Denver, Colorado
Posts: 319
Likes: 0
Received 0 Likes
on
0 Posts
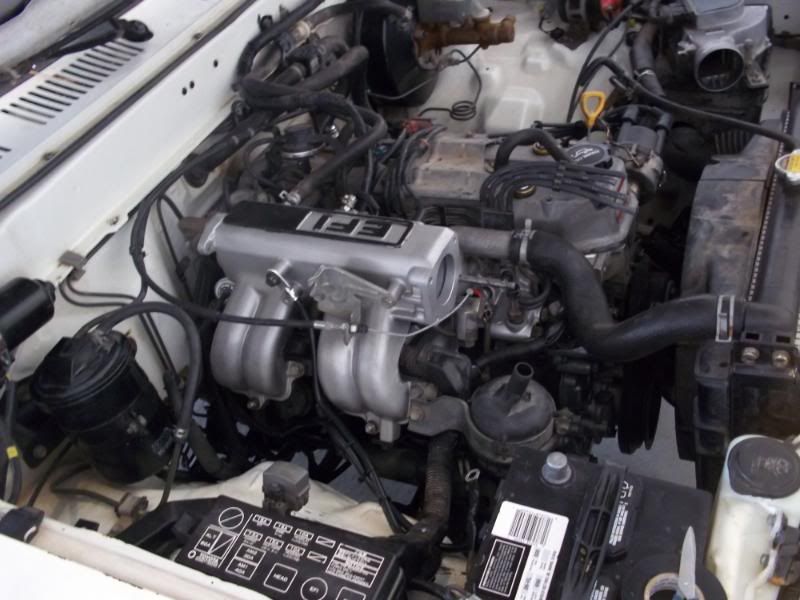
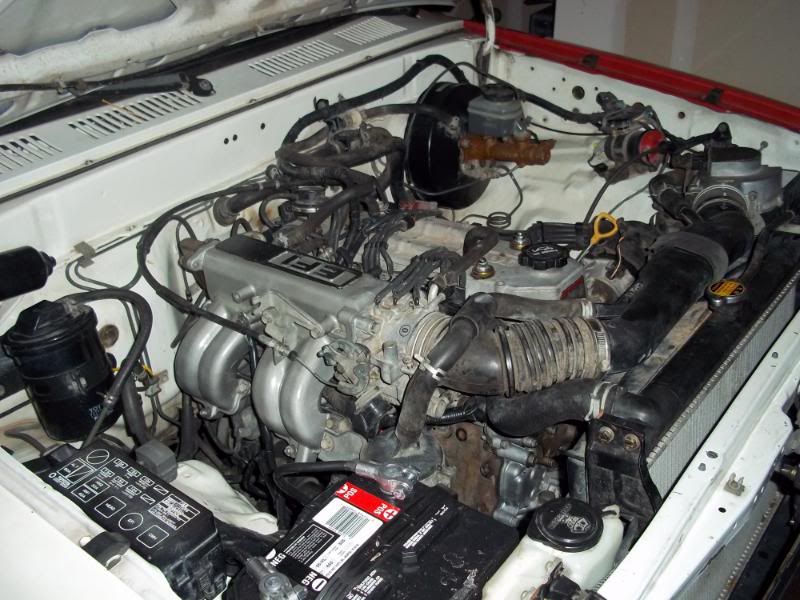
Unfortunately I didn't have my camera handy yesterday and decided to just go ahead and do it. It took me about an hour to complete the project.
When I got the pump off the o-ring was pretty smashed up. No kinks or anything but it was as flat as a sheet of paper. I'm glad I didn't crack the timing cover from tightening the bolts to much.
After looking over the FSM and getting the torque specs correct I realized what I had done wrong the first time. Instead of following the correct torque specs for the bolts that were on the oil pump I mixed and matched them. The FSM states that the top has less and as it goes further towards the bottom the torque gets higher. The first time I made the top with a higher torque and one or two of the bolts at the bottom with a lower torque.... OOOOOOPS! haha. Oh well, you live and learn right?
I haven't started; it yet because I wanted to adjust the valves and get rid of a slight tick. After I get it running and drive it for a bit I'll post as to what my results were.
Thank you chef for all of your input. It helped to make me double check my work and find the mistakes that I had orginally made.
07-02-2011, 09:16 AM
#64
Right on, ....and my pleasure.
Glad you got it sussed away.
Just remember, 93..... THEY TICK! lol. Actually, my 86 never did, and this one never did till I rebuilt it... EVERY ONE has been that way, .... "quiet for 250K until rebuilt, then suddenly they tick"...
There is also "header click".... so might wanna look into that if you have one.
Far as adjusting the valves...NEVER A BAD IDEA! lol. Just never turn the crank BACK to get it 'BACK TO TDC'.... just go another couple turns to get back there, otherwise, it creates a slack and your lash wont be the same ones you button it up and start it. My buddy on here, Brandon, was ABSOLUTELY correct.... Cuz I checked the intake 1 and 2 afterward, miles later, and they were WAY OFF and the 1 & 3 exhaust were... but the others on the other stroke? FINE! lol. (cuz I'd gone forward with the crank to them and didn't have to turn the pulley back for the second adjustment.)
POST A VID OF YOUR RIG RUNNIN, LEAK FREE, K?
12-10-2011, 02:25 PM
#65
Registered User
Thread Starter
Join Date: Jul 2009
Location: Denver, Colorado
Posts: 319
Likes: 0
Received 0 Likes
on
0 Posts
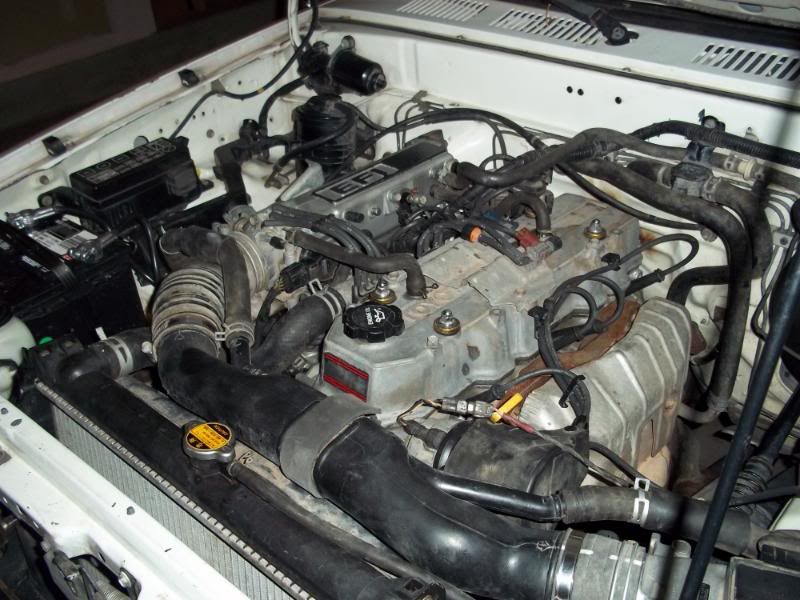
So I haven't posted in a while but I was able to get her started and she was leak free! I haven't done a whole bunch since then. I did manage to paint the rims flat black with the cap being white. Everyone keeps telling me it looks funny but I don't care, its original.
Going back to the tick I did manage to take care of that. I forgot that in the past I have adjusted them by hand so I decided to do it and it worked wonders. Seems like after the motor goes through several thousands of miles the FSM specs just don't seem to do the trick. I'm sure others have experienced this as well. Either way she runs smooth as can be and the tick is too minimal to even notice.
Anyway, So although I have not done much I did just start a new project for this truck. I decided to add some HID headlights and do a complete retrofit.
Here is the link of the retrofit if any of you would like to check it out.
https://www.yotatech.com/forums/f116.../#post51833495
Last edited by 93YotaGuy; 12-10-2011 at 02:36 PM.
11-07-2012, 08:40 AM
#66
Registered User

Join Date: Apr 2011
Posts: 4
Likes: 0
Received 0 Likes
on
0 Posts
I received my injectors back from whichhunter the other day. I went straight to work and decided to paint my plenum after it was sandblasted. Here is how it turned out. Not too bad for a quick 10 min masking.

Progress!
Done!
Now the not so easy part. After i got it started I received a code 12 "RPM SIGNAL-NO SIGNAL TO ECU FROM DISTRIBUTOR ("Ne" OR "G") AFTER ENGINE HAS BEEN CRANKED"
I set the timing a bit after getting it started and now I am throwing a code 51 for the TPS.
My question is, can a code 51 turn into a 12 due to the fact that the code 51 and the TPS being out of wack may have caused it to not start which would send the wrong information the the ECU.
At one point it was throwing out both codes although I think I have worked through the code 12 since it does not seem to be doing it now. I have read the many posts on how to adjust the TPS and have even printed out the process but just cant seem to get it to work well with the ohm meter. Previously, when I had a TPS issue in my other truck I gave up and took it to the dealer. The tech there told me that the TPS is normally adjusted through touch and an ohm meter is not needed. I am pretty sure I have gone through all the areas to where it can be adjusted while each time pulling the battery cable between each adjustment.
I need some guidance in helping me out with this issue. tomorrow I plan to head to the junkyard to pick up another TPS but part of me is thinking that the same thing is going to happen and the problem lies elsewhere.
Your help would be greatly appreciated!
THANK YOU!
What all did you put on that intake when you got it all dressed up? And where did you get the parts, etc. and how much $$$? lol Did they clean up your fuel rail also?
I got an intake sitting at home, just gotta find parts to throw on it.

Thread
Thread Starter
Forum
Replies
Last Post
RedRunner_87
95.5-2004 Tacomas & 96-2002 4Runners (Build-Up Section)
84
06-01-2021 01:51 PM


