
Corey's 2007 FJ Cruiser Build-Up Thread
 Nov 30, 2013 | 02:43 PM
#362
Thread Starter
Co-Founder/Administrator
iTrader: (1)
Joined: May 2002
Posts: 32,242
Likes: 21
From: Auburn, Washington
ARB 12V Twin Air Compressor And Springtail MPAC Molle Side Rack Installed 11-27-2013
Thanks Paul.
ARB 12V Twin Air Compressor And Springtail MPAC Molle Side Rack Installed 11-27-2013
And power hooked up on 11-30-2013
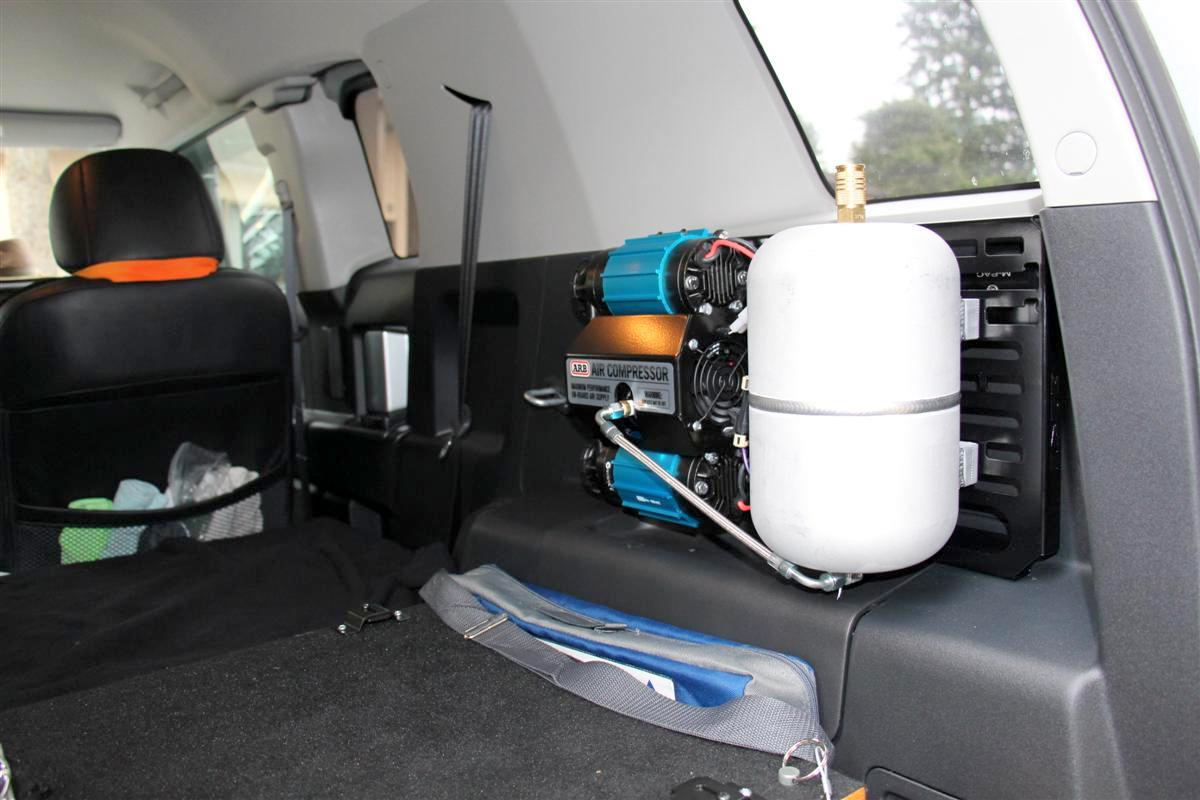
This is a two part mod, as I installed another one of Doc's side racks to hold the ARB CKMTA12 compressor.
The only other item I had to buy was a brass 1/4" NPT male universal coupler from Lowes so my Powertank air hose would mate with the ARB unit.
ARB does not supply this part unless you also buy their hose kit which I did not since the Powertank one will work just fine.
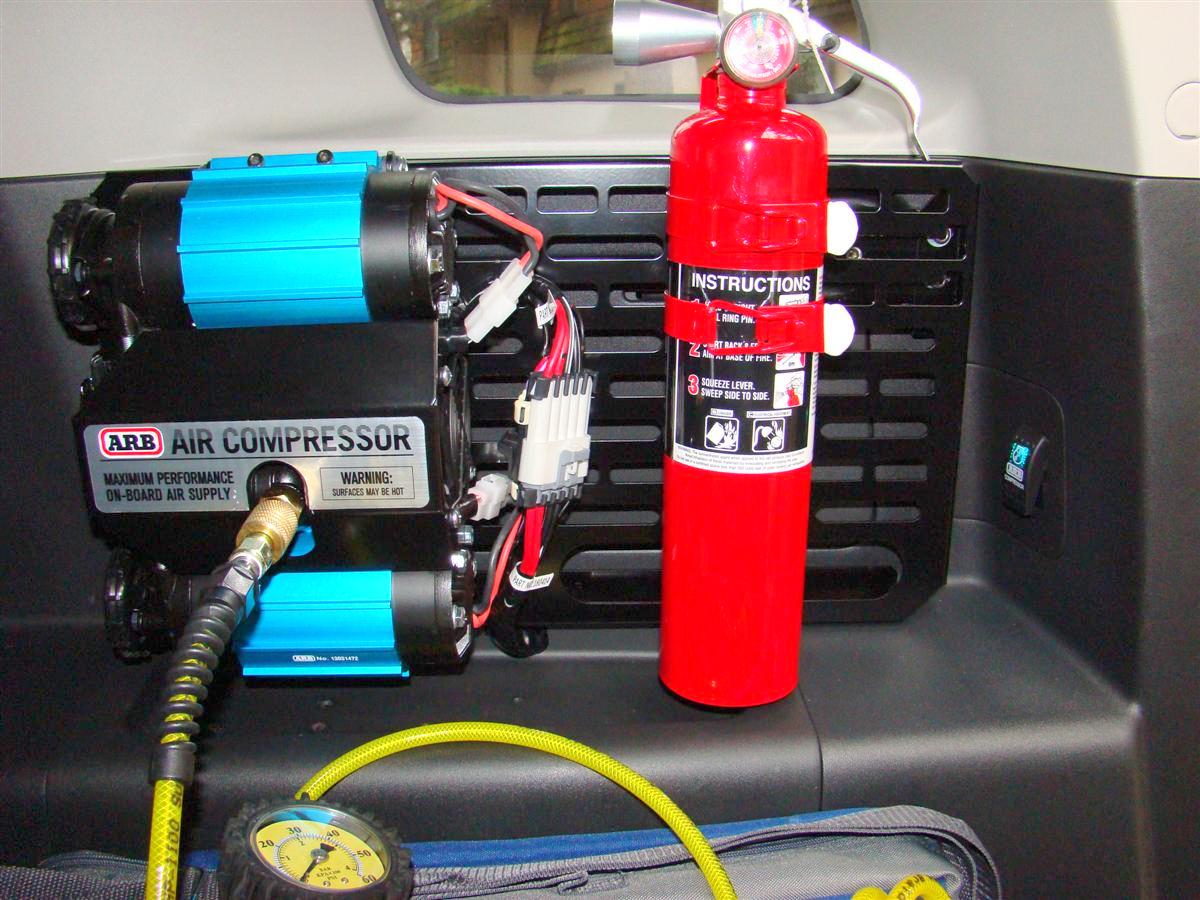
I had to remove two items where the new side rack goes, and they were my fire extinguisher and Maglight.
I will not be remounting the Maglight as I now own several of the small Surefire lights and a Fenix PD35 lights that blows the doors off of the Maglights, and they fit in the palm of my hand.
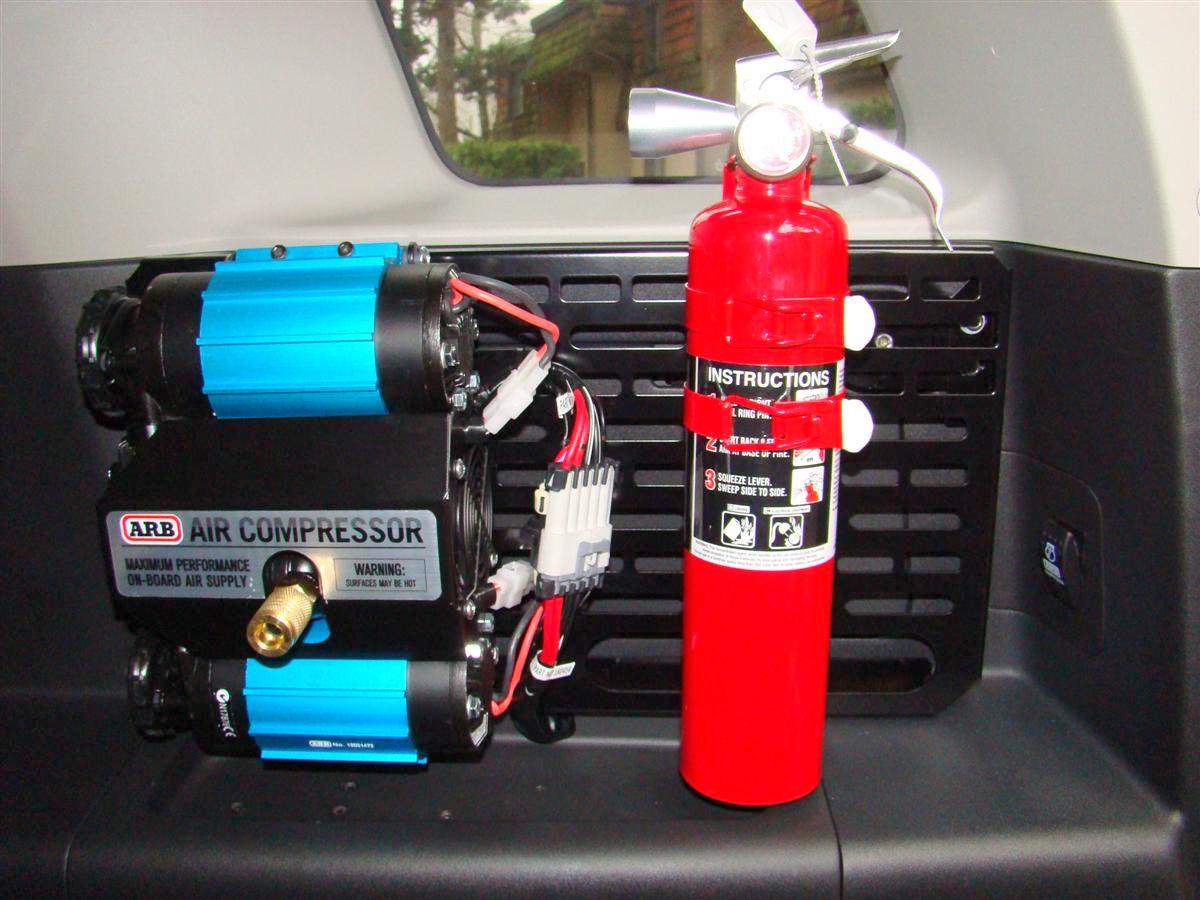
The fire extinguisher is now mounted to the new rack beside the ARB compressor.
Only hitch mounting the new side rack was I put in the billet blocks with the logo upright, and since this is on the passenger side, you need to turn the billet blocks upside down.
Also with the compressor on there it is heavy, and I found removing the billet mount from where the stock FJs grocery bag mount was and mounting the billet block loosely to the back of the side rack allowed me to align up the mount/rack into the hole back there and mount it.
I was then able to use a small tool as a fulcrum to lift up the rack and align it up with the front billet mount and insert the two bolts there.
Had there not been any weight on the rack I could have mounted it much easier like the drivers side one, but then there would be no way to mount the compressor on it.
I thought it turned out pretty good, and the fire extinguisher is in a very easy spot to grab should the need ever arise to grab it.
The new compressor is very powerful, and I am glad I went with this model over the one you can buy from them that comes in the case and has a one gallon air tank with it too.
Since I will not be running airtools off of the ARB unit and only filling tires, it will work out great.
The CO2 tank excels with running airtools since it can run at a much higher output than the ARB unit.
All the parts laid out with the exception of the Cobalt airhose fitting

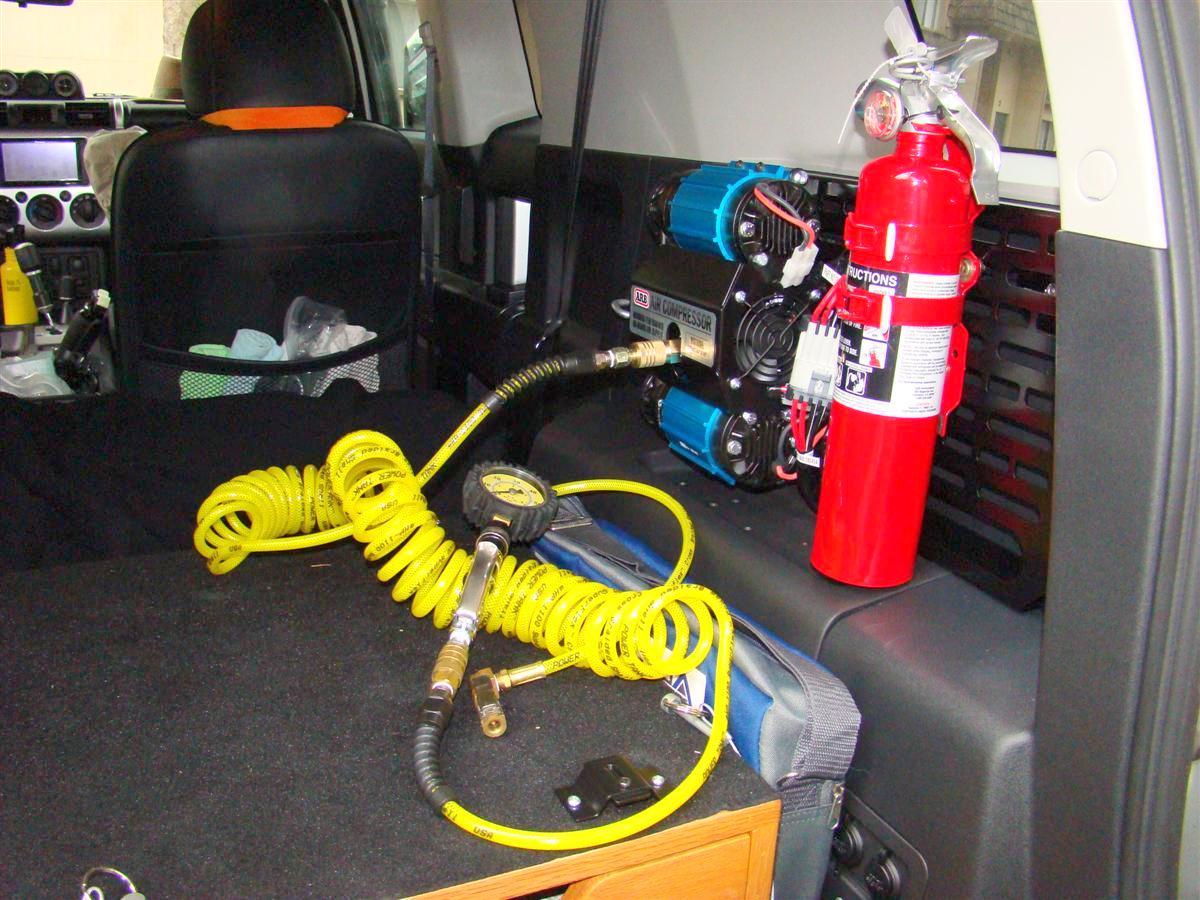
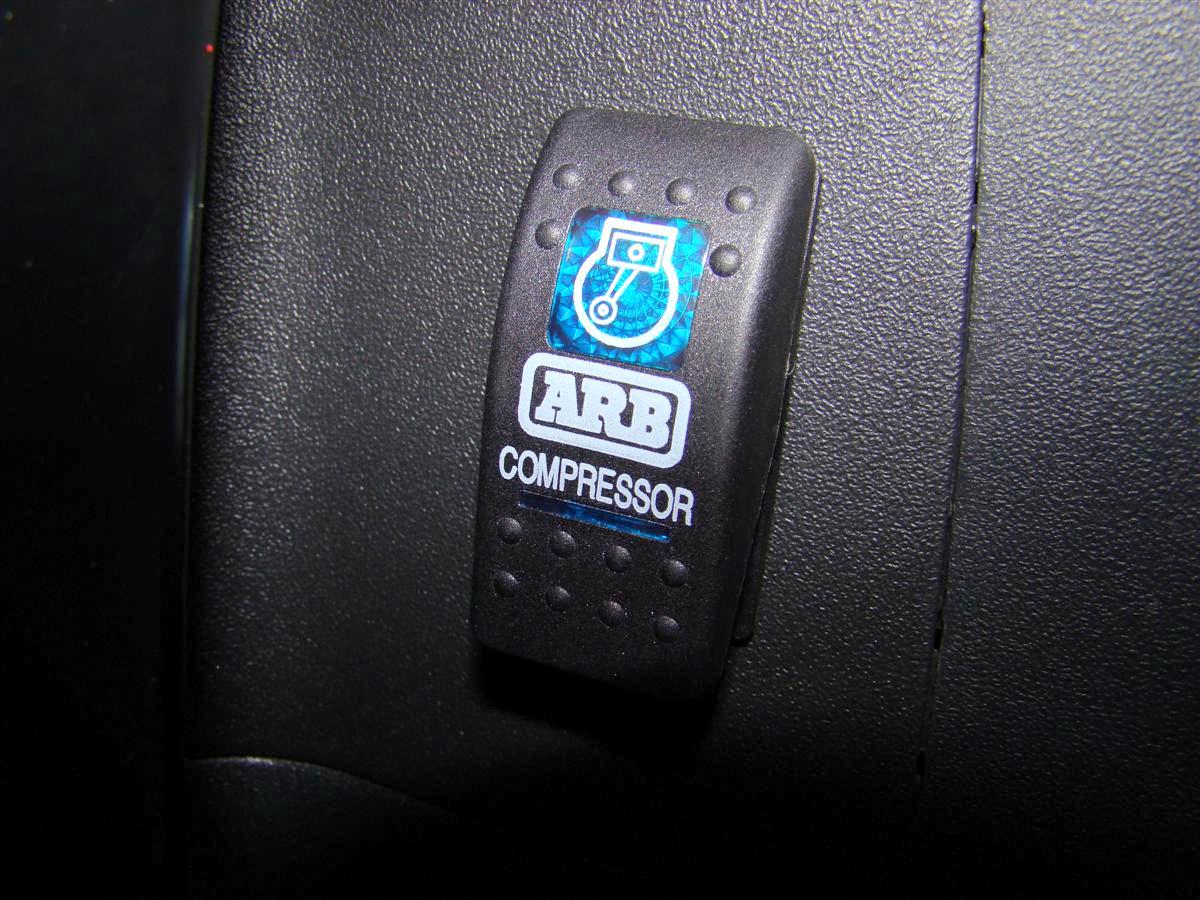
A few shots with airhose hooked up/and without, and a closeup of the lighted switch
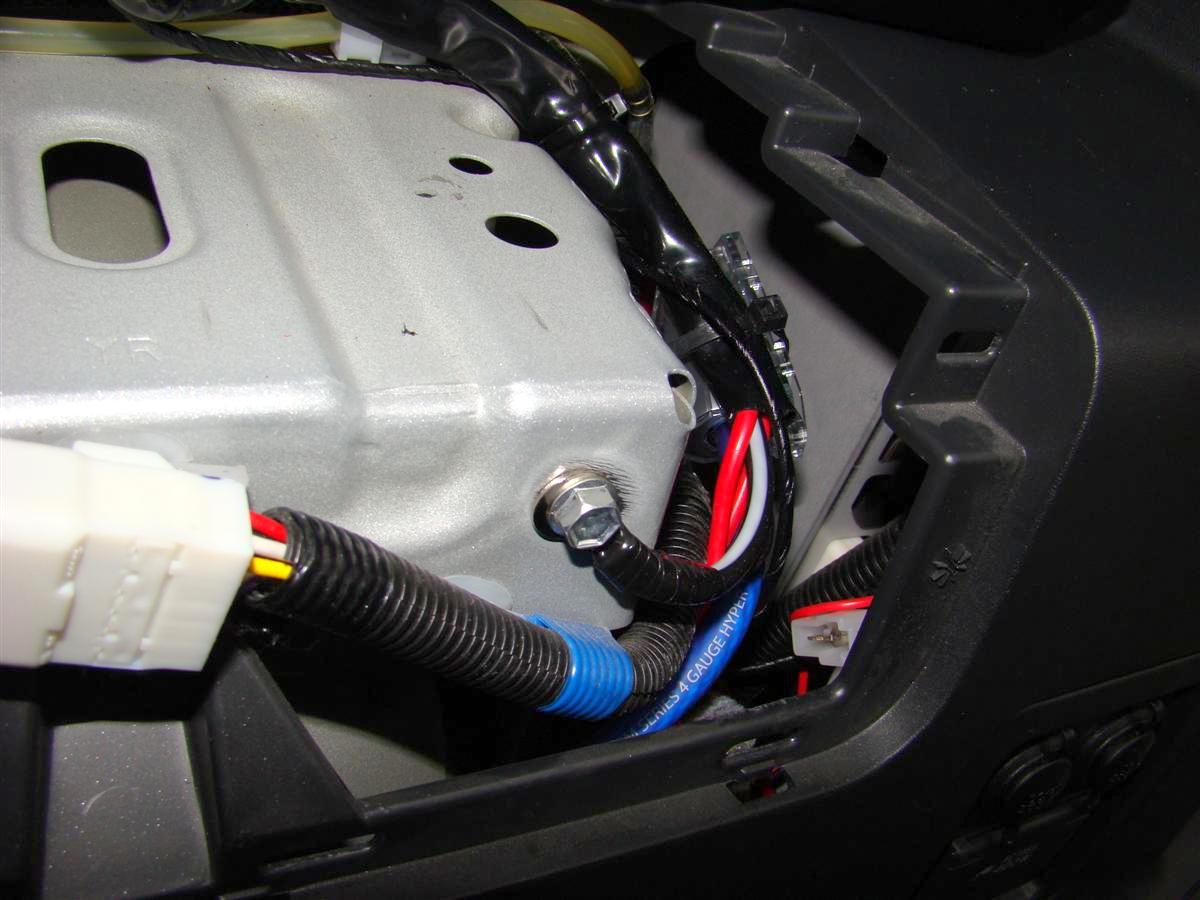
The blue wire seen in one of the pics is a 4 gauge amp wire running to a distribution amp block, and the two big power wires coming off of the ARB's wiring harness go directly to the distribution block
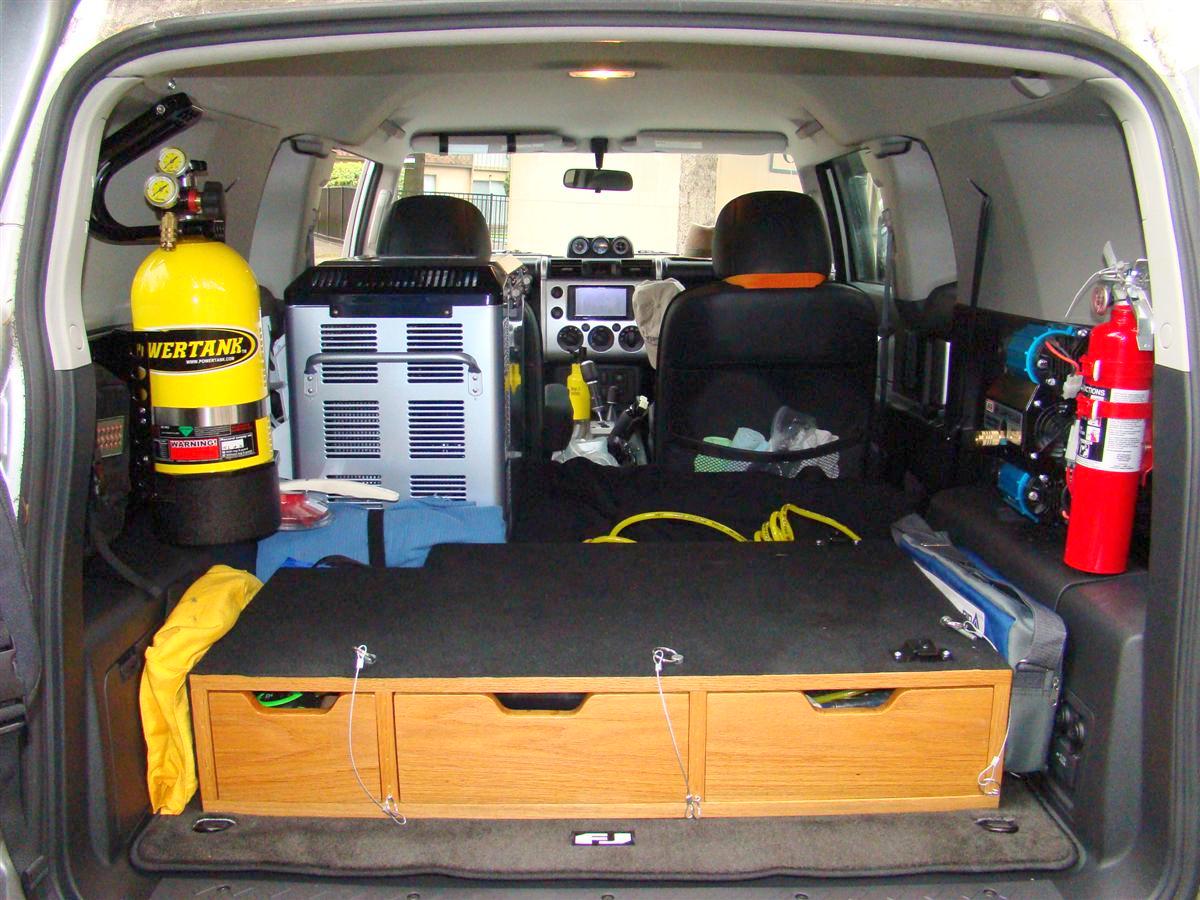
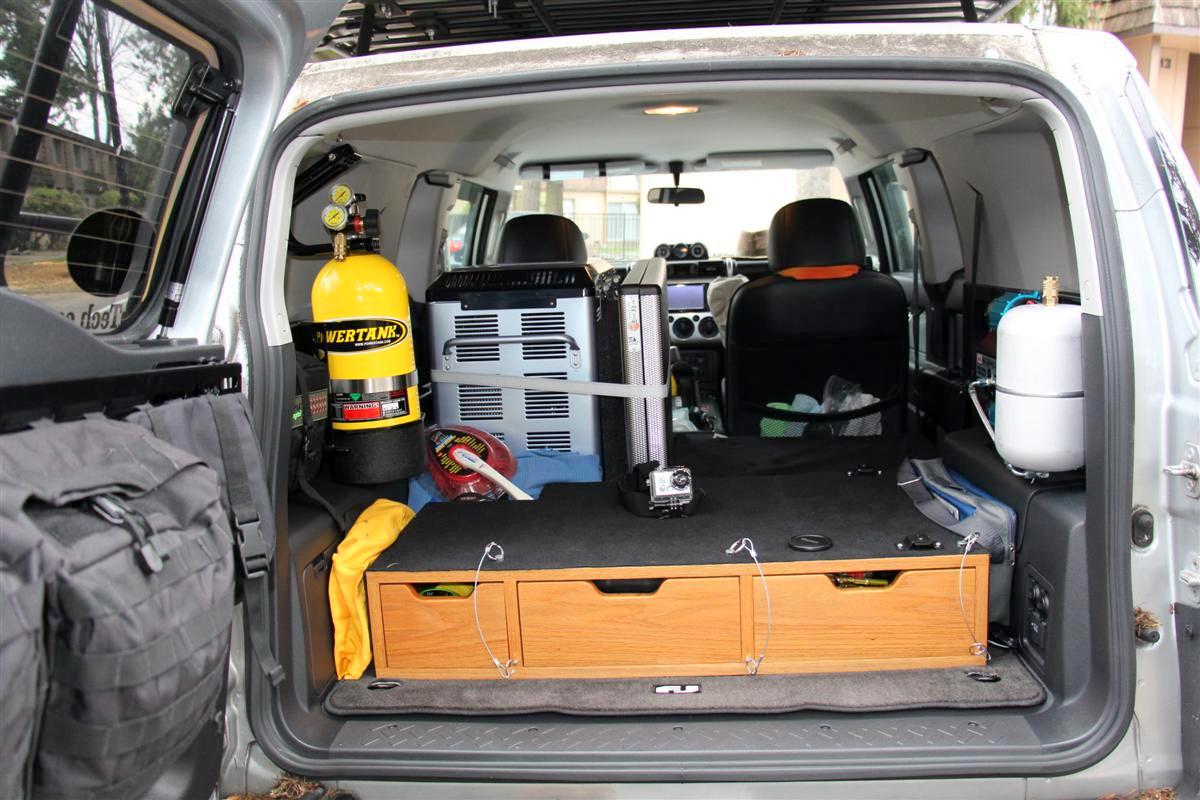
Rear shot showing both side rack with Powertank and ARB dual compressor
Stinger 100 amp circuit breaker below wired up to my auxiliary battery, an Optima Red Top
Pump is live all the time without needing the key turned on once the ARB switch is energized
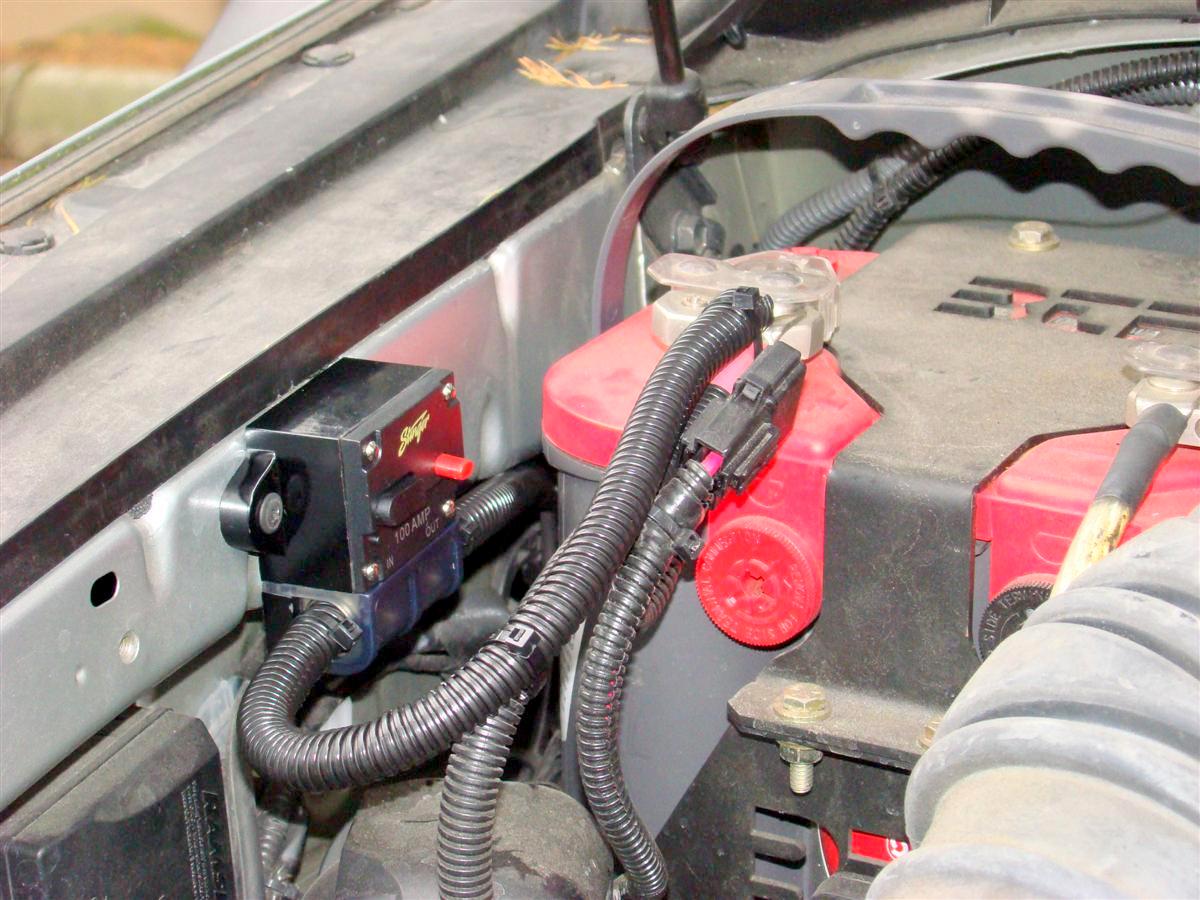
There is a distribution block in there somewhere, could not capture it with the camera
Closeup with the switch lit up
Links
ARB On-Board High Performance 12 Volt Twin Air Compressor (CKMTA12)
FJ Cruiser Side Rack with Mounts
Kobalt 1/4-in Brass Universal Coupler
Lowes Item #: 129967 | Model #: SGY-AIR27
Video shot with my Sony DCS-H9 showing fan noise, then when pulling the trigger to fill the tires the pump kicks in.
Wanted to use my GoPro Hero 2 HD, but the battery was dead, and it takes forever to charge via USB.
What is really nice is when you are not squeezing the air trigger, the pump shuts off all the way, but the fans keep running as long as the switch is on.
Pull the trigger again to fill the tires, the pump then kicks on.
This compressor is frackin' cool
ARB 12V Twin Air Compressor And Springtail MPAC Molle Side Rack Installed 11-27-2013
And power hooked up on 11-30-2013
This is a two part mod, as I installed another one of Doc's side racks to hold the ARB CKMTA12 compressor.
The only other item I had to buy was a brass 1/4" NPT male universal coupler from Lowes so my Powertank air hose would mate with the ARB unit.
ARB does not supply this part unless you also buy their hose kit which I did not since the Powertank one will work just fine.
I had to remove two items where the new side rack goes, and they were my fire extinguisher and Maglight.
I will not be remounting the Maglight as I now own several of the small Surefire lights and a Fenix PD35 lights that blows the doors off of the Maglights, and they fit in the palm of my hand.
The fire extinguisher is now mounted to the new rack beside the ARB compressor.
Only hitch mounting the new side rack was I put in the billet blocks with the logo upright, and since this is on the passenger side, you need to turn the billet blocks upside down.
Also with the compressor on there it is heavy, and I found removing the billet mount from where the stock FJs grocery bag mount was and mounting the billet block loosely to the back of the side rack allowed me to align up the mount/rack into the hole back there and mount it.
I was then able to use a small tool as a fulcrum to lift up the rack and align it up with the front billet mount and insert the two bolts there.
Had there not been any weight on the rack I could have mounted it much easier like the drivers side one, but then there would be no way to mount the compressor on it.
I thought it turned out pretty good, and the fire extinguisher is in a very easy spot to grab should the need ever arise to grab it.
The new compressor is very powerful, and I am glad I went with this model over the one you can buy from them that comes in the case and has a one gallon air tank with it too.
Since I will not be running airtools off of the ARB unit and only filling tires, it will work out great.
The CO2 tank excels with running airtools since it can run at a much higher output than the ARB unit.
All the parts laid out with the exception of the Cobalt airhose fitting
A few shots with airhose hooked up/and without, and a closeup of the lighted switch
The blue wire seen in one of the pics is a 4 gauge amp wire running to a distribution amp block, and the two big power wires coming off of the ARB's wiring harness go directly to the distribution block
Rear shot showing both side rack with Powertank and ARB dual compressor
Stinger 100 amp circuit breaker below wired up to my auxiliary battery, an Optima Red Top
Pump is live all the time without needing the key turned on once the ARB switch is energized
There is a distribution block in there somewhere, could not capture it with the camera
Closeup with the switch lit up
Links
ARB On-Board High Performance 12 Volt Twin Air Compressor (CKMTA12)
FJ Cruiser Side Rack with Mounts
Kobalt 1/4-in Brass Universal Coupler
Lowes Item #: 129967 | Model #: SGY-AIR27
Video shot with my Sony DCS-H9 showing fan noise, then when pulling the trigger to fill the tires the pump kicks in.
Wanted to use my GoPro Hero 2 HD, but the battery was dead, and it takes forever to charge via USB.
What is really nice is when you are not squeezing the air trigger, the pump shuts off all the way, but the fans keep running as long as the switch is on.
Pull the trigger again to fill the tires, the pump then kicks on.
This compressor is frackin' cool
Dec 2, 2013 | 08:49 AM
#365
Holy Modtastical sexiness! Lol.... Great!
Very impressed, as usual, with the sparkling cleanliness of your work! the moment I think I've done really well with my modifications, I come and look at your work and have to sigh... Ahhhhh, hehe. As always, thanks for the ideas and thanks for sharing. Very fun to work at, and I hope it makes it that much nicer!
Very impressed, as usual, with the sparkling cleanliness of your work! the moment I think I've done really well with my modifications, I come and look at your work and have to sigh... Ahhhhh, hehe. As always, thanks for the ideas and thanks for sharing. Very fun to work at, and I hope it makes it that much nicer!
Dec 2, 2013 | 12:09 PM
#366
Thread Starter
Co-Founder/Administrator
iTrader: (1)
Joined: May 2002
Posts: 32,242
Likes: 21
From: Auburn, Washington
Thanks Chef for the comps.
It has been fun documenting the build too.
Looking forward to trying out the compressor.
Temps are dropping into the 20s here this week, so it would be a good time to check my tires and make sure they are up to 40 PSI since they loose a bit during colder weather.
My tires have never seen regular air before except when mounted back in the summer of 2007, and I always pump them back up and check them once a month with my CO2 tank.
Jan 7, 2014 | 07:11 PM
#367
Registered User
Joined: Aug 2011
Posts: 1,507
Likes: 2
From: Fraser Valley, British Columbia
Wow, very tidy mods. I'll have to take the time to really dig through here for ideas to steal. I like road tripping in my 4Runner and your drawers and fridge would be nice in mine.
Jan 8, 2014 | 01:40 AM
#368
Thread Starter
Co-Founder/Administrator
iTrader: (1)
Joined: May 2002
Posts: 32,242
Likes: 21
From: Auburn, Washington
Thanks Red, every rig should have drawers and a fridge
Did not post this video to my thread here, but I think I did add it to the "What did you do to your rig today" thread.
Compressor exceeded my expectations, it was well worth the money, and no more worries about running out of CO2.
Will save that for air tools.
The ARB compressor is very fast, but not as fast as CO2.
All my tires where down to around 34 PSI, and the compressor took them up 6 pounds to 40 PSI quickly.
Jan 9, 2014 | 05:52 AM
#370
Thread Starter
Co-Founder/Administrator
iTrader: (1)
Joined: May 2002
Posts: 32,242
Likes: 21
From: Auburn, Washington
Yeah Paul, I was very surprised at how quiet it is.
I have had a few of the disposable ones in the past that take 10 minutes to pump up a tire, and they are noisy and vibrate all over the place.
I have had a few of the disposable ones in the past that take 10 minutes to pump up a tire, and they are noisy and vibrate all over the place.
Jan 9, 2014 | 10:08 AM
#371
Registered User
Joined: Aug 2011
Posts: 1,507
Likes: 2
From: Fraser Valley, British Columbia
I like how tidy the compressor looks. I like things to be in their place so really want to create something as organised as what you have.
I love taking my rig exploring but hate the mess it is. So many things on my to do list. It never ends.
I love taking my rig exploring but hate the mess it is. So many things on my to do list. It never ends.
Mar 1, 2014 | 08:27 AM
#373
Thread Starter
Co-Founder/Administrator
iTrader: (1)
Joined: May 2002
Posts: 32,242
Likes: 21
From: Auburn, Washington
Double Shot mods Installed 3-1-2014
I can run airtools no problem with my CO2 Powertank, but the ARB compressor did not have the reserve capacity to run airtools.
For filling up tires though, the ARB compressor rocks, and I do not waste any CO2 like with the Powertank.
But I wanted to try running a few tools with the ARB compressor, so I bought the ARB one gallon tank from Wil at Sierra Expeditions.
Just installed it today along with a fitting and 10" hose from ARB that goes from the compressor outlet to the new tank.
It can run the drill OK, but it is still not as fast as the CO2 tank.
The new tank will also help out for filling tires, as the compressor will not have to run as long when pulling the trigger on the tire inflator.
Ideally the air hose connection should be on the the bottom of the tank and not the top like I installed it, but unfortunately the hoses quick disconnect would interfere with the shelf there below the MPAC side rack.
Here are a few pics from the installation.
Here is a video taken with my GoPro Hero 2 camera.
Links:
ARB Aluminum Air Tank 1 Gal (4L) from Sierra Expeditions
But wait, there is more...
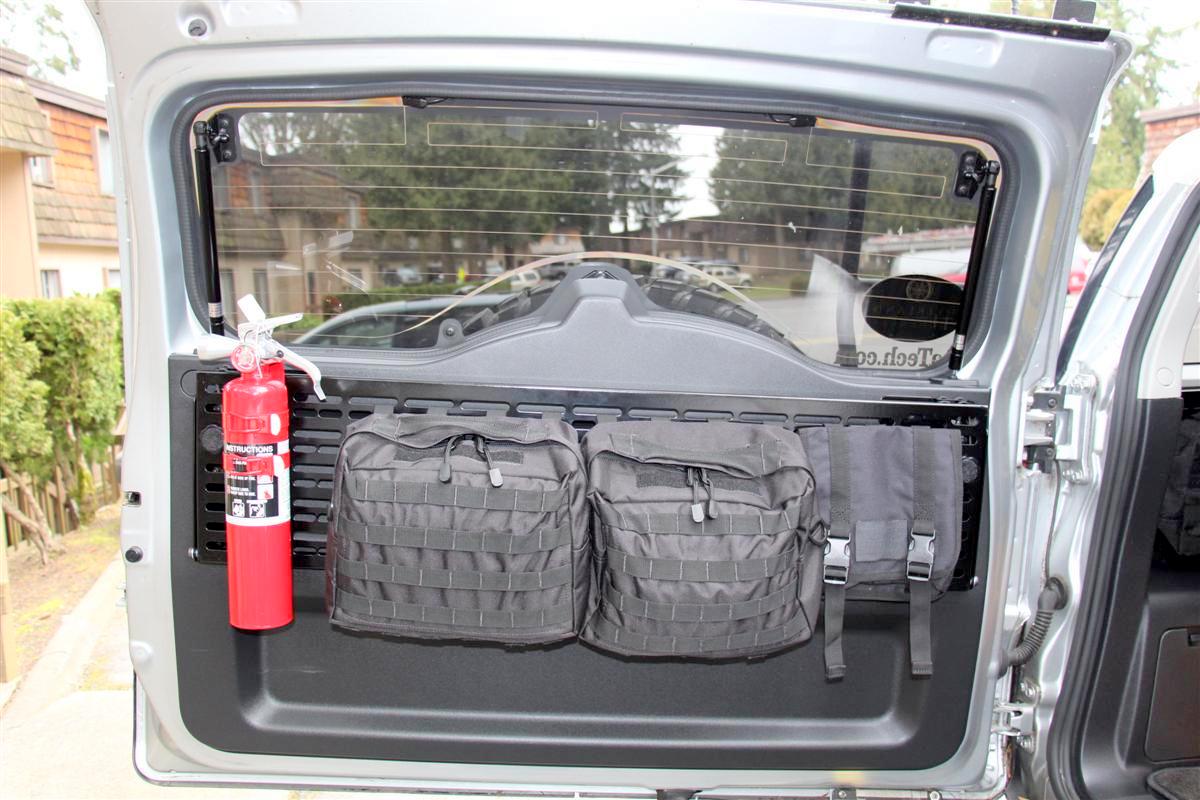
Since I had to remove the fire extinguisher from the MPAC Side Rack that was next to the air compressor, I relocated it to the MPAC rear rack/table.
It should work out great in that location.
Would have been three mods today, but the item below got help up by bad weather in Fargo, ND via train, and not it is sitting in Spokane.
It is due to land on Monday, so I will get this installed the following weekend.
MP-X Seat Back MOLLE Panel COMBO
For filling up tires though, the ARB compressor rocks, and I do not waste any CO2 like with the Powertank.
But I wanted to try running a few tools with the ARB compressor, so I bought the ARB one gallon tank from Wil at Sierra Expeditions.
Just installed it today along with a fitting and 10" hose from ARB that goes from the compressor outlet to the new tank.
It can run the drill OK, but it is still not as fast as the CO2 tank.
The new tank will also help out for filling tires, as the compressor will not have to run as long when pulling the trigger on the tire inflator.
Ideally the air hose connection should be on the the bottom of the tank and not the top like I installed it, but unfortunately the hoses quick disconnect would interfere with the shelf there below the MPAC side rack.
Here are a few pics from the installation.
Here is a video taken with my GoPro Hero 2 camera.
Links:
ARB Aluminum Air Tank 1 Gal (4L) from Sierra Expeditions
But wait, there is more...
Since I had to remove the fire extinguisher from the MPAC Side Rack that was next to the air compressor, I relocated it to the MPAC rear rack/table.
It should work out great in that location.
Would have been three mods today, but the item below got help up by bad weather in Fargo, ND via train, and not it is sitting in Spokane.
It is due to land on Monday, so I will get this installed the following weekend.
MP-X Seat Back MOLLE Panel COMBO
 Jun 3, 2016 | 11:40 AM
#377
Thread Starter
Co-Founder/Administrator
iTrader: (1)
Joined: May 2002
Posts: 32,242
Likes: 21
From: Auburn, Washington
Toyo Open Country M/T Tires, Body Mount Chop May-June 2016
Tires 5-27-2016, and body mount chop 6-3-2016.
Two major mods two Fridays in a roll, and while I am on a roll, getting another major mod done next Friday.
See a pattern here
It has been a while since my beast has been pampered, it has been like a spa vacation week for it.
Was at Les Schwab Tires last Friday to get a tire rotation and re-balance, and we noticed my Dick Cepek Mountaincats were cupped some on the inside.
Rest of the tread looked OK for 60K+ miles on them, but I said lets go with some new shoes.
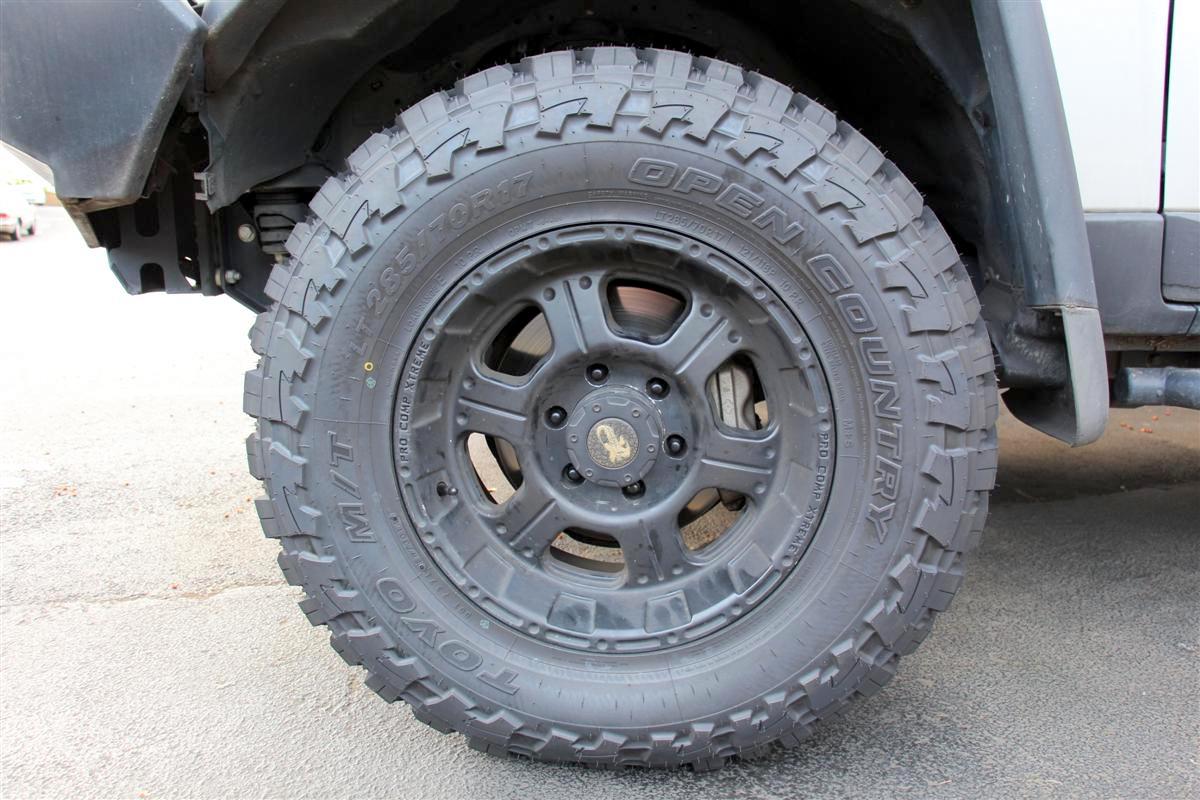
I have had my eyes on the Toyo Open Country M/Ts for awhile, so that is what I went with.
The tech mentioned these are going to be very quiet, not noisy like my Cepeks.
The way they make the tread pattern makes them very quiet.
So quiet I can now be serenaded by my Magnaflow muffler, it never sounded better.
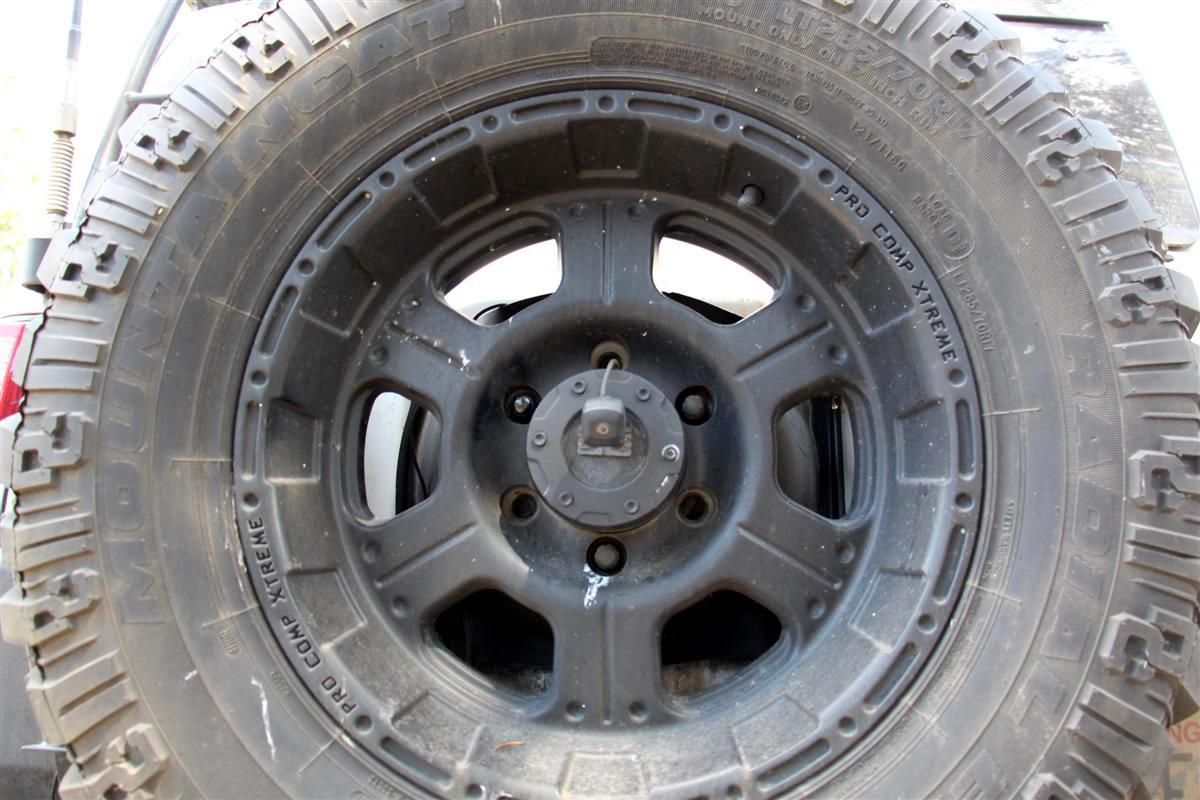
Same size as the Cepeks, 285x70x17, but they are a little more aggressive, and the aggressiveness continues down the side of the tire.
They are also higher ply than the old tires.
Have had them on for a week now at almost up to 70 MPH, and the rig does not shake at all, very smooth for an aggressive mud tire.
I like these so much better than the old set.
Only one picture, and yes, my wheels are dirty, in fact the whole rig needs to be scrubbed on the outside, it is a mess from winter still and parking under an old growth fir tree at home, and another three at work.
For the past year my left front tire started rubbing by the mudflap that covers the infamous Toyota body mount that the FJ Cruisers and Tacomas share.
My Old Man Emu front springs that go over the coilovers must be settling a bit.
So the left tire has been grinding away in that area when I turn sharp like when backing up, and if I turned real sharp, it would bind on the metal of the body mount, not good.
And with these new tires being more meaty, it came in contact even more.
I did a search on FJ Cruiser Forums website for a shop that I had visited many years ago after getting my FJ (can you believe it, the rig will be ten years old next month!) and found the thread with the shops name.
They are only a mile or so North of my Toyota dealership, and I called them on Tuesday to get the body mount chop done today at 8 am.
Very great shop that has been in business same location for twenty years.
We talked rear bumpers too, and next Friday morning I am getting the ARB rear bumper installed along with a hitch since they cannot use my Toyota again.
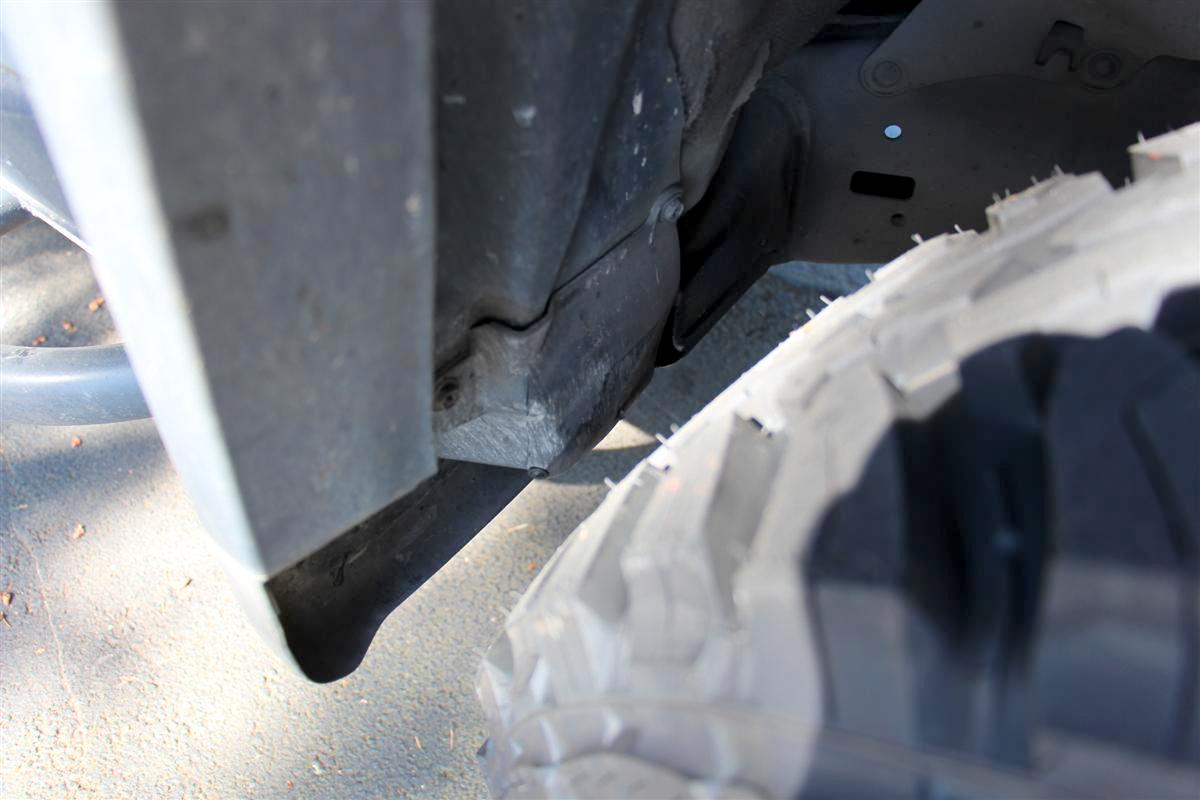
Here are some pics of the body mount and chop.

Before the chop, you can see how the rear of the left front tire made a hole in the flap part that covers the long body mount "nose" that sticks out.
Here is the passenger side with the mount cut off and a cover plate put on to cover the hole.
Also the tech trims the mudflap back some.
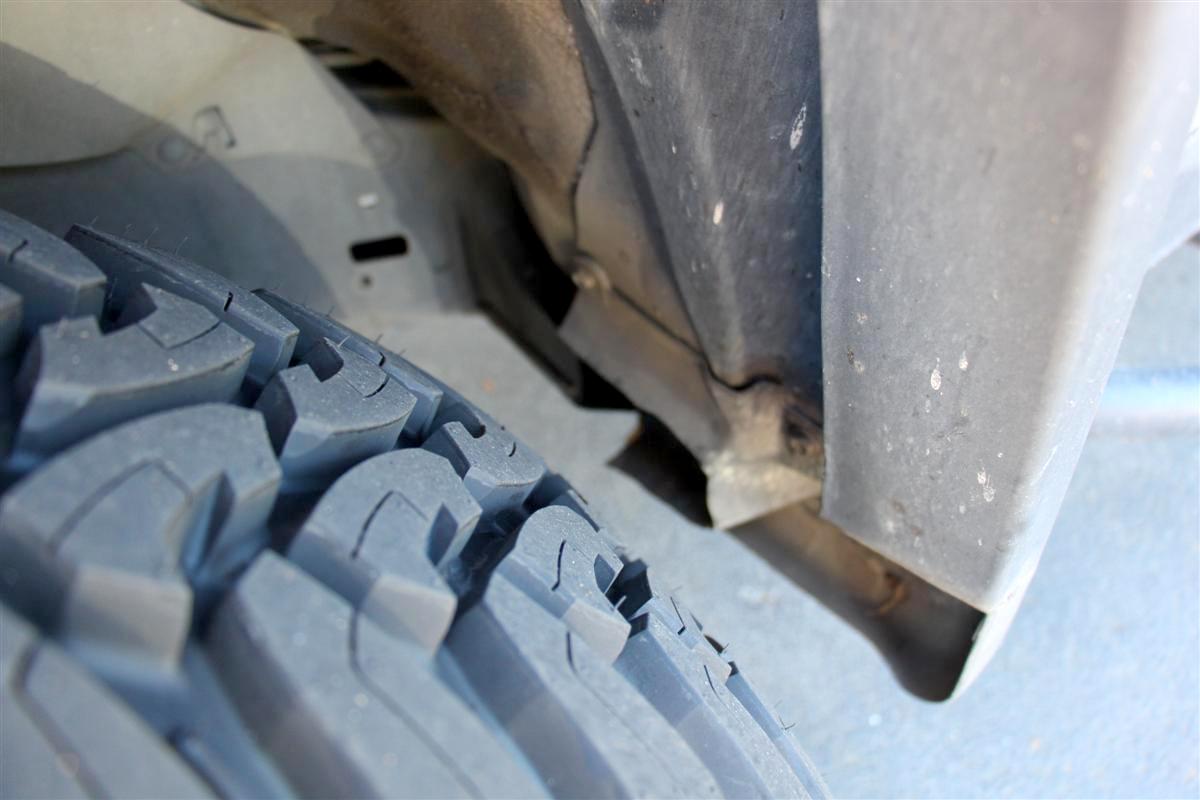
You cannot see the new cover here, as the stock flap is still on since he cannot trim it with it being all messed up from the tire.
My dealership did not have any in stock or they would have put one on today and trimmed it like the passenger side one.
It will look much better next week when they put it on, and I will update my build thread here with the new rear bumper too.
The noise is gone now on the left side finally!
The right side never rubbed, as the left side was closer to the rear of the tire on account of the way they align it during an alignment.
Links:
Toyo Open Country M/Ts
Auburn Car Repair & OffRoad
Two major mods two Fridays in a roll, and while I am on a roll, getting another major mod done next Friday.
See a pattern here
It has been a while since my beast has been pampered, it has been like a spa vacation week for it.
Was at Les Schwab Tires last Friday to get a tire rotation and re-balance, and we noticed my Dick Cepek Mountaincats were cupped some on the inside.
Rest of the tread looked OK for 60K+ miles on them, but I said lets go with some new shoes.
I have had my eyes on the Toyo Open Country M/Ts for awhile, so that is what I went with.
The tech mentioned these are going to be very quiet, not noisy like my Cepeks.
The way they make the tread pattern makes them very quiet.
So quiet I can now be serenaded by my Magnaflow muffler, it never sounded better.
Same size as the Cepeks, 285x70x17, but they are a little more aggressive, and the aggressiveness continues down the side of the tire.
They are also higher ply than the old tires.
Have had them on for a week now at almost up to 70 MPH, and the rig does not shake at all, very smooth for an aggressive mud tire.
I like these so much better than the old set.
Only one picture, and yes, my wheels are dirty, in fact the whole rig needs to be scrubbed on the outside, it is a mess from winter still and parking under an old growth fir tree at home, and another three at work.
For the past year my left front tire started rubbing by the mudflap that covers the infamous Toyota body mount that the FJ Cruisers and Tacomas share.
My Old Man Emu front springs that go over the coilovers must be settling a bit.
So the left tire has been grinding away in that area when I turn sharp like when backing up, and if I turned real sharp, it would bind on the metal of the body mount, not good.
And with these new tires being more meaty, it came in contact even more.
I did a search on FJ Cruiser Forums website for a shop that I had visited many years ago after getting my FJ (can you believe it, the rig will be ten years old next month!) and found the thread with the shops name.
They are only a mile or so North of my Toyota dealership, and I called them on Tuesday to get the body mount chop done today at 8 am.
Very great shop that has been in business same location for twenty years.
We talked rear bumpers too, and next Friday morning I am getting the ARB rear bumper installed along with a hitch since they cannot use my Toyota again.
Here are some pics of the body mount and chop.
Before the chop, you can see how the rear of the left front tire made a hole in the flap part that covers the long body mount "nose" that sticks out.
Here is the passenger side with the mount cut off and a cover plate put on to cover the hole.
Also the tech trims the mudflap back some.
You cannot see the new cover here, as the stock flap is still on since he cannot trim it with it being all messed up from the tire.
My dealership did not have any in stock or they would have put one on today and trimmed it like the passenger side one.
It will look much better next week when they put it on, and I will update my build thread here with the new rear bumper too.
The noise is gone now on the left side finally!
The right side never rubbed, as the left side was closer to the rear of the tire on account of the way they align it during an alignment.
Links:
Toyo Open Country M/Ts
Auburn Car Repair & OffRoad
Jun 10, 2016 | 12:44 PM
#378
Thread Starter
Co-Founder/Administrator
iTrader: (1)
Joined: May 2002
Posts: 32,242
Likes: 21
From: Auburn, Washington
ARB Rear Bumper Installed 6-10-2016
Phase III of a major mod, three Fridays in a row.
After visiting with John at Auburn Car Repair & Off-Road last Friday when I got my body mount chop done, I decided to go for the ARB rear bumper.
Also with ARB right down the road from John's shop, there was no waiting for the bumper to be built from another maker.
The only thing I did not like about the ARB bumper was the silver colored plate that sits on top, so John outsourced it to a local powder coater to do it up in ARB black.
I do not understand why ARB would not have had the top plate in black to more match their front bumpers which are all black.
Also he got in my drivers side front mudflap so the body mount chop is also now complete.
It is a joy not hearing the rear of the tire hitting the body mount, or as it has been for the past week, hitting the ripped mudflap that they left in place to give me some protection from road debris hitting the drivers side of the rig.
Also ordered was the optional ARB hitch receiver which also includes a D ring on top for attaching a recovery or winch line to it.
No need for a hitch mounted shackle like I use to run, but I did add it back in for the last picture just for kicks.
Also John drove in an orange 4 door Wrangler today with some 7" ARB Hi Intensity LED lamps which I am seriously thinking of having him get for me and install there.
I still have a factory Toyota lamp switch I ordered long time ago to do a bumper driving light installation, but I will let them wire it up this time.
Last time I wired up a set of lights it was for the ARB foglamps in my front bumper, and that was near a decade ago.
Time for some pictures.
The backup camera had to be relocated, and we felt the best spot was to onto the spares wheel cap.
The old location was much lower on the face of the stock bumper, and this gives a much broader field of view.
Please excuse the bird doo doo on the wheel
I park under a tree at home and work, and I guess my rig is open territory to an outdoor bathroom for them.
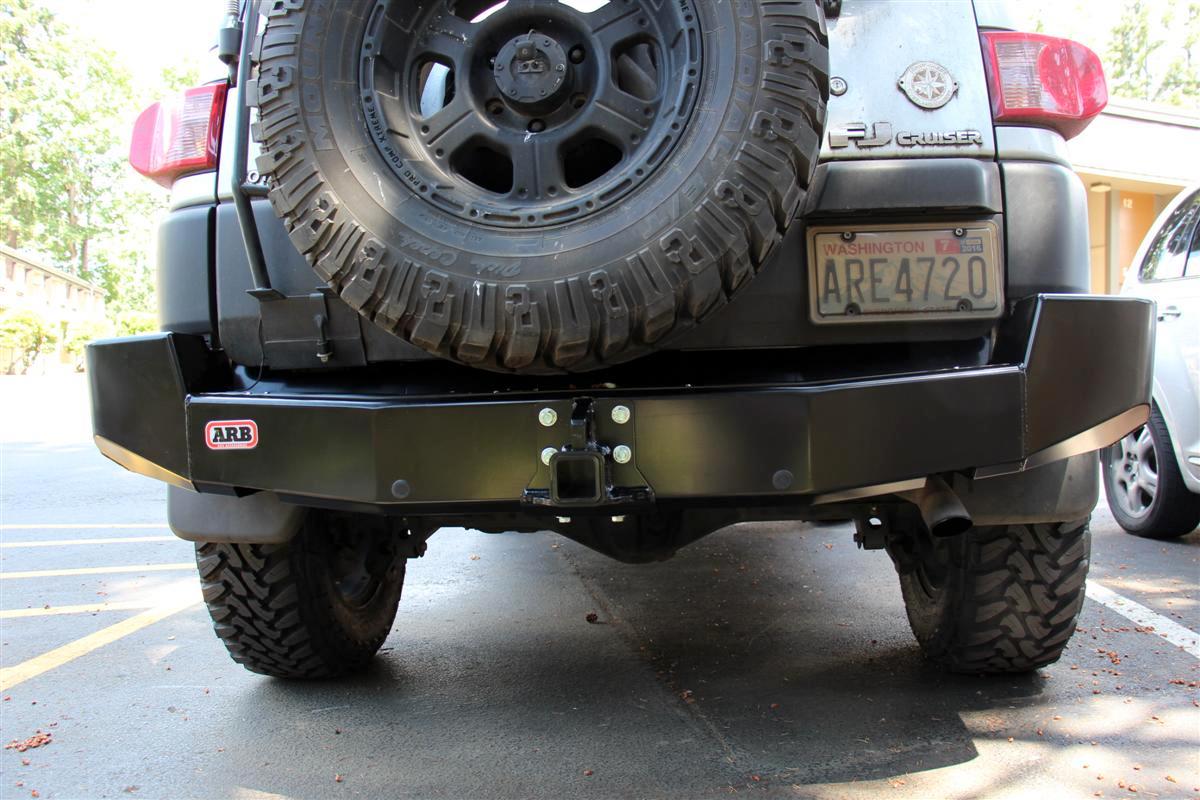
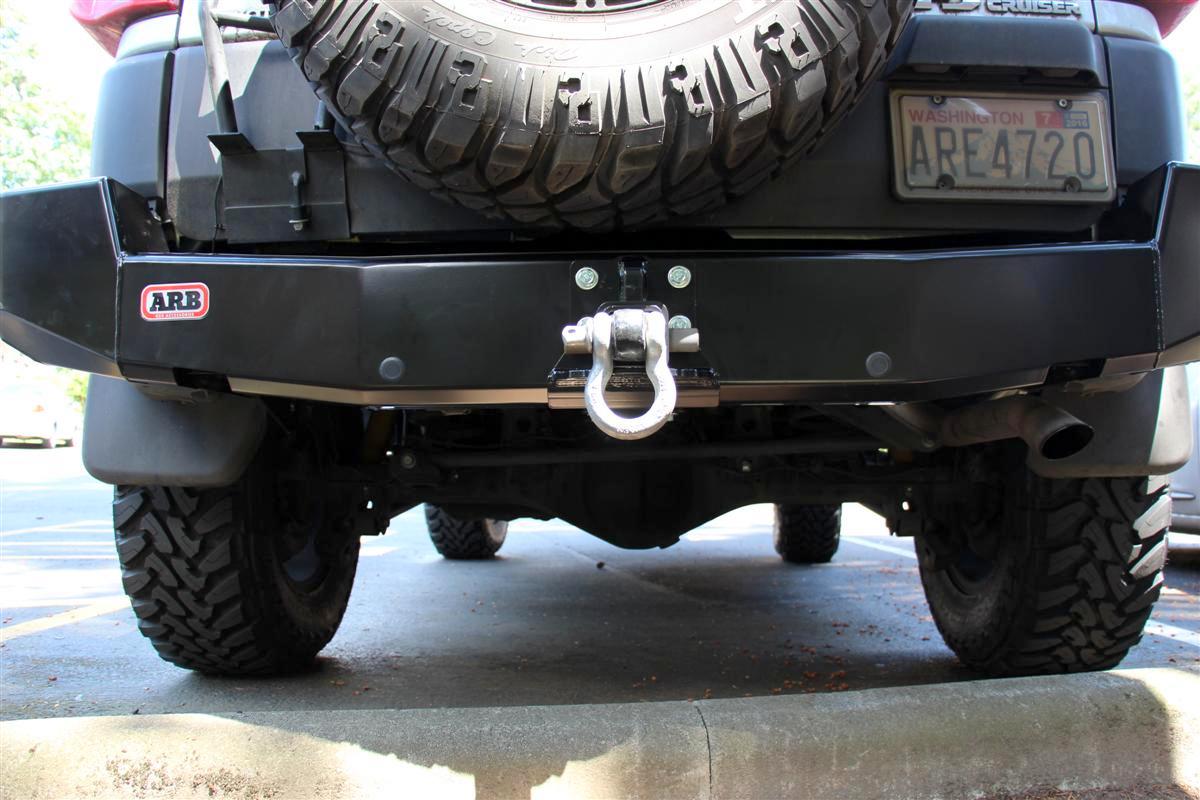
Full shot of the new bumper with hitch.
Kind of hard to see the D ring on the upper part, I guess I should have taken a side angle shot too.
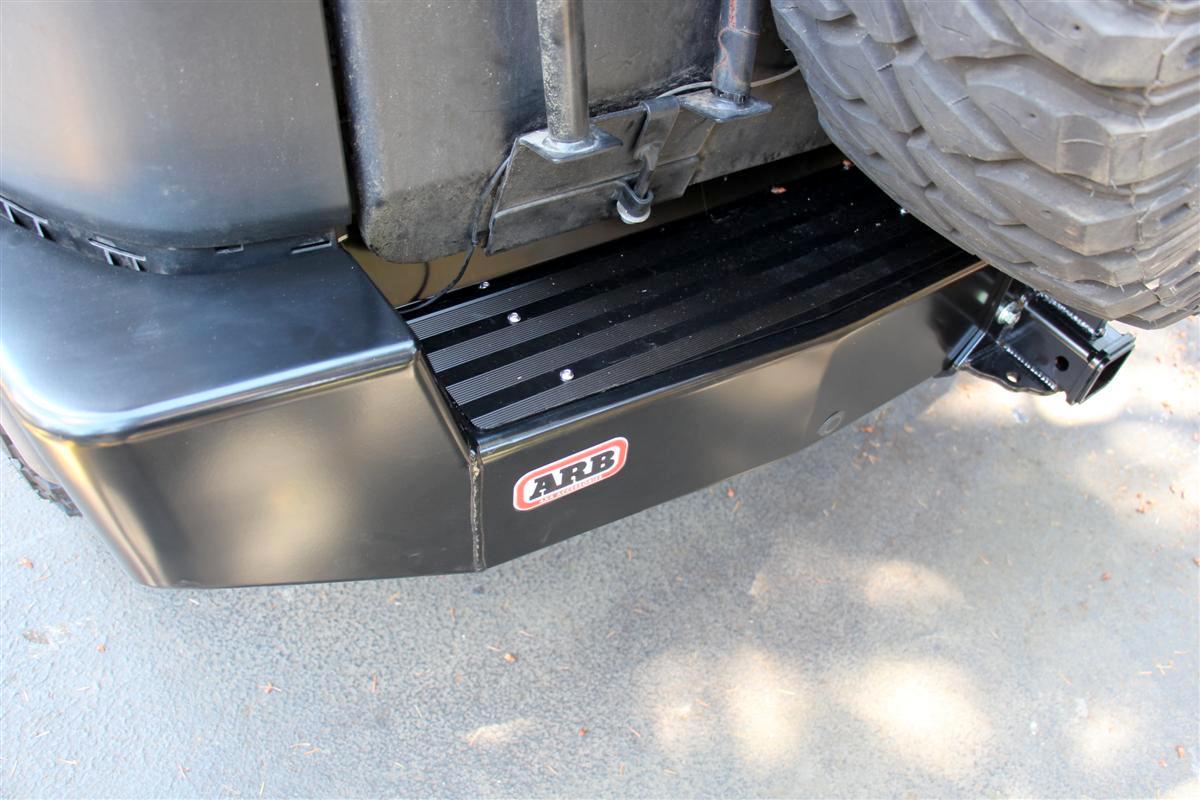
Showing the top plate powder coated in black.
That gap on the side where part of the plastic wraparound is suppose to be there for body/bumper compression.
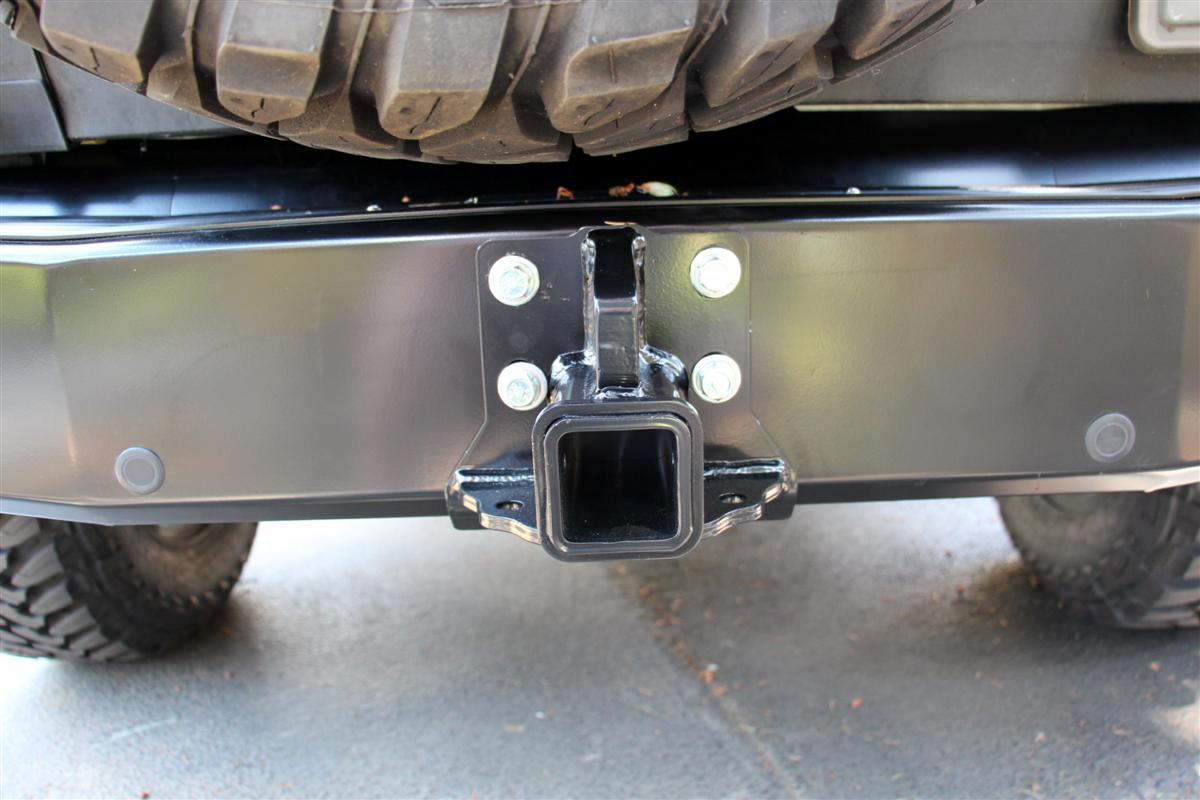
Close-up of the hitch/D ring combo.
Also note the stock backup sensors are fitted into the bumper as well.
Showing the old receiver mount and shackle I have used in the past.
I may leave it on.
Links:
FJ Cruiser ARB rear bumper part # ARB 5620010
Note that the picture from the first FJ Cruiser sent to Australia long ago shows an all silver bumper still.
It does come in black now like mine.
FJ Cruiser ARB rear hitch part # 5720020
And looking ahead to Phase IV, hear are the lamps I am thinking of getting.
One will be a flood, the other a pencil beam.
John says this setup works great.
ARB Intensity LED Driving Lights
The 7" ones are listed further down the page, and I would also get the clear covers to go onto them.
Good video there too.
Feels great to be back into doing a few mods again.
I thought the rear bumper was going to be the last, but after seeing those LED lights in person, I am going to get them.
Overland Journal did a review on these in the 2016 Gear edition on page 31.
After visiting with John at Auburn Car Repair & Off-Road last Friday when I got my body mount chop done, I decided to go for the ARB rear bumper.
Also with ARB right down the road from John's shop, there was no waiting for the bumper to be built from another maker.
The only thing I did not like about the ARB bumper was the silver colored plate that sits on top, so John outsourced it to a local powder coater to do it up in ARB black.
I do not understand why ARB would not have had the top plate in black to more match their front bumpers which are all black.
Also he got in my drivers side front mudflap so the body mount chop is also now complete.
It is a joy not hearing the rear of the tire hitting the body mount, or as it has been for the past week, hitting the ripped mudflap that they left in place to give me some protection from road debris hitting the drivers side of the rig.
Also ordered was the optional ARB hitch receiver which also includes a D ring on top for attaching a recovery or winch line to it.
No need for a hitch mounted shackle like I use to run, but I did add it back in for the last picture just for kicks.
Also John drove in an orange 4 door Wrangler today with some 7" ARB Hi Intensity LED lamps which I am seriously thinking of having him get for me and install there.
I still have a factory Toyota lamp switch I ordered long time ago to do a bumper driving light installation, but I will let them wire it up this time.
Last time I wired up a set of lights it was for the ARB foglamps in my front bumper, and that was near a decade ago.
Time for some pictures.
The backup camera had to be relocated, and we felt the best spot was to onto the spares wheel cap.
The old location was much lower on the face of the stock bumper, and this gives a much broader field of view.
Please excuse the bird doo doo on the wheel
I park under a tree at home and work, and I guess my rig is open territory to an outdoor bathroom for them.
Full shot of the new bumper with hitch.
Kind of hard to see the D ring on the upper part, I guess I should have taken a side angle shot too.
Showing the top plate powder coated in black.
That gap on the side where part of the plastic wraparound is suppose to be there for body/bumper compression.
Close-up of the hitch/D ring combo.
Also note the stock backup sensors are fitted into the bumper as well.
Showing the old receiver mount and shackle I have used in the past.
I may leave it on.
Links:
FJ Cruiser ARB rear bumper part # ARB 5620010
Note that the picture from the first FJ Cruiser sent to Australia long ago shows an all silver bumper still.
It does come in black now like mine.
FJ Cruiser ARB rear hitch part # 5720020
And looking ahead to Phase IV, hear are the lamps I am thinking of getting.
One will be a flood, the other a pencil beam.
John says this setup works great.
ARB Intensity LED Driving Lights
The 7" ones are listed further down the page, and I would also get the clear covers to go onto them.
Good video there too.
Feels great to be back into doing a few mods again.
I thought the rear bumper was going to be the last, but after seeing those LED lights in person, I am going to get them.
Overland Journal did a review on these in the 2016 Gear edition on page 31.
Jun 15, 2016 | 03:43 AM
#379
Thread Starter
Co-Founder/Administrator
iTrader: (1)
Joined: May 2002
Posts: 32,242
Likes: 21
From: Auburn, Washington
The 7" ARB Intensity LED lights and wiring harness are at John's shop, and the installation will take place July the 5th.
Will have pics up of them that day, and probably a video a few days later on a totally dark stretch of road between the Auburn and Kent border on my way into work.
These are totally not street legal, will come in handy when there is no traffic, and for early runs to the mountains.
Nothing like parking at the top of FS Road 72 in Greenwater and watching the sun come up with Mount Rainier in your face.
The sun shining on the mountain before the sun is fully illuminated is mind blowing.
Jun 19, 2016 | 11:59 AM
#380
Thread Starter
Co-Founder/Administrator
iTrader: (1)
Joined: May 2002
Posts: 32,242
Likes: 21
From: Auburn, Washington
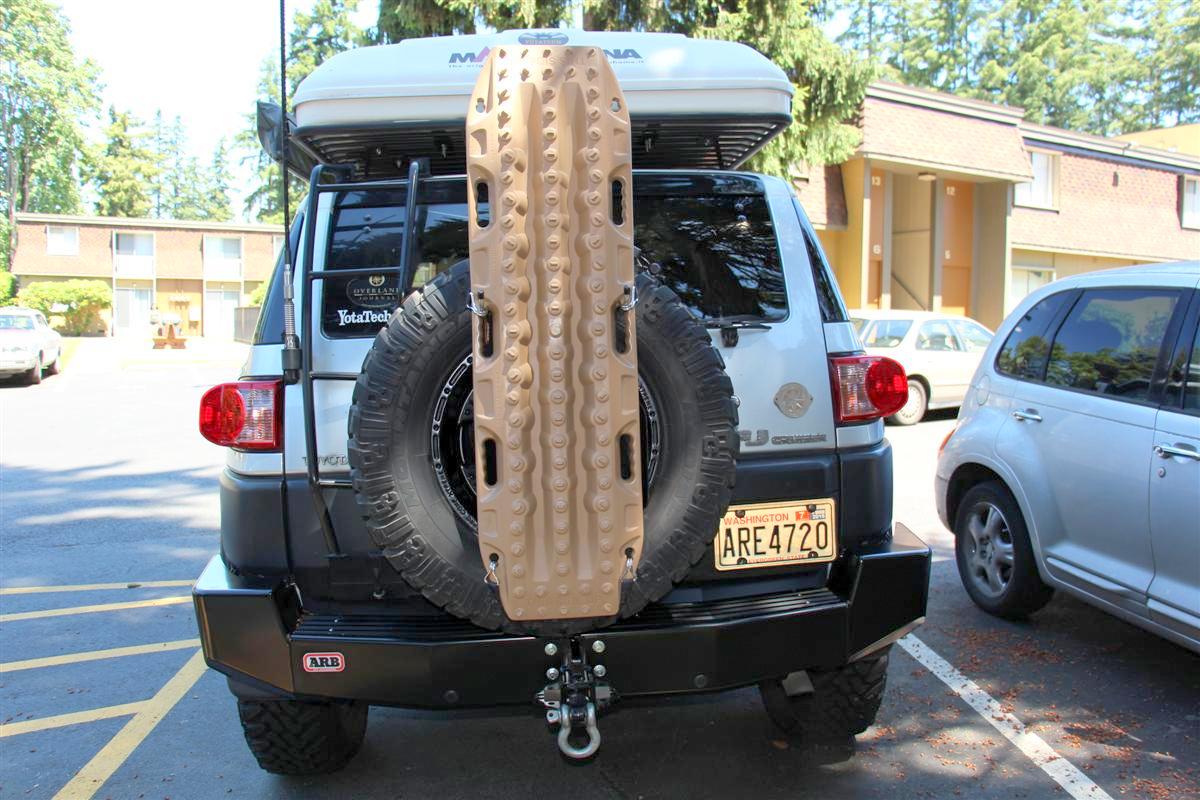
Maxtrax Installed 6-19-2016
I bought these back on September 9th 2013, and now just getting around to installing them
It is covering my backup camera now though that is installed on my spare tires wheel cap.
Oh well, do not really use the camera anyways, but I may end up trying to relocate that down the road.
There are instructions that come with the spare tire mount, but they are a bit vague, and I had to do it a little differently than what they detail, as well as the instructions online.
But they are on there good, and I will check it tomorrow morning when I get to work and then again when I get home to see if they loosened up any.
Links:
Maxtrax Australia
Sierra Expeditions
Maxtrax Rear Wheel Harness
Rear Wheel Harness Instructions
This was not my first color of choice, but Sierra back when I ordered them did not have the orange or the green which I would have preferred.
I do have to admit they look cool with that new sexy ARB rear bumper
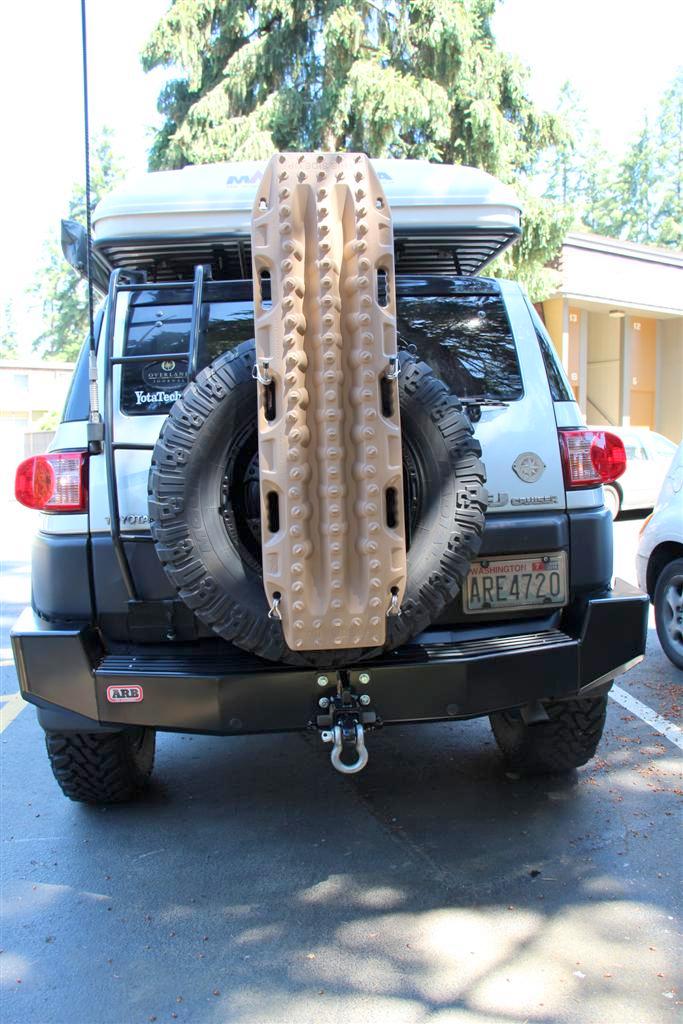


