

 Mar 21, 2016, 12:13 PM
Last edit by: IB Advertising
See related guides and technical advice from our community experts:
- Toyota Tundra Brake Modifications
Overview of popular modificatoins to help you customize your Tundra.

Tundra Brake Upgrade - PC'd my Calipers High Gloss Red
Dec 27, 2007 | 11:37 AM
#1
Thread Starter
Contributing Member
iTrader: (1)
Joined: May 2006
Posts: 2,262
Likes: 1
From: B'ham, AL
Tundra Brake Upgrade - PC'd my Calipers High Gloss Red
Well, new brakes are finally on. My old ones have been slowly wearing out and I figured it�s best to replace everything now, then later when I encounter a problem. I also knew that when the time came to do the brake job, I�d replace the front calipers, hard lines and soft lines with new components. (Having bought this 4Runner up North, the front brakes looked 3x their age.  )
)
I had planned to just replacing everything with OEM stock parts, but for not much more in overall price, I decided to go with the Tundra brakes instead. I purchased the Calipers from my local Advanced Auto Parts Store. I picked up a set of Brembo Blank Rotors from Auto Parts Warehouse. The Pads & Hard Lines I purchased from my local dealer. Last, but not least, I purchased a set of Goodridge SS front braided brakes lines from Wheeler's Off Road to complete the system.
Again, having purchased my 4Runner up North, I also figured the pins and springs in the rear drums would need replacing. Therefore, I purchased a set of rear OEM shoes, pins and springs to completely do the rear drums too.
For the Front, I purchased the following (All Prices listed are 'Total, Out the Door' Prices):
2001 Tundra Reman 199mm (S13WE, Pins included) Calipers (2) $300 - $100 Core Charge = $200
2001 Tundra Brembo Blank Rotors (2) = $124.00
2001 Tundra OEM Pads (4.7" pads = D812 = 199mm calipers) = $55.00
2002 4Runner OEM Hard Lines (set) � (These are the hard lines that come directly off the calipers.) = $10.00
2002 4Runner Goodridge SS Braided Brakes Lines (set) =$66.50
Parts Total = $455.50
EDIT: Just to be clear, in order to complete this upgrade, the Hard Lines and/or Soft Lines (SS Braided Brake Lines) DO NOT have to be replaced. I went a step further and did so because my OEM lines needed replacing.
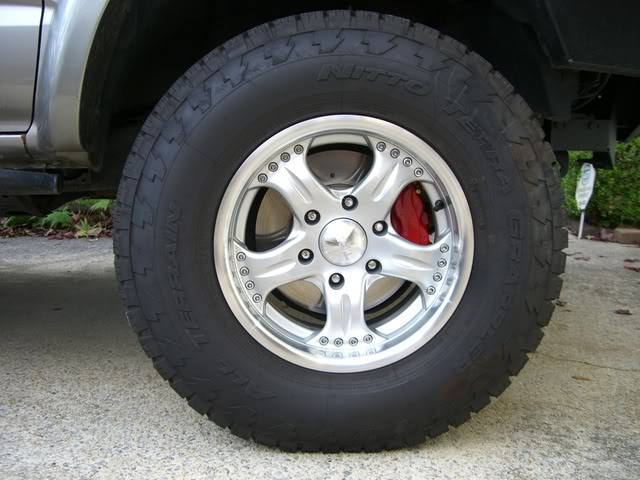
As others have said, yes this was a simple �bolt on� upgrade. However, I knew I would not be able to complete all the work by myself. Yes, I could have done the fronts by myself, but I had planned to have more work than just fronts done. First off, I know zero about installing pins, springs and shoes in the rear brakes. Second, I also wanted my new calipers powder coated while the truck was down. (Yes, I could have had the calipers powder coated before I tore the truck down, but I needed to know if they fit my TRD IS wheels first to see if they rubbed. If they did rub, I�d have to grind the calipers down a bit, and well, I don�t own a grinder .) With that said, I drove down to WabFab Off Road to pay Brian a visit.
The good news was, when we looked at the rear brakes, everything checked out clean! Not only did the shoes still look good, but it also appears the dealer replaced all the pins and springs in the rears before I bought it a year and a half ago. (Fortunately, I was able to return all the rear parts for a full refund.) I guess that's what I get for assuming the worst.
Now for the fronts - The front calipers & rotors were removed and put to the side. Mounted the new, thicker Tundra Rotors & Tundra Calipers for a test fit to see if they would rub my wheels any. Fortunately, we found no rubbing what so ever . Plus, the dust shields themselves needed no trimming either.
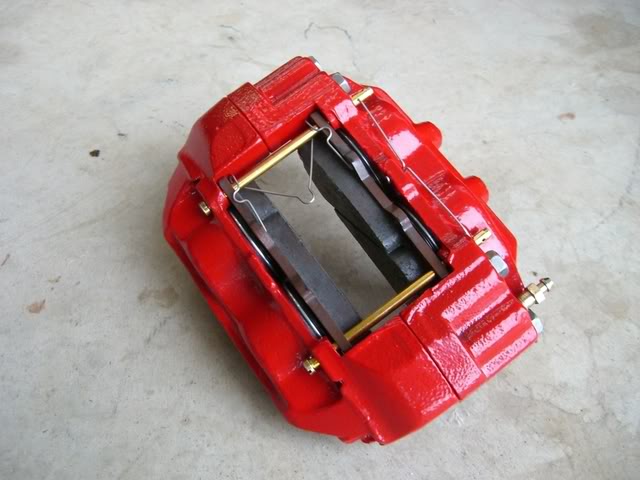
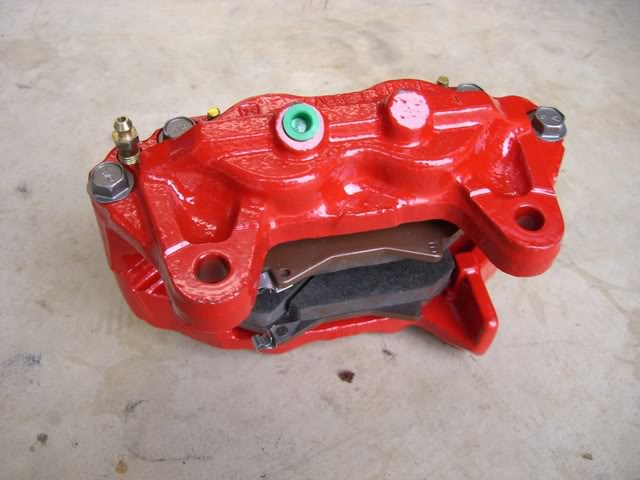
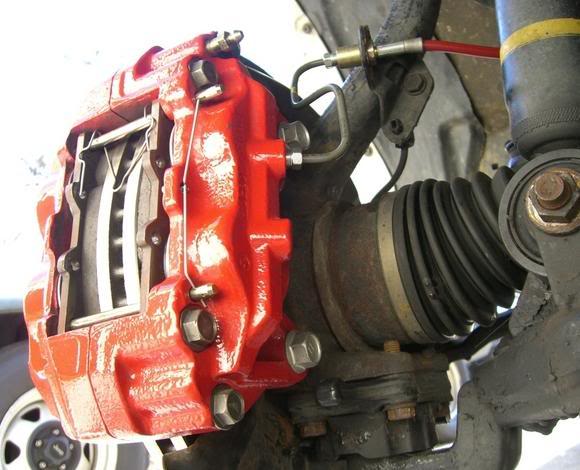
Next, the new Tundra Calipers were dismantled to be powder coated. Just for grins, I had them powder coated High Gloss Red. Within a few hours of being pc'd, Brian already had them put back together and mounted on the truck. Next came the installation of the hard lines, followed by the ss braided lines. Finally, bled the brakes and I was good to go!
Drove down to the local Advanced Auto and returned my stock cores for a full refund .
.
I can�t say enough about WabFab Off Road. Brian�s a great guy to do business with and does exceptional work. I definitely plan to continue doing business with him.
Some pictures from beginning to end:
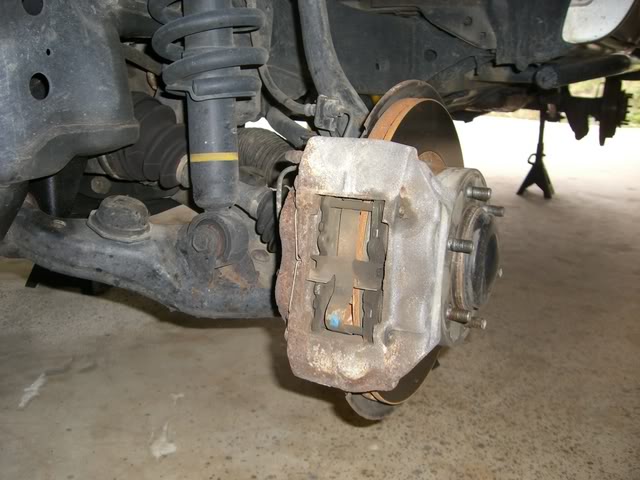
The Old:

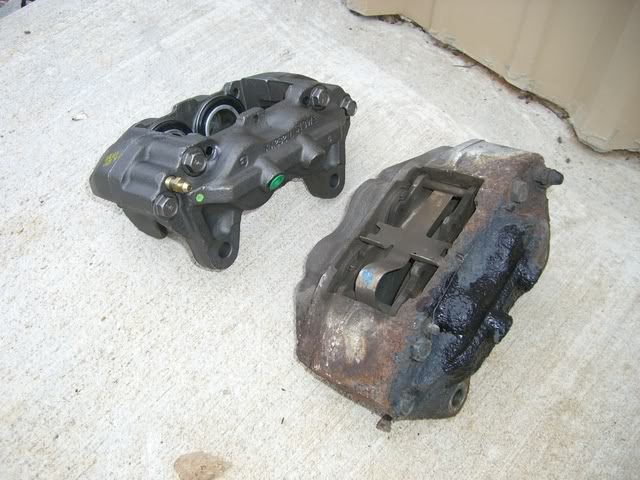
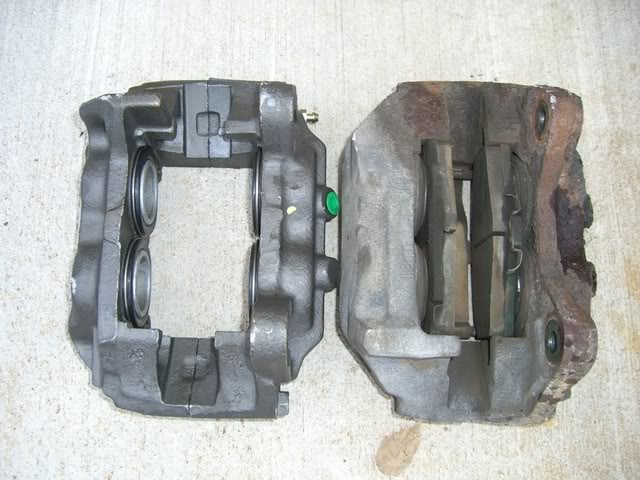
New vs. Old:
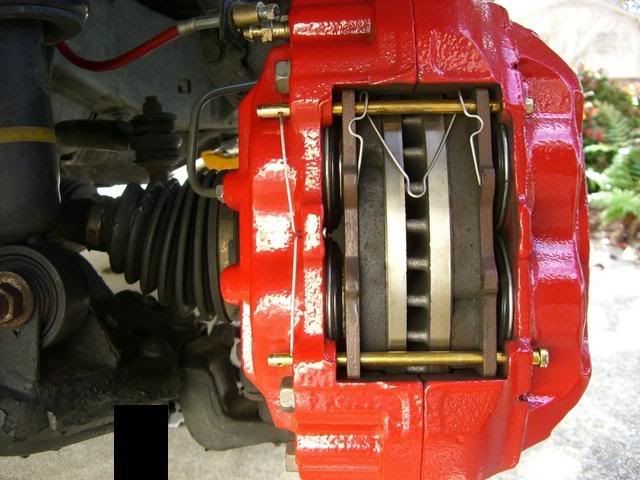
New Caliper pc'd and ready to go:
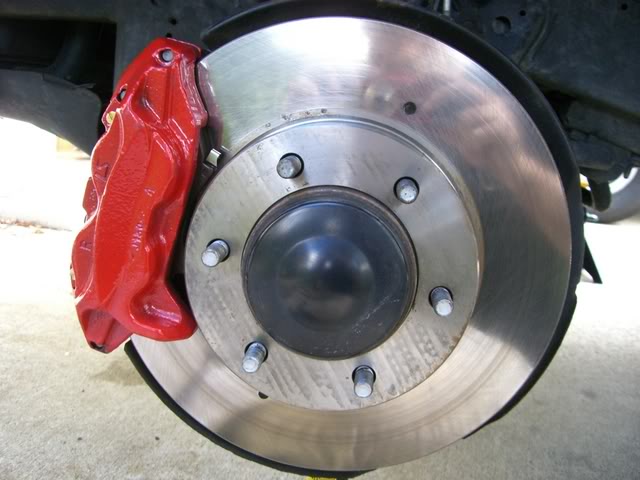
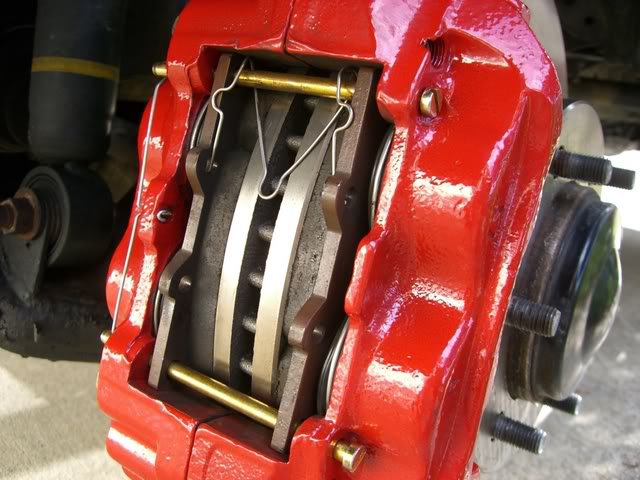
New Calipers, Pads & Rotors installed:
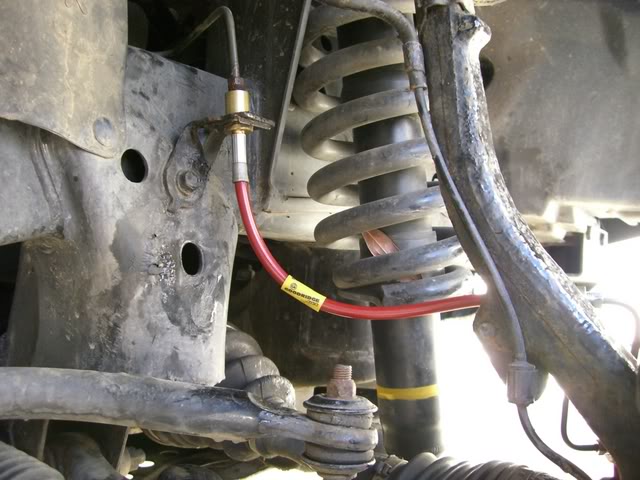
SS Braided Line (As luck would have it, they are red too ):
):
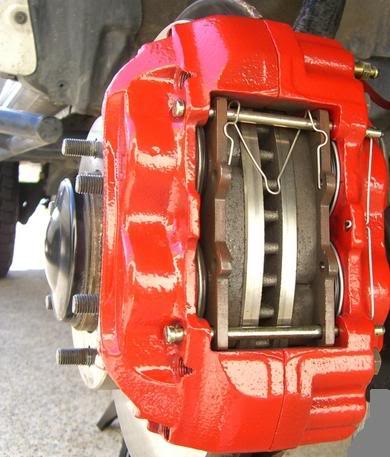
More shots:
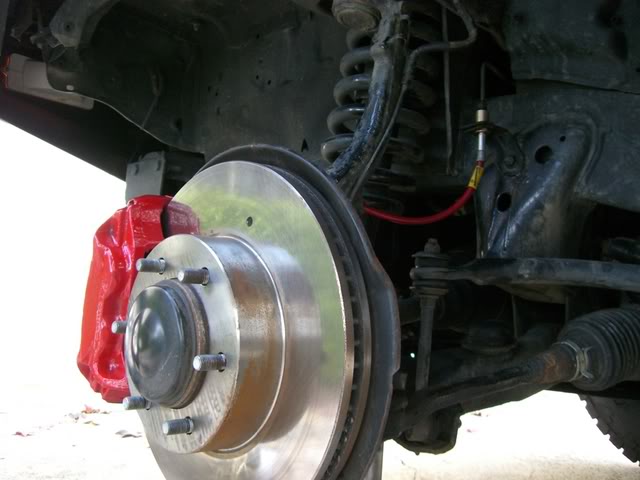
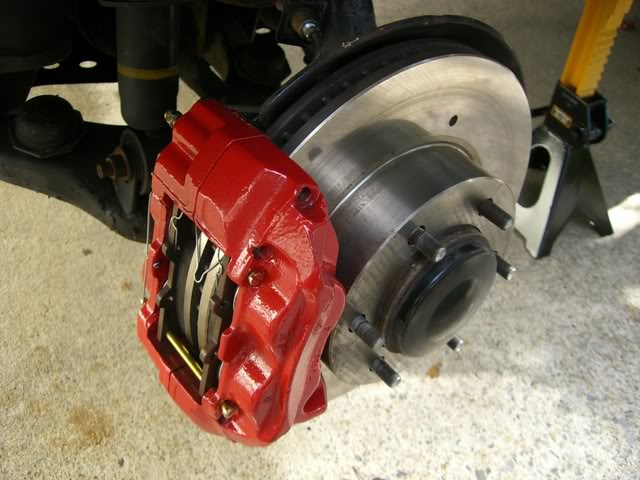
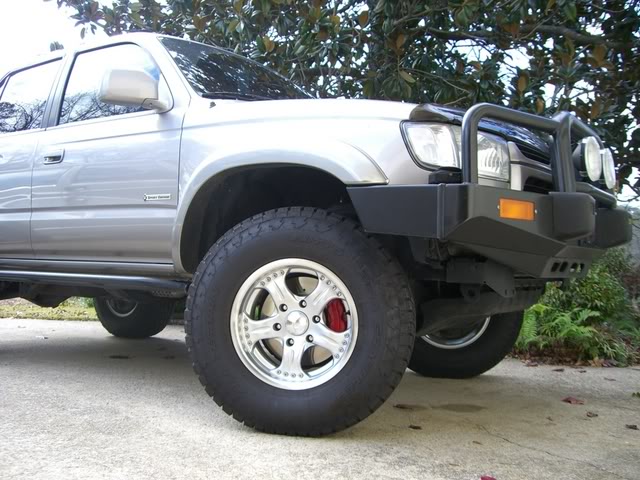
Finished Product:
~~~~~~~~~~~~~~~~~~~~~~~~~~~~~~~~~~~~~~~~~~~~~~~~~~ ~~~~
**DISCLAIMER** - The following method worked for me, but by no means is it the ONLY way to properly break-in new brakes. There are many useful tips on the internet that illustrate how to seat new brakes correctly. You may also want to check with your brake component manufacturer to get their recommendations on how to seat brakes properly. If you attempt the below method and it fails, do not seek recourse with me...I am simply passing along useful information.
Once my install was complete, I followed the following break-in period in order to properly seat the brakes: (This information comes to you courtesy of Squid...the site owner of Toyota Tundra Forum)
Brake Bedding:
Brake pad glazing is caused when the brake pad friction material is overheated. This results in crystallized friction material on the pad surface and the brake disc. Typical symptoms of glazed brake pads include: Poor stopping performance, vibration or brake judder, and cracks or fissures in the brake pad material.
Pad glazing is typically caused by operating the brake pads at a temperature above the specified temperature range of the friction material or not properly following the 'Bedding-in' instructions for the brake pads. Always follow the manufacturers brake pad bedding-in instructions and use a brake pad that has a temperature range that is sufficient for its intended use.
For optimal use of any given brake system, the pads and rotor have to be compatible with each other. The bed-in procedure establishes that compatibility between the pad and rotor. This is achieved by a combination of rubbing speed, temperature, line pressure, and Inertia. Bed-in is also influenced by pad and rotor material chemistries. It is always recommended that only compatible pads and rotors be used in any given application.
Bedding In Advantages:
1. Gradually heat treats the rotor and eliminates any thermal shock in the rotor.
2. Burn off volatiles and moisture from the resin that is near pad surface.
This will eliminate 'green fade'.
3. Establish a layer of transfer film about a few microns thick on the rotor surface. Shearing of the film during friction is an effective source of friction force. Otherwise, when using a freshly ground rotor without the transfer film, the main friction force would come from cutting, plowing, or scoring the asperities on the rotor surface. This leads to inconsistent braking effectiveness.
4. Mate the two surfaces to a near perfect geometrical match, so that the contact area is high, and therefore the friction force is increased.
5. The performance of a fresh rotor/fresh pad system would be inconsistent. This is due to ever-changing structures and properties of the two mating materials. Bed-in of pads and rotor will form a stable transfer film.
6. If bedding in procedure is not applied, a stable transfer film may not be established for a long time. In other words, the rotor surface would have to be constantly regenerating a film that is not quite stable for a long time. This effect would reduce the performance and increase the wear.
I now have over 38,000 miles on my truck and no judder. I wonder if it's because I always perform this procedure on all my new vehicles (even motorcycles) and whenever I do a brake job.
For stop and go driving this is very important and I have a hunch that this might be part of the problem.
Bed In Procedure:
From a speed of about 60mph, gently apply the brakes to slow the car down to about 45mph, then accelerate back up to 60mph and repeat. Do this about four or five times to bring the brakes up to operating temperature. This prevents you from thermally shocking the rotors and pads in the next steps.
Make a series of eight near-stops from 60 to about 10 mph. Do it HARD by pressing on the brakes firmly, just shy of locking the wheels or engaging ABS.
At the end of each slowdown, immediately accelerate back to 60mph. DO NOT COME TO A COMPLETE STOP! (Note: With less aggressive street pads and/or stock brake calipers, you may need to do this fewer times. If your pedal gets soft or you feel the brakes going away, then you've done enough. Proceed to the next step.)
During this process, you must not come to a complete stop because you will transfer (imprint) pad material onto the hot rotors, which can lead to vibration, uneven braking, and could even ruin the rotors.
Depending on the pads you are using, the brakes may begin to fade slightly after the 7th or 8th near-stop. This fade will stabilize, but not completely go away until the brakes have fully cooled. A bad smell from the brakes, and even some smoke, is normal.
After the 8th near-stop, accelerate back up to speed and drive around for as long as possible without using the brakes. The brakes will need at least 10 minutes to cool down. Obviously, it's OK to use the brakes to avoid an accident, but try to minimize their use until they have cooled.
After the break-in cycle, there should be a blue tint and a light gray film on the rotor face. The blue tint tells you the rotor has reached break-in temperature and the gray film is pad material starting to transfer onto the rotor face. This is what you are looking for. The best braking occurs when there is an even layer of of pad material deposited across the face of the rotors. This minimizes squealing, increases braking torque, and maximizes pad and rotor life.
After the first break in cycle shown above, the brakes may still not be fully broken in. A second bed-in cycle, AFTER the brakes have cooled down fully from the first cycle, may be necessary before the brakes really start to perform well. If you've just installed a big brake kit, the pedal travel may not feel as firm as you expected. After the second cycle, the pedal will become noticeably firmer.
-Squid
This information can also be found on his site: Click here
~~~~~~~~~~~~~~~~~~~~~~~~~~~~~~~~~~~~~~~~~~~~~~~~~~ ~~~~~
Hope this info helps
**
)I had planned to just replacing everything with OEM stock parts, but for not much more in overall price, I decided to go with the Tundra brakes instead. I purchased the Calipers from my local Advanced Auto Parts Store. I picked up a set of Brembo Blank Rotors from Auto Parts Warehouse. The Pads & Hard Lines I purchased from my local dealer. Last, but not least, I purchased a set of Goodridge SS front braided brakes lines from Wheeler's Off Road to complete the system.
Again, having purchased my 4Runner up North, I also figured the pins and springs in the rear drums would need replacing. Therefore, I purchased a set of rear OEM shoes, pins and springs to completely do the rear drums too.
For the Front, I purchased the following (All Prices listed are 'Total, Out the Door' Prices):
2001 Tundra Reman 199mm (S13WE, Pins included) Calipers (2) $300 - $100 Core Charge = $200
2001 Tundra Brembo Blank Rotors (2) = $124.00
2001 Tundra OEM Pads (4.7" pads = D812 = 199mm calipers) = $55.00
2002 4Runner OEM Hard Lines (set) � (These are the hard lines that come directly off the calipers.) = $10.00
2002 4Runner Goodridge SS Braided Brakes Lines (set) =$66.50
Parts Total = $455.50
EDIT: Just to be clear, in order to complete this upgrade, the Hard Lines and/or Soft Lines (SS Braided Brake Lines) DO NOT have to be replaced. I went a step further and did so because my OEM lines needed replacing.
As others have said, yes this was a simple �bolt on� upgrade. However, I knew I would not be able to complete all the work by myself. Yes, I could have done the fronts by myself, but I had planned to have more work than just fronts done. First off, I know zero about installing pins, springs and shoes in the rear brakes. Second, I also wanted my new calipers powder coated while the truck was down. (Yes, I could have had the calipers powder coated before I tore the truck down, but I needed to know if they fit my TRD IS wheels first to see if they rubbed. If they did rub, I�d have to grind the calipers down a bit, and well, I don�t own a grinder
.) With that said, I drove down to WabFab Off Road to pay Brian a visit.The good news was, when we looked at the rear brakes, everything checked out clean! Not only did the shoes still look good, but it also appears the dealer replaced all the pins and springs in the rears before I bought it a year and a half ago. (Fortunately, I was able to return all the rear parts for a full refund.) I guess that's what I get for assuming the worst.
Now for the fronts - The front calipers & rotors were removed and put to the side. Mounted the new, thicker Tundra Rotors & Tundra Calipers for a test fit to see if they would rub my wheels any. Fortunately, we found no rubbing what so ever
. Plus, the dust shields themselves needed no trimming either.Next, the new Tundra Calipers were dismantled to be powder coated. Just for grins, I had them powder coated High Gloss Red. Within a few hours of being pc'd, Brian already had them put back together and mounted on the truck. Next came the installation of the hard lines, followed by the ss braided lines. Finally, bled the brakes and I was good to go!
Drove down to the local Advanced Auto and returned my stock cores for a full refund
.I can�t say enough about WabFab Off Road. Brian�s a great guy to do business with and does exceptional work. I definitely plan to continue doing business with him.
Some pictures from beginning to end:
The Old:
New vs. Old:
New Caliper pc'd and ready to go:
New Calipers, Pads & Rotors installed:
SS Braided Line (As luck would have it, they are red too
):More shots:
Finished Product:
~~~~~~~~~~~~~~~~~~~~~~~~~~~~~~~~~~~~~~~~~~~~~~~~~~ ~~~~
**DISCLAIMER** - The following method worked for me, but by no means is it the ONLY way to properly break-in new brakes. There are many useful tips on the internet that illustrate how to seat new brakes correctly. You may also want to check with your brake component manufacturer to get their recommendations on how to seat brakes properly. If you attempt the below method and it fails, do not seek recourse with me...I am simply passing along useful information.
Once my install was complete, I followed the following break-in period in order to properly seat the brakes: (This information comes to you courtesy of Squid...the site owner of Toyota Tundra Forum)
Brake Bedding:
Brake pad glazing is caused when the brake pad friction material is overheated. This results in crystallized friction material on the pad surface and the brake disc. Typical symptoms of glazed brake pads include: Poor stopping performance, vibration or brake judder, and cracks or fissures in the brake pad material.
Pad glazing is typically caused by operating the brake pads at a temperature above the specified temperature range of the friction material or not properly following the 'Bedding-in' instructions for the brake pads. Always follow the manufacturers brake pad bedding-in instructions and use a brake pad that has a temperature range that is sufficient for its intended use.
For optimal use of any given brake system, the pads and rotor have to be compatible with each other. The bed-in procedure establishes that compatibility between the pad and rotor. This is achieved by a combination of rubbing speed, temperature, line pressure, and Inertia. Bed-in is also influenced by pad and rotor material chemistries. It is always recommended that only compatible pads and rotors be used in any given application.
Bedding In Advantages:
1. Gradually heat treats the rotor and eliminates any thermal shock in the rotor.
2. Burn off volatiles and moisture from the resin that is near pad surface.
This will eliminate 'green fade'.
3. Establish a layer of transfer film about a few microns thick on the rotor surface. Shearing of the film during friction is an effective source of friction force. Otherwise, when using a freshly ground rotor without the transfer film, the main friction force would come from cutting, plowing, or scoring the asperities on the rotor surface. This leads to inconsistent braking effectiveness.
4. Mate the two surfaces to a near perfect geometrical match, so that the contact area is high, and therefore the friction force is increased.
5. The performance of a fresh rotor/fresh pad system would be inconsistent. This is due to ever-changing structures and properties of the two mating materials. Bed-in of pads and rotor will form a stable transfer film.
6. If bedding in procedure is not applied, a stable transfer film may not be established for a long time. In other words, the rotor surface would have to be constantly regenerating a film that is not quite stable for a long time. This effect would reduce the performance and increase the wear.
I now have over 38,000 miles on my truck and no judder. I wonder if it's because I always perform this procedure on all my new vehicles (even motorcycles) and whenever I do a brake job.
For stop and go driving this is very important and I have a hunch that this might be part of the problem.
Bed In Procedure:
From a speed of about 60mph, gently apply the brakes to slow the car down to about 45mph, then accelerate back up to 60mph and repeat. Do this about four or five times to bring the brakes up to operating temperature. This prevents you from thermally shocking the rotors and pads in the next steps.
Make a series of eight near-stops from 60 to about 10 mph. Do it HARD by pressing on the brakes firmly, just shy of locking the wheels or engaging ABS.
At the end of each slowdown, immediately accelerate back to 60mph. DO NOT COME TO A COMPLETE STOP! (Note: With less aggressive street pads and/or stock brake calipers, you may need to do this fewer times. If your pedal gets soft or you feel the brakes going away, then you've done enough. Proceed to the next step.)
During this process, you must not come to a complete stop because you will transfer (imprint) pad material onto the hot rotors, which can lead to vibration, uneven braking, and could even ruin the rotors.
Depending on the pads you are using, the brakes may begin to fade slightly after the 7th or 8th near-stop. This fade will stabilize, but not completely go away until the brakes have fully cooled. A bad smell from the brakes, and even some smoke, is normal.
After the 8th near-stop, accelerate back up to speed and drive around for as long as possible without using the brakes. The brakes will need at least 10 minutes to cool down. Obviously, it's OK to use the brakes to avoid an accident, but try to minimize their use until they have cooled.
After the break-in cycle, there should be a blue tint and a light gray film on the rotor face. The blue tint tells you the rotor has reached break-in temperature and the gray film is pad material starting to transfer onto the rotor face. This is what you are looking for. The best braking occurs when there is an even layer of of pad material deposited across the face of the rotors. This minimizes squealing, increases braking torque, and maximizes pad and rotor life.
After the first break in cycle shown above, the brakes may still not be fully broken in. A second bed-in cycle, AFTER the brakes have cooled down fully from the first cycle, may be necessary before the brakes really start to perform well. If you've just installed a big brake kit, the pedal travel may not feel as firm as you expected. After the second cycle, the pedal will become noticeably firmer.
-Squid
This information can also be found on his site: Click here
~~~~~~~~~~~~~~~~~~~~~~~~~~~~~~~~~~~~~~~~~~~~~~~~~~ ~~~~~
Hope this info helps
**
Last edited by Rock Slide; Jul 3, 2023 at 05:28 PM. Reason: Bedding brakes
 Dec 27, 2007 | 11:50 AM
#4
I'm not a fan of red by any means, but Bill's 3rd gen 4Runner is one of the cleanest and most meticulously kept I've seen, and the red looks good on his truck...especially to offset some of that damn nasty orange and blue. Looks good Bill!
Roll tide!

Roll tide!
Dec 27, 2007 | 01:19 PM
#7
Registered User
Joined: Jul 2005
Posts: 919
Likes: 1
From: Huntsville, Alabama
Trending Topics
 Dec 27, 2007 | 10:14 PM
#9
Registered User

Joined: Jan 2007
Posts: 454
Likes: 3
From: Austin, TX
sweet. I scored a set of tundra calipers and rotors on craigslist for $25! The pads have about 12k on them. I tempted to just try the setup as is instead of getting new pads.
Thanks for posting. Now i want to pc my calipers to match the Tacoma.
Thanks for posting. Now i want to pc my calipers to match the Tacoma.
 Dec 28, 2007 | 05:54 AM
#13
Thread Starter
Contributing Member
iTrader: (1)
Joined: May 2006
Posts: 2,262
Likes: 1
From: B'ham, AL
Yeah, I probably would have painted them by hand too, but for as little as Brian charged me to pc them, I couldn't refuse .
Now days, anyone interested in having something pc'd, there are literally hundreds of colors to choose from. In one brochure I looked at, even a color that "glows in the dark" is offered. Possibilities are endless with this stuff.
Thanks again for all the compliments.
. Now days, anyone interested in having something pc'd, there are literally hundreds of colors to choose from. In one brochure I looked at, even a color that "glows in the dark" is offered. Possibilities are endless with this stuff.
Thanks again for all the compliments.
Last edited by Rock Slide; Dec 28, 2007 at 05:56 AM.
Dec 28, 2007 | 07:49 AM
#15
Contributing Member
Joined: Apr 2004
Posts: 7,122
Likes: 6
From: 5th Gen San Diegan, California
Dec 28, 2007 | 07:53 AM
#16
Thread Starter
Contributing Member
iTrader: (1)
Joined: May 2006
Posts: 2,262
Likes: 1
From: B'ham, AL
To be honest, it's tough to pin point exactly. Reason being, I've been driving on bad brakes for some time now (2+ months). Therefore any thing new I put on there would have been an improvement over what I had.
With that said, yes braking is much, much better than it was before and I don't "baby" my brakes nearly as much as I did before either. I know it will stop now when I want it to.
As others have noted, the pedal did go down a tad bit further at first, but now it's as firm as stock. Once these brakes grab, they really grab.
Last edited by Rock Slide; Dec 28, 2007 at 11:33 AM. Reason: needed to clarify pedal firmness
Dec 28, 2007 | 09:35 AM
#19
Contributing Member
Joined: Jul 2003
Posts: 8,807
Likes: 3
From: Montreal, QC Canada
http://www.ultimateyota.com/index.ph...16142#msg16142
Mine went down a bit further too when I first installed them but the power bleeding fixed that.
My pedal is about the same firmness as stock, but grabs much quicker if you really get on the pedal.
Dec 28, 2007 | 11:30 AM
#20
Thread Starter
Contributing Member
iTrader: (1)
Joined: May 2006
Posts: 2,262
Likes: 1
From: B'ham, AL
see a couple posts up.
Oops...guess I was thinking one thing and typing another. Yes, my brake pedal went down a little further at first, but now it's as firm as stock. Thanks for pointing that out Jamie...I'll update my older post. Don't want to confuse anyone.
Try bleeding them with a homemade power bleeder:
http://www.ultimateyota.com/index.ph...16142#msg16142
Mine went down a bit further too when I first installed them but the power bleeding fixed that.
My pedal is about the same firmness as stock, but grabs much quicker if you really get on the pedal.
http://www.ultimateyota.com/index.ph...16142#msg16142
Mine went down a bit further too when I first installed them but the power bleeding fixed that.
My pedal is about the same firmness as stock, but grabs much quicker if you really get on the pedal.
Oops...guess I was thinking one thing and typing another
. Yes, my brake pedal went down a little further at first, but now it's as firm as stock. Thanks for pointing that out Jamie...I'll update my older post. Don't want to confuse anyone.


