How to install an ARB for dummies
 02-04-2010, 10:01 PM
#1
Registered User
Thread Starter
Join Date: Oct 2009
Location: Tampa, FL
Posts: 112
Likes: 0
Received 0 Likes
on
0 Posts
How to install an ARB for dummies
I see people saying all the time, "the instructions on the ARB suck," "what do you cut?" "Whoops my bumperettes are upside down" etc....
So I figured I'd make an attempt at showing how it's done as simply as possible. Here we go.
This is what you start with.....
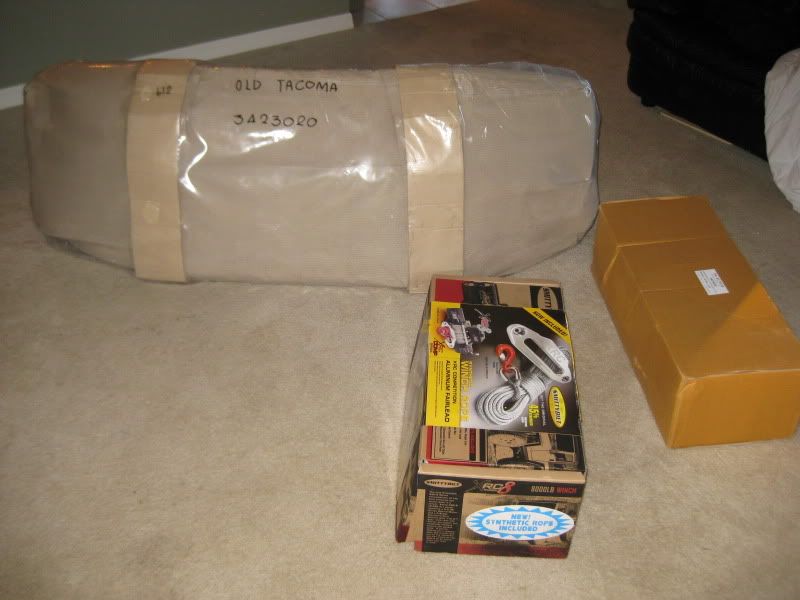
Unpack it and slap it all together........
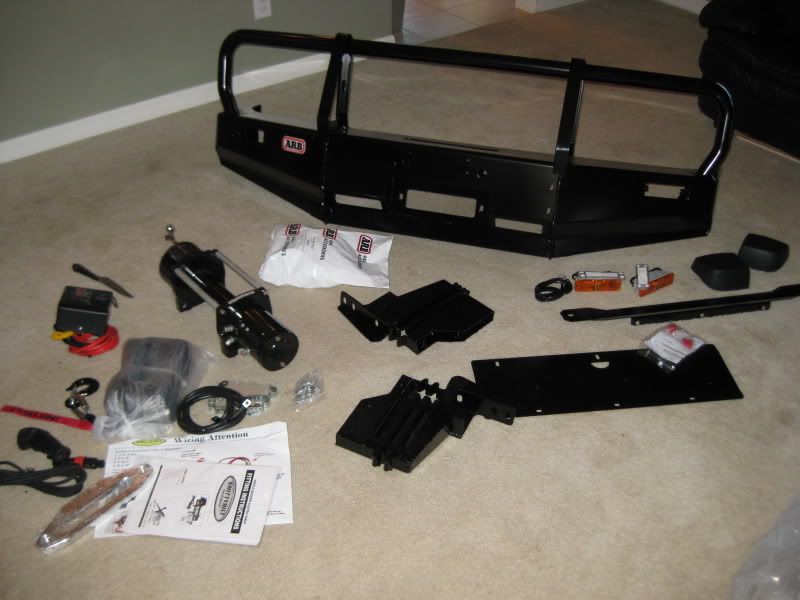
Now, every winch is different so we'll save that for another time, besides not everyone is installing a winch with the bumper. Putting the bumper together is pretty straight forward and I didn't bother to photograph it. It's pretty self explanatory. One thing I have noticed is a lot of people install the bumperettes upside down. THE FLAT SIDE GOES UP. You'll see later.
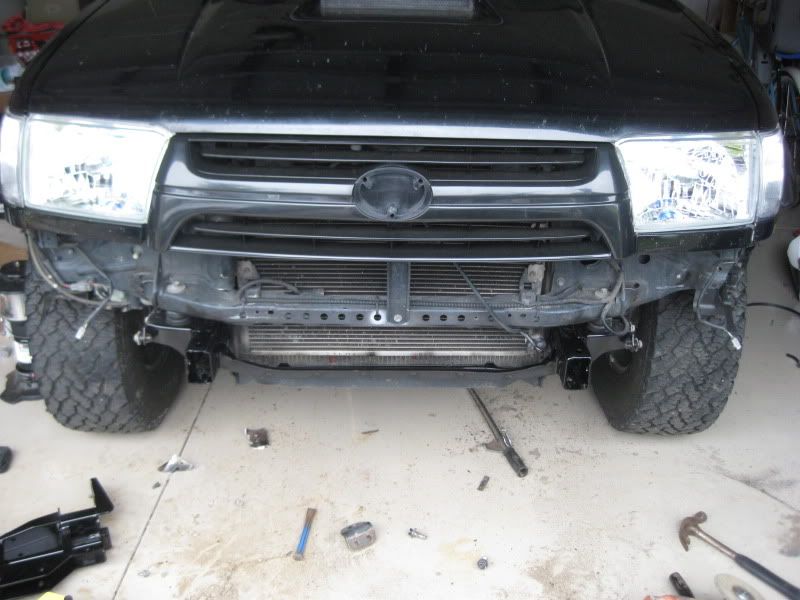
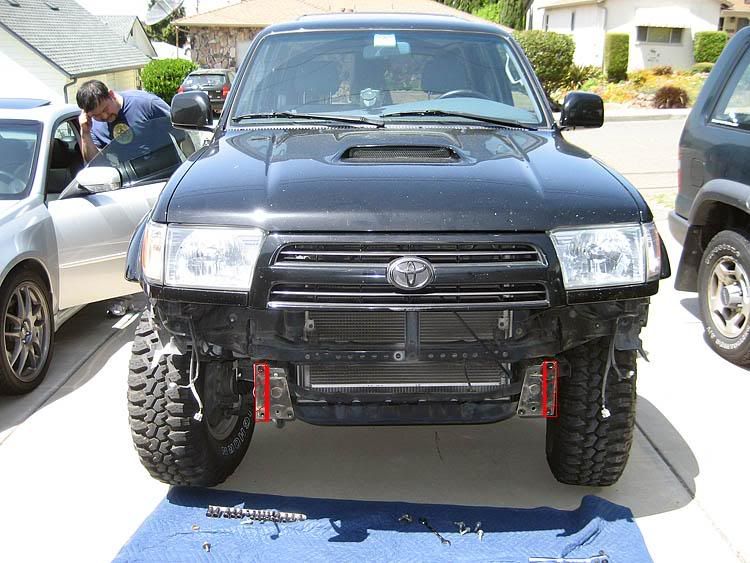
Back to the project, strip the bumper off your rig and you should be looking at something similar to this.
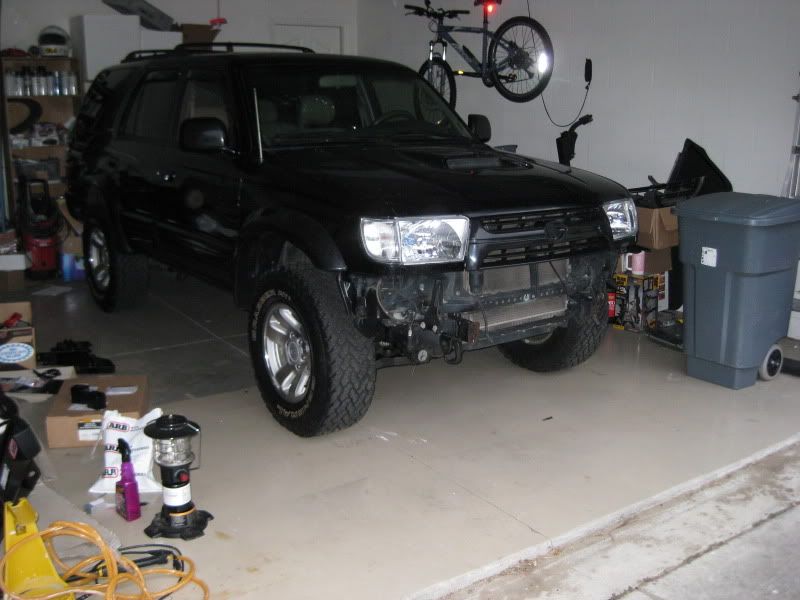
Take off the front brackets, tow hook, tie downs, and crush cans. Next get ready to cut. Now here's the magic info everyone needs. These guys here circled in red, the end plates, cut them off.
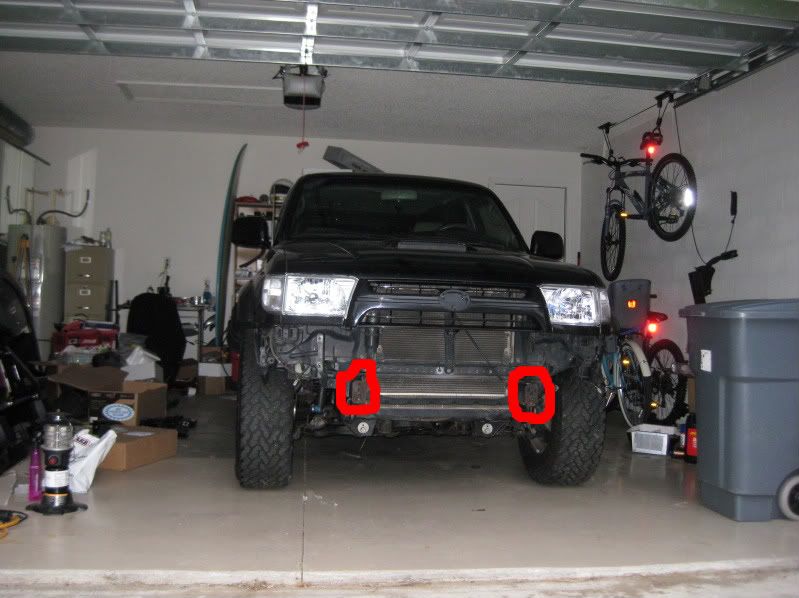
How you do it is up to you; cut off wheel, hack saw, sawzall, plasma cutter, plastic butter knife; whatever floats your boat.
Then you end up with something like this, well after a little paint for protection.
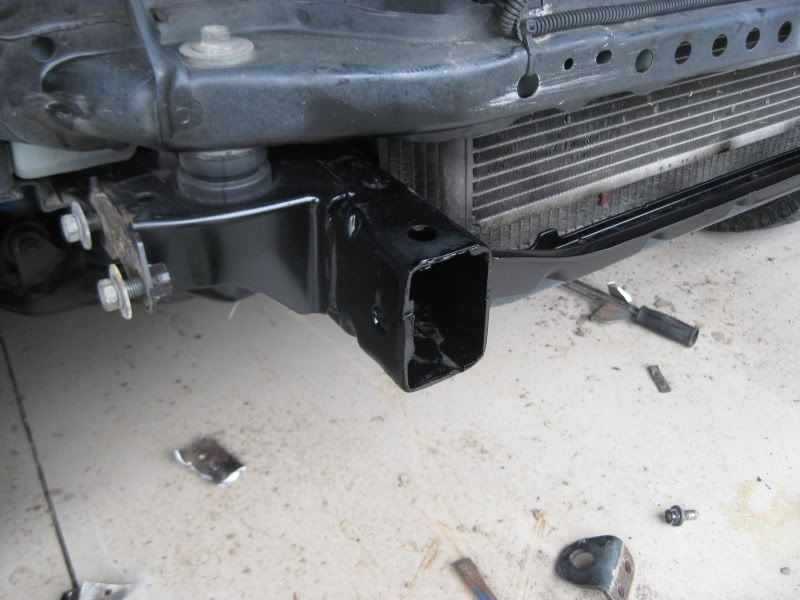
Here's both of the front frame rails finished.
Now this step isn't all that necessary, but I feel it's a good idea. Rub some wax on the outside of the frame rail.
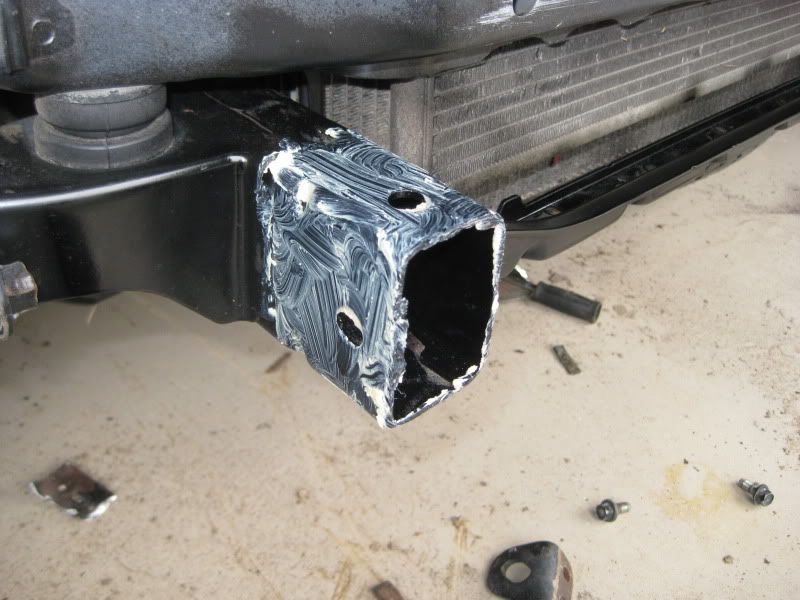
And on the inside of the ARB bracket.
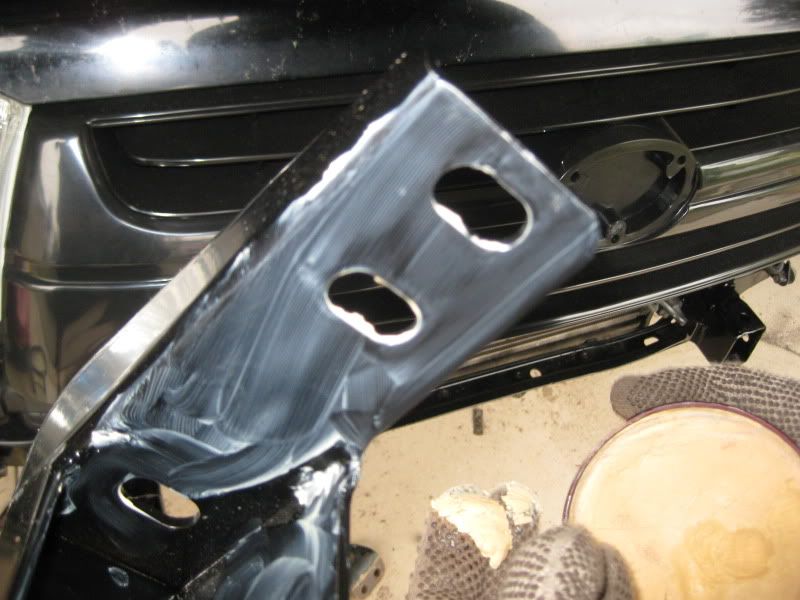
The wax does two things. First, it makes the brackets slide on to the frame a little easier. Second, it helps protect from corrosion. Again it's not a necessity, but this is what I did.
Now that we got that done, slide the brackets on and LOOSELY bolt them on. You'll notice that the forward most hole in the bracket does not have a corresponding hole in the frame. You have to make one. Start with smaller drill bits and slowly progress to a 1/2" bit.
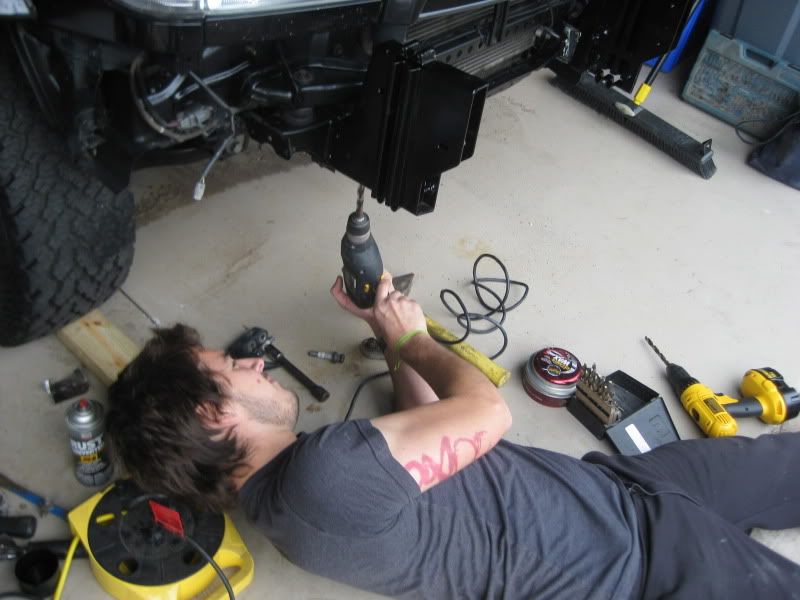
Then slide the giant bolt that came with your kit through the bracket and frame from bottom to top and put the nut on it. Again do not tighten it yet.
Now you can lift the bumper into place and, once again, loosely bolt it on. Then you can line it up.
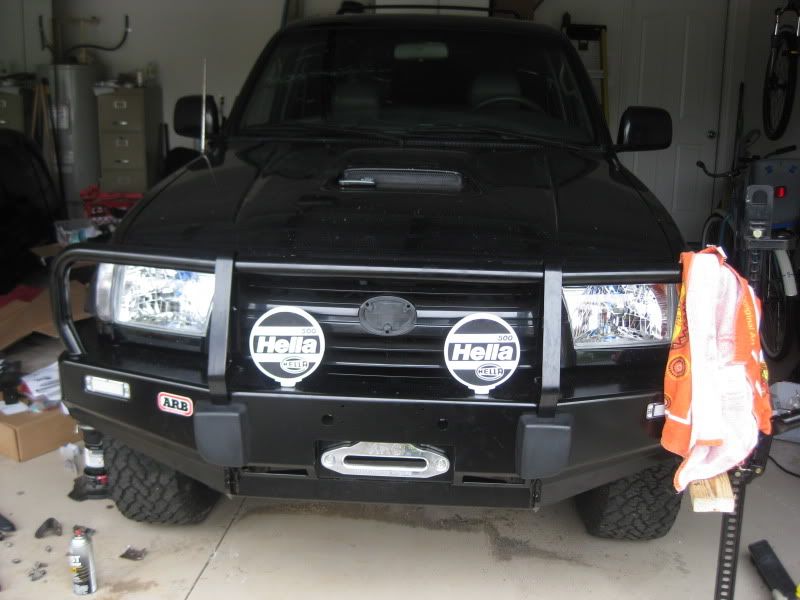
Once you got it all lined up how you like, tighten everything down. Make sure to leave a gap between the bumper and the body. About a 1/2" is good. This keeps the bumper from eating the body as the frame and body twist and shift.
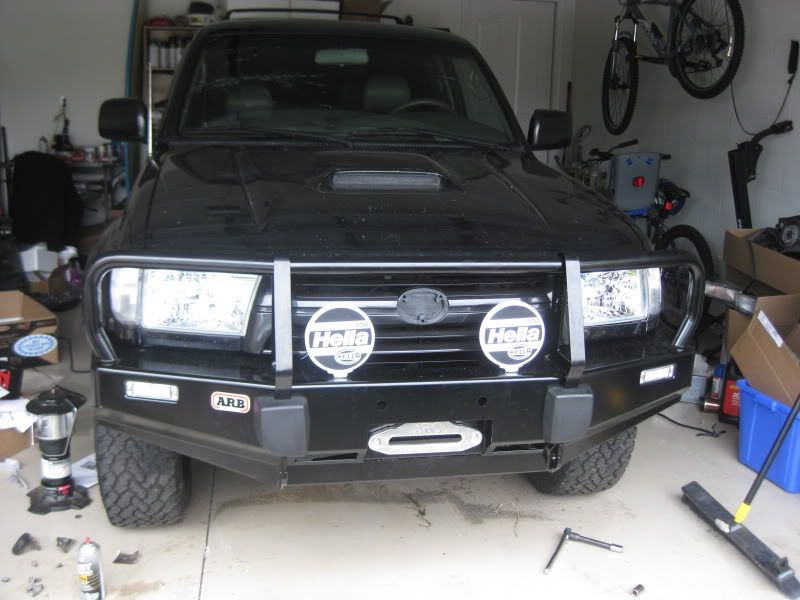
Now you can hook up all your lights, hook up and spool your winch, and your ready to smash into trees. Oh, don't forget your skid plate extension. It's pretty self explanatory.
Well, that my take on it if you have any questions or additions tear it up!
So I figured I'd make an attempt at showing how it's done as simply as possible. Here we go.
This is what you start with.....
Unpack it and slap it all together........
Now, every winch is different so we'll save that for another time, besides not everyone is installing a winch with the bumper. Putting the bumper together is pretty straight forward and I didn't bother to photograph it. It's pretty self explanatory. One thing I have noticed is a lot of people install the bumperettes upside down. THE FLAT SIDE GOES UP. You'll see later.
Back to the project, strip the bumper off your rig and you should be looking at something similar to this.
Take off the front brackets, tow hook, tie downs, and crush cans. Next get ready to cut. Now here's the magic info everyone needs. These guys here circled in red, the end plates, cut them off.
How you do it is up to you; cut off wheel, hack saw, sawzall, plasma cutter, plastic butter knife; whatever floats your boat.
Then you end up with something like this, well after a little paint for protection.
Here's both of the front frame rails finished.
Now this step isn't all that necessary, but I feel it's a good idea. Rub some wax on the outside of the frame rail.
And on the inside of the ARB bracket.
The wax does two things. First, it makes the brackets slide on to the frame a little easier. Second, it helps protect from corrosion. Again it's not a necessity, but this is what I did.
Now that we got that done, slide the brackets on and LOOSELY bolt them on. You'll notice that the forward most hole in the bracket does not have a corresponding hole in the frame. You have to make one. Start with smaller drill bits and slowly progress to a 1/2" bit.
Then slide the giant bolt that came with your kit through the bracket and frame from bottom to top and put the nut on it. Again do not tighten it yet.
Now you can lift the bumper into place and, once again, loosely bolt it on. Then you can line it up.
Once you got it all lined up how you like, tighten everything down. Make sure to leave a gap between the bumper and the body. About a 1/2" is good. This keeps the bumper from eating the body as the frame and body twist and shift.
Now you can hook up all your lights, hook up and spool your winch, and your ready to smash into trees. Oh, don't forget your skid plate extension. It's pretty self explanatory.
Well, that my take on it if you have any questions or additions tear it up!
 02-05-2010, 02:23 AM
#4
Registered User
Join Date: Nov 2005
Location: Toronto, ON
Posts: 548
Likes: 0
Received 0 Likes
on
0 Posts
A few comments...
- Instead of fully cutting the end plates you can cut only one side of it. Its better as you save ridgidity of the frame end, or you can weld a new end plates to close up the end.
- In place of wax, I used Anti-Seize as it last much longer and offers very low friction
- You can slide the winch after the bumper install from under the bumper. In this case bumper would weight nearly 80lbs less when you installing it.
02-05-2010, 05:33 AM
#5
Registered User
Thread Starter
Join Date: Oct 2009
Location: Tampa, FL
Posts: 112
Likes: 0
Received 0 Likes
on
0 Posts
-Twitchee 2- I'll snap a pic today when I get home. I prefer this look to the larger Prado bumper, but to each their own.
-Elton- I got the turn signal covers from www.gamiviti.com. They were $30 shipped, and I think they make the Taco bumper look a little newer and cleaner.
-AlexJet- Perhaps your install was different as I believe you installed the old Sahara bumper that was actually made for the 4runner. On the Taco bumper you have to cut off all four sides, at which point it will just fall off, as that is where it is welded. I agree with the suggestion of welding on new end plates, as many have suggested, and I may do that if and when I remove the bumper to freshen up the paint.
-As far as the anti-seize vs. wax, it's what I had handy. I'm sure your way works just as good if not better.
-Yes I probably could have installed the winch after the bumper, but it would have been a PITA. As far as the extra weight I just took off my skirt and was able to place it myself with the winch in place. It wasn't that heavy.
02-05-2010, 05:42 AM
#6
Contributing Member
 02-05-2010, 06:14 AM
#7
Contributing Member
Wait so did you install the winch after the bumper was installed or before?
Looks good.
I may be picking up a winch here this month. Don't wanna take the damn bumper off though.
Looks good.
I may be picking up a winch here this month. Don't wanna take the damn bumper off though.
Trending Topics
02-05-2010, 06:35 AM
#8
Registered User
Thread Starter
Join Date: Oct 2009
Location: Tampa, FL
Posts: 112
Likes: 0
Received 0 Likes
on
0 Posts
Before, it's easier that way. I just sat the winch on a bucket, sat the bumper on top of the winch, and bolted it all together. Easier than maneuvering an 80 pound winch into a little hole and lining up the bolt holes. As far as taking the bumper off, just mark your holes and pull it it's only 6 bolts. Your rig looks beastly by the way.
02-05-2010, 06:42 AM
#9
Registered User

Join Date: Nov 2007
Location: vancouver, bc
Posts: 54
Likes: 0
Received 0 Likes
on
0 Posts
i had 3/8" plates (only plates my machinist/fabricator buddy had laying around) and we put a nut on the inside of the plate, and welded those onto the open frame end on my 4runner... sorta like the tacoma frame plate mod... a MUST if you actually decide to use your winch...
02-05-2010, 08:14 AM
#10
Registered User
Join Date: Nov 2005
Location: Toronto, ON
Posts: 548
Likes: 0
Received 0 Likes
on
0 Posts
-AlexJet- Perhaps your install was different as I believe you installed the old Sahara bumper that was actually made for the 4runner. On the Taco bumper you have to cut off all four sides, at which point it will just fall off, as that is where it is welded. I agree with the suggestion of welding on new end plates, as many have suggested, and I may do that if and when I remove the bumper to freshen up the paint.
-As far as the anti-seize vs. wax, it's what I had handy. I'm sure your way works just as good if not better.
-Yes I probably could have installed the winch after the bumper, but it would have been a PITA. As far as the extra weight I just took off my skirt and was able to place it myself with the winch in place. It wasn't that heavy.
I did installed winch on my truck after the bumper was on even ARB strongly suggested to do it before putting the bumper on. I even had a call when the rep said it would not fit and it actually did, tight (1/4" gap when I slide it in), but it did work. They were surprised. Looking at my wife's Runner and the fact that the gap is much larger it would be an easy to do so. Just my personal experience.
02-05-2010, 09:00 AM
#11
Registered User
Alex, I'm not sure what you mean about the frame ends either. Unless you cut the whole piece off, the bumper mounts won't slide over the rail - there's too big of a lip on the end piece. And if you try to grind it flush (like I did at first), the piece falls off either way. It's basically just tacked on there.
SafariRNR,
Nice write-up and the bumper looks great. Nice runner too!
SafariRNR,
Nice write-up and the bumper looks great. Nice runner too!
02-05-2010, 09:58 AM
#12
Registered User
http://www.nwtoys.com/tech/frame-endcap
If you do not weld in a piece of THICK plate steel in the end of the frame rail for the bumper to bolt to you will have BIG problems winching. What will happen is that bolt that goes from the bottom of the frame tube to the top of the frame tube will litterlly rip the frame apart when winching.
See above link
FOG
02-05-2010, 10:12 AM
#13
Registered User
I agree w/ FogRunner, the ends should be reinforced before winching with it and there's nothing wrong with that method, it's the standard. However, I reinforced mine a different way that I think is much easier. Although I don't have a winch yet, I've hooked up the tow strap quite a few times and pulled cars, trucks, and even trees down with my ARB and it (and my frame rails) are holding up perfectly. So, I consider this way a viable option too:
Bolt the bumper mounts on the frame rails and make a 1" weld on the top where it meets the frame, both sides, and even the bottom (at the end of the long piece). BTW, All the 1" welds would be easy to grind if you ever needed to take the bumper off. Then just hit it with some black Rustoleum and you're good to go.
Bolt the bumper mounts on the frame rails and make a 1" weld on the top where it meets the frame, both sides, and even the bottom (at the end of the long piece). BTW, All the 1" welds would be easy to grind if you ever needed to take the bumper off. Then just hit it with some black Rustoleum and you're good to go.
02-05-2010, 10:26 AM
#15
did you find a way to reinforce the bumper for the winch with the bumper raised up like that? ive always wanted to raise my bumper up an inch to match the body lift but everyone tells me it would be too weak to winch anything. if you could figure out a way to reinforce it i think you would be the first person with a winch with a raised bumper, at least on this site
02-05-2010, 10:57 AM
#16
Registered User
did you find a way to reinforce the bumper for the winch with the bumper raised up like that? ive always wanted to raise my bumper up an inch to match the body lift but everyone tells me it would be too weak to winch anything. if you could figure out a way to reinforce it i think you would be the first person with a winch with a raised bumper, at least on this site
But once you raise the bumper and winch you a lever effect that is putting a downward bending force on the frame rather that the straight pulling force of a normal inline winch/bumper.
I've seen it done twice and both times in resulted in the top of the frame rail being cracked open during a hard winch pull.
FOG
02-05-2010, 11:06 AM
#17
Registered User
Join Date: Jul 2004
Location: HB, CA
Posts: 384
Likes: 0
Received 0 Likes
on
0 Posts
You definitely have to do the endcap mod on a tacoma since you have to add the extra frame extension blocks. It's basically only held to the front of the frame and the tow hook bolts. On the 4runner (longer frame), long bolts go through the frame vertically(not to the front), and not super close to the end from what I remember. I doubt that bolt will rip through the frame.
Last edited by CYi5; 02-05-2010 at 11:07 AM.
02-05-2010, 11:42 AM
#18
Registered User
Join Date: Nov 2005
Location: Toronto, ON
Posts: 548
Likes: 0
Received 0 Likes
on
0 Posts
Alex, I'm not sure what you mean about the frame ends either. Unless you cut the whole piece off, the bumper mounts won't slide over the rail - there's too big of a lip on the end piece. And if you try to grind it flush (like I did at first), the piece falls off either way. It's basically just tacked on there.
SafariRNR,
Nice write-up and the bumper looks great. Nice runner too!
SafariRNR,
Nice write-up and the bumper looks great. Nice runner too!
 02-05-2010, 11:45 AM
#19
Registered User
Join Date: Nov 2005
Location: Toronto, ON
Posts: 548
Likes: 0
Received 0 Likes
on
0 Posts
http://www.nwtoys.com/tech/frame-endcap
If you do not weld in a piece of THICK plate steel in the end of the frame rail for the bumper to bolt to you will have BIG problems winching. What will happen is that bolt that goes from the bottom of the frame tube to the top of the frame tube will litterlly rip the frame apart when winching.
See above link
FOG
If you do not weld in a piece of THICK plate steel in the end of the frame rail for the bumper to bolt to you will have BIG problems winching. What will happen is that bolt that goes from the bottom of the frame tube to the top of the frame tube will litterlly rip the frame apart when winching.
See above link
FOG
Meanwhile Prado version has much better mounting solution. As of example my Prado Sahara have the Prado style mount as on the picture bellow, but with incorporated crach zones from the Tacoma mount you have in post 1, image 9.

Last edited by AlexJet; 02-05-2010 at 11:49 AM.
02-05-2010, 12:12 PM
#20
Registered User
Was the wife at work when ya took that picture ?? If my wife came home and saw I had large car parts like a bumper, winch and support hardware in the house ON THE CARPET I would end up in the doghouse BIGTIME.
FOG


