

 Mar 30, 2016, 10:00 AM
Last edit by: IB Advertising
See related guides and technical advice from our community experts:
- Toyota Tacoma 231mm Tundra Brake Upgrade<br>Step by step instrucstions for do-it-yourself repairs.

'01 Tundra Brakes installed on '98 Gen 3 4Runner
May 27, 2008 | 11:57 AM
#1


'01 Tundra Brakes installed on '98 Gen 3 4Runner
 Well I did the Tundra brake mod this weekend. What a satisfying and rewarding mod that was. Never having done a brake job on disc brakes made me a bit apprehensive, but it is really a very simple project. Want to say a huge THANK YOU to Rockslide for his insightful look and excellent write up on his install as well as the inputs I got from several of you fellow Techers who offered information on TSB that Toyota issued on the Tundra brakes.
 If you are going to do this upgrade (recommended indeed) check out his write up here: https://www.yotatech.com/forums/f2/t...ss-red-133294/
Very complete if you decide to go with all new replacement brakes which is a gr8 way to go.
 As for myself, I tried to be a bit more economical and with some perseverance, I was successful and saved myself some money at the same time.
A foot note here, I used all Toyota OEM parts that were obtained from salvaged vehicles. If you chose to do this upgrade using 'used' parts, be aware that you need to do a thorough inspection of those parts before preceeding. I obtained a set of calipers and rotors from a late production 2001 Tundra. The pads may have been replacement pads as they were Raybestos brand but the thickness was almost the same as new. Removal and installation will require the following tools:
�” drive ratchet
17mm socket
10mm combination wrench
Needle nose pliers
8" flat mill bastard file
Floor jack
Jack stands (1 pair)
Supplies:
01 Tundra front calipers
01 Tundra front rotors
Tundra brake pads
Bottle DOT3 brake fluid
My write up will describe how I disassembled and installed 2001 Tundra brakes on my Gen 3 1998 4runner. I did encounter one problem during fitting and this issue was not addressed on any of the write ups I found on several different installs of this mod.
It has been noted that using the 199mm calipers vice the 231mm calipers requires no modification of the dust shields and everything is a direct bolt up. I will vouch for the direct bolt up but I still had to file the dust shields on both wheel hubs in order to fit the Tundra rotors without interference. This may have been an anomaly, but be advised, you may have to do some custom fitting as I did.
I did not understand what portion of the dust shield was contacting the rotor or where. After fitting up the rotor, I tried to rotate the wheel and the wheel would move to a spot then bind. I removed the wheel/rotor and could not find any markings that was showing me where or why the wheel was binding. As in the other write ups and mod descriptions, the location on the dust shield that would need modifing for the 231mm calipers was never shown or described. I had the 199mm calipers as best as I could determine and there was no interefence with the caliper and wheel itself. I finally was able to determine where the interference was and used a flat mill bastard file, removed enough metal on the shields to allow for a perfect fit and maintained the shape and contour of the OEM dust shields.
 I located a 2001 Tundra that had relatively low mileage. I checked the pad thickness as well as the condition and thickness of the rotors. Both were in excellent condition with the exception of some surface rust and some minor grooving on one side of one rotor. The thickness was within specfications. The pads showed no excessive wear, glazing or missing portions of the pads. If you are concerned about the pads I would recommend obtaining new OEM pads before you begin. I was going to get a caliper rebuild kit but after talking with a Toyota parts rep that had been a Toyota tech, he convinced me that I could save myself some time and money. He stated that the dealership he was at (in Seattle area) had not had any instances of Tundra calipers needing to have the pistons, boots or anything else replaced/rebuilt. He recommended, bolt them up and go. He also recommended that if the pads were in good condition, check for cracks, breaks, grooves and just use 150 grit sand paper and clean the surface of the pads. He also recommended that I have the rotors turned on the vehicle. Not able to do that so he then recommended that I have them ‘match marked’. Wasn’t able to totally do that as I did not have the tools to do that. I will describe what I did to compensate for not having the optimum installation.
 NOTE:
NOTE: Disclaimer: As with all modifications, this write up is for educational purposes only. Any use or application of this procedure is done so at the risk of the installer/owner. The author and YotaTech are not responsible for any modifications done to any vehicle using these or any other related procedures contained in this write up. Descriptions and photographs are the sole property and copyright of the author and may not be copied or distributed without written consent. Links to this article may be allowed but are protected by all US copyrights. Use of specific products along with any photographs of such items remains the copyrighted property of the copyright holder and is not an endorsement of any specific company or items.
To begin, place the vehicle on flat level ground. Block the rear wheel. Place the jack under the front lower A arm.
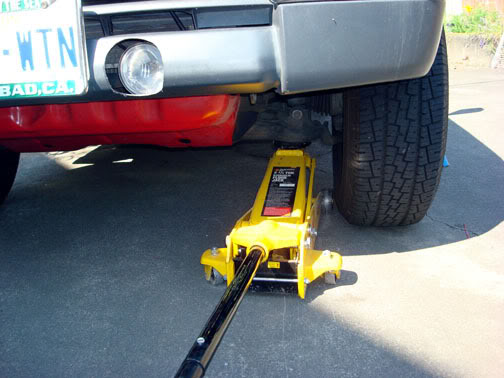
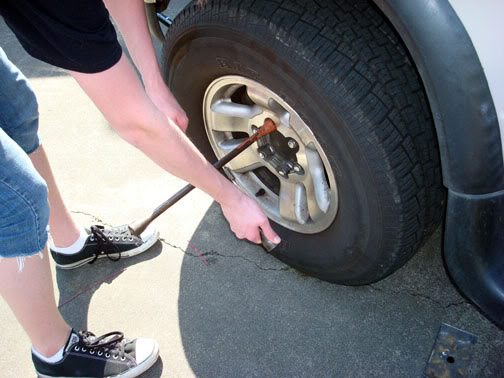
Lift vehicle slightly to take the weight off the suspension but so the tire remains in contact with the ground. Break loose the lug nuts but do not remove them just yet.
Continue raising the vehicle until the jack stand can be placed under the frame located aft of the wheel.
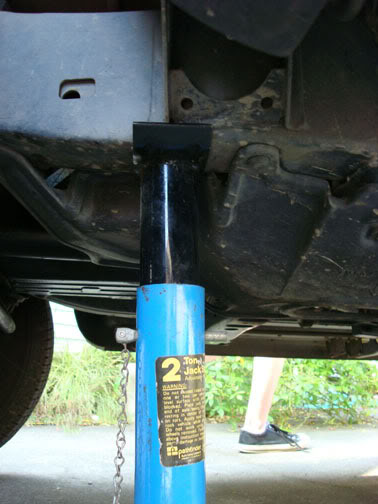
If you can not obtain enough ground clearance to support the vehicle on the jack stand with the wheel clear, then remove the wheel at this time. Slowly lower the vehicle onto the jack stand.
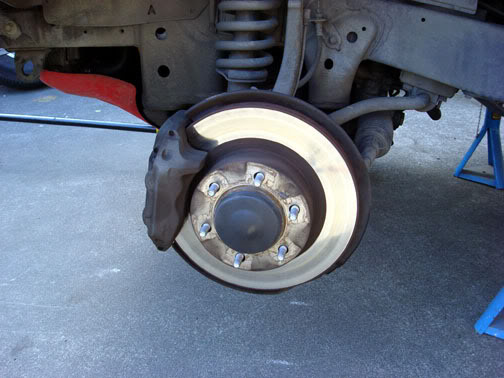
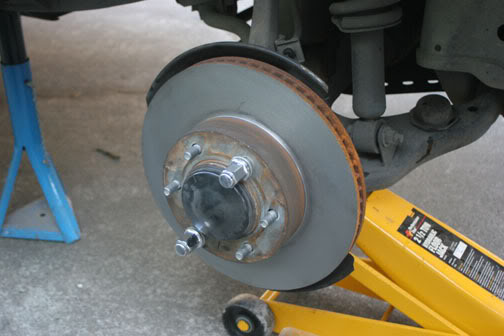
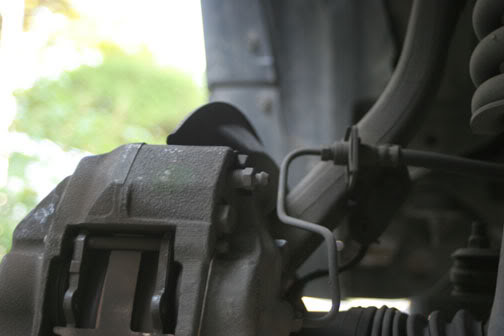
This is the front with the wheel removed:
Prepare to remove the caliper and rotor as follows:
Place a suitable container under the front caliper to catch leaking brake fluid.
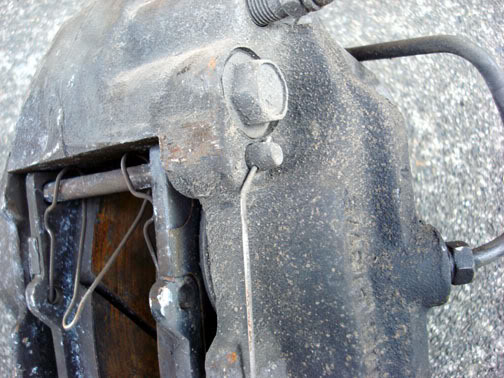
Break loose the 10mm collar nut holding the brake line to the caliper.
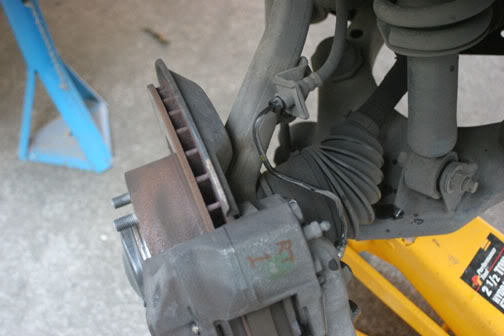
Once the nut has been completely loosened, gently pull the brake line out of the caliper. The fluid will continue to drain unless you have some way of sealing the end of the line so be sure to have a large enough container to catch the fluid.
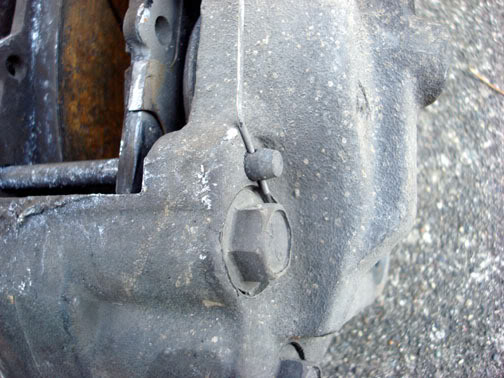
Using a 17mm socket and ratchet remove the lower and upper caliper attachment bolts
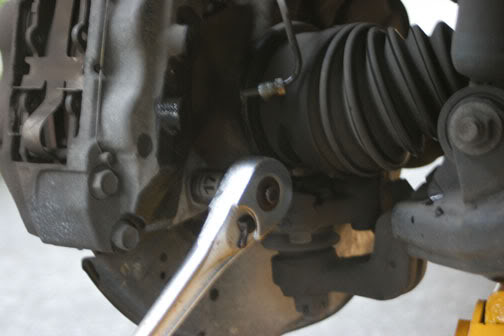
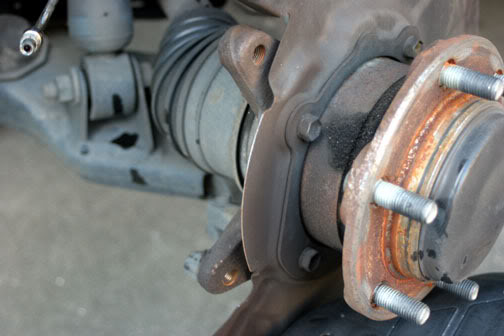
You should now be able to lift the caliper off the rotor. Remove the rotor from the hub. It may be necessary to use a large ball pean hammer to ‘persuade’ the rotor to come off. Lightly tap around the hub breaking the rust seal on the rotor. Remove the rotor from the hub.
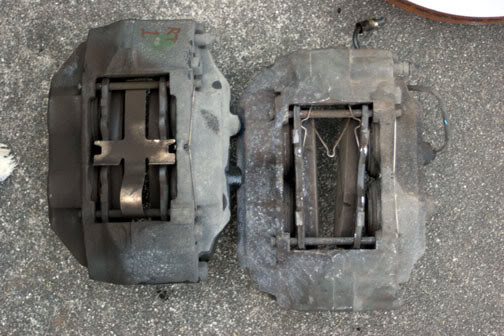
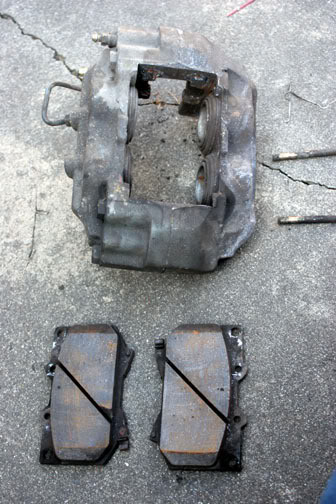
This picture shows the two calipers side by side so you can see the differences. The 4runner caliper is on the left and has a large spring shield.
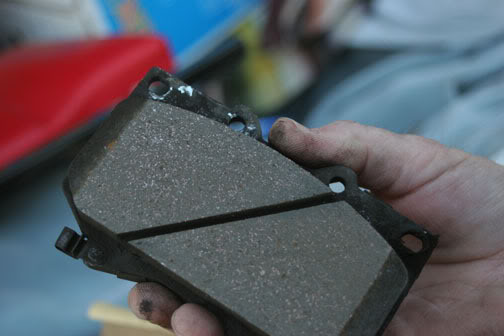
The Tundra pads are retained in the caliper using two pins, pin retaining spring, and pad retaining spring.
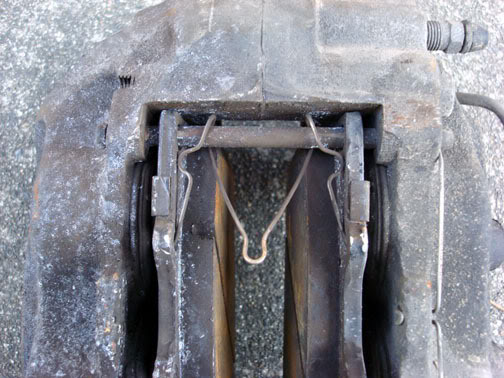
Remove the upper and lower pin retaining spring.
Remove the ends of the pad retaining spring from each pad.
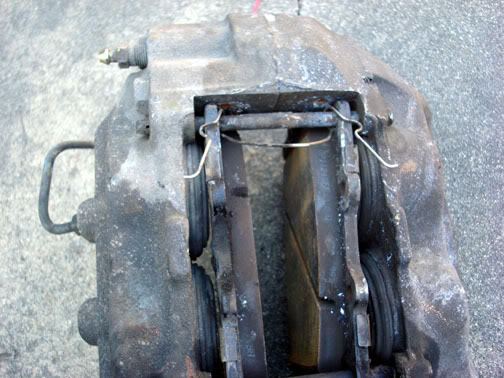
Push the pins out of the caliper and pads, upper and lower.

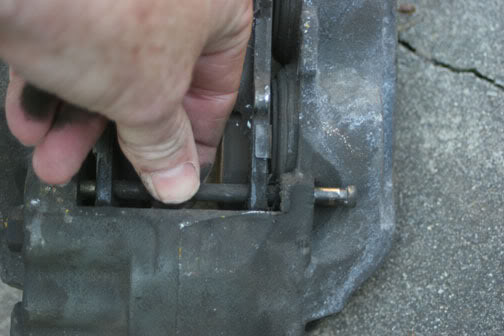
Remove the pads from the caliper.
If you are going to replace the pads skip down to reassembly
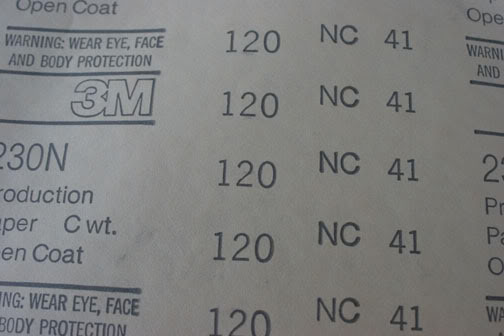
Using 120 grit sand paper, place the sand paper on a flat work surface. I used a 2x12.
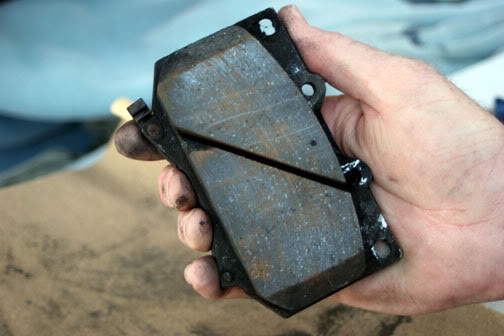
Note any markings, glazing, burnishing or ridges and gouges in the pads.
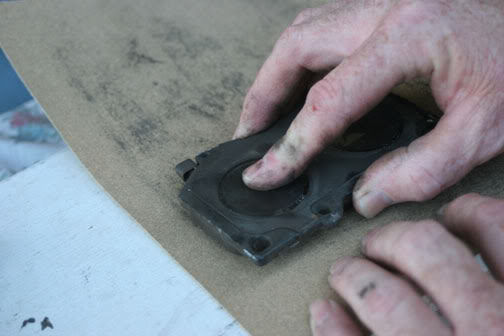
Place the pad directly on the sand paper and pull the pad towards you. Turn the pad � turn and repeat until the pad has been cleaned and roughened.
Check to see that all imperfections of the pads have been removed.
REASSEMBLY
Reassemble the calipers and pads. This procedure is virtually the reverse order in which you disassembled the calipers and pads previously. Place the upper pad spring in position before you insert the upper pin. Install the upper pin.
Note the side of the caliper that the pin retaining spring is installed. You must insert the pad retaining pin in from the opposite side of the caliper.
After both pins are installed, install the retaining pins retaining spring into both the upper and lower pin then snap the center coil of the pin retaining spring into its location on the caliper.
Insert the pad retaining spring ends into the holes in each of the pads.
Install the rotor onto the hub. Use two of the lug nuts to hold the rotor in the correct position for installation of the calipers.
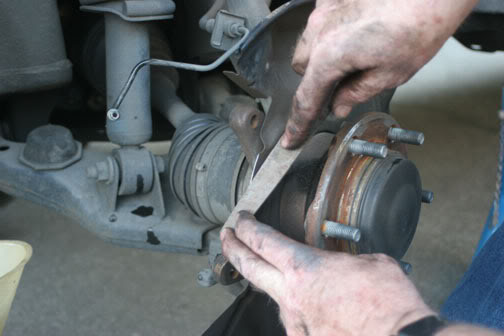
Attempt to rotate the rotor to ensure that there is sufficient clearance of the dust shield and the rotor. If any tightness is detected or grinding noises are heard, remove the wheel and rotor. It may be required to rotate the rotor on the hub studs. Attempt again. If there is still contact or rubbing on the dust shield, you will need to cut down the dust shield in order to allow non-interference of the dust shield and the rotor.
Check the dust shield. Use the file to remove a small amount of the dust shield edge.
Once the proper clearance has been obtained, install and center the rotor using the lug nuts,
Place the caliper on the rotor and install the upper then lower caliper attachment bolts.
Tighten securely.
Install the brake line fitting to the caliper and tighen. Ensure both ends of the brake line are secure.

I would recommend bleeding the brakes at this point before installing the wheel. Check the fluid level of the brake master cylinder. Top off as necessary. Using a second person in the cab, have them pump up the brake pedal several times then hold it firmly down. Open the brake bleed valve about a � turn or until fluid/air begin to issue from the nipple then tighten. The brake pedal will go to the floor. Ensure that your helper maintains pressure on the pedal until after you tighten down the bleed valve nipple.
Repeat this process until a solid stream of brake fluid issues from the nipple. Check your fluid level and top off again as necessary. Repeat on the opposite side caliper.
Once both sides have been bled, install the wheels, jack up the vehicle, remove the jack stands, and slowly lower the wheels until the contact the ground. Hold the vehicle in this position, tighten the lug nuts securely then completely lower the vehicle and remove the jack. Reverify the torque on the lug nuts. Road test vehicle. Test brakes in both directions (forward and reverse). After road testing, if the brakes seem mushy, bleed the brakes and road test again.
My cost to do the mod:
$50-Rotors and calipers (used)
$28-Rotors turned local auto parts store (Westbay, Silverdale- NAPA)
$2 - Bottle STP brake fluid
Total cost:$80
Installation time was under 3 hours. Remember this is the first time I have ever done brakes so anyone with reasonable mechanical skills can do this.
Enjoy better performance and stopping power.

UPDATE: REPLACED ROTORS and PADS
I decided on this upgrade as I wanted to have better braking performance over all and avoid over heating and warping of my stock 4runner rotors. If you are looking at having to replace your current rotors and brakes then take a look at upgrading to the Tundra calipers and then going with NAPA Ultra Premium rotors and Adaptive One pads.
You could effectively save some cash by just picking up a set of the calipers from a wrecked Tundra for around $50 depending on your local wrecking yard prices. Check them out carefully to ensure no damage to the castings. Pick up the new NAPA parts mentioned below and you will have a solid no worry front braking system. You should not have to worry about having to "rebuild" the pistons. Toyota factory mechanic at my local dealership told me in the 10 years he has seen the Tundras coming in he has yet to have to rebuild any calipers.
My total investment in my initial upgrade then was less then $100. 18 months later I started to get a bit of shimmy when I braked, but not all the time, took the truck to Midas to have it inspected and then to get an estimate. This told me what I needed to do and I found out that my right rotor would not turn (below minimum legal limits) and the left would go one more time.
Went to NAPA and picked up the Ultra Premium rotors along with a set of the Adapative One composite pads. These are a bit unique in that they are matched, inner to outer, with different compouonds for each side of the set. Super easy to install, if you can do the upgrade then you can do the rotor and pad install. I was VERY impressed with these pads and rotors! Install was like I said EASY!
Been over a year now and they are still performing with outstanding stopping performance. Check out this link about Adaptive One pads. http://www.adaptive1.com/
Here is the spec sheets and costs for the rotors and pads.
Ultra premium rotors:http://www.napaonline.com/Search/Det...+50070+2070029
Adaptive One pads (199mm calipers): http://www.napaonline.com/Search/Det...+50070+2070029
Adaptive One pads (233mm calipers): http://www.napaonline.com/Search/Det...+50070+2070029
Be sure to get the right pads for the calipers as there are two different size pads depending on your caliper size.
As for me, the rotors were $90 ($180 for the pair) and another $45 for the pads. I would recommend these to anyone who wants to do the upgrade. Hope this helps provide some more information on upgrading. They really do make a difference
Last edited by Ritzy4Runner; Nov 1, 2010 at 08:03 PM. Reason: Update for replacement rotors and pads
 May 27, 2008 | 12:33 PM
#4
Registered User
Joined: May 2006
Posts: 35
Likes: 0
From: Knoxville, TN
I just did this same upgrade about a week ago. I chose to buy new rotors and pads, but still only spent like $225 total. Not bad compared to my mother-in-law who's Sebring brake job cost her about $400!
Anyway, I just took a trip over the holiday weekend through the mountains near Asheville, NC. 2 adults, cargo area loaded down, A/C on and a 4 cylinder BMW engine on a trailer hitch rack. Not once did my steering wheel shake while braking and there was no fade coming down the mountain at all. So far the best modification I have done to my truck!
Anyway, I just took a trip over the holiday weekend through the mountains near Asheville, NC. 2 adults, cargo area loaded down, A/C on and a 4 cylinder BMW engine on a trailer hitch rack. Not once did my steering wheel shake while braking and there was no fade coming down the mountain at all. So far the best modification I have done to my truck!

Trending Topics
May 28, 2008 | 12:24 PM
#8
Oh and Ritzy, do not forget to break in your brakes properly. I should have mentioned this in my own write up...I just simply forgot too. (However, I have since rectified that.)
I know you went with used parts, but it is still a good idea to break them in properly to get the most use out of them as possible.
I have since added a good write up on proper brake break-in to my write up that I found off a Tundra Forum. Check it out when you get a chance.
I know you went with used parts, but it is still a good idea to break them in properly to get the most use out of them as possible.
I have since added a good write up on proper brake break-in to my write up that I found off a Tundra Forum. Check it out when you get a chance.
Jun 25, 2009 | 07:23 AM
#9
Registered User
Joined: May 2009
Posts: 16
Likes: 0
From: Louisville, KY
Thanks for the write-up. Did it last night, probably took all of two hours or so.
To plug the brake line we used a wine bottle cork (one that hadnt been used) and put a finger condom over it. Worked pretty well. Either way your going to lose some though.
The 199mm calipers couldnt fit any closer the stock 16inch, 6 spoke wheel.
Also, we only had to grind the middle part of the dust shield and not the top and bottom parts.
Brakes already feel better and no pulling.
 Aug 19, 2009 | 06:02 AM
#16
Aug 29, 2009 | 06:58 PM
#17
Registered User
Joined: Jun 2003
Posts: 60
Likes: 0
From: Flower Mound, TX
Very nice. Has anyone compared the Tundra upgrade to simply installing some PowerSlot slotted rotors or a diff. aftermarket rotor? I put PowerSlots on my first 3rd gen and it was crazy how much difference it made. I think 4-wheel auto parts charged me around $400 for rotors plus install.
Aug 29, 2009 | 08:23 PM
#18
Registered User
Joined: May 2009
Posts: 434
Likes: 2
From: Galveston, Texas
I tried power slots and several other aftermarket rotors before I knew about the trundra brake mod. All of them warped, some after just a month some after 2-3 months.
Aftermarket rotors cannot come close to how much of an improvement the Tundra swap makes IMHO.
Aftermarket rotors cannot come close to how much of an improvement the Tundra swap makes IMHO.


