LifterCatcher's 1993 4Runner Build-Up Thread
 08-14-2010, 07:47 AM
#21
Registered User
Thread Starter
Heck will not be doing this again anytime soon, but Ill help ya 
Matt,
You cannot actually wash them in the washing machine they have to be hand washed, the seat covers have metal rods that run through them. The metal rods are used to hold the seat cover down onto the seat. I hand washed them using a small brush, the garden hose and a bucket of water mixed with laundry detergent. I also must add that taking the seat covers off is not easy to do, there are a million little copper rings that you have to bend to get the seat covers off.
Today I will be working on painting the interior trim pieces.
Chris
Last edited by LifterCatcher; 08-14-2010 at 08:01 AM.
 08-14-2010, 02:52 PM
#22
Registered User
Thread Starter
Update time: It's freakin hot outside!
OK got some more work done today, and its really starting to look like a 4Runner again.
Best part of the day is that I was able to remove the old cheap alarm system with little to no problems, but I had a few. The person who installed the alarm system used some fuse taps that caused a lot of problems. These are the taps he used to tap wires into the fuse box.

It uses a metal piece that slips over the fuse and then you put the fuse into the fuse box. NEVER NEVER buy these or use these!!! Reason being is that the extra width causes the female adapters in the fuse box to be forced wider than they should be, a regular fuse without the tap will no longer fit into the fuse box. So after removing these junk taps and putting the fuses back in the dash gauges and AC quit working. It took me a little bit to figure out what the problem was but I got it taken care of. For future reference if you ever want to tap a power line from the fuse box make sure to use these devices called "ad a fuse" they are awesome, and I have used them on all of my vehicles.
They are a little more pricey but so worth it.

OK after spending a couple of hours getting the alarm system out, and cleaning up the wires I started to prep and paint some of the interior pieces, and they turned out amazing I am very happy, they match the Herculiner really well.
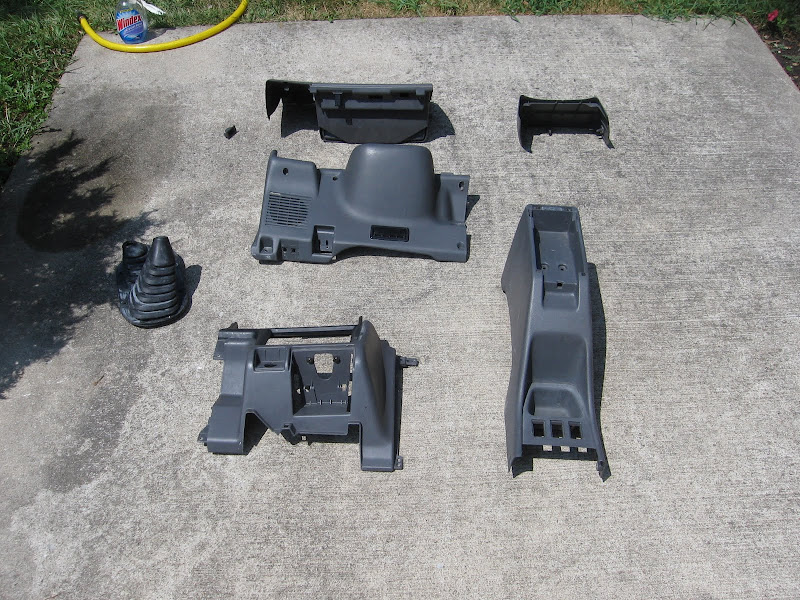
( Gray stock parts cleaned and drying in the sun.)
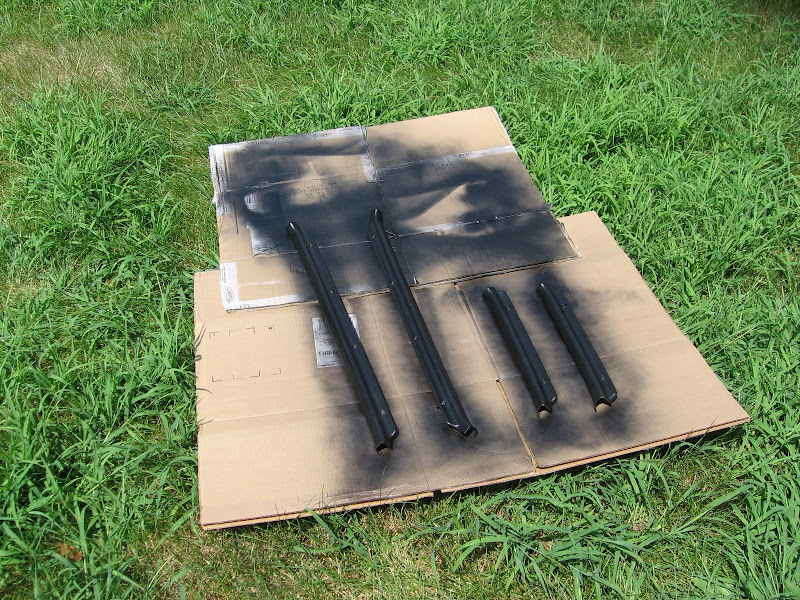
(lower trim painted and drying in the sun.)
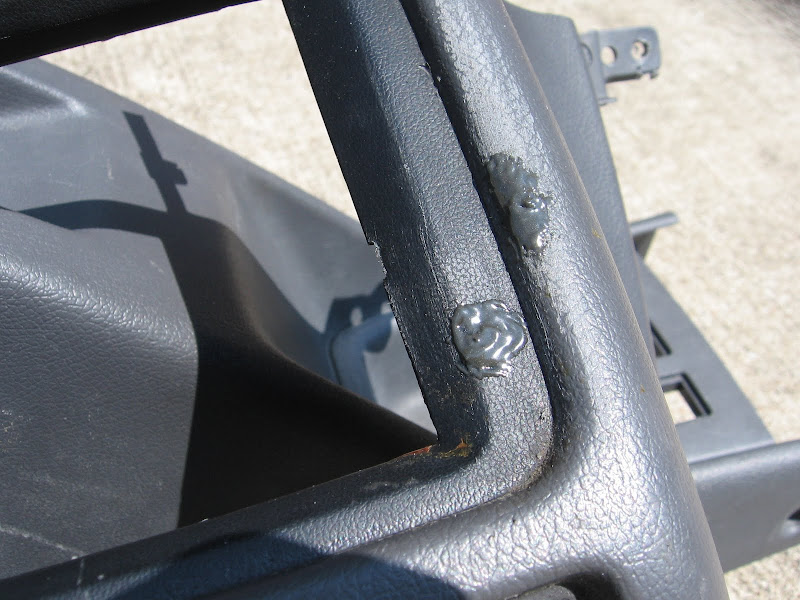
(The dash had a couple of screw holes drilled in them so I used some good ole JB weld to fill the holes and then sanded down the JB weld flush and its ready for paint, sorry I forgot to snap a pic of the sanded down dash piece.)
(Pass side kick panel painted and installed matches perfect.)
(Drivers side kick panel painted and installed )
)
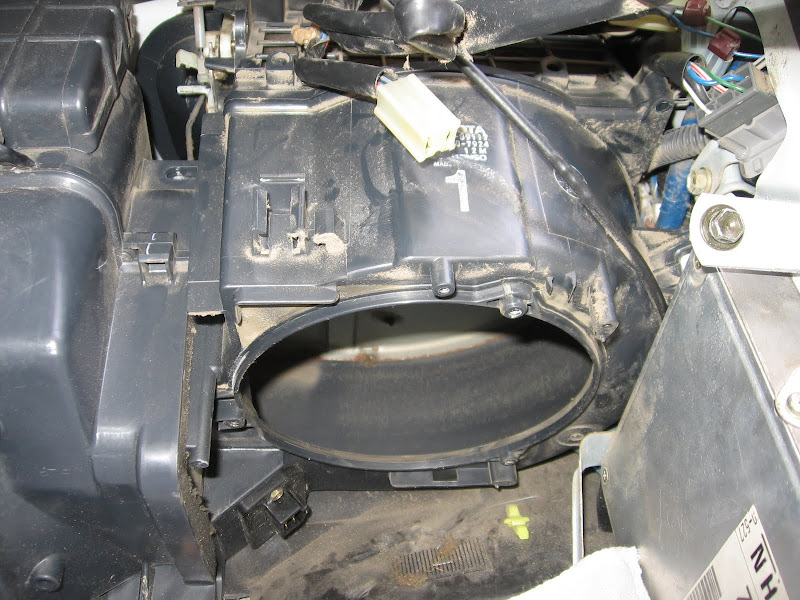
While some of the other trim pieces were drying in the sun I decided to try and locate the in cab air filter. Well I searched and searched to no avail, decided to take a little break from the sun and search Yota Tech to try and see if someone else has found the in cab air filter, conclusion is that the 2nd gen does not have one. So I decided to pull the blower motor and fan and give the system a thorough cleaning.
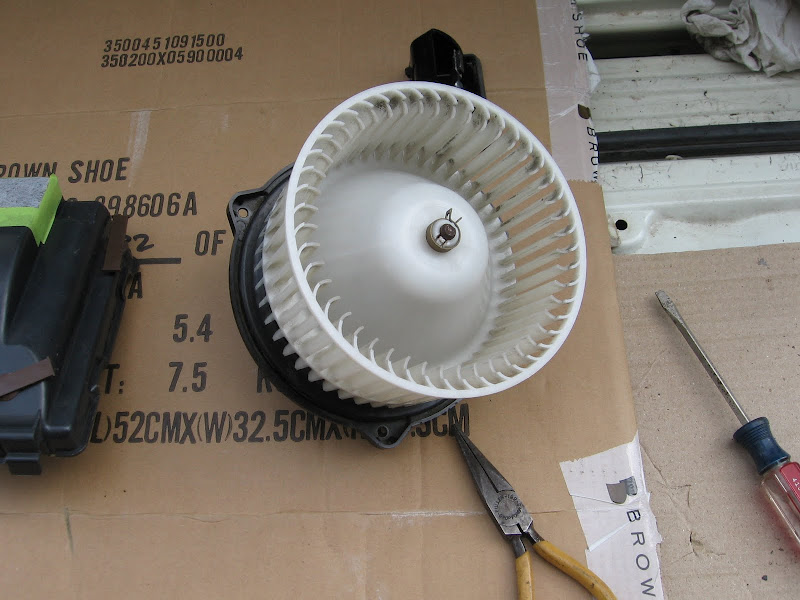
(Pulled the blower motor and fan)
(This pic is after the cleaning looks 100 times better forgot to snap a before shot but all the white you see was BLACK with dust and crap.)
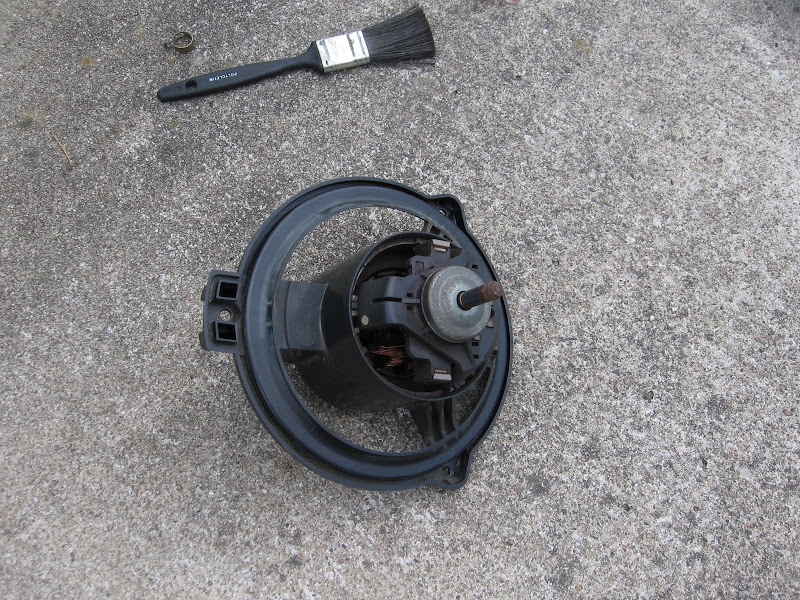
(Blower motor and fan separated, used a dry paint brush to clean the motor and motor housing.)
Since the 1st gen and 2nd gen do not have in cab air filters I decided to make my own I used a dryer sheet and cut it to fit over the in cab air circulation intake used some frog tape to hold it in place, don't worry once the glove box is installed you cannot see any of this. The dryer does two jobs, its thin and allows air to flow through it very easy and it also smells great
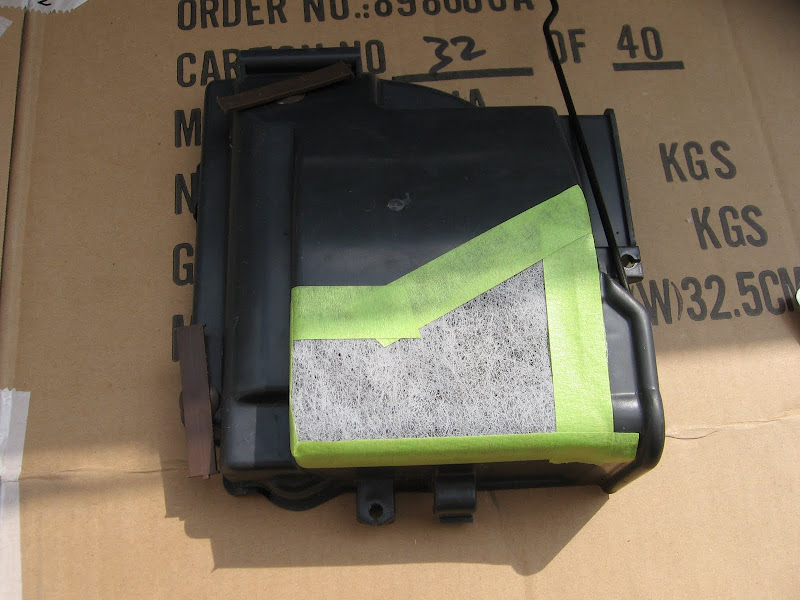

( This shot is from the inside looking out, you can also see how thin the dryer sheet is)
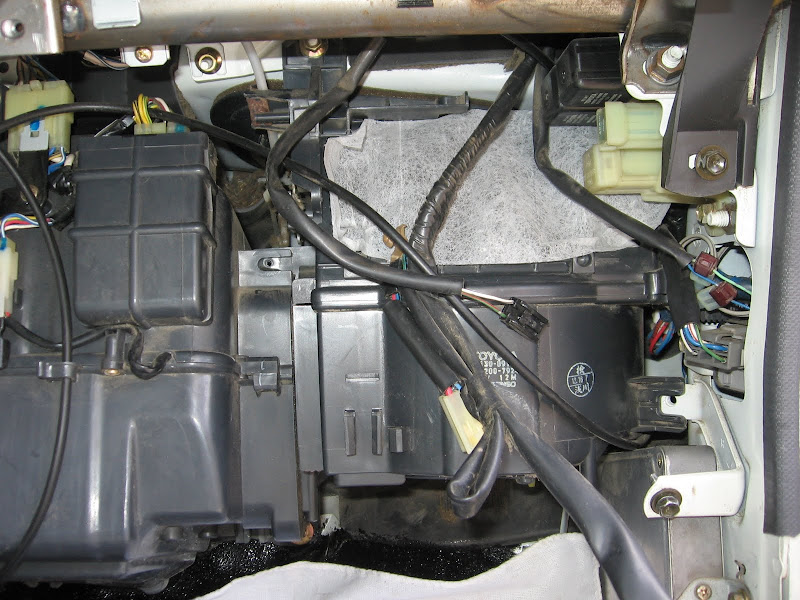
( Blower motor and fan installed after being cleaned, you can also see the other intake covered with a dryer sheet, I used a rubber band to hold in in place over the intake.)
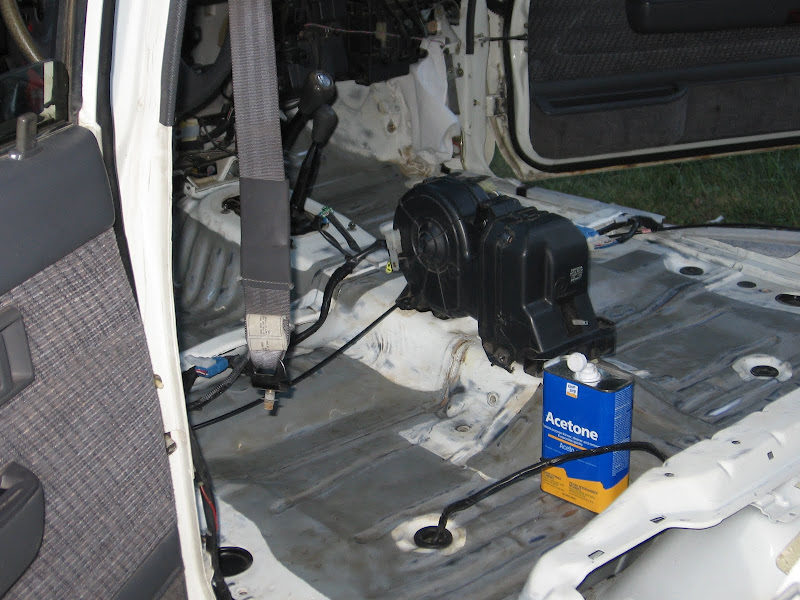
I also relocated the rear wiring harness. In stock form this wiring harness comes out directly under the front drivers seat and then does through the floor board to the under side of the truck right in the middle of the rear driver side seat area. If there was a passenger sitting in the rear seat behind the driver this wiring harness would be right in the way. You can see the wiring harness in the pic right to the left of the Acetone can.
(Here you can see the new location of the plug for the wiring harness, it moves the plug to the left of the drivers seat and out of the way of the rear seat foot area.
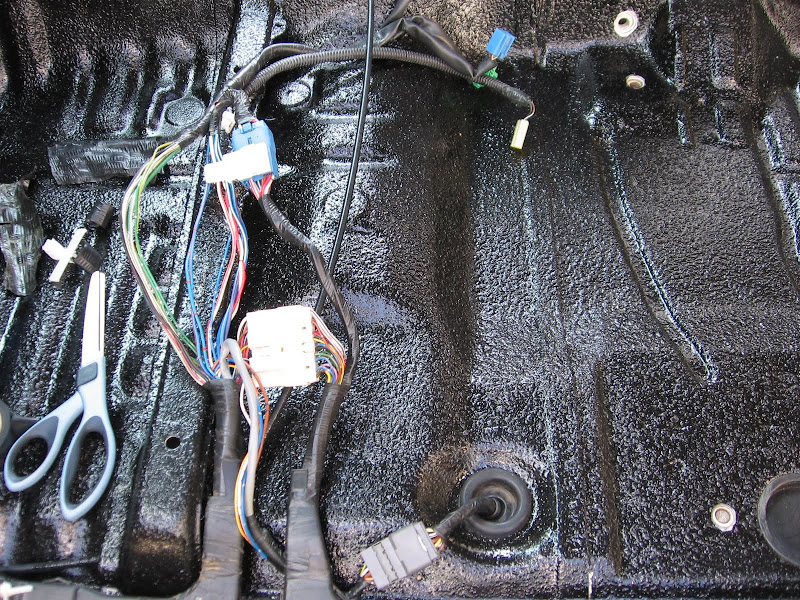
(In order to relocate the plug and harness I had to split the harness to gain access to the wires.)
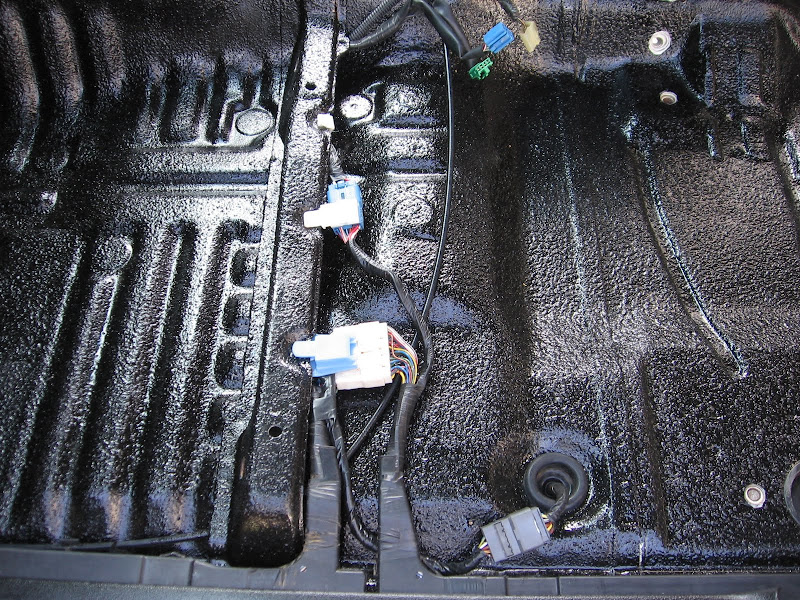
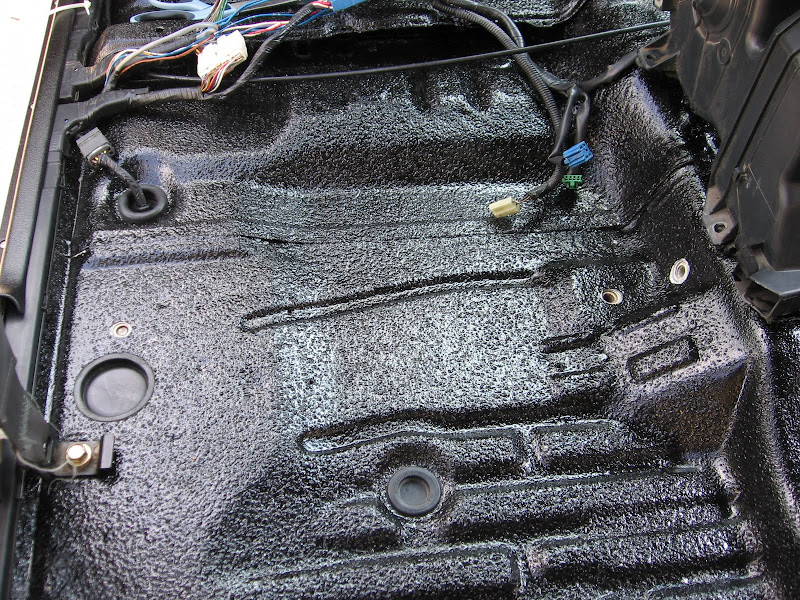
(Here is the final product Wiring harness all tapped back up and the plug and harness relocated. All of the wires that you see will be hidden under the drivers seat. It looks stock)
That it for now
Chris
Best part of the day is that I was able to remove the old cheap alarm system with little to no problems, but I had a few. The person who installed the alarm system used some fuse taps that caused a lot of problems. These are the taps he used to tap wires into the fuse box.
It uses a metal piece that slips over the fuse and then you put the fuse into the fuse box. NEVER NEVER buy these or use these!!! Reason being is that the extra width causes the female adapters in the fuse box to be forced wider than they should be, a regular fuse without the tap will no longer fit into the fuse box. So after removing these junk taps and putting the fuses back in the dash gauges and AC quit working. It took me a little bit to figure out what the problem was but I got it taken care of. For future reference if you ever want to tap a power line from the fuse box make sure to use these devices called "ad a fuse" they are awesome, and I have used them on all of my vehicles.
They are a little more pricey but so worth it.
OK after spending a couple of hours getting the alarm system out, and cleaning up the wires I started to prep and paint some of the interior pieces, and they turned out amazing I am very happy, they match the Herculiner really well.
( Gray stock parts cleaned and drying in the sun.)
(lower trim painted and drying in the sun.)
(The dash had a couple of screw holes drilled in them so I used some good ole JB weld to fill the holes and then sanded down the JB weld flush and its ready for paint, sorry I forgot to snap a pic of the sanded down dash piece.)
(Pass side kick panel painted and installed matches perfect.)
(Drivers side kick panel painted and installed
)While some of the other trim pieces were drying in the sun I decided to try and locate the in cab air filter. Well I searched and searched to no avail, decided to take a little break from the sun and search Yota Tech to try and see if someone else has found the in cab air filter, conclusion is that the 2nd gen does not have one. So I decided to pull the blower motor and fan and give the system a thorough cleaning.
(Pulled the blower motor and fan)
(This pic is after the cleaning looks 100 times better forgot to snap a before shot but all the white you see was BLACK with dust and crap.)
(Blower motor and fan separated, used a dry paint brush to clean the motor and motor housing.)
Since the 1st gen and 2nd gen do not have in cab air filters I decided to make my own
I used a dryer sheet and cut it to fit over the in cab air circulation intake used some frog tape to hold it in place, don't worry once the glove box is installed you cannot see any of this. The dryer does two jobs, its thin and allows air to flow through it very easy and it also smells great ( This shot is from the inside looking out, you can also see how thin the dryer sheet is)
( Blower motor and fan installed after being cleaned, you can also see the other intake covered with a dryer sheet, I used a rubber band to hold in in place over the intake.)
I also relocated the rear wiring harness. In stock form this wiring harness comes out directly under the front drivers seat and then does through the floor board to the under side of the truck right in the middle of the rear driver side seat area. If there was a passenger sitting in the rear seat behind the driver this wiring harness would be right in the way. You can see the wiring harness in the pic right to the left of the Acetone can.
(Here you can see the new location of the plug for the wiring harness, it moves the plug to the left of the drivers seat and out of the way of the rear seat foot area.
(In order to relocate the plug and harness I had to split the harness to gain access to the wires.)
(Here is the final product
Wiring harness all tapped back up and the plug and harness relocated. All of the wires that you see will be hidden under the drivers seat. It looks stock)That it for now
Chris
Last edited by LifterCatcher; 08-14-2010 at 03:03 PM.
08-16-2010, 09:24 PM
#23
Registered User
Thread Starter
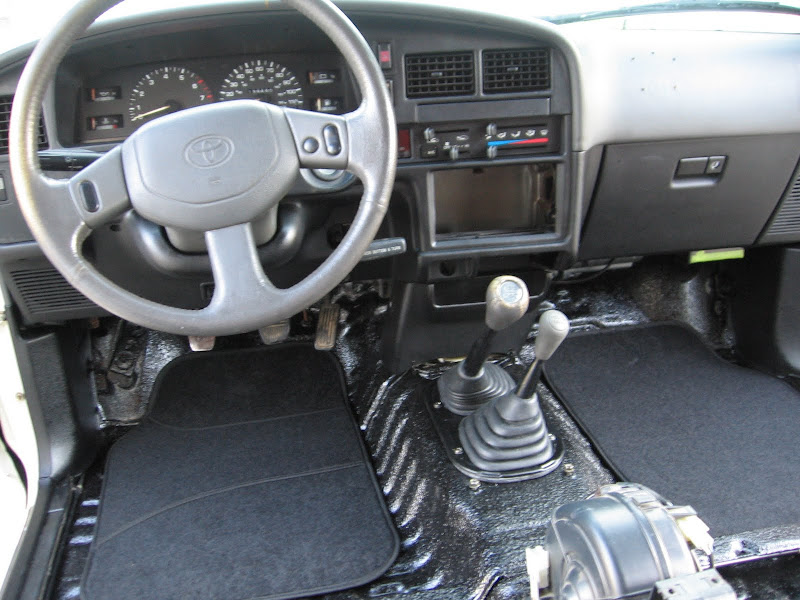
Got some more work done on the truck. I painted a lot of the interior parts flat black and they look awesome. I used a total of 5 cans of Krylon Fusion paint and some of the parts need a few more coats.
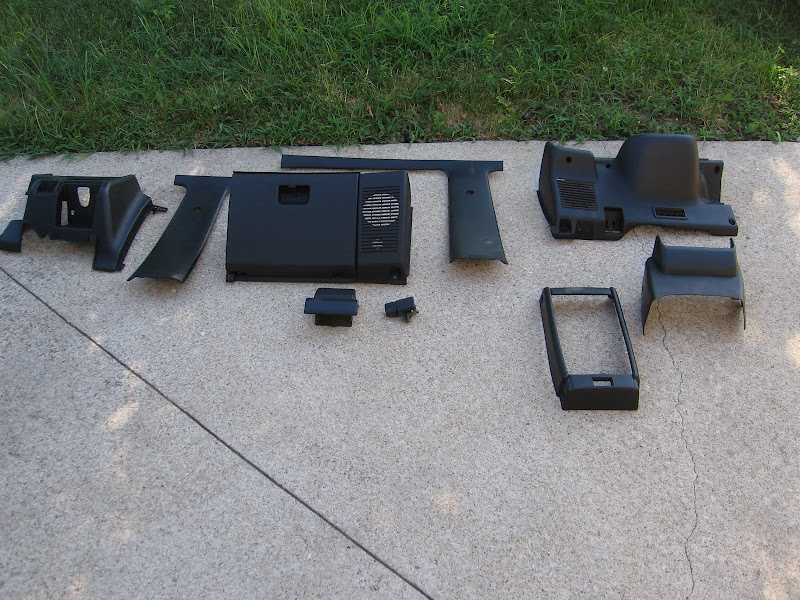
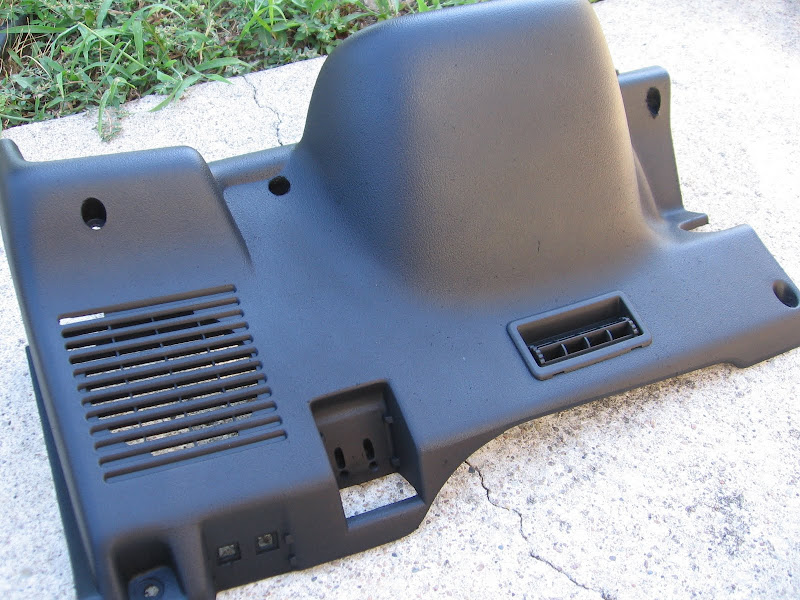
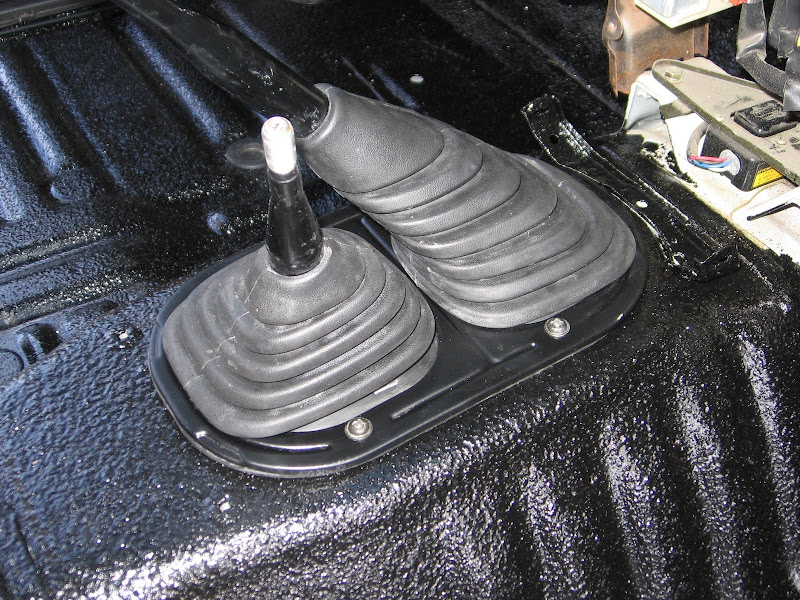
(Shifter boots all cleaned and shifter bracket painted and installed, I just need some custom shifter handles and it will be set.)
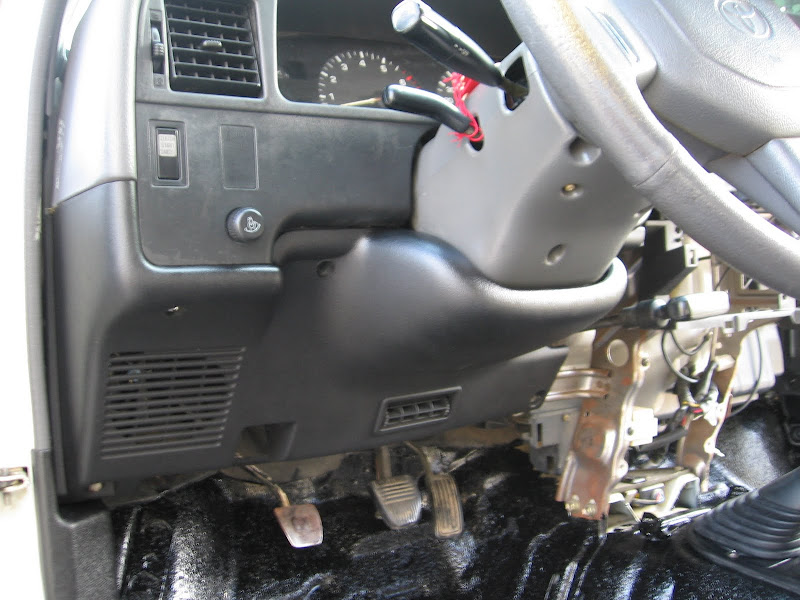
(lower steering column cover)
(Glove box, radio surround painted and installed.)
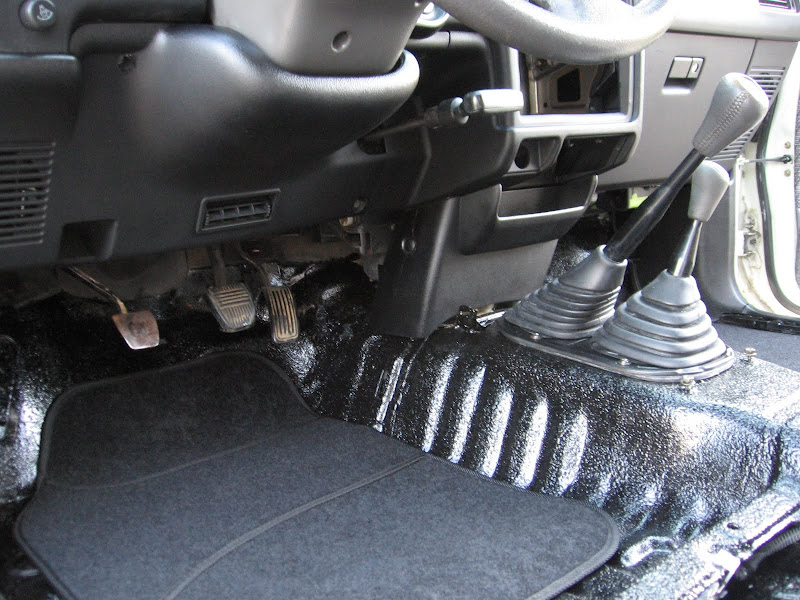
(This pic captures the color the best, also shows how bad I either need to clean the pedals or get new ones.)
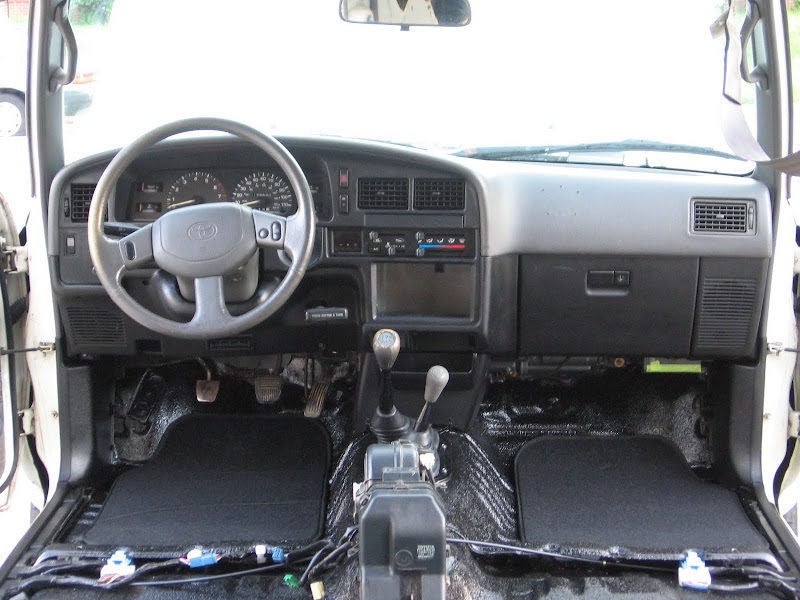
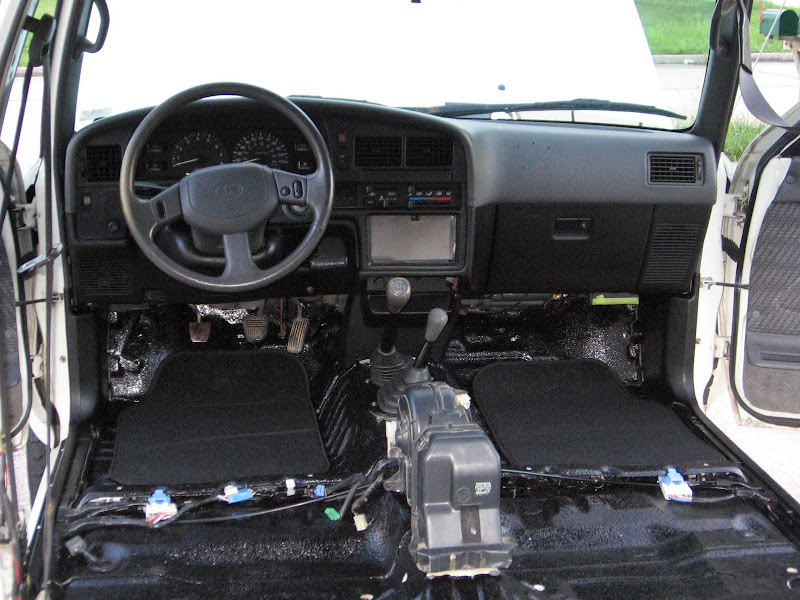
(I will be getting a black dash rug to cover the top dash.)
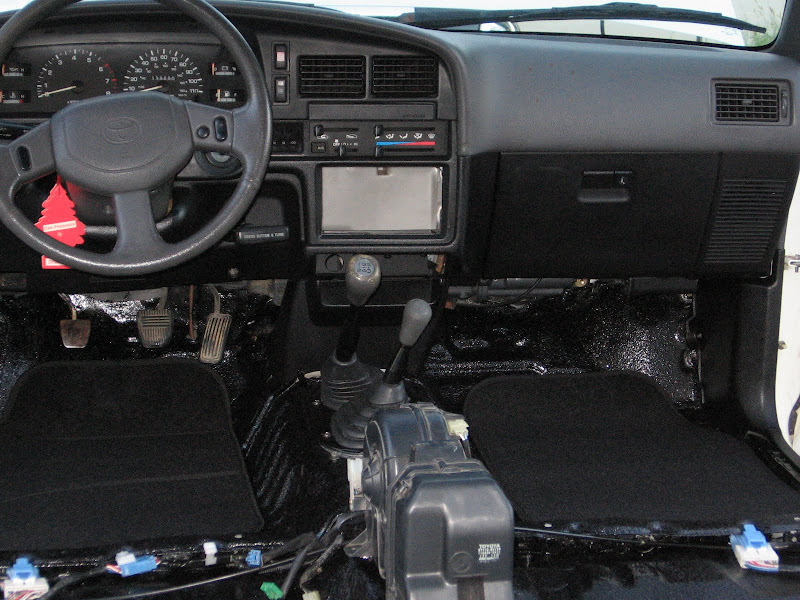
( I am going to install a CD player and 3 52mm Autometer gauges in a custom bracket in the radio bezel hole.)
(Shifter boots all cleaned and shifter bracket painted and installed, I just need some custom shifter handles and it will be set.)
(lower steering column cover)
(Glove box, radio surround painted and installed.)
(This pic captures the color the best, also shows how bad I either need to clean the pedals or get new ones.)
(I will be getting a black dash rug to cover the top dash.)
( I am going to install a CD player and 3 52mm Autometer gauges in a custom bracket in the radio bezel hole.)
Last edited by LifterCatcher; 08-16-2010 at 09:35 PM.
08-18-2010, 10:33 AM
#26
Registered User
Thread Starter
The trick with the Fusion paint is to spray a very light coat as a base coat, almost like a misting. Let that first coat sit for 30min to 1 hour, then paint the parts like normal. The base coat helps the paint to have something to stick to. You can handle the parts after about an hour or two of painting them but I let them sit for at least 12 hours before installing them. The paint is chip proof after about seven hours.
Chris
08-18-2010, 08:45 PM
#27
Registered User
Just how "chip proof" is that paint....???? never heard of spray painting plastic ??? it's doesn't seem like it will just wear through quickly???? I love the idea if it's semi-permenent and will last more then 5 years or so... nice work....
08-19-2010, 08:35 AM
#29
Registered User
Thread Starter
Krylon Fushion paints very little prep work on most plastics but interior parts are tricky especially if the interior parts have been slathered with Armor All over the years. I prep the interior parts as follows:
Glad it helped.
Chris
08-24-2010, 04:50 AM
#30
Registered User
Thread Starter
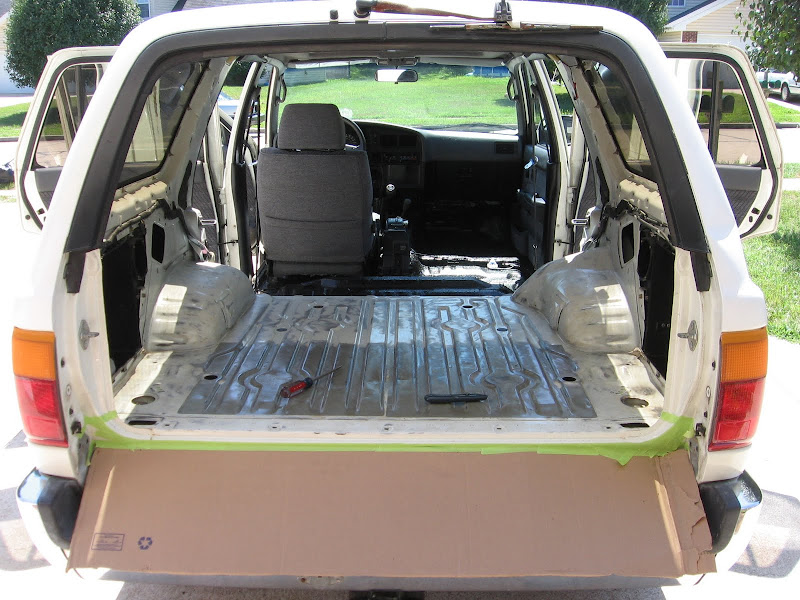
I was able to get a little more prep work done on the rear area of the truck yesterday morning.
I also ordered a power steering pump rebuild kit and hope to tackle the rebuild this week.
Here are a few pics
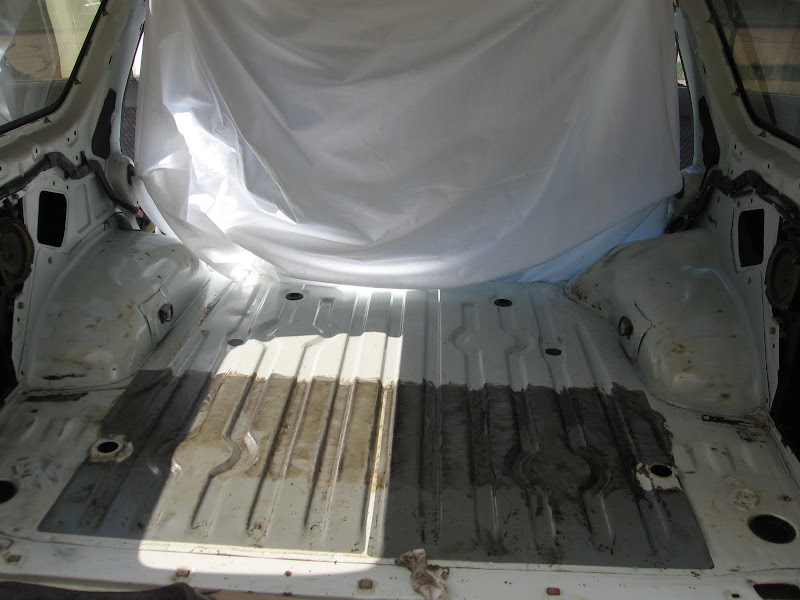
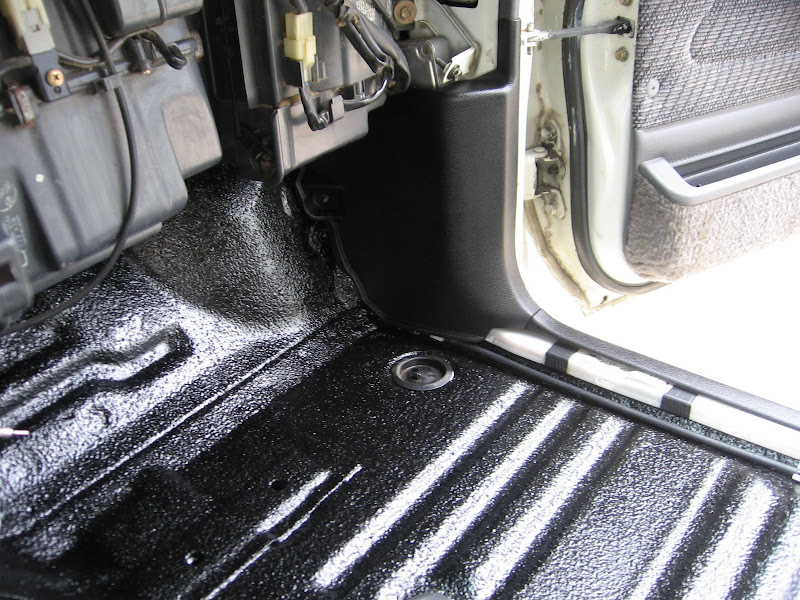
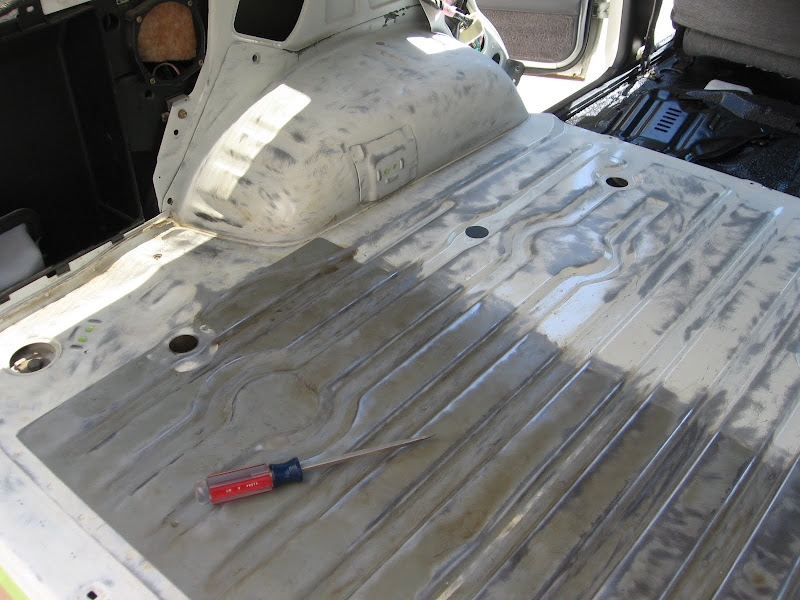
(Still have a lot of sanding, grinding and wiping to do on the nasty area where the sound deadening tar was laid in the rear hatch. Also put up divider to keep the wire wheel from slinging crap into the finished front area, worked pretty well.)
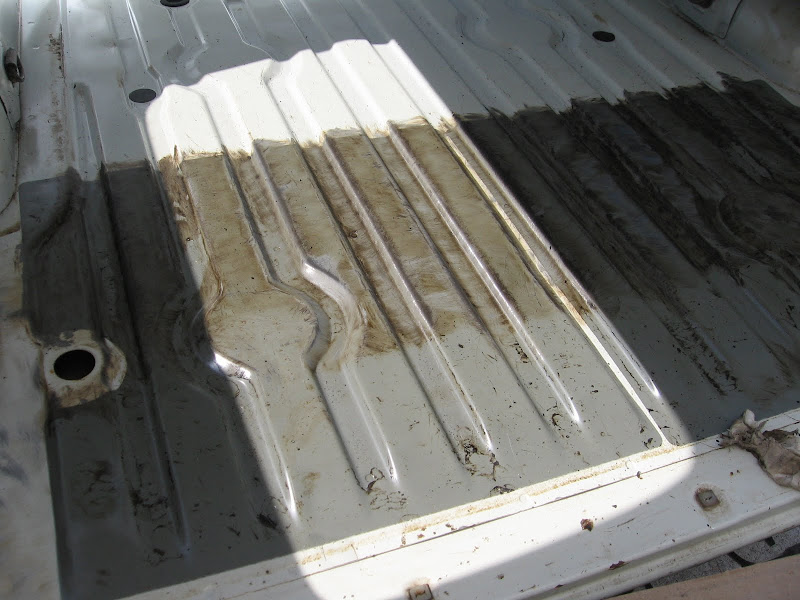
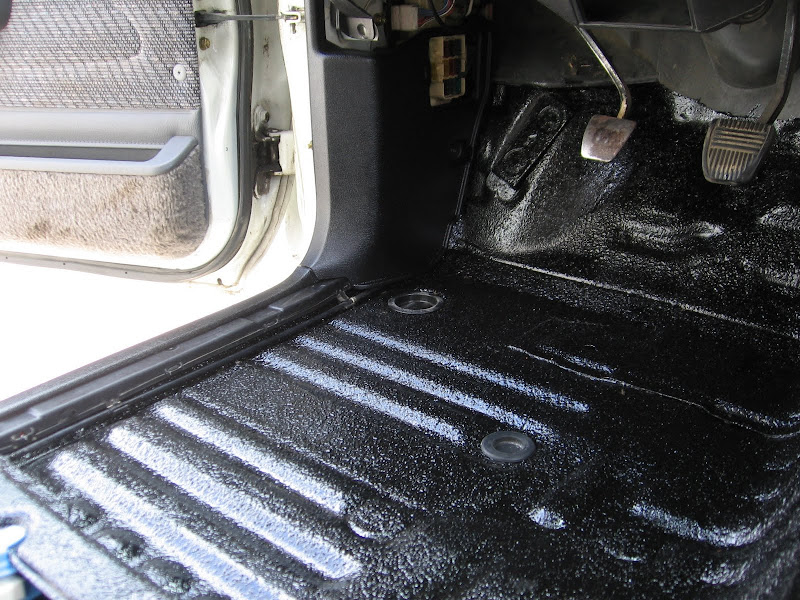
(Also I will not be tapping off any of the drain holes before applying the Herculiner in the rear area, I will only be tapping off holes that have threads, the rubber plugs will still seat just fine with the Herculiner applied all the way to the edge of the drain holes.)
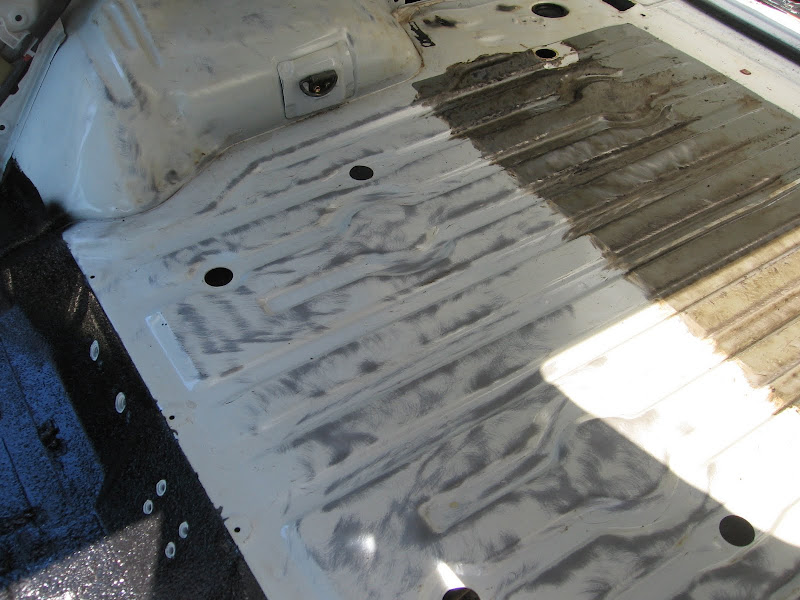
(One last pic showing the area wire wheeled.)
Cheers until next time.
Chris
I also ordered a power steering pump rebuild kit and hope to tackle the rebuild this week.
Here are a few pics
(Still have a lot of sanding, grinding and wiping to do on the nasty area where the sound deadening tar was laid in the rear hatch. Also put up divider to keep the wire wheel from slinging crap into the finished front area, worked pretty well.)
(Also I will not be tapping off any of the drain holes before applying the Herculiner in the rear area, I will only be tapping off holes that have threads, the rubber plugs will still seat just fine with the Herculiner applied all the way to the edge of the drain holes.)
(One last pic showing the area wire wheeled.)
Cheers until next time.
Chris
08-24-2010, 07:12 AM
#32
Registered User
Thread Starter
I remember helping a buddy remove his sound deadening material in his civic and the entire floor board area had massive rust problems under the material due to moisture being trapped. I plan to wheel my truck a lot and any way to lesson the chances of rust is worth the extra effort.
Also it is heavy as HELL, in total I removed over 50lbs of sound deadening material
 the Herculiner does a great job in reducing road noise and weights a lot less than the sound deadening junk, atleast 40lbs lighter
 In the summer the sound deadening material will get hot and pliable and even gooey at times, in areas like the foot wells the material will cause the Herculiner to move and split and also get everywhere, just think of road tar. If you want a complete Herc job that will last for years and years to come spend the extra time and remove the sound deadening.
Chris
08-24-2010, 09:16 PM
#33
Registered User
Thread Starter
I wanted to add a build thread that I came across that is the perfect example as to why you should remove the sound deadening material for reasons posted above.
Pics at https://www.yotatech.com/forums/f199...04/index7.html
Pics at https://www.yotatech.com/forums/f199...04/index7.html
08-24-2010, 09:58 PM
#34
Registered User
I wanted to add a build thread that I came across that is the perfect example as to why you should remove the sound deadening material for reasons posted above.
Pics at https://www.yotatech.com/forums/f199...04/index7.html
Pics at https://www.yotatech.com/forums/f199...04/index7.html
08-25-2010, 07:48 PM
#35
Registered User
Thread Starter
Son of a *****! Two days ago I had the body shop that's working on my truck put some Herculiner down! After seeing yours I thought it looked like a great idea. The sound deadening material on yours though looks different than the stuff on Z's build-up thread. As you can see from my avatar I have a Red P/U just like his. The stuff he was popping out didn't look like the deadening material to me so I had them line over it? Big mistake I guess! I had a few rust spots that the body shop fixed and covered w/POR 15 then Herculined. Do you think I'm screwed? Can the Herculiner be removed? What should I do???
I dont think you are screwed, its good they fixed the rust spots with the POR 15 that should put a stop to it. You might have some seperation over the years where the Herc is layed over the sound deadening material that sees a lot of use. Dont stress over it, it may be just fine I would let it be, only time will tell.
Also you can get some cheap wal-mart floor mats this will help reduce teh wear in the foot well area, then when you need to clean your truck take them out and hose out your truck
Dont stress man it will be fine.
08-25-2010, 08:11 PM
#36
Registered User
Thread Starter
I got a lot of work done on the truck today, and was able to finish up the Herculiner and it feels great to be done with it. It took me two weeks to get it done but I am super happy with the out come. It will look amazing when I get all of the interior parts painted and reinstalled.
Here are the pics of todays work.
(finally got the rear hatch area prepped and ready for the Herc, my hands and arms feel like hell.)
(Removed the tail gate and protected the non Herc areas.)
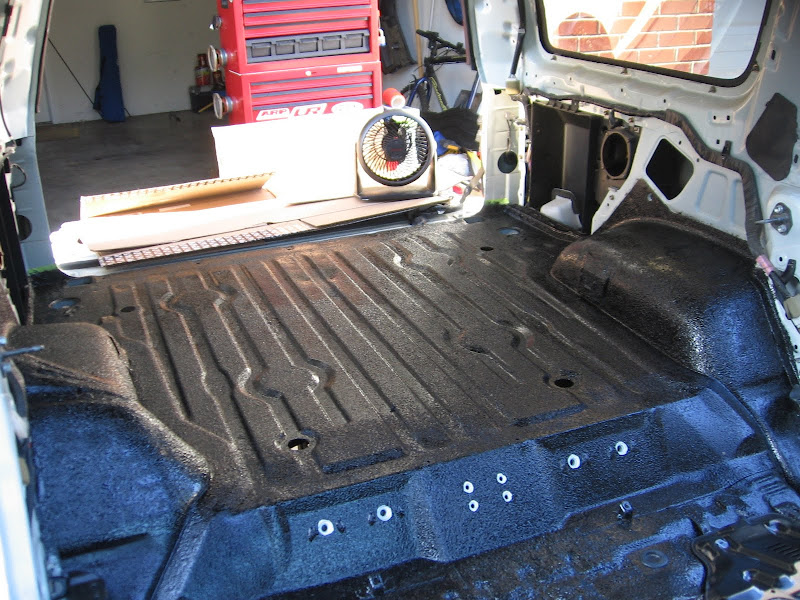
(First coat down and drying.)
(Second coat down and drying I AM DONE!!!)
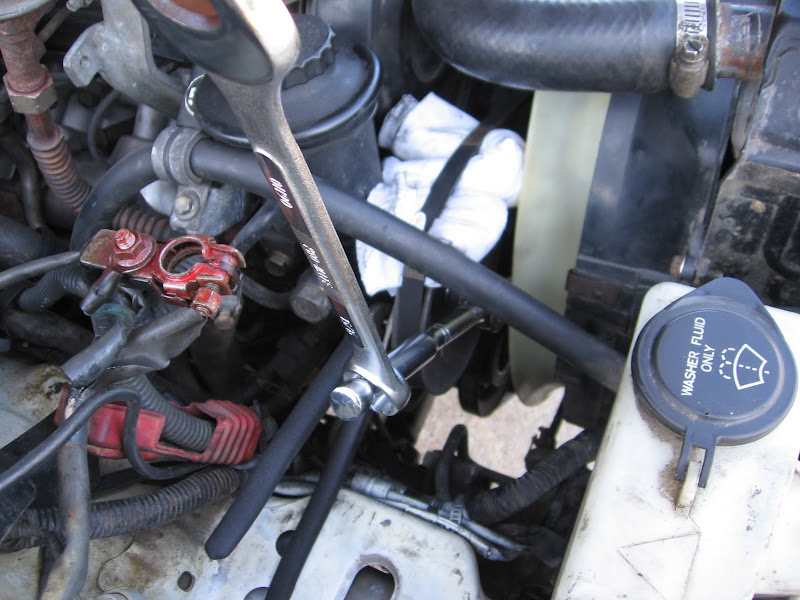
(While the Herc dried, I decided to tackle my leaky power steering pump. I read Bugs thread about the rebuild and decided to give it a try. Well it was a huge PITA to get the pulley bolt loose. I used two thick shop towels under the belt, but the pulley still slipped. I then used a pair of chanel locks on the back of the pulley and rested the handle against the battery tray. I could not get enough muscle on the bolt so I ended up using a wrench on the end of my socket handle as a breaker bar. After lots of bad words, it finally broke loose.)
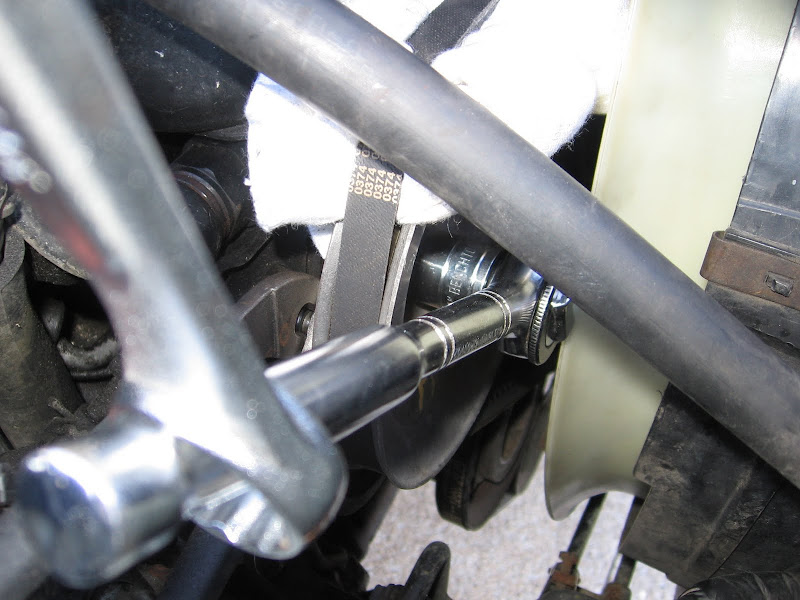
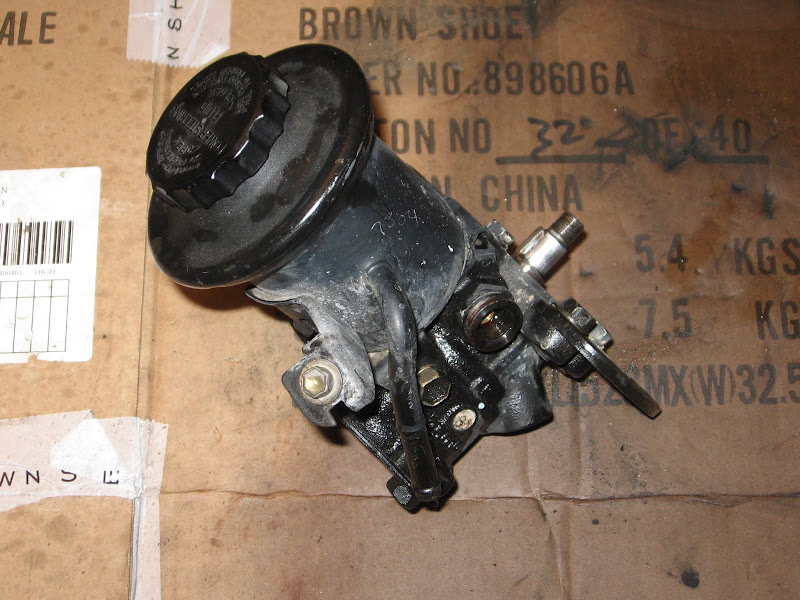
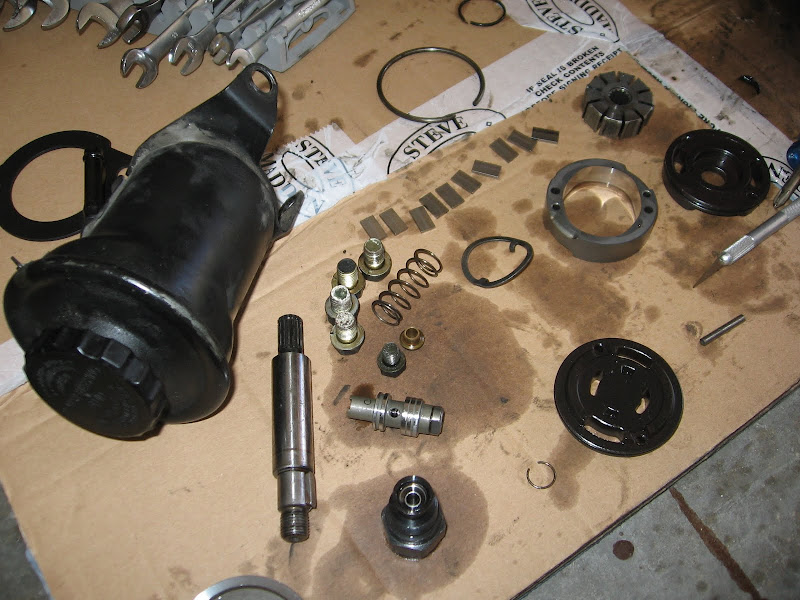
(MOFOer is out! Now its time to tear it apart and rebuild it, I was able to get the pump all broke down and and the new orings and seals installed before calling it a night. Tomrrow I will put the pump all back together and reinstall it. Also prep and paint some more interior stuff.)
Till tomorrow.
Chris
Here are the pics of todays work.
(finally got the rear hatch area prepped and ready for the Herc, my hands and arms feel like hell.)
(Removed the tail gate and protected the non Herc areas.)
(First coat down and drying.)
(Second coat down and drying I AM DONE!!!)
(While the Herc dried, I decided to tackle my leaky power steering pump. I read Bugs thread about the rebuild and decided to give it a try. Well it was a huge PITA to get the pulley bolt loose. I used two thick shop towels under the belt, but the pulley still slipped. I then used a pair of chanel locks on the back of the pulley and rested the handle against the battery tray. I could not get enough muscle on the bolt so I ended up using a wrench on the end of my socket handle as a breaker bar. After lots of bad words, it finally broke loose.)
(MOFOer is out! Now its time to tear it apart and rebuild it, I was able to get the pump all broke down and and the new orings and seals installed before calling it a night. Tomrrow I will put the pump all back together and reinstall it. Also prep and paint some more interior stuff.)
Till tomorrow.
Chris
08-25-2010, 09:08 PM
#37
Registered User
Its the same sound deadening stuff, but what is weird is that it acts diffrent depending on what region you are in. Some stuff I was able to break out like Z did and other areas in the truck I had to use dry ice.
I dont think you are screwed, its good they fixed the rust spots with the POR 15 that should put a stop to it. You might have some seperation over the years where the Herc is layed over the sound deadening material that sees a lot of use. Dont stress over it, it may be just fine I would let it be, only time will tell.
Also you can get some cheap wal-mart floor mats this will help reduce teh wear in the foot well area, then when you need to clean your truck take them out and hose out your truck
Dont stress man it will be fine.

I had no idea that was sound deadening stuff that could be taken off?

You can see the 2 major areas that needed to be fixed. They put some new sheet metal over the area with the holes then POR 15'n it. The area under the gas pedal they ground out then sealed it up.


The passenger door jam area here was completely cut out and replaced.
Oh yeah, they also herculined right over the rubber plugs? After seeing the work you've done their job looks pretty half a**ed! I still can't believe that stuff can be removed? I thought it was extra layers of sheet metal to reinforce the floor panels? Man I feel stupid even admitting that!
Last edited by 86 TOY; 08-25-2010 at 09:10 PM.
08-26-2010, 05:52 PM
#38
Registered User
Thread Starter
The passenger door jam area here was completely cut out and replaced.
Oh yeah, they also herculined right over the rubber plugs? After seeing the work you've done their job looks pretty half a**ed! I still can't believe that stuff can be removed? I thought it was extra layers of sheet metal to reinforce the floor panels? Man I feel stupid even admitting that!
Oh yeah, they also herculined right over the rubber plugs? After seeing the work you've done their job looks pretty half a**ed! I still can't believe that stuff can be removed? I thought it was extra layers of sheet metal to reinforce the floor panels? Man I feel stupid even admitting that!
I agree that the shop that Herced your truck should have at least pulled the rubber plugs before appyling the Herc (that should be common sense to anyone and a shop should know better). If you ever need to remove the plugs just take a exacto knife and carefully cut around the plug, Herculiner is pretty flexable when dry and it should not tear or peel if you make sure to make a nice clean cut around the Herc.
Glad they got that rust fixed for you, rust is a mojor PITA.
Chris
08-26-2010, 06:10 PM
#39
Registered User
Thread Starter
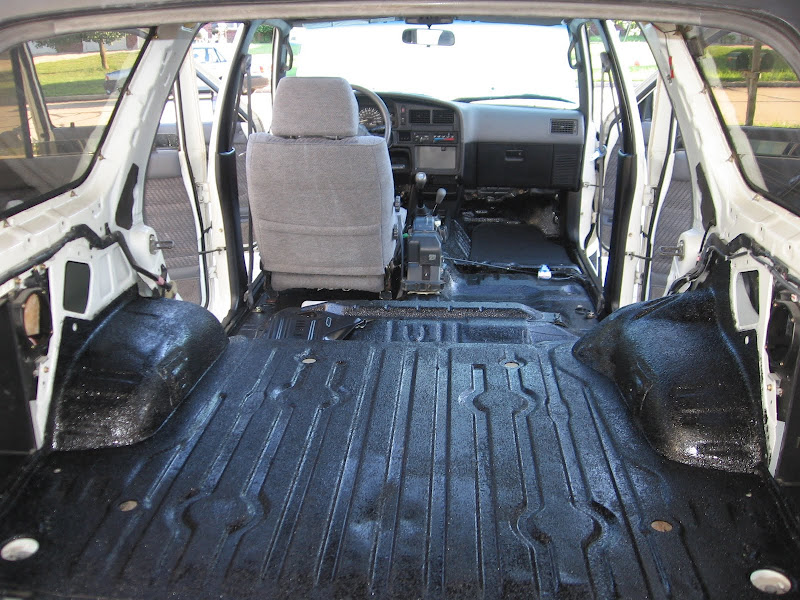
Today was another productive day on the rig and I got the rear area almost done.
Onto the pics.
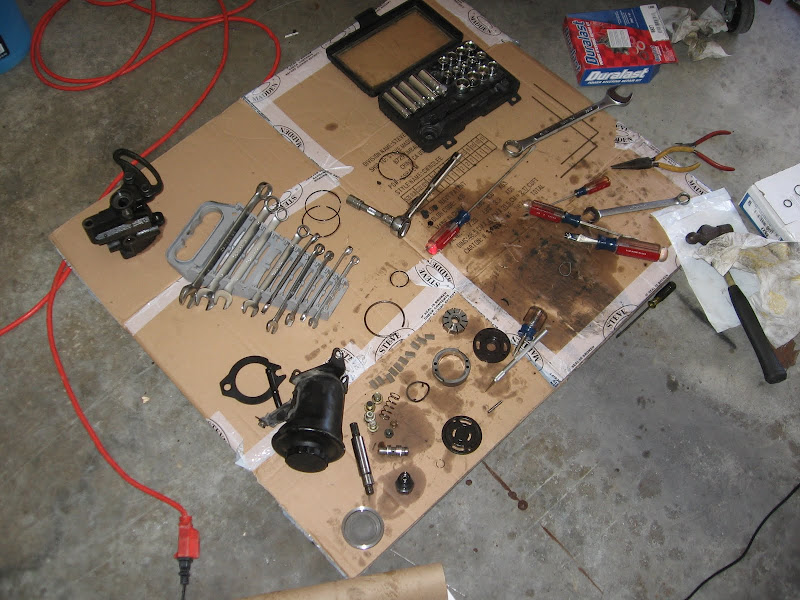
(Power sterring pump rebuild, man I need a work bench.)
(Snap rings are the most PITA things ever made, somewhere some Japanese eng is laughing his ass off )
)
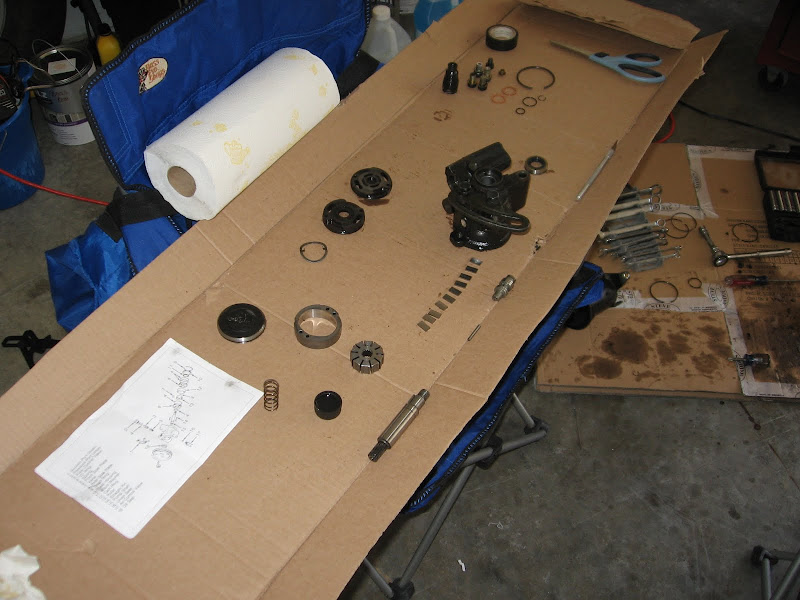
(I decided to make my own work bench it got the job done.)
Okay onto the Hercu
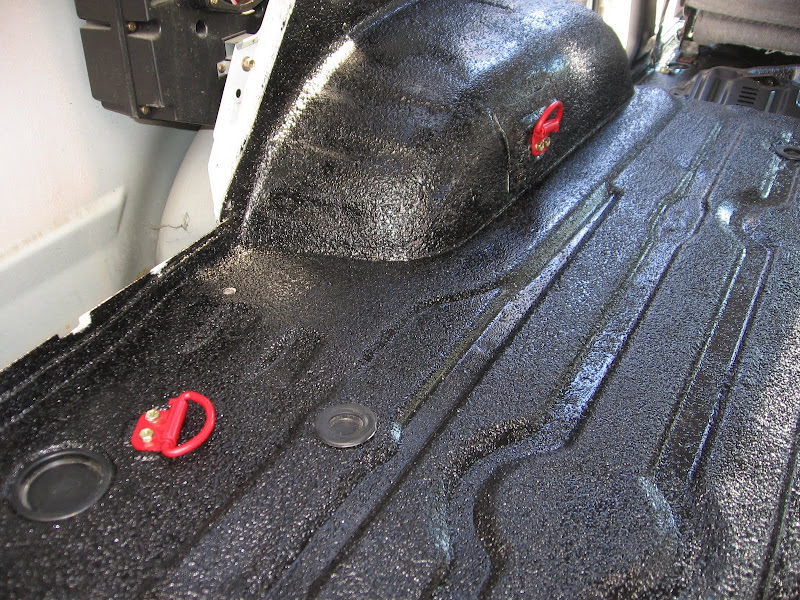
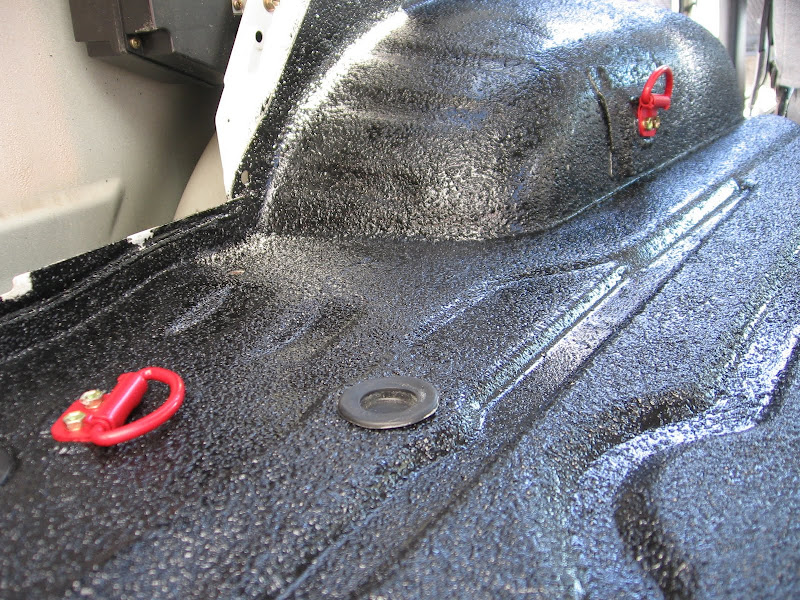
( I had the tie down loops powder coated red, they look awesome and give the rear area some nice contrast.)
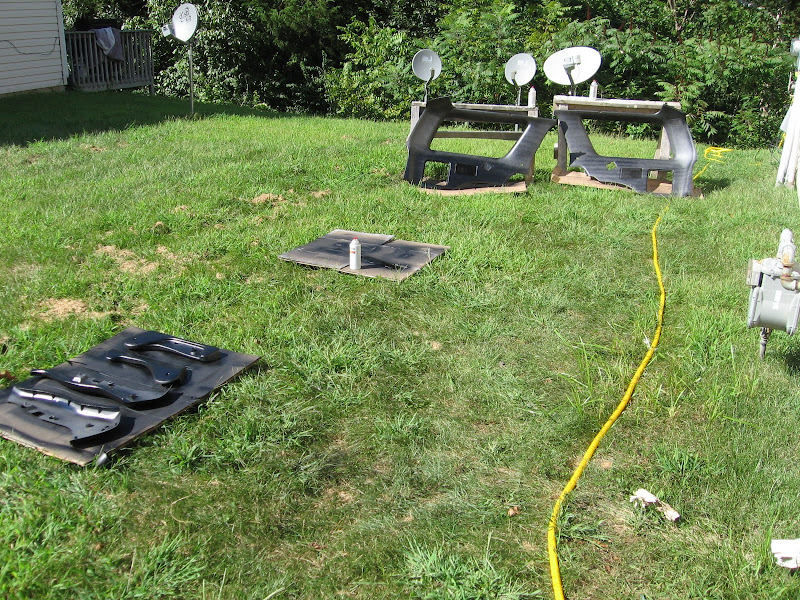
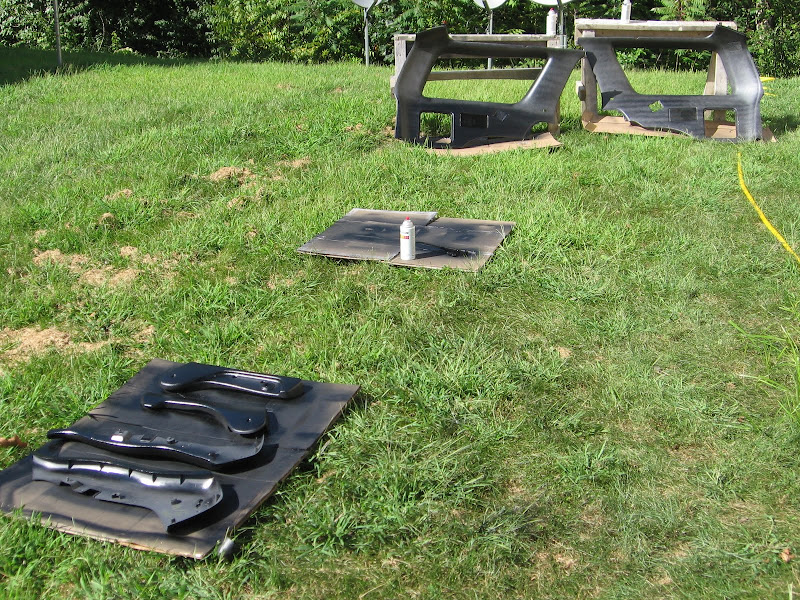
(Side yard AKA the paint shop)
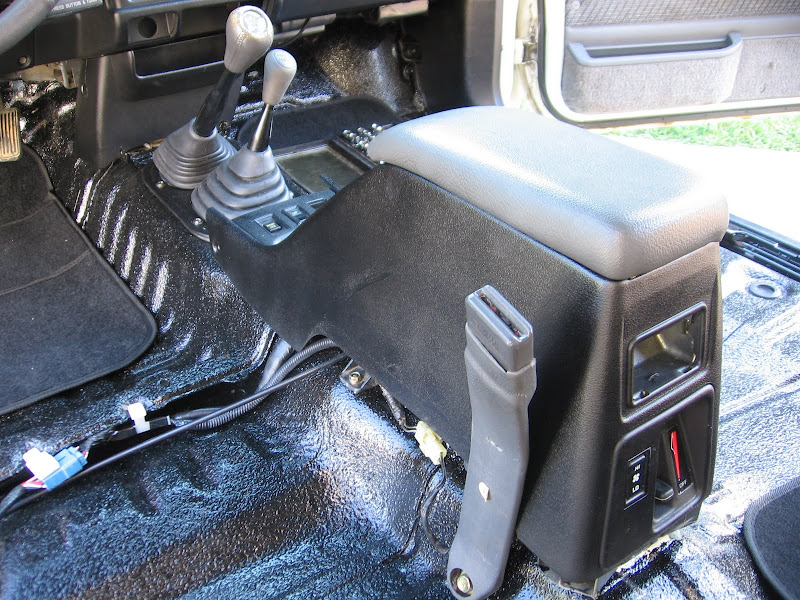
(Center console painted and installed.)
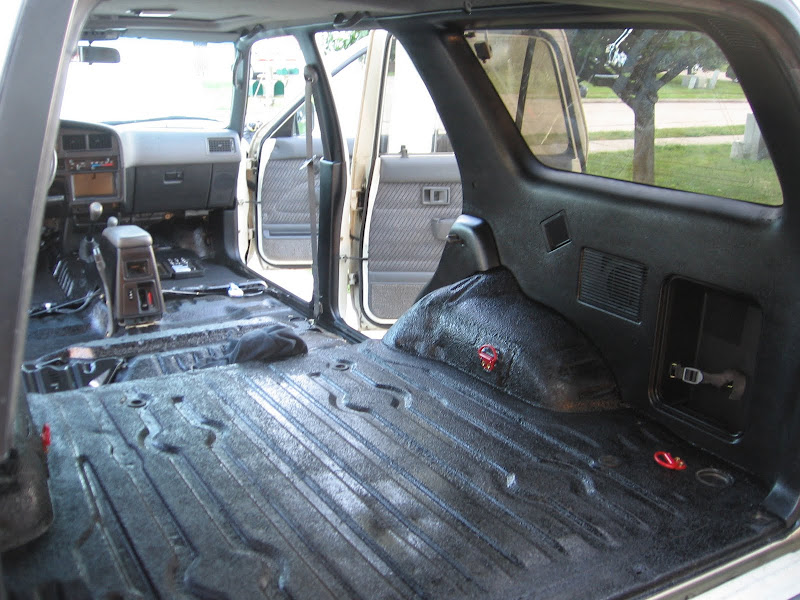
(rear side panels black and installed.)

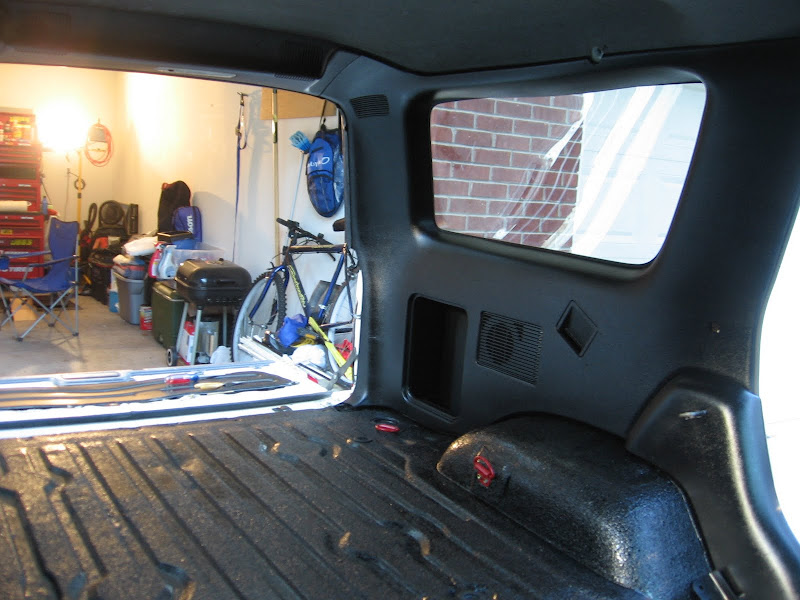
Last one It turned out great and I am very happy with how it looks.

Chris
Onto the pics.
(Power sterring pump rebuild, man I need a work bench.)
(Snap rings are the most PITA things ever made, somewhere some Japanese eng is laughing his ass off
)(I decided to make my own work bench
it got the job done.)Okay onto the Hercu
( I had the tie down loops powder coated red, they look awesome and give the rear area some nice contrast.)
(Side yard AKA the paint shop)
(Center console painted and installed.)
(rear side panels black and installed.)
Last one
It turned out great and I am very happy with how it looks.Chris


