When you click on links to various merchants on this site and make a purchase, this can result in this site earning a commission. Affiliate programs and affiliations include, but are not limited to, the eBay Partner Network.
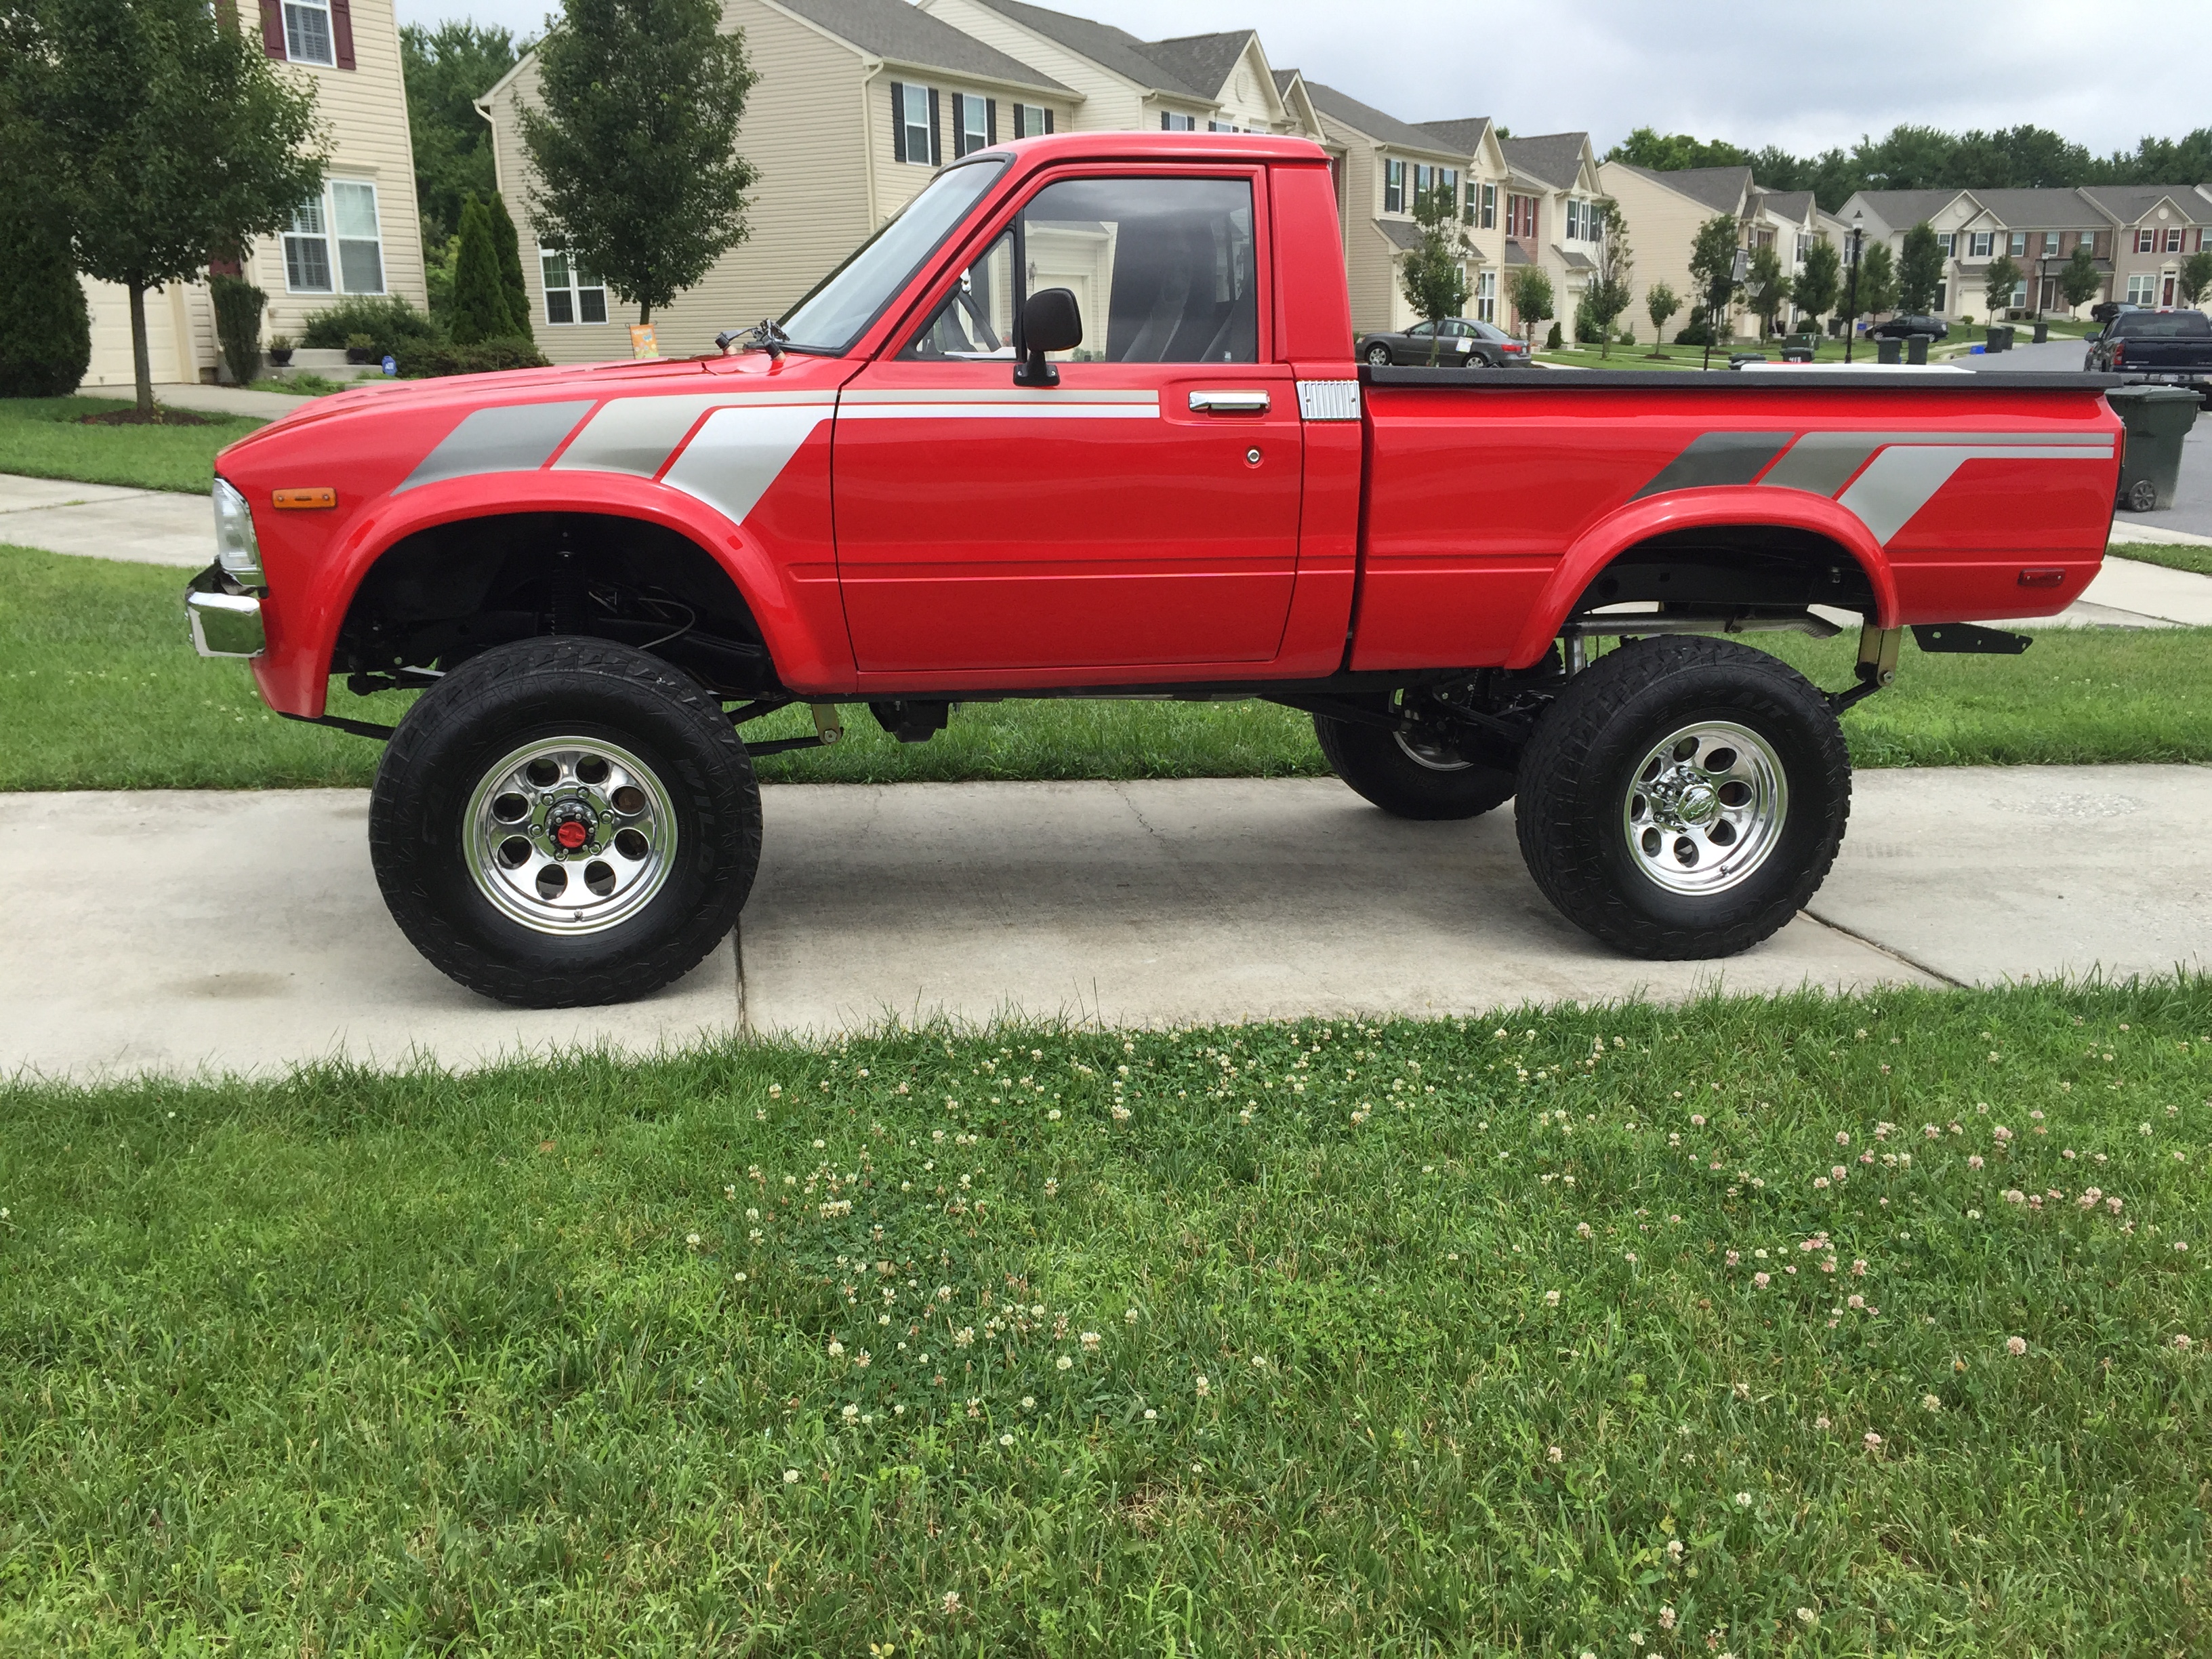
Ok I Finally Decided to Jump In after enjoying months of Browsing the Builds On this site. I may be a Newbie here But not to the Toyota world. My first Toyota, was the Black 81 Toyota 4WD Pictured under it's Call Sign "Big Little Bear". I got her back in 1984 and sunk 20k into her before regrettably selling at just over 5k. After her it was an 89 4Runner, 91 4WD toyota truck, 99 4runner sport, 2001 4WD Tacoma, and Now I'm back to My beginning with this Ebay Find Which For now will Name The Big Red Rolling Turd. This Truck was In Arizona and was in pretty good shape for being 32 years old and abused and molested by many previous owners. The Guy I bought her from , Dave, was just like the rest of us here. He owned one back in the 80s as well and had plans to restore her and started with a new 7 inch full spring Lift, 3 inch body lift, Shackles, Stainless Lines, 35 inch Good Year Kevlars, Shocks, dual stabilizers, drop drag link, and a custom made drive line. Needless to say, A very good start for me since I would have lifted the truck if it wasn't already and gone with everything he chose. I got the truck for a little over 5k just as it sits and I figure all the New items put on by Dave would have cost me around 2800.. So a good deal on the truck.
I divide my time between Arizona and Maryland. Arizona being my Home state and Maryland being my wife's State. Since I'm spending the Summer here I decided to Bring the truck from AZ and Start the restoration in MD. My reservations about driving that distance were in the back of my mind, considering the age of the truck showing 180k and probably more. I knew that 22R was tough as nails and with This generation truck it wasn't my first Rodeo.
I would love to do a KawaZX636 Resto but finances and time are not on my side. And What a beautiful build he did. Hopefully I'll run into him someday.
So with that said This will Resto will just bring this truck to a respectable level for me for now and give me a good head start for when money isn't an issue.
That's my intro and As soon as I have some more time I'll post some more Pics. cheers everyone, Dan
Last edited by Big Little Bear; 10-09-2018 at 06:48 AM.
oK...So I'm going to have to ask you to leave... There's only room for one bright red 83 pickup on this forum...
LOL, Juuuuuust kidding! That thing looks sharp! And for $5K...somebody's wife must have been really pissed and made him sell it! Can I get some more pictures of that rear bumper? I think it is something I may like to do to when I actually get around to my installing a rear bumper on my truck.
Where are you located in Maryland? We'll definitely have to get the twins together some time!
LOL on room for only one....Yes Will Do on The Bumper Pic asap and I'm in Rockville MD half the time and Arizona the rest.
It Does look sharp going 35 down the road but when you get up close you can see she needs a lot of TLC...Yours is definitely the best I've seen other than factory new back in the 80s.
Last edited by Big Little Bear; 10-03-2015 at 11:02 AM.
Please forgive me for not getting the step by step approach to my resto and keep in mind my time and financial restraints. I found Myself absorbed in working on the repairs and not so much remembering the camera until afterwards. So what you get here is more of a before and after.
Before anyone dogs me on the Haynes or Chilton manuals I Do have The Factory Manual as well...
I found a bit of home brew wiring going on throughout the truck...Oh well more to do..
I decided that dash frame is coming out and everything needs to get air chucked and wiped down with a rag and bucket of soapy water...I HATE OVER SPRAY ...Arghh!!
After air chucking 5 lbs of AZ dirt from this and the interior, This baby went into a five gallon bucket and got washed.
Hmmm. some ugly rust around the driver body mount point. Lucky for me it's not bad and the only other place was the gas pedal floor mount nut...but both areas will have to be addressed...
Ok , I know that gas pedal was spotted earlier hanging as the carpet was coming out. I may have got a little out of order. Anyway What I did to get this newer style pedal in, was to cut the weight near the throttle cable end for clearance issues and rebend the pedal rod in a vice with a BFH to give me the correct angle down and match the other pedals. This allowed me to keep the existing pivot stem point rather than cut and reweld it to the opposite side.
Original 1983 gas pedal bracket that hangs off the firewall will need to be reshaped to accommodate the newer style pedal.
Old 83 bracket now reshaped in a vice and BFH so new pedal pivot stem can work in this bracket.
Oh and look new carpet with that pedal.... Some aspects of this resto I decided to move forward with knowing I will be going back to repair things underneath or behind things. Like the Floor boards. For me it made sense to prioritize wrapping up a resto task depending on if I needed to move or use the truck.
Dash Frame Painted and Going Back in. The Dash Frame Brackets painted with Black Epoxy paint. Since I'm doing this on the Cheap Every thing that gets Painted gets Sanded to remove rust, Coated with Rust proof Primer, And Painted. Bracket are Painted with Epoxy Black and Colors are( I hate to say this.. Acrylic) and Cleared.. I Know urethane with a hardener would be better but I Suck at Painting. I'll have this thing done right later. For now anything is better than before.
Wiring Repairs. Between the Engine Bay and The Dash I found Lots Of Cut Wires From Previous Owners For whatever reason. I Spent Hours Making Clean Cuts, Dipping all ends in Flux then solder, Slipping on shrink wrap, Soldering the gaps together and then shrink wrapping every repair. I know it takes longer but I'm not a fan of cut twist and tape.
Prepping center gauges to go into a housing that wasn't cracked I tracked down on Ebay. The gauges are aftermarket and had more informative displays than factory so I used them instead.
I went with this 15 dollar unit that had an aux input. Cheap and it will fit the New Dash bezel.
Things Move pretty quickly once the foundation is laid. New Dash pad, New Ball vent, New dash Bezel and Radio in... I also replaced the Instrument Cluster, Climate controls, glove box door, center gauge housing, defrost vents, steering column covers, steering wheel and horn button assy, with ones that were in much better shape. Some wiring getting done for the radio. Every Nut Bolt and Screw I remove was Replaced with New Stainless Steel .
Someone ran a screw too long through Old GB Door... so here is the replacement with new paint
Last edited by Big Little Bear; 10-09-2018 at 06:55 AM.
Got this cool illuminated button for my power antennae...Only problem is my antennae isn't powered.
The Head light and Wiper control sticks were wore out and nasty after 32 years so I replaced them with nice New Factory ones with Bright new Pictographs
Nice Ebay Find, Factory Steering wheel Used But Great Shape.
 09-22-2015, 09:25 AM