Turn Signal and Tail Light Reconditioning and Restoration.
 04-11-2009, 09:27 PM
#1
Registered User
Thread Starter
Join Date: Feb 2009
Posts: 62
Likes: 0
Received 0 Likes
on
0 Posts
Turn and Tail Light Restoration.
Most certainly NOT a new idea, but its always nice when something is written just for us 'yota guys.
This is very simple and I am posting it for the guys who's rigs are their Daily Driver, not for trail only rigs - because you guys probably don't care if your rig has bright turn signals and such.
Hope this helps you enjoyably kill an hour or so fooling with your truck.
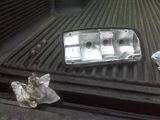
Okay I am going to start off by saying I did more of a "refurbish" than a full restoration of my tail lights and front turn signals because I randomly decided to spend the last two hours of daylight on this and only used products and tools that I had within my line of vision at the split second I decided to take on the task.
I honestly did not know that the bulb socket was an integral part of the reflector and that the lens would separate without the use of either an oven or heat gun until I started unscrewing things.
I decided half way through to pull my blackberry out of my pocket and take some pictures so sorry if this seems half-@$$ed, because it is.
Lets try to keep this quick and painless, it is my first tech writeup you know.
TOOLS:
Phillips screwdriver
Clutch Pick (optional- a pencil or paper clip could do the same thing here)
Supplies:
Faux Chrome in a can (Auto parts or hardware store)
Aluminum HVAC Tape (for those who cant work spray paint)
Simple Green (or any other suitable mild degreaser or basic bar soap even)
Dielectric silicone (Auto parts store)
Toothbrush (recommended)
Scrubby kitchen pad (under kitchen sink)
Q-tips (cotton swabs)
Cotton balls
Masking tape
Plastic Polish
Okay well now that we know all of what we need and may want, remove your taillights (4 screws each) and front turn signals (2 screws each).
1) First things first, if you have plants growing in your turn signals you may want to clean them out and devise or purchase some new seals. Wash old seals with a little bar soap.. the simple green seemed to make them overly soft and gave me a bit of a scare. We used to use simple green as tire compound to soften the rubber when I was 12 and I raced little gas RC cars - So I wouldn't use it on those rubber seals if you don't plan on replacing them.
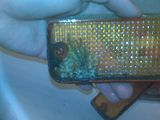
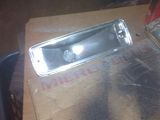
2) Now I cleaned the reflectors (the part that SHOULD be shiny again when we are done) REALLY well. I goofed and didn't get any "before" shots, but who gives a crap how bad mine looked before I fixed them up. What matters is how bad yours are now, and how great mine are (and yours will be) after we are all done here! This is where the simple green is used.
3) Clean your electrical Connections!!
4) Put some dielectric silicone on a cotton swab and lube up your electrical connections in your light sockets. This will keep any paint from sticking to them (if you decide to submerge it in paint..?) and will help later down the road in preventing corrosion. Now jam a cotton ball in that socket. That is how we mask those. Now mask around the black trim portion of the reflector assembly with some masking tape. Do a good job here in the prep work and you wont regret it.
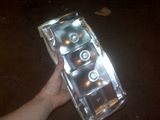
5) Heat up the paint a little so its room temperature and shake the crap out of it. I don't feel enthusiastic enough to explain the reasoning behind this right now.
6) Spray a VERY light mist first, and let it dry for a few minutes. The next one can be a bit thicker. All you want is for it to be for the most part smooth and shiny. It does not, I repeat it does NOT have to be perfect. This faux chrome paint is usually very thin and runs easily. The can I used has been in my garage for at least 10 years and in the last few years some major advancements in faux chrome have been made. If your lights don't turn out better than my 10-year old bumper in a can then you used dollar store stuff or glitter. Don't be cheap, your lights keep you safe at night, as well as others.
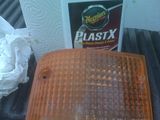
7) Now go clean your lenses and if you haven't, your gaskets while the paint dries.
8) If your like me and want to let things air dry for a good long while then go play with your lights and make sure you have good electrical connections, and that your paint dried nicely.
Okay I am tired of writing step by step stuff.
Last step
9) I don't have to tell you how to put everything back together because you have the intelligence of a 2nd grader or higher.
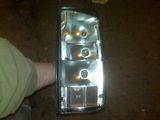
9b) Polish. This is the polish I used.. Its okay. I recommend the $17.00 kit that you use a drill and buff the surface with.. much much better. I used a paper towel. You can see the difference with the product I used below - which is more for cleaning than actual polishing. The results could have been much worse, but at the same time could have been much much better. I'm happy and am not complaining.
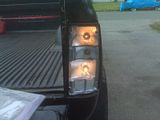
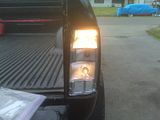
It is simple but wow does it make a difference. Later I will get started on the parking lamps (aka front corner markers).
Edit: Okay so I get the feeling like some people are saying "so f***ing what.. they are tail lights". Well I care because I live where it is usually gray and ty out, and my black truck would be invisible in the mist and fog if I didnt have bright and direct lighting. When the sun is out and bright that also seems to make brake lights disappear. I dont like it when people run into my vehicle I have spent so much time and money keeping on the road and the way I like it. I dont like it when my morning commute is screwed up because someone wasnt paying attention and my brake lights wernt bright enough to get his or her attention. I dont like getting pulled over because the officer "didnt see my turn signal on that last turn".. seriously.. lights are good. Plus, if they look good, your whole truck looks better. My truck has dents and scratches and chips, but it looks like it worked for those, not like its just been left to rot for 20 years.
I am adding in here also that if you want to keep and restore your stock lights, but want better bulbs as well, do not use those cheap LED bulbs you find on the corner. They do not work well for our types of light housings. Use some nicer incandescent bulbs. I recommend the Sylvania Silverstar turn/brake/park light bulbs. I have used them on past vehicles and they were an incredible improvement over standard incandescent bulbs. Perhaps once I replace my current bulbs with them I will take before/after shots as a comparison.
Update: Sylvania no longer sells the super cool turn/brake/park light bulbs but maybe you will find them stocked somewhere still.
Most certainly NOT a new idea, but its always nice when something is written just for us 'yota guys.
This is very simple and I am posting it for the guys who's rigs are their Daily Driver, not for trail only rigs - because you guys probably don't care if your rig has bright turn signals and such.
Hope this helps you enjoyably kill an hour or so fooling with your truck.
Okay I am going to start off by saying I did more of a "refurbish" than a full restoration of my tail lights and front turn signals because I randomly decided to spend the last two hours of daylight on this and only used products and tools that I had within my line of vision at the split second I decided to take on the task.
I honestly did not know that the bulb socket was an integral part of the reflector and that the lens would separate without the use of either an oven or heat gun until I started unscrewing things.
I decided half way through to pull my blackberry out of my pocket and take some pictures so sorry if this seems half-@$$ed, because it is.
Lets try to keep this quick and painless, it is my first tech writeup you know.
TOOLS:
Phillips screwdriver
Clutch Pick (optional- a pencil or paper clip could do the same thing here)
Supplies:
Faux Chrome in a can (Auto parts or hardware store)
Aluminum HVAC Tape (for those who cant work spray paint)
Simple Green (or any other suitable mild degreaser or basic bar soap even)
Dielectric silicone (Auto parts store)
Toothbrush (recommended)
Scrubby kitchen pad (under kitchen sink)
Q-tips (cotton swabs)
Cotton balls
Masking tape
Plastic Polish
Okay well now that we know all of what we need and may want, remove your taillights (4 screws each) and front turn signals (2 screws each).
1) First things first, if you have plants growing in your turn signals you may want to clean them out and devise or purchase some new seals. Wash old seals with a little bar soap.. the simple green seemed to make them overly soft and gave me a bit of a scare. We used to use simple green as tire compound to soften the rubber when I was 12 and I raced little gas RC cars - So I wouldn't use it on those rubber seals if you don't plan on replacing them.

2) Now I cleaned the reflectors (the part that SHOULD be shiny again when we are done) REALLY well. I goofed and didn't get any "before" shots, but who gives a crap how bad mine looked before I fixed them up. What matters is how bad yours are now, and how great mine are (and yours will be) after we are all done here! This is where the simple green is used.
3) Clean your electrical Connections!!
4) Put some dielectric silicone on a cotton swab and lube up your electrical connections in your light sockets. This will keep any paint from sticking to them (if you decide to submerge it in paint..?) and will help later down the road in preventing corrosion. Now jam a cotton ball in that socket. That is how we mask those. Now mask around the black trim portion of the reflector assembly with some masking tape. Do a good job here in the prep work and you wont regret it.
5) Heat up the paint a little so its room temperature and shake the crap out of it. I don't feel enthusiastic enough to explain the reasoning behind this right now.
6) Spray a VERY light mist first, and let it dry for a few minutes. The next one can be a bit thicker. All you want is for it to be for the most part smooth and shiny. It does not, I repeat it does NOT have to be perfect. This faux chrome paint is usually very thin and runs easily. The can I used has been in my garage for at least 10 years and in the last few years some major advancements in faux chrome have been made. If your lights don't turn out better than my 10-year old bumper in a can then you used dollar store stuff or glitter. Don't be cheap, your lights keep you safe at night, as well as others.


7) Now go clean your lenses and if you haven't, your gaskets while the paint dries.
8) If your like me and want to let things air dry for a good long while then go play with your lights and make sure you have good electrical connections, and that your paint dried nicely.


Okay I am tired of writing step by step stuff.
Last step
9) I don't have to tell you how to put everything back together because you have the intelligence of a 2nd grader or higher.
9b) Polish. This is the polish I used.. Its okay. I recommend the $17.00 kit that you use a drill and buff the surface with.. much much better. I used a paper towel. You can see the difference with the product I used below - which is more for cleaning than actual polishing. The results could have been much worse, but at the same time could have been much much better. I'm happy and am not complaining.


It is simple but wow does it make a difference. Later I will get started on the parking lamps (aka front corner markers).
Edit: Okay so I get the feeling like some people are saying "so f***ing what.. they are tail lights". Well I care because I live where it is usually gray and ty out, and my black truck would be invisible in the mist and fog if I didnt have bright and direct lighting. When the sun is out and bright that also seems to make brake lights disappear. I dont like it when people run into my vehicle I have spent so much time and money keeping on the road and the way I like it. I dont like it when my morning commute is screwed up because someone wasnt paying attention and my brake lights wernt bright enough to get his or her attention. I dont like getting pulled over because the officer "didnt see my turn signal on that last turn".. seriously.. lights are good. Plus, if they look good, your whole truck looks better. My truck has dents and scratches and chips, but it looks like it worked for those, not like its just been left to rot for 20 years.
I am adding in here also that if you want to keep and restore your stock lights, but want better bulbs as well, do not use those cheap LED bulbs you find on the corner. They do not work well for our types of light housings. Use some nicer incandescent bulbs. I recommend the Sylvania Silverstar turn/brake/park light bulbs. I have used them on past vehicles and they were an incredible improvement over standard incandescent bulbs. Perhaps once I replace my current bulbs with them I will take before/after shots as a comparison.
Update: Sylvania no longer sells the super cool turn/brake/park light bulbs
but maybe you will find them stocked somewhere still.
Last edited by the 38 special; 11-27-2009 at 08:21 PM.
 04-13-2009, 05:08 PM
#3
Registered User
Thread Starter
Join Date: Feb 2009
Posts: 62
Likes: 0
Received 0 Likes
on
0 Posts
I have almost no free time right now so it will have to wait a little bit.. i'll get to it. normally i would set them up as thumbnails and then you click them to open the full image.. that is how i will do it later most likely.. if i size them down then they will be too small to clearly see what the image is meant to display.

Thread
Thread Starter
Forum
Replies
Last Post
jasonty
Pre 84 Trucks (Build-Up Section)
41
12-23-2018 01:00 PM
GreatLakesGuy
The Classifieds GraveYard
8
09-04-2015 09:27 AM
sabine
86-95 Trucks & 4Runners
4
07-18-2015 03:59 PM
Johntom240
General Electrical & Lighting Related Topics
7
07-13-2015 12:18 AM


