The 95 4runner 1UZ swap project begins
 12-01-2010, 11:11 AM
#21
Registered User
Thread Starter
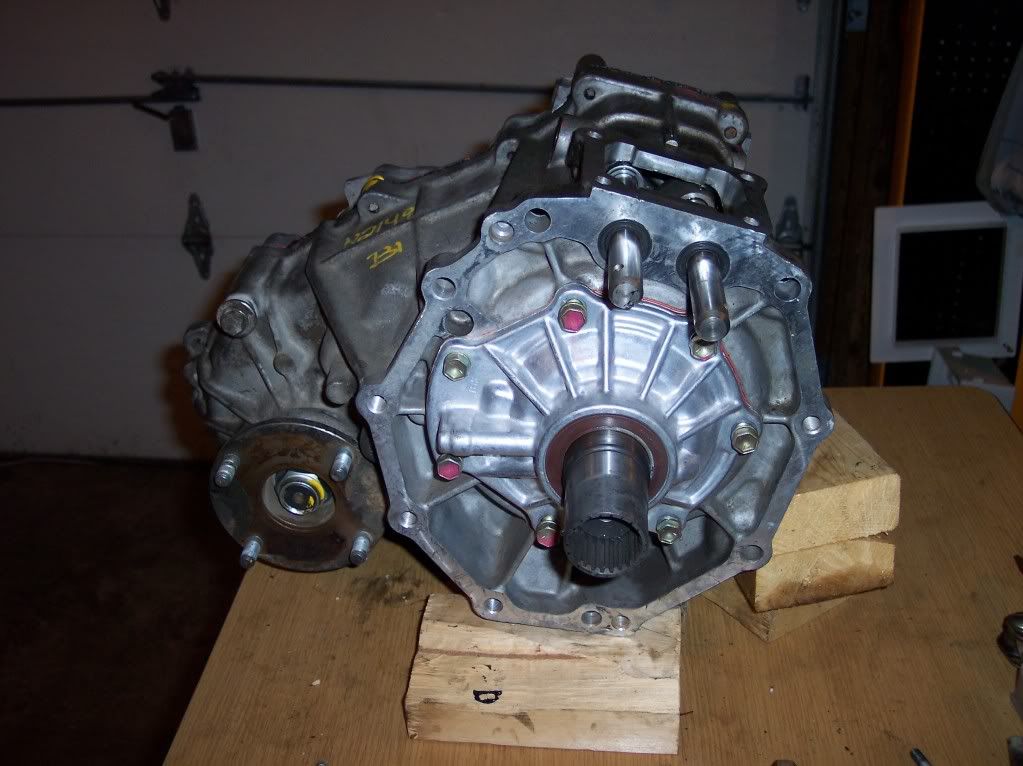
The only difference I see in the back of the trans is that lower center hole is not tapped out on it for the 7th hole..easy fix there. The end of the coupler on the t/c hitting the 4 prong piece seems to be the only fitment problem, of course I have yet to measure and cut the output on the 341..It would prob all fit if I left the 4 prong deal out but I believe it and the coupler are supposed to have a few thousandths between them when all is fitted together. To keep the speedo gear from walking and to keep the coupler sleeve on the input side of the t/c from sliding over towards the trans, but this is just a guess from looking at all the components. What the hell are the prongs for and what is it called anyway? I wonder what it looks like from the T100? If it was shorter I might be in biz. Anyone have one they can measure??
I tried photo bucket on these pics. Ahhh..it doesn't blow up when you mouse over them like the pics resizer program I used on all my other pics here. Wow..just noticed using the bucket took my pics from 1.5 mb to 4kb. I can re do it if they are too small to see enough detail.
I tried photo bucket on these pics. Ahhh..it doesn't blow up when you mouse over them like the pics resizer program I used on all my other pics here. Wow..just noticed using the bucket took my pics from 1.5 mb to 4kb. I can re do it if they are too small to see enough detail.
Last edited by maniacmotorsports; 12-01-2010 at 11:17 AM.
 12-01-2010, 11:42 AM
#22
Contributing Member
You need the 4 prong rotor .
and this looks to easy , if it works out . .. you should really go 5 speed and sell me those parts ...
...
If you dont mind not being able to regear your case , this is perfect and alot cheaper than the inchworm adapter , with gear case..
so you got these parts off a 1996 t-100 4x4 auto what engine was it .
and this looks to easy , if it works out . .. you should really go 5 speed and sell me those parts
...If you dont mind not being able to regear your case , this is perfect and alot cheaper than the inchworm adapter , with gear case..
so you got these parts off a 1996 t-100 4x4 auto what engine was it .
12-01-2010, 12:20 PM
#23
Registered User
Thread Starter
You need the 4 prong rotor .
and this looks to easy , if it works out . .. you should really go 5 speed and sell me those parts ...
If you dont mind not being able to regear your case , this is perfect and alot cheaper than the inchworm adapter , with gear case..
so you got these parts off a 1996 t-100 4x4 auto what engine was it .
and this looks to easy , if it works out . .. you should really go 5 speed and sell me those parts
...If you dont mind not being able to regear your case , this is perfect and alot cheaper than the inchworm adapter , with gear case..
so you got these parts off a 1996 t-100 4x4 auto what engine was it .
Last edited by maniacmotorsports; 12-01-2010 at 12:41 PM.
12-01-2010, 06:25 PM
#24
Contributing Member
yea bigger pics would be better, thanks .
just upload them to photobucket and copy paste the img code to your post thats it , dont attach them to anything on here.
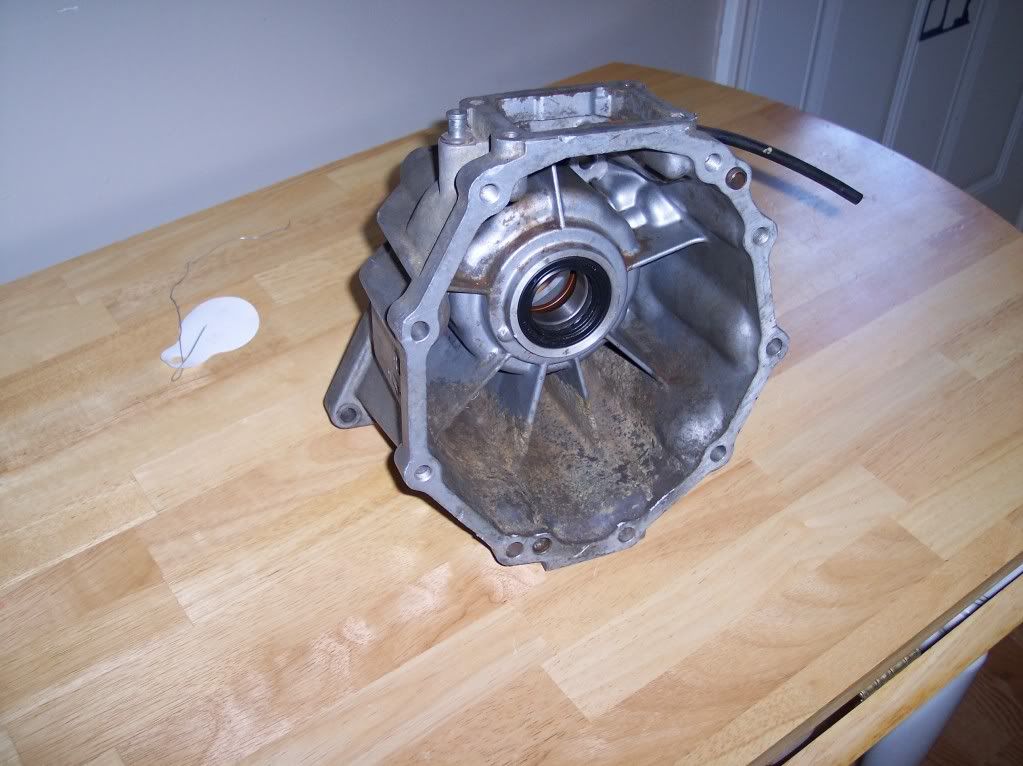
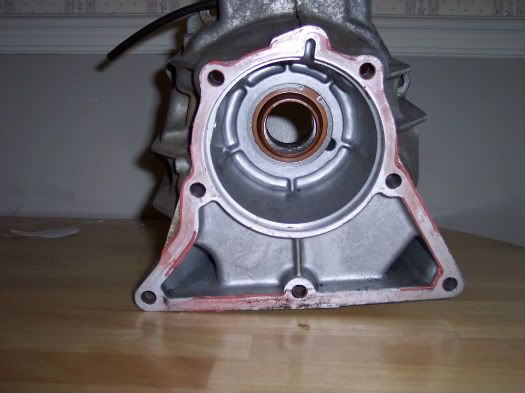
i went and tried to find that housing but all i could find was driver drop not the passenger drop . Thanks again man for the pics .
just upload them to photobucket and copy paste the img code to your post thats it , dont attach them to anything on here.
i went and tried to find that housing but all i could find was driver drop not the passenger drop . Thanks again man for the pics .
 12-02-2010, 10:51 AM
#26
Contributing Member
hey man .. post 21 shows the adapter but it looks like it has a curve to it .. the left side in the middle pic , the part that mates to the tranny .. is it curved .
 12-03-2010, 07:17 PM
#28
Contributing Member
sorry about that . never mind .. this looks real good it looks like it will work .am so glad you posted this stuff , we have been waiting around for the inchworm adapter for months now .
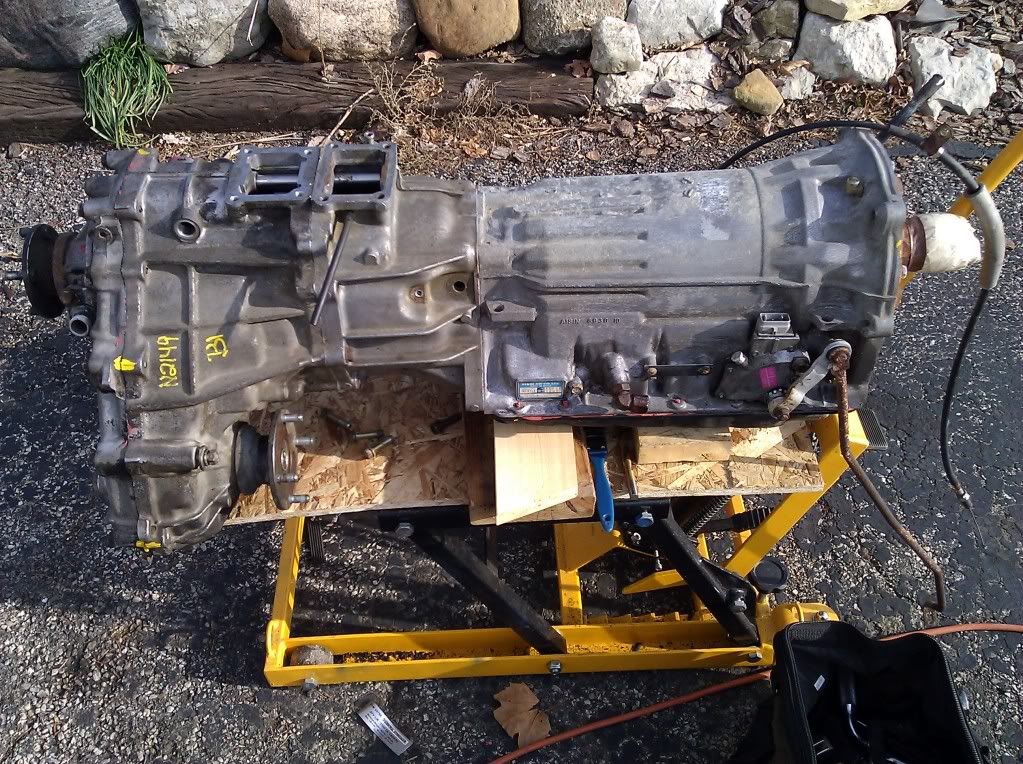
we went ahead and picked up a complete tranny from a 1997 t-100 4x4 auto with the 3.4 for $300 .
started putting the pieces together , nothing major yet .
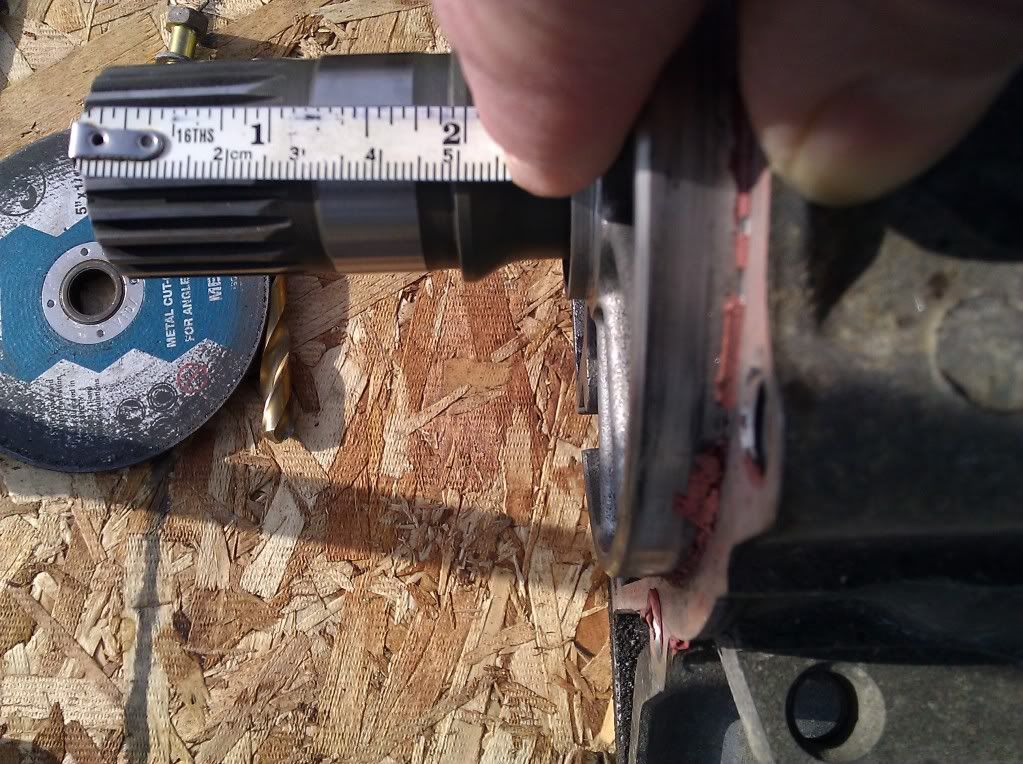
cut the lexus output shaft to 2.5"
cut down the 4 prong rotor(going to put some spot welds on the inside of the rotor and file them down to fit onto the splined part of the lexus shaft)
enlarge the speed sensor hole on the t-100 housing to fit the lexus speed sensor
need to drill and tap the extra hole on the lexus housing..
ok enough hijack .. ill post pics and more info on my thread .
i think the t-100 housing is gonna be even harder to find now .
ooohh one more thing the thread i read on using this said he had to change the t-case input shaft .. but not so it fits perfect,like you stated earlier, with almost an inch of shaft into the t-case coupler,exactly how it was on the t-100.
good luck ..
we went ahead and picked up a complete tranny from a 1997 t-100 4x4 auto with the 3.4 for $300 .
started putting the pieces together , nothing major yet .
cut the lexus output shaft to 2.5"
cut down the 4 prong rotor(going to put some spot welds on the inside of the rotor and file them down to fit onto the splined part of the lexus shaft)
enlarge the speed sensor hole on the t-100 housing to fit the lexus speed sensor
need to drill and tap the extra hole on the lexus housing..
ok enough hijack .. ill post pics and more info on my thread .
i think the t-100 housing is gonna be even harder to find now .
ooohh one more thing the thread i read on using this said he had to change the t-case input shaft .. but not so it fits perfect,like you stated earlier, with almost an inch of shaft into the t-case coupler,exactly how it was on the t-100.
good luck ..
12-04-2010, 07:19 PM
#29
Registered User
Thread Starter
no worries, no such thing as a hijack in this thread when the talk is how to make a 1uz swap process easier. I want to hear from anyone who has done this swap and ran into a challenge or 10 in the process and could help or save someone else from a costly mistake. No questions, ideas or experiences shunned here.
I have lots of hands on time with toyota trucks but I am at a disadvantage on this one because all my trucks b4 now have been the 22r or 3.blow with the 5spd. I have been told the 88 22re auto has a similar extension housing to the t100 but I have never laid eyes on those to see. Anyone else?? RMA, Tell me more about the 4prong rotor and sensors..this is the part that still has me a little confused. You cut the length of the rotor? How precision does the length need to be? This t/c has 4 sensors in it from the t100 so i'm wondering if they can be wired into the trucks harness or do I have to make the sensors from the truck fit the t/c?
Since you got the mated trans and t/c from the auto t100, what does the rotor look like on it? Same length as the lex one?
Last edited by maniacmotorsports; 12-04-2010 at 07:22 PM.
12-05-2010, 01:25 AM
#30
Contributing Member
The rotors are not the same between the lexus and t-100 .the t-100 has an aluminum one thats very different . Ill get pics of it for you . the holes on the housing for the 4 prong rotor are off and at different heights.
i posted picks and more info on here .
https://www.yotatech.com/forums/f161...32/index3.html
i think all you need is the transfer indicator switch , thats on the passenger side of the transfer case and the speedometer drive gear at the rear of the case. the other 2 will not be need , I think .
i also read the 22re auto has the housing but couldnt find one when we went looking thru a toyota only yard .. we looked at about 40 trannies and none had the housing . some were alike but had drivers side drop . so i dont know what the deal is on that.
again man thanks ..
12-08-2010, 08:40 PM
#31
Registered User
Thread Starter
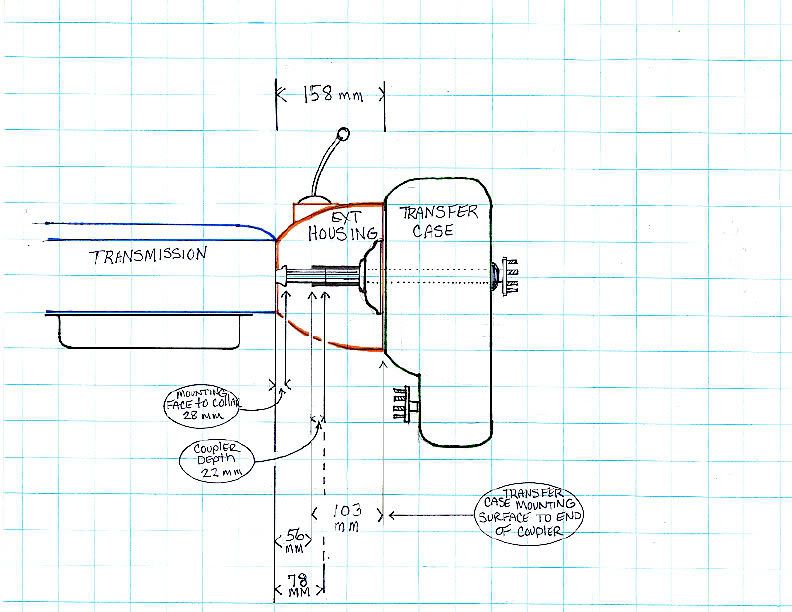
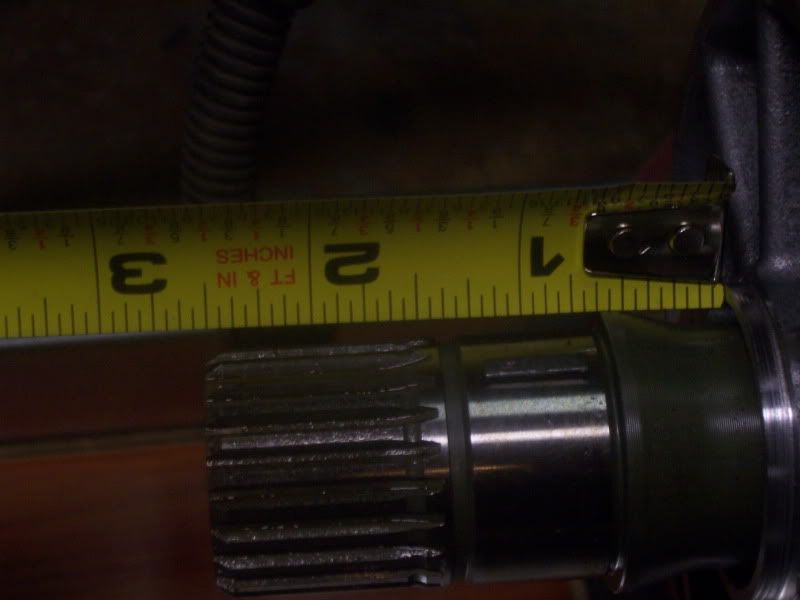
Ok, I have tried to sneak away as often as I can to measure all parameters on fitment for the 341 to vf1a transfer case route and to put actual numbers to all the parts. I'm a mathtard so bear with me, I may have confused my math(measured the parts a 100 times). From the mounting face of the extension housing at the transmission end to the end of the coupler on the t/c is 56mm.
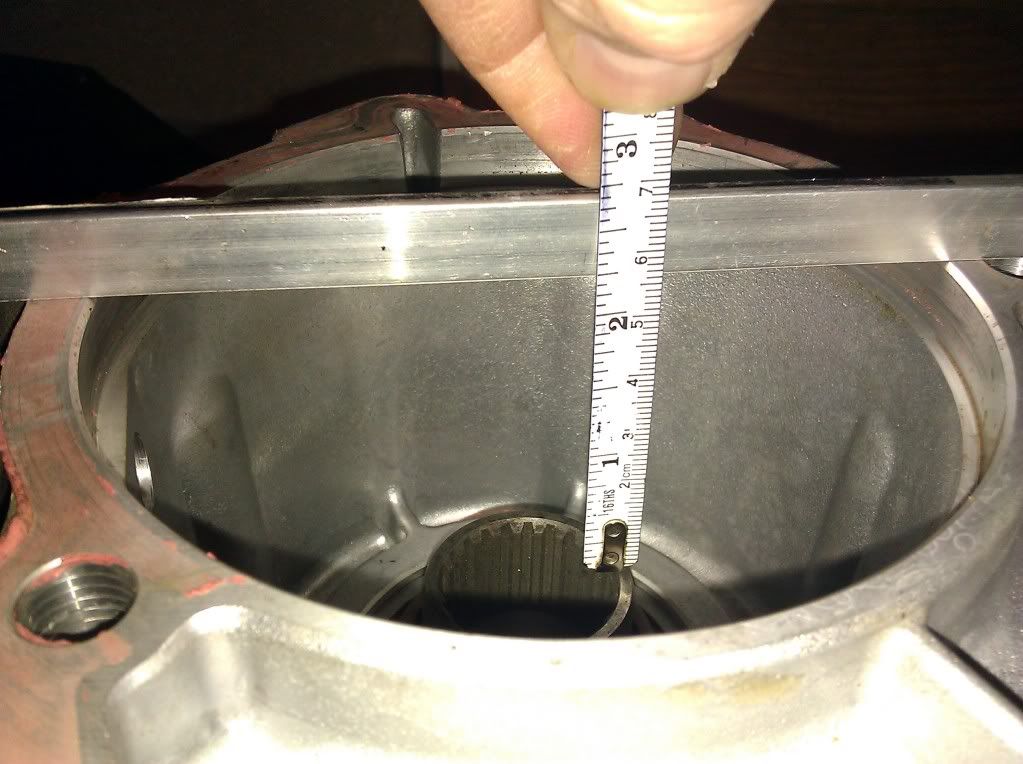
The same measurement to inside the coupler to the end of splined shaft is 78mm
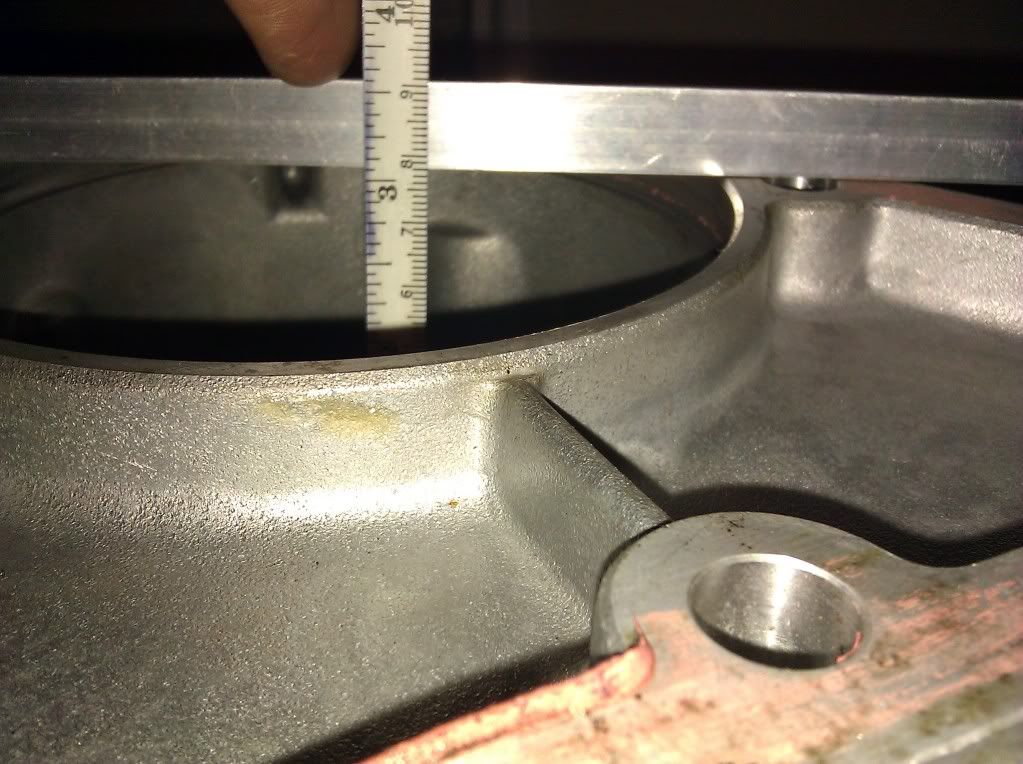
The spline depth measurement is 22mm...78mm - 56mm= 22mm...All the numbers were making me stoopit so I had to just draw it out. The conclusion I came to is the output should be cut at 50mm from the collar the rotor rests on. Leaving 28mm for the rotor, it comes 38mm so cutting 10mm off the rotor should work out perfect. The only measurement that was questionable and not working out was the 103mm measurement from t/c mounting face to end of coupler..should be 102 for the numbers to work but dammit if it didn't measure 103 a million times!!
 .
.
The same measurement to inside the coupler to the end of splined shaft is 78mm
The spline depth measurement is 22mm...78mm - 56mm= 22mm...All the numbers were making me stoopit so I had to just draw it out. The conclusion I came to is the output should be cut at 50mm from the collar the rotor rests on. Leaving 28mm for the rotor, it comes 38mm so cutting 10mm off the rotor should work out perfect. The only measurement that was questionable and not working out was the 103mm measurement from t/c mounting face to end of coupler..should be 102 for the numbers to work but dammit if it didn't measure 103 a million times!!
.
Last edited by maniacmotorsports; 12-08-2010 at 09:15 PM.
12-09-2010, 10:41 AM
#33
Registered User
Thread Starter
Thanks, that would be awesome..been drive'n me nuts wondering how long the output is from the collar to end. As well as the rotor length. It would be nice to be able to use the t100 one instead of having to cut the lex one and weld teeth. Just no way to get 10 mm off it and still be able to cut a ring off the end with the teeth on it to weld back on without cutting 5 mm off behind the 4 tab ring too. Gotta be one out there that fits another toyota..the Japanese were good about not pissing away R&D if they didn't have to.
12-09-2010, 03:39 PM
#34
Contributing Member
Thanks, that would be awesome..been drive'n me nuts wondering how long the output is from the collar to end. As well as the rotor length. It would be nice to be able to use the t100 one instead of having to cut the lex one and weld teeth. Just no way to get 10 mm off it and still be able to cut a ring off the end with the teeth on it to weld back on without cutting 5 mm off behind the 4 tab ring too. Gotta be one out there that fits another toyota..the Japanese were good about not pissing away R&D if they didn't have to.
dont worry about cutting the rotor and rewelding the original grooves back , throw what you cut off away , make new ones its not that hard , and you dont need very many of them , i figured 3 should be fine .
the grooves on the lexus 4 prong rotor will not be used anymore those were used to turn the speedometer gear sensor for the cluster , you will now use the one at the rear of the transfer case.so those grooves are not that important anymore .
you dont have to weld splines on the rotor you could also use some grub screws (i think thats what there called ) to hold the rotor on to the output shaft.
if you cut the rotor right where the grooves start ( opposite end of the 4 prongs)that will be enough to keep it out of the way from the transfer case coupler .. the transfer case will slide all the way now . This will also give you enough room to weld some splines on the inside of the rotor and still be able to have the lexus output shaft turn this rotor . you did notice the splines on the lexus output shaft dont go all the way into the tranny .
12-09-2010, 08:25 PM
#35
Contributing Member
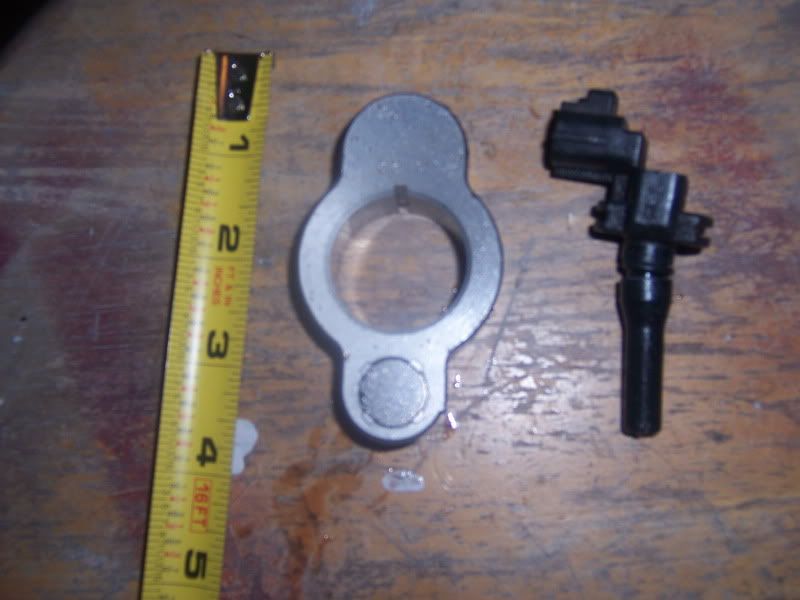
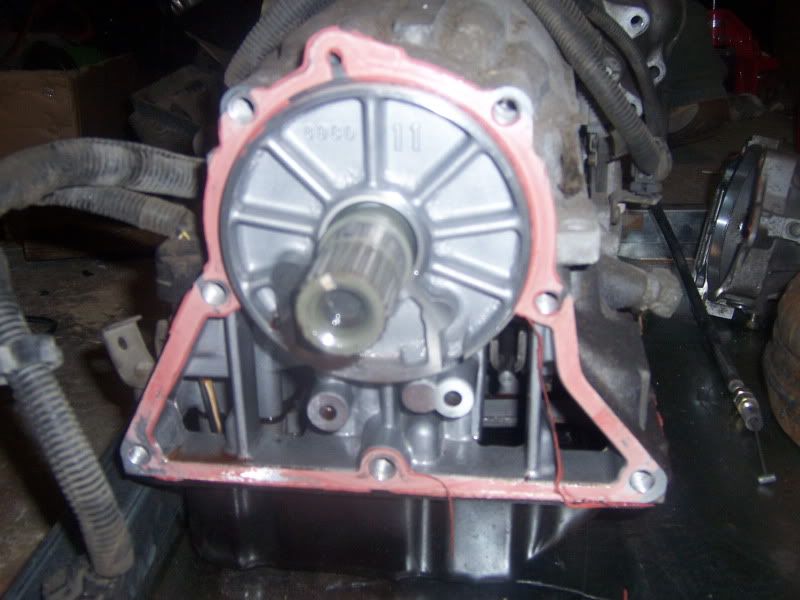
so the lexus tranny and the t-100 trannies bodies are basically the same , so if you cut the output shaft to 2.5" and the lexus rotor to where the grooves start you will have the same amount of spline engaged in the coupler .heres a couple pics that should help out ...t-100 tranny,rotor ,sensor and output shaft. good luck man ..
12-10-2010, 09:01 AM
#36
Registered User
Thread Starter
[quote=RMA;51611510]
the grooves on the lexus 4 prong rotor will not be used anymore those were used to turn the speedometer gear sensor for the cluster , you will now use the one at the rear of the transfer case.so those grooves are not that important anymore. quote]
That is essentially what I needed to know, with not having gotten that deep into the sensor arrangement steps yet, I assumed the gear section was still to be used. That changes things, I may take the 10 mm from the middle gear section instead. My concern was with the inner surface of the rotor having soo many different specs, the teeth are milled the same tollerences as the o.d. of the output splines which maintains perfect allignment end to end of the rotor, but the center section under the gear is milled much larger. Was just concerned that by cutting away the factory teeth that centered that end, it exposes a larger diameter which may require closer attention to the length of the new welded teeth to ensure that end is re centered. It is prob not an issue but...OCD at it's finest lol. It would drive me insane if a micro out of ballance caused some harmonics of some kind at higher rpm's.
Last edited by maniacmotorsports; 12-10-2010 at 09:03 AM.
12-10-2010, 10:58 AM
#37
Contributing Member
yes the teeth do keep the rotor aligned and so does the rear inner lip , just inside the oil holes . i had to file the welds i made quit a bit , measure then re grind , measure then re weld .. and on and on .. until it came out close enough for me .I also made the rotor fit on the tighter side .I dont really think it has to be super perfect , so long as the rotor fits tight, doesnt wobble and the sensor is able to pick up the ends of the 4 prongs .
But your idea of cutting the teeth off then re welding them on is probably a better way , you can grind down the grooves and make some nice welds .
Ill remember that next time .
But your idea of cutting the teeth off then re welding them on is probably a better way , you can grind down the grooves and make some nice welds .
Ill remember that next time .
Last edited by RMA; 12-10-2010 at 11:01 AM.
12-12-2010, 11:29 AM
#38
Registered User
Thread Starter
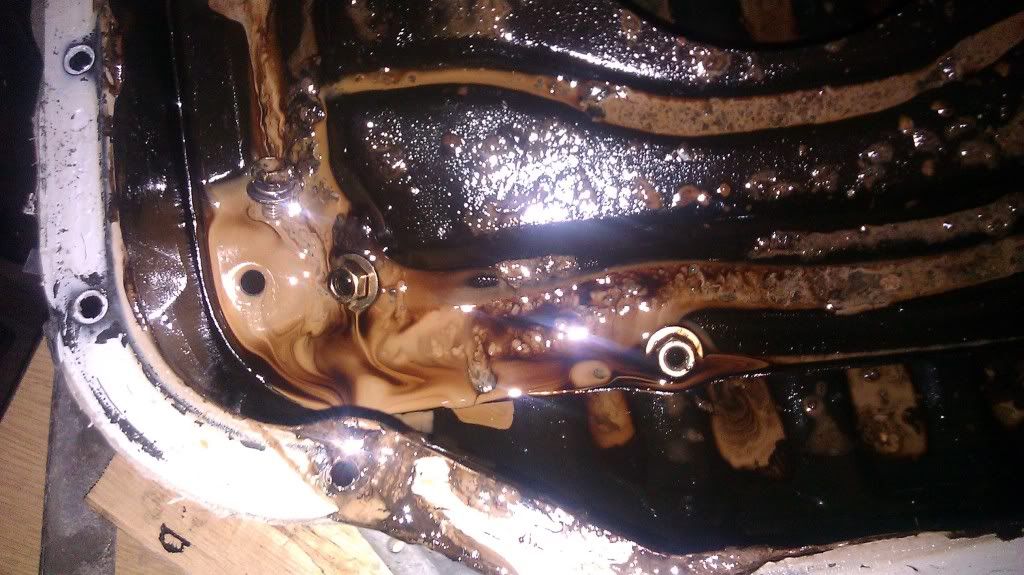
Took a few hrs to work a little more on the drive train, got the 341 output cut and all fit together. Slipped together like butter but I'm gonna put a piece of clay in the coupler and fit them together again, I just have to know what kind of tolerences 50 mm gives ya and to ensure there is not too much pressure on the output bearing.
Next is the rotor, lets see if I can take that 10mm out of the gear section without dick'n it up.
Popped the pan on the original motor and it was UGLY!! Everything in it was coated with "poop soup". Not sure how to proceed on this, rinse out this one and hope it was this way because the cat at the yard fired the car up for a minute to show it was a running motor after somehow getting water in the crank case?? They said they power wash their motors so..?? or...continue to tear into the other one that has a catch in it and see if I discover something simple, the further I tear into it the more $$$ it racks up tho. My pockets sure as hell didn't plan on a $1000 frick'n rebuild and never expected to get 2 chit motors in a row, one with 75k and the other 116k, when I hear of good runners with 1/4 and 1/2 million miles on them!!!! Hillbillys rough on chit 'round hurr.
Last edited by maniacmotorsports; 12-13-2010 at 12:55 PM.
12-12-2010, 01:45 PM
#39
Registered User
Thread Starter
tried this stupid flickr app and who knows what that was I edited back out..
Last edited by maniacmotorsports; 12-12-2010 at 01:52 PM.
12-13-2010, 11:48 AM
#40
Registered User
Thread Starter
our special for today is baby poo soup with an exquisite pickup screen snot chowder.

Last edited by maniacmotorsports; 12-13-2010 at 12:51 PM.


