When you click on links to various merchants on this site and make a purchase, this can result in this site earning a commission. Affiliate programs and affiliations include, but are not limited to, the eBay Partner Network.
My P/S pump has been leaking quite a bit on my '86 22r since I bought the truck. So, I bought an o-ring/seal kit from autozone and tore it apart today. I took some pics to hopefully help someone else out. Things you will need: rebuild kit, p/s fluid, brake cleaner/rags, a vise would be really helpful but is not required, and a little bit of patience.
Ok let's get started:
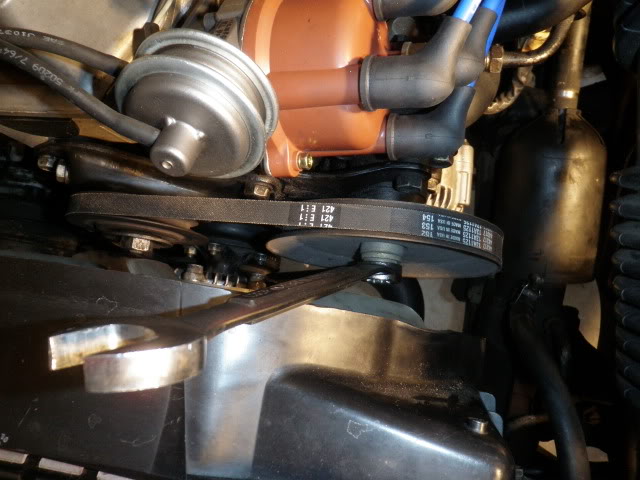
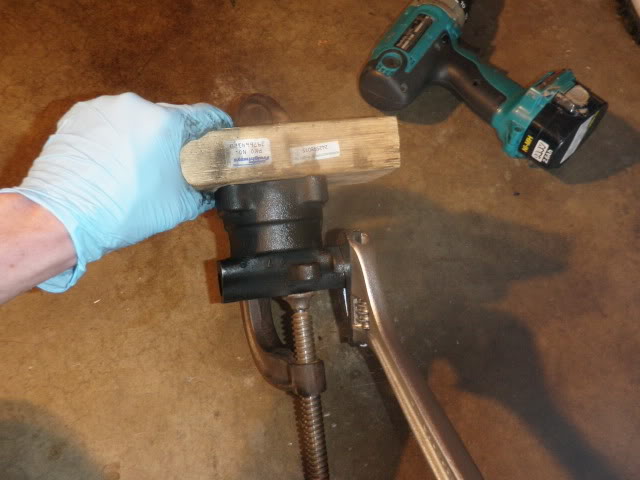
1. Bust the nut loose on the P/S pulley. This is much easier with the belt on as you can push down on the belts and break the nut loose. You can remove the pulley now if you want. Oh, it's a 19mm nut.
2. Disconnect both hoses going to the pump. I put some rags and a little plastic cup underneath to catch the excess.
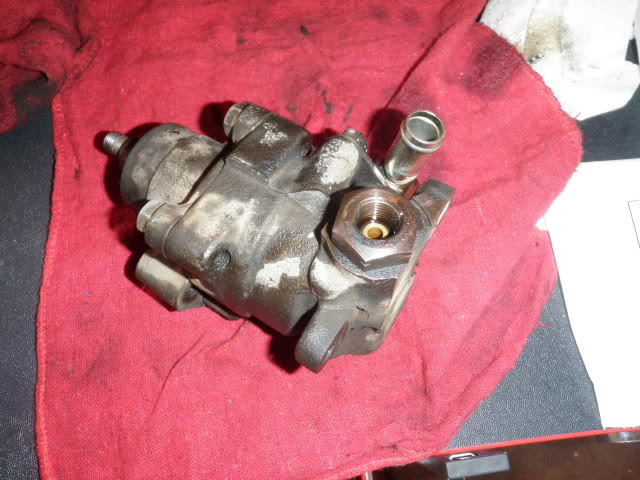
3. Remove the pump. There are only 4 bolts holding it on.
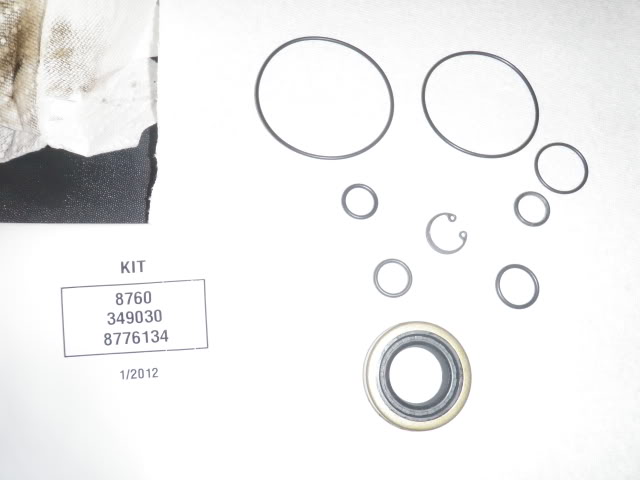
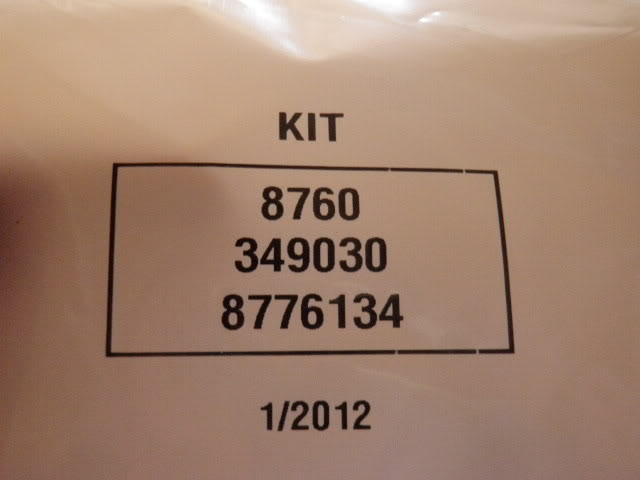
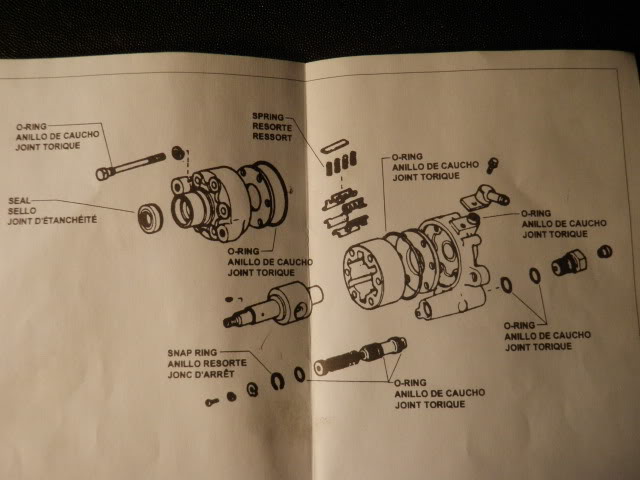
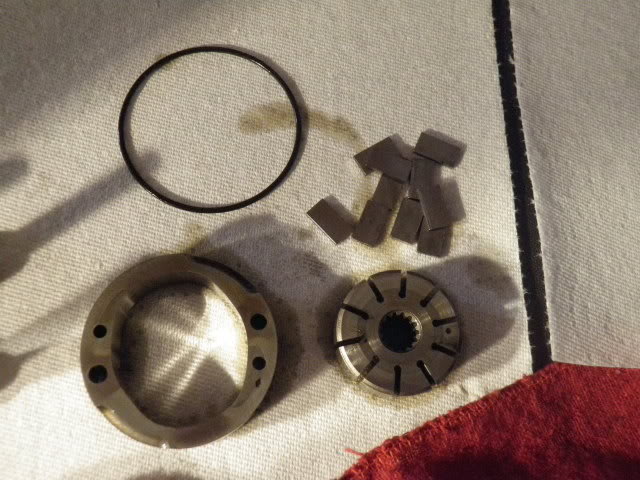
Here's some close ups of the kit and p/n that I picked up at autozone. Note the diagram is just a generalization. You should definitely refer to the FSM as it was much more helpful.
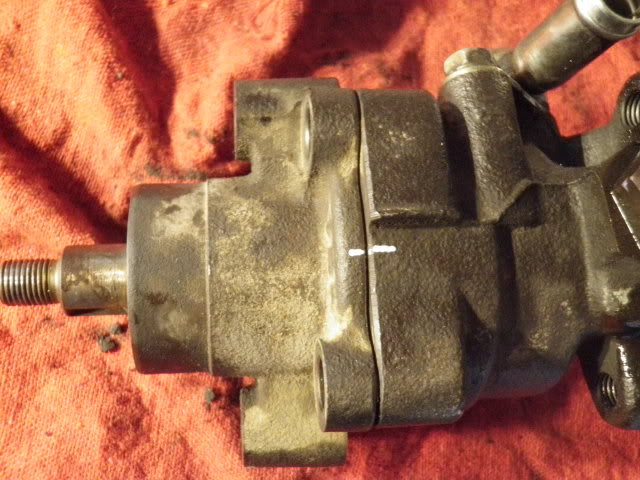
4. Throw some match marks on the housing before taking apart.
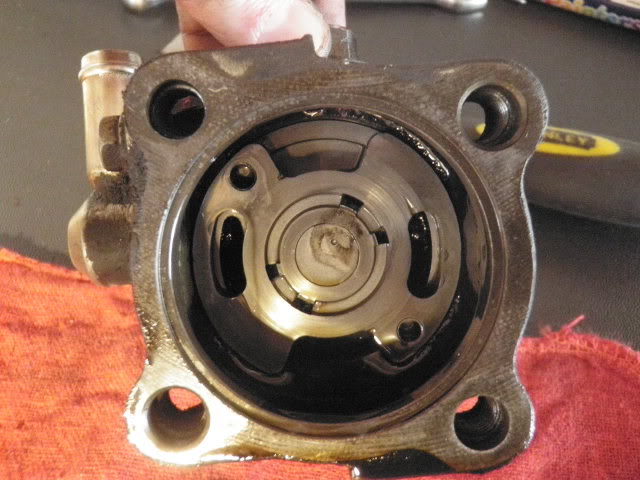
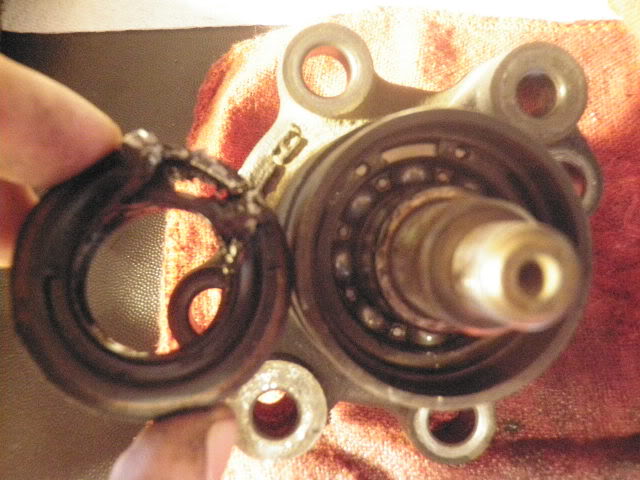
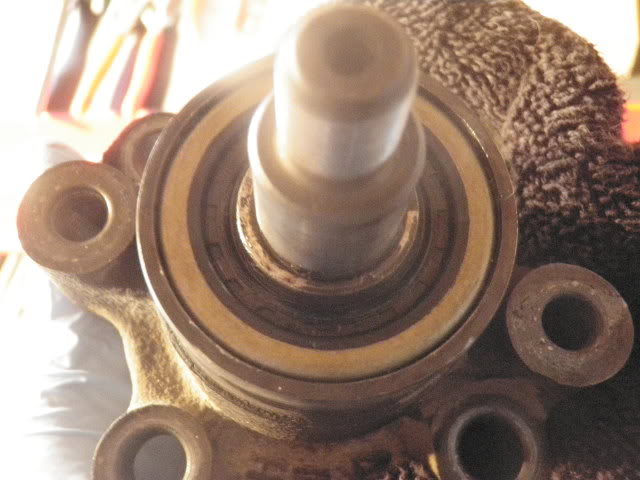
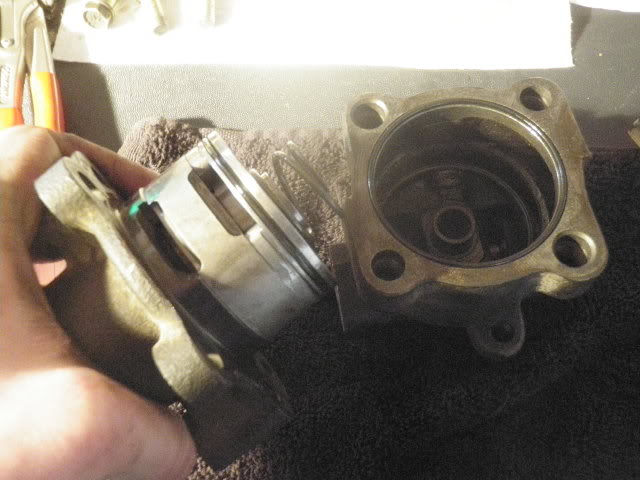
5. Open her up. Here is the back half of the pump
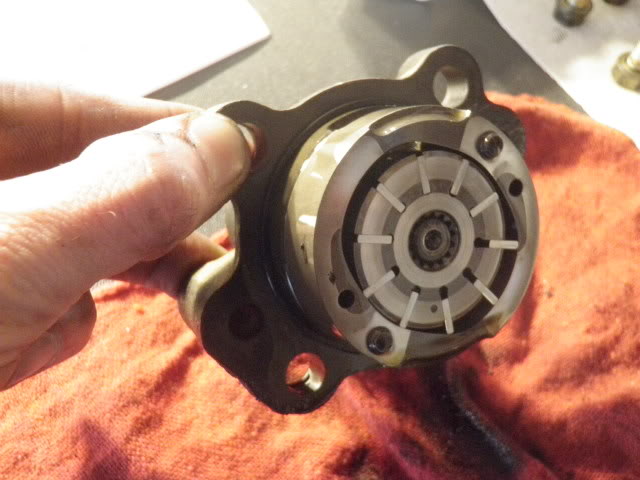
6. Here's the front half. Take note how the outer and inner pieces are installed. They are directional.....in other words, it DOES matter which way they are reinstalled.
7. Here is a pic of the front half internals.
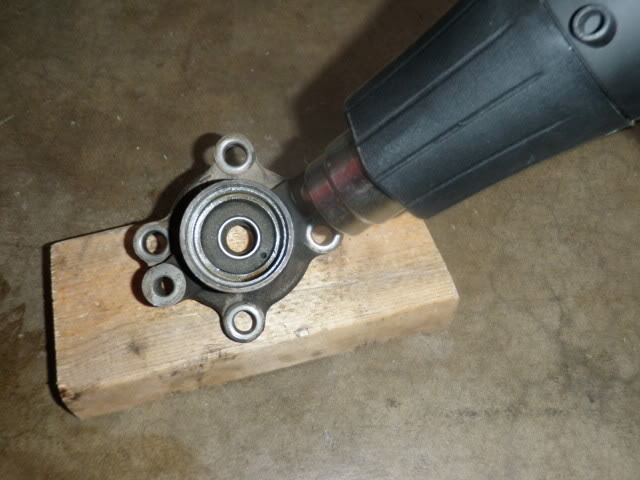
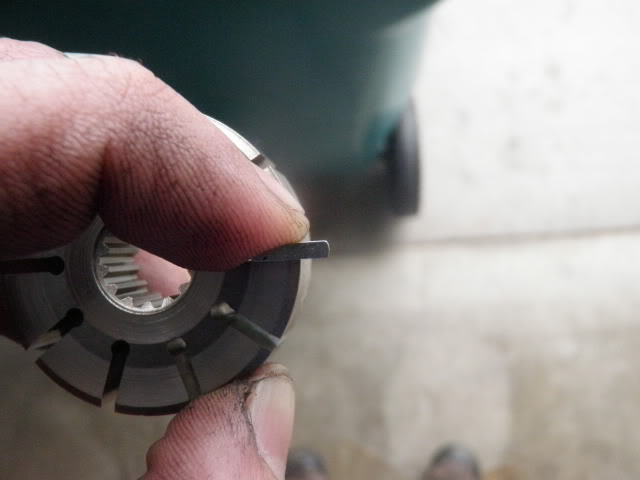
8. Hardest freeking part of the job for me. The seal removal. You can't just remove the inner shaft then remove the seal as the shaft has a snap ring holding it in. I have had success by drilling a hole in the seal face, threading a course screw into the face, and using a slide hammer to extract. I was slide hammerless so I drilled a hole and basically mangled the thing until I got it out. Thank god I didn't put a single scratch where the seal lip rides!
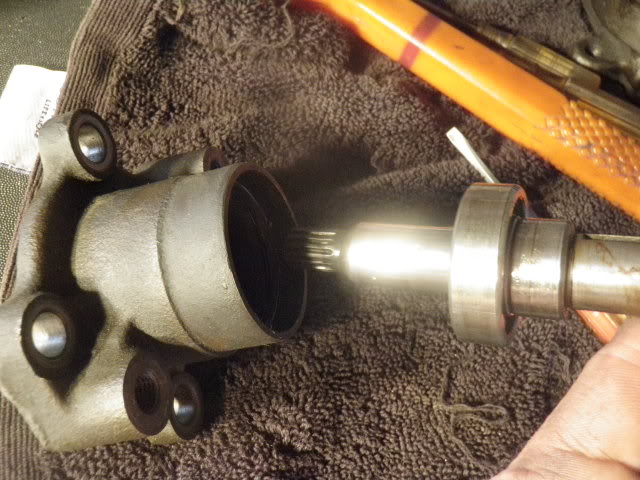
9. After you get the seal out. You can remove the snapring for the shaft and remove it if you'd like but it's not necessary. I did just because I wanted to check out the bearing and figured I'm already in this far, this bastard is coming all the way apart! A heat gun really helps here. If you heat up the housing it will expand a little allowing the shaft/bearing to be tapped out easily enough.
10. Heat up the housing and reinstall the shaft/bearing.
11. I heating up the housing once more and installed the seal. Be sure to grease up the lip and also the part of the shaft that the seal rides on. Also, I put a very light coat of FIPG on the outer diameter of the housing so when I pressed the seal in there would be no chance of oil migrating out the outer diameter.
12. Disassemble the back part of the pump. I didn't have a vise so I rigged up this c-clamp to give me enough holding power to break the nuts loose. Every piece of hardware on this pump was on very tight!
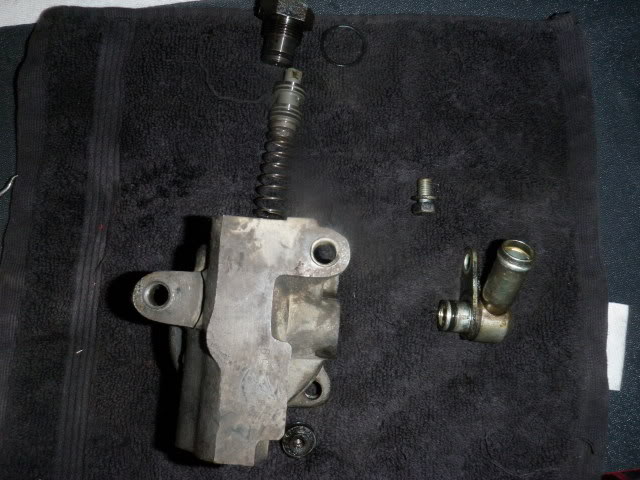
13. Here is the back half of the pump disassembled. The fitting at the very top of pic has two o-rings so don't miss that. One will probably stick to the housing as you take it apart. Pretty straight forward. That little circle piece near the bottom of the pic actually slides out the top where you see that spring. there is a snapring that keeps the little circle do hickey from coming out the bottom if that makes sense. If it doesn't, it will when you take it apart.
14. This pic is a little misleading. I never mentioned how to get this guy out. It is held in by o-ring pressure so if you take a dead blow hammer (not a metal faced one!) and beat the back of the housing like you mean it, it will pop out along with the spring. Don't reinstall this into the housing yet, you'll see why shortly.
15. I didn't say this but it should be obvious, replace all o-rings with a new lubricated one before reassembling anything.
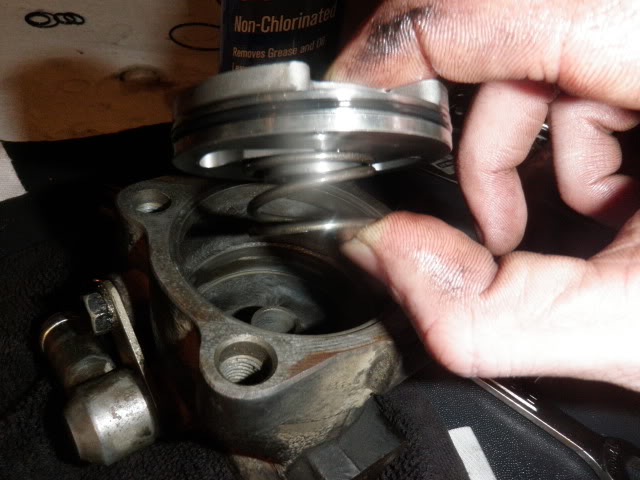
16. Reassemble the forward half of the pump. Note the orientation on these vanes. The rounded side faces outboard! Also, the piece that the vanes go into installs onto the shaft with the more chamfered end forward. Check out the FSM for more detail on this.
17. I chose to install all the internals on one side of the the pump and then just install the other housing half onto this assembly. This makes life much easier as everything must be aligned/engaged properly. Make sure you put a new o-ring where the housings meet.
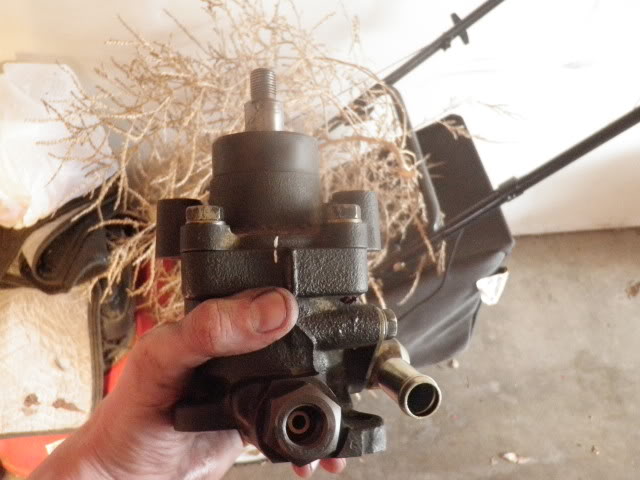
18. Pat yourself on the back because you just rebuilt your P/S pump for about $20!
19. Reinstall pump, both lines, and pulley/belt. Refill P/S fluid. IMPORTANT. Make sure you put enough fluid in the reservoir! I wasn't thinking as clearly as I should have been and only filled it to the top of the cold line on the dipstick. I cranked my truck up and within a couple seconds the pump gulped that down and wanted more. Needless to say she started whining like crazy. Don't know if it was cavitating or what. Anyway, I shut her off and topped her off then started her back up and cycled the steering a couple times and topped the reservoir off one last time. In hindsight, you could just prime the pump by turning the pulley before tightening up the belt and topping off the reservoir as you go.
The end result? I just drove my truck for a couple hours through the mountains. When I got home the pump was bone dry! It took me a few hours from start to finish and was a pretty fun Sunday project. If you have any questions let me know!
you know my 2002 tacoma called for ATF i think but i just threw in some power steering fluid for this and it seemed to work just fine. don't some say that the atf is thicker and reduces leaks? either way, just sold the truck i did this on so it was a courtesy to the buyer either way-he got a leak free truck and i got some knowledge
Thanks Fambugee for posting this it was really helpful.
I just wanted to add something to save someone else from the mistake I made.
When you take out the peace with the snap ring take it out in the direction of the threaded nut. I lost some of the material for the snap ring groove going in the other direction as there isn't much material on the inner face where the groove is so it folded over.
Looking into the pump I can see about forty percent of the oring now. I think it should be ok with the pressure pushing to the outside where the oring has full contact on the groove but there is a lot of pressure.
If any one has a spare I'd appreciate it as when I get this motor back together after the head gasket I really don't want to tear into it again.
Funny you brought this up there FundyRider....I used this thread also.
Thanks...x2!
PS I can't remember exactly what you're talking about...but I do remember having to take it apart again because I put something in backwards. I took some pics...let me see if I can figure out what it was and I'll post up.
Last edited by daved5150; 05-18-2014 at 07:28 AM.
Reason: add to post
So my pump seal near the front pulley was leaking and I decided to buy the Gates rebuild kit as shown above and rebuild it. It was working great otherwise. I took it all apart, laying everything out in the order I removed it. Replaced everything the kit came with while carefully cleaning and reoiling before reassembling each component.
Now I'm worried. I put it back on the truck and refilled reservoir several times turning the steering wheel back and forth both with the wheels off the ground and back on. Lots of microbubbles in reservoir not too mention it overflowed several times. Finally got the overflowing to settle down but it is whining really bad and seems to fight hard when switching from one direction to the other(wheels on the ground.) Off the ground its fairly quiet but I'm sure it's because there's no load.
Drove it down the road and it got no better. I'm down in the dumps because I feel like I took an otherwise good pump and pushed it over the edge somehow.
If you let the pump run dry while turning the wheels, it's gone.
I always hook the pump up and turn the steering wheel by hand (do not start the truck) to work all the air out. You will see the bubble raise through the reservoir. Once all the air is purged, then fill to the correct level and drive.
I learned my lesson doing what you did with running the truck and trying to purge the system. Everything happens too fast and the pump runs dry...
That may have happened however I don't believe so. I threw in the towel and ordered a reman pump from Autozone which I will put on tonight. Last night when I pulled it the entire bottom of it was soaked. I don't think I got a good seal when I put it back together from the two halves. I didn't investigate as I was ready to throw it out deep in to the yard like a football.
Thanks for the tip though on working the air out with the truck off though! I will definitely do that. What was frustrating to me was trying to get the level correct. I will report back if I got a good unit from Vatozone.
Originally Posted by snobdds
If you let the pump run dry while turning the wheels, it's gone.
I always hook the pump up and turn the steering wheel by hand (do not start the truck) to work all the air out. You will see the bubble raise through the reservoir. Once all the air is purged, then fill to the correct level and drive.
I learned my lesson doing what you did with running the truck and trying to purge the system. Everything happens too fast and the pump runs dry...
Thanks for the post Fambugee, good stuff. Anyone know the o-ring sizes/durometers(hardness) that come in the kit? I'd rather spend $2 instead of $20. Plus, my shaft seal is still good so I would like to replace just the o-rings. Found something close for all except the front housing seal, went ahead and rebuilt w/o housing seal.... and guess what's still leaking! It's a 2.5 inch diameter ring, but w/o calipers I'm not sure of the original size/thickness (~1/8in or 1mm). Any help is appreciated.... and before anyone else says it, yes, I know that I should just rebuild the whole thing, but I am stubborn/cheap/lazy.
EXCELLENT pictures..
viewed your instructions and have a few questions
1. you did a reinstall of the bearing? did you NOT put a new bearing inside the pump?
2. after removing the belt pulley, does the pulley just come right off with the belt?
3. why is the seal so tuff to get out?
4. does the seal just seat easily back in?
5. what type of lube did you use for the o-rings?
6. you did not use Dexron or DexronII (obsolete now)? What version would you have used?
I'm not the OP but I did get the chance to rebuild my pump 3 times!!! (1 rebuild w/cheap o-rings & ps fluid, didn't stop the leak, 2 with proper o-rings/kit but I put the vanes in backwards, no leak, no pump, 3rd time was a charm!). As for your questions, I hope I can shed some light:
1. you did a reinstall of the bearing? did you NOT put a new bearing inside the pump?
I did replace the bearing in the pump, a new bearing came with the kit. Like others, I had to destroy my bearing to get it out.
2. after removing the belt pulley, does the pulley just come right off with the belt?
Not all shafts & pulleys are created equal; mine came off with a little tap of a hammer, but others had to use pulley pullers
3. why is the seal so tuff to get out?
Not 100% sure on this but I think it has something to do with a tight fit needed to keep pressurized fluid inside the pump
4. does the seal just seat easily back in?
It does seat back in, but you'll need a little force. If you have a bearing press, this is probably the best way to ensure the new bearing slides in straight. I tapped mine in with a wood mallet and a cloth over the bearing to protect it. Many small taps.
5. what type of lube did you use for the o-rings?
Always use the same lube/oil that goes into what you are lubing; you don't want a chunk of lithium grease floating in your pump and it's best not to mix different oils & fluids if you don't know what compounds might be created from. I used dextron ATF for lube.
6. you did not use Dexron or DexronII (obsolete now)? What version would you have used?
I used Dextron ATF as this is what is suggested in the manual. I used name brand power steering fluid the 1st rebuild and it leaked though the cheap o-rings I used.
And if you're like me and have no confidence in your work, you can bend a piece of metal ( I has some stainless sheet laying around) and create a drip tray/chute so the PS fluid doesn't drip into your alternator (burned thru 2 alternators before I found the culprit).

 03-11-2012, 06:04 PM