
Reviving a long-dormant, low-mile 22RE
 07-29-2011, 11:38 AM
#21
Registered User
Thread Starter
Join Date: Dec 2010
Location: Torrance, CA
Posts: 53
Likes: 0
Received 0 Likes
on
0 Posts
Awesome - thank you - that must be the answer. I found a thread about this exact topic. The original poster describes the problem exactly, and it turns out to be that small allen-head bolt. More progress should happen tonight.
https://www.yotatech.com/forums/f116...-stuck-112013/
https://www.yotatech.com/forums/f116...-stuck-112013/
 07-29-2011, 11:59 AM
#22

Awesome, when jeetS brought it up, I remembered it because that happened to me, didn't know about it either then, I looked all over looking for a hex bolt or nut, couldn't find one till I got out flash light and looked all over underneath and saw it and smacked my forehead duh, but I do know about it now, took off injector rail to get to it when allen wrench didn't work If I remember right;}LOL
07-29-2011, 05:02 PM
#23
Registered User
I would use a good amount of break-in additive containing plenty of zddp for the first 5-10 thousand miles or so. There was plenty of zddp in all oils when that motor was built, and it's essential to break in the cam & followers, in particular. It also helps with corrosion, and may help deal with some of the rust that's on various internal parts. Red Line makes an excellent one:
http://www.redlineoil.com/product.aspx?pid=121&pcid=1
http://www.summitracing.com/parts/RED-81403/
For the first fill of oil, shoot for around 1600-1800 ppm zinc. Most modern 5W-30 or 10W-30 "SM" grade oils have around 600-700 ppm, so adding half a bottle (8 oz) of the Red Line product to 5 quarts of oil would give an additional 1104 ppm zinc, for a total of 1704-1804 for most SM 30 weights. I would change oil pretty quick after you first get it going, maybe after 600 miles or so. Use the same amount of zddp for the second oil fill too. Run that longer, maybe 3000 miles or so. Then for the rest of the first 5-10k miles, I'd use 1300-1500 ppm zinc. Using 6 oz of the Red line product would give a boost of 828 ppm of zinc, or 1428- 1528 ppm zinc total for most SM 5W-30 or 10W-30s.
For the dry seals, you'll need an oil that has extra seal-swelling esters for the first couple oil fills. You could either use an ester synthetic like Red Line, or a high mileage oil that has extra esters. The best of those is probably Valvoline MaxLife. MaxLife 5W-30 has 741 ppm zinc, so you'll need the zddp additive:
http://www.bobistheoilguy.com/forums...&Number=996248
BTW if you use a conventional 5W-30, I wouldn't run it for more than 2000 miles. They are 5 weight oils with a TON of viscosity index improvers added, and almost all mineral 5W-30s will break down to 20 weights in 2000-3000 miles:
http://www.toyotanation.com/forum/sh...9&postcount=40
MaxLife is a syn blend and holds viscosity better than most, so you could probably run it for 3k, but no more. In general (and this is for everyone, on any vehicle) if using 5W-30, you're much better off with a synthetic which will hold up for at least 4k, probably 5k miles without much loss of viscosity.
An alternative to adding zddp to an SM grade oil is to use an oil that already has a good amount of zddp, like Amsoil Series 3000 Synthetic 5W-30 Heavy-Duty Diesel Oil which has 1379 ppm zinc. The 5W-30 synthetic will flow better at startup and the extra detergents in diesel oil might be helpful.
http://www.amsoil.com/storefront/hdd.aspx
http://www.amsoil.lube-direct.com/20...nc-oil-amsoil/
Use something with more esters for the first two fills, tho.
Last edited by sb5walker; 07-29-2011 at 05:04 PM.
07-29-2011, 05:41 PM
#24
@ local walmart they have
1. Delvac super 1300 $12.96 a gal 15w-40 with 1380 ppm zink dino oil
2. Rotella tripple protection 13.79 a gal. around 1200 ppm zink dino oil
3. Rotella t-5 $16.00 a gal. synthetic blend around 1200 ppm zink synthetic oil
4. Rotella T-6 $21.36 a gallon 5w-40 around 1200 ppm zink dino oil
older specs of CI-4 and CH-4 have higher levals of zink
told stay away from newer CJ-4 less levals of zink
Would anybody use these? I'm leaning on the 1st one!!!! or number #3!!!!
07-29-2011, 06:24 PM
#25
Registered User
@ local walmart they have
1. Delvac super 1300 $12.96 a gal 15w-40 with 1380 ppm zink dino oil
2. Rotella tripple protection 13.79 a gal. around 1200 ppm zink dino oil
3. Rotella t-5 $16.00 a gal. synthetic blend around 1200 ppm zink synthetic oil
4. Rotella T-6 $21.36 a gallon 5w-40 around 1200 ppm zink dino oil
older specs of CI-4 and CH-4 have higher levals of zink
told stay away from newer CJ-4 less levals of zink
Would anybody use these? I'm leaning on the 1st one!!!! or number #3!!!!
1. Delvac super 1300 $12.96 a gal 15w-40 with 1380 ppm zink dino oil
2. Rotella tripple protection 13.79 a gal. around 1200 ppm zink dino oil
3. Rotella t-5 $16.00 a gal. synthetic blend around 1200 ppm zink synthetic oil
4. Rotella T-6 $21.36 a gallon 5w-40 around 1200 ppm zink dino oil
older specs of CI-4 and CH-4 have higher levals of zink
told stay away from newer CJ-4 less levals of zink
Would anybody use these? I'm leaning on the 1st one!!!! or number #3!!!!
For higher mile motors, I prefer a 40 weight. The Delvac and Rotella triple would be fine for summer, but I would use the T6 for winter. 5W- flows much better in the cold temps. And actually the T6 is fine for summer too since it's still a 40 weight at op temp and thicker when at room temp than at op temp, of course.
07-31-2011, 10:56 PM
#26
Registered User
Thread Starter
Join Date: Dec 2010
Location: Torrance, CA
Posts: 53
Likes: 0
Received 0 Likes
on
0 Posts
Thanks for all the oil info. I'll keep it handy for when the time comes to start this engine for the first time (in 25 years). I may or may not replace all the seals...the rear main looks & feels really nice, so it's tempting to leave it in. On the other hand, replacing it is cheap insurance in the event that it has lost its sealing properties from its long slumber.
07-31-2011, 11:14 PM
#27
Registered User
Thread Starter
Join Date: Dec 2010
Location: Torrance, CA
Posts: 53
Likes: 0
Received 0 Likes
on
0 Posts
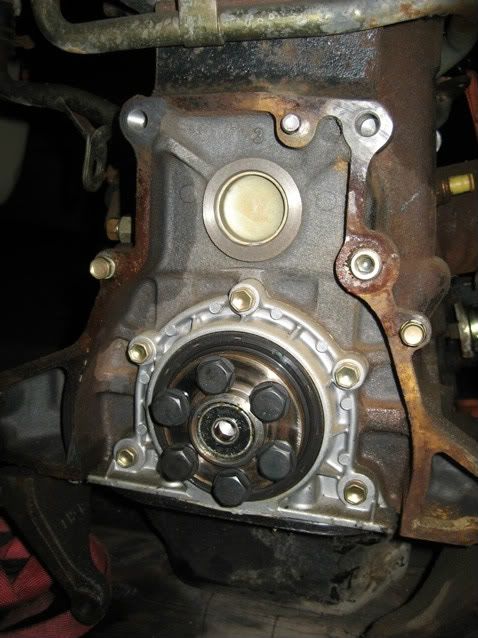
I made some good progress this weekend. Got the intake manifold off; the culprit was indeed the sneaky hidden Allen screw. I used a hex driver socket, u-joint and extension to get to the screw and break it loose. Worked like a charm, and it may even be possible in a vehicle.
You can see the screw head on the right in this picture (taken from underneath & forward of the manifold) and the u-joint in the middle:

With the manifold off, I could see how clean the intake ports and valves are. Just a tiny bit of blackness on the valve faces. They all look like this one:

And the coolant ports on the intake side of the head look great as well. Just a few dried-up antifreeze crystals.

With the help of my friends Simple Green and PB Blaster, I made short work of the exhaust manifold as well. None of the nuts or bolts put up much of a fight.

The exhaust ports and valves are really clean too. This is not the best picture, but trust me, they are.

Since the engine is obviously not in a truck, I couldn't do the old tried-&-true starter bump method to loosen the crank pulley bolt. However, I do have a BIG screwdriver, which I don't get to use very often. This is how I used it yesterday; up against one of the bellhousing bolts and inbetween the flywheel teeth, to hold the flywheel solid as I cracked the pulley bolt loose with a breaker bar. Sweet!

Worked like a charm. Gotta love the BFS.

This also allowed me to loosen the pressure plate bolts and the six flywheel bolts, no problem. The flywheel looks remarkable for sitting outside for so long. Just a wee bit of surface rust...

...which cleaned right up with some Scotch-Brite and elbow grease.

The clutch disc looks awesome too. I haven't measured the pads yet but it looks well within the wear limit.

You can see the screw head on the right in this picture (taken from underneath & forward of the manifold) and the u-joint in the middle:
With the manifold off, I could see how clean the intake ports and valves are. Just a tiny bit of blackness on the valve faces. They all look like this one:
And the coolant ports on the intake side of the head look great as well. Just a few dried-up antifreeze crystals.
With the help of my friends Simple Green and PB Blaster, I made short work of the exhaust manifold as well. None of the nuts or bolts put up much of a fight.
The exhaust ports and valves are really clean too. This is not the best picture, but trust me, they are.
Since the engine is obviously not in a truck, I couldn't do the old tried-&-true starter bump method to loosen the crank pulley bolt. However, I do have a BIG screwdriver, which I don't get to use very often. This is how I used it yesterday; up against one of the bellhousing bolts and inbetween the flywheel teeth, to hold the flywheel solid as I cracked the pulley bolt loose with a breaker bar. Sweet!
Worked like a charm. Gotta love the BFS.
This also allowed me to loosen the pressure plate bolts and the six flywheel bolts, no problem. The flywheel looks remarkable for sitting outside for so long. Just a wee bit of surface rust...
...which cleaned right up with some Scotch-Brite and elbow grease.
The clutch disc looks awesome too. I haven't measured the pads yet but it looks well within the wear limit.
07-31-2011, 11:23 PM
#28
Registered User
Thread Starter
Join Date: Dec 2010
Location: Torrance, CA
Posts: 53
Likes: 0
Received 0 Likes
on
0 Posts
There wasn't even any clutch dust on the disc or pressure plate, and behind the steel plate rear cover everything looks good. The rear main seal is clean, pliable, and not cracked or dried out at all. I might re-use it. We'll see.
I had the pickup pushed out in my driveway, which gave me a chance to take a few better pictures. It's not lifted; this is the stock IFS ride height with very little weight in the front (minus engine & trans)!

That's my KLX300R next to the truck. I'm looking forward to more frequent desert riding trips once I have a way to transport it again.
My cat decided to inspect the front end. I think he signed off on it but I couldn't be sure.

And I finally got the 22RE up onto an engine stand to make flipping it over a bit easier! Here's how I ended the day. 22RE on the left, original 208k-mile 22R on the right. Lots to be done, but good progress has been made. Next on the list is pulling the pan and taking a gander at the bottom end.

I had the pickup pushed out in my driveway, which gave me a chance to take a few better pictures. It's not lifted; this is the stock IFS ride height with very little weight in the front (minus engine & trans)!
That's my KLX300R next to the truck. I'm looking forward to more frequent desert riding trips once I have a way to transport it again.
My cat decided to inspect the front end. I think he signed off on it but I couldn't be sure.
And I finally got the 22RE up onto an engine stand to make flipping it over a bit easier! Here's how I ended the day. 22RE on the left, original 208k-mile 22R on the right. Lots to be done, but good progress has been made. Next on the list is pulling the pan and taking a gander at the bottom end.
08-01-2011, 06:26 AM
#29
Registered User
Try to discourage your cat from climbing into engine compartments. One time when my family left from visiting my cousins - unknown to us, one of their cats had climbed up there for a nap. When my dad started the engine to leave, the cat jumped down to escape and got caught up in the fan belt. I'll never forget the sound of the screams, and sight of the cat dragging it's shredded and bloody back half around the driveway.
08-01-2011, 02:39 PM
#30
Registered User
Thread Starter
Join Date: Dec 2010
Location: Torrance, CA
Posts: 53
Likes: 0
Received 0 Likes
on
0 Posts
Geez - poor cat. Sorry you had to see that. I try to keep him out of danger as much as I can, but they are naturally curious creatures...anyways in this case I figured it was harmless since the truck wasn't going anywhere. He likes to sit in the shade under our cars but usually gets spooked when someone walks up. Thanks for the warning though.
08-02-2011, 10:10 PM
#31
Registered User
Thread Starter
Join Date: Dec 2010
Location: Torrance, CA
Posts: 53
Likes: 0
Received 0 Likes
on
0 Posts
More progress...got the motor mounts and oil pan off tonight. First I cracked the drain plug and a bit of oil dribbled out, followed by this slug:

Which is not an action shot, by the way. That is a nice viscous gooey blob of oil and water that is just hanging there.
With a screwdriver as a prodding tool, I poked around a bit in the oil drain hole and at various different times I had this goop, decent looking oil, and clear water draining out. Obviously water had made its way into the bottom end, either slowly as condensation or from rain. Either way, there was clear water in there that had separated out (no coolant) plus the mixture and clean oil. I was starting to feel a sinking feeling that the bottom end might be totally rusted out.
Just for fun I poured out what was left in the bottom of the pan...

...and out squirmed this slug pie. I feel like I should have named it. Hey buddy, how does it feel to be free?

Good news, however! Looking up at the crank and rods, it would appear that all is well! I'm the first person to look at this stuff since the '80s Japanese assembly guys buttoned it up. It felt like an archaeological dig.


You can see some light surface rust on the crank. I don't think that is anything to worry about. The interior of the block is clean, there is still oil coating most surfaces, and the underside of the pistons look fantastic. From what I can see the cylinder bores are fine too. Everything is still super clean supporting my Dad's recollection of the 22RE having 2,000 miles on it. The red drops are from ATF that I poured into the cylinders a few days ago.
I'm assuming that this bluing around the rod journals on the crank is a result of the grinding operation at the factory, not from overheating, since the rod caps are not blued at all and the motor spins freely. Does anyone remember seeing this on a known good crank?

All in all, I'm still pretty satisfied!
Which is not an action shot, by the way. That is a nice viscous gooey blob of oil and water that is just hanging there.
With a screwdriver as a prodding tool, I poked around a bit in the oil drain hole and at various different times I had this goop, decent looking oil, and clear water draining out. Obviously water had made its way into the bottom end, either slowly as condensation or from rain. Either way, there was clear water in there that had separated out (no coolant) plus the mixture and clean oil. I was starting to feel a sinking feeling that the bottom end might be totally rusted out.
Just for fun I poured out what was left in the bottom of the pan...
...and out squirmed this slug pie. I feel like I should have named it. Hey buddy, how does it feel to be free?
Good news, however! Looking up at the crank and rods, it would appear that all is well! I'm the first person to look at this stuff since the '80s Japanese assembly guys buttoned it up. It felt like an archaeological dig.
You can see some light surface rust on the crank. I don't think that is anything to worry about. The interior of the block is clean, there is still oil coating most surfaces, and the underside of the pistons look fantastic. From what I can see the cylinder bores are fine too. Everything is still super clean supporting my Dad's recollection of the 22RE having 2,000 miles on it. The red drops are from ATF that I poured into the cylinders a few days ago.
I'm assuming that this bluing around the rod journals on the crank is a result of the grinding operation at the factory, not from overheating, since the rod caps are not blued at all and the motor spins freely. Does anyone remember seeing this on a known good crank?
All in all, I'm still pretty satisfied!
08-02-2011, 10:46 PM
#32
Registered User
Cool to see an original toyota motor with so few miles. Aren't many of THOSE around, that's for sure. Interesting to see that the oil pan sealant is factory original grey FIPG. That's what the dealer sold me in 98 for my oil pan and (knocking wood!) it's still holding tight with no leaks.
https://www.yotatech.com/forums/f116.../#post51334868
https://www.yotatech.com/forums/f116.../#post51334868
08-03-2011, 11:59 AM
#33
Registered User
Thread Starter
Join Date: Dec 2010
Location: Torrance, CA
Posts: 53
Likes: 0
Received 0 Likes
on
0 Posts
Yeah the grey FIPG was smeared on fairly thick; you can see where it oozed past the flange on the inside edge of the oil pan. There was some evidence of leakage over the years but nothing major. The FIPG isn't designed to sit out in the weather in a non-running engine, most likely. I'm just glad no one ever drained the oil completely...the bottom end would not have fared as well.
Incidentally I did save a bit of the "clean" oil that was draining at one point, and may have it analyzed just out of curiosity. There's a good chance it's the original factory fill. I haven't checked to see what Toyota's recommended oil change schedule was for a brand new '85; I suppose it could have been changed once. Should be interesting to see whether Blackstone can determine if it was still breaking in when it last ran. Also that would give me a rough idea of the zinc content in the factory fill, if it is indeed the original oil.
How many other 22REs just potentially had their first oil change last night? Not too many I'd reckon...
08-09-2011, 01:53 PM
#34
Registered User
Thread Starter
Join Date: Dec 2010
Location: Torrance, CA
Posts: 53
Likes: 0
Received 0 Likes
on
0 Posts
Still going on the teardown of this low-mile 22RE... here's a quick update.
I decided to replace the valve springs on principle since they have been sitting in the same position for 25 years, with some more compressed than others. Of course in order to do this I needed to remove the rocker assembly, which means removing all of the head bolts. Since I'd gone that far, I figured I should pull the head to inspect the cylinders, pistons, valve faces and combustion chambers. Also I don't want to assume that the old head gasket would be reusable after loosening the head bolts.
This gives me good access to the cam lobes. The surface rust is cleaning up nicely so at this point it looks like I can run the original cam. Here's a good close up of the lobes.

After a few minutes of light scrubbing with a green Scotch-Brite pad using WD-40 as a lubricant they seem to be OK.
The rocker faces look almost perfect. The rusty substance in the picture below must have been from the cam lobes...it wiped right off. There's no pitting or damage to the rockers.

And here's cylinder #3. I'll be cleaning up the carbon soon with gravity's help by flipping the shortblock over, which will let me get a closer look at everything. Factory crosshatching is obviously still there, with no deep vertical grooves (just a few very light ones that can't be felt with a fingernail) and no ridge at the top of the cylinder. All of the cylinders look this good.

Unless I find some compelling reason to do so, I won't be taking the bottom end apart. Just making sure everything is clean and ready for reassembly with a new head gasket.
I decided to replace the valve springs on principle since they have been sitting in the same position for 25 years, with some more compressed than others. Of course in order to do this I needed to remove the rocker assembly, which means removing all of the head bolts. Since I'd gone that far, I figured I should pull the head to inspect the cylinders, pistons, valve faces and combustion chambers. Also I don't want to assume that the old head gasket would be reusable after loosening the head bolts.
This gives me good access to the cam lobes. The surface rust is cleaning up nicely so at this point it looks like I can run the original cam. Here's a good close up of the lobes.
After a few minutes of light scrubbing with a green Scotch-Brite pad using WD-40 as a lubricant they seem to be OK.
The rocker faces look almost perfect. The rusty substance in the picture below must have been from the cam lobes...it wiped right off. There's no pitting or damage to the rockers.
And here's cylinder #3. I'll be cleaning up the carbon soon with gravity's help by flipping the shortblock over, which will let me get a closer look at everything. Factory crosshatching is obviously still there, with no deep vertical grooves (just a few very light ones that can't be felt with a fingernail) and no ridge at the top of the cylinder. All of the cylinders look this good.
Unless I find some compelling reason to do so, I won't be taking the bottom end apart. Just making sure everything is clean and ready for reassembly with a new head gasket.
08-09-2011, 03:20 PM
#37
Registered User
Thread Starter
Join Date: Dec 2010
Location: Torrance, CA
Posts: 53
Likes: 0
Received 0 Likes
on
0 Posts
 08-17-2011, 11:03 AM
#38
Registered User
Thread Starter
Join Date: Dec 2010
Location: Torrance, CA
Posts: 53
Likes: 0
Received 0 Likes
on
0 Posts
Back to the action on this engine...
I was able to catch enough clean oil to send in for analysis, just out of my own curiosity. Blackstone said there was no water (!) present, so I must have gotten a good sample as the clean oil was draining out of the pan, between the emulsion and the clear water.
The report shows high levels of iron, copper, lead, and silicon. Other metals like aluminum, chromium and nickel were higher than average but not way off. The comments say that the iron, copper and lead are most likely from bearing wear but since I have seen zero evidence of wear on anything in this engine so far, I was skeptical.
I called Blackstone and talked with a tech today, who explained that the copper and lead could be from a brass or bronze component wearing in. He agreed that it did look like the engine was still going through its break-in period but that the analysis didn't necessarily point to bearing wear.
The high iron content could be from rust, since there is some surface rust present inside the block, but not much. The oil was 5W/20 and could possibly have been the factory fill. There's a slight possibility that this '80s oil could have some unusual additives that would explain the results. They found no antifreeze whatsoever, which is a good sign but I'm not surprised given the awesome condition of the head.
Blackstone confirmed my suspicion...that I should check back after the engine is cleaned out, rebuilt and running again with modern oils to monitor these high-occurrence elements.

The engine's 25-year period of sitting outside probably had some impact on the analysis. Either way, as it turns out I will be taking the bottom end apart to check and clean the piston rings/grooves. The oil rings may be stuck or gummed up from sitting stationary so long, and I don't want to take the chance of major smoking or oil consumption once it's back together and running.
The plan is to re-use all the original fasteners and bearings in the bottom end assuming I see no major wear. The rods and pistons will stay together. This will give me a good chance to clean up the block and paint it as well. Also I plan on re-using the head bolts after cleaning up the threads since they have seen very few cycles with such low miles. Should be a fun rebuild!
More pics to come soon...
I was able to catch enough clean oil to send in for analysis, just out of my own curiosity. Blackstone said there was no water (!) present, so I must have gotten a good sample as the clean oil was draining out of the pan, between the emulsion and the clear water.
The report shows high levels of iron, copper, lead, and silicon. Other metals like aluminum, chromium and nickel were higher than average but not way off. The comments say that the iron, copper and lead are most likely from bearing wear but since I have seen zero evidence of wear on anything in this engine so far, I was skeptical.
I called Blackstone and talked with a tech today, who explained that the copper and lead could be from a brass or bronze component wearing in. He agreed that it did look like the engine was still going through its break-in period but that the analysis didn't necessarily point to bearing wear.
The high iron content could be from rust, since there is some surface rust present inside the block, but not much. The oil was 5W/20 and could possibly have been the factory fill. There's a slight possibility that this '80s oil could have some unusual additives that would explain the results. They found no antifreeze whatsoever, which is a good sign but I'm not surprised given the awesome condition of the head.
Blackstone confirmed my suspicion...that I should check back after the engine is cleaned out, rebuilt and running again with modern oils to monitor these high-occurrence elements.
The engine's 25-year period of sitting outside probably had some impact on the analysis. Either way, as it turns out I will be taking the bottom end apart to check and clean the piston rings/grooves. The oil rings may be stuck or gummed up from sitting stationary so long, and I don't want to take the chance of major smoking or oil consumption once it's back together and running.
The plan is to re-use all the original fasteners and bearings in the bottom end assuming I see no major wear. The rods and pistons will stay together. This will give me a good chance to clean up the block and paint it as well. Also I plan on re-using the head bolts after cleaning up the threads since they have seen very few cycles with such low miles. Should be a fun rebuild!
More pics to come soon...
08-17-2011, 01:28 PM
#39
Registered User
Thread Starter
Join Date: Dec 2010
Location: Torrance, CA
Posts: 53
Likes: 0
Received 0 Likes
on
0 Posts
Incidentally I just realized that the high iron in the oil sample could have been from cylinder break-in, and/or anywhere else where steel-on-steel contact occurs such as the timing chain & sprockets. 22Rs and 22REs had iron rings from the factory, correct? I seem to remember reading that. If so, that might explain it also.
For comparison purposes I also had an oil sample from my original '86 22R analyzed by Blackstone at the same time. Overall it looks about as I would expect; iron was high in this engine also. I actually bore scoped the cylinders last year and didn't see any vertical gouging but I can't say for certain it's not cylinder wear contributing to the high iron content. Anyways, it mostly speaks for itself.

For comparison purposes I also had an oil sample from my original '86 22R analyzed by Blackstone at the same time. Overall it looks about as I would expect; iron was high in this engine also. I actually bore scoped the cylinders last year and didn't see any vertical gouging but I can't say for certain it's not cylinder wear contributing to the high iron content. Anyways, it mostly speaks for itself.
09-11-2011, 03:59 PM
#40
Registered User
Thread Starter
Join Date: Dec 2010
Location: Torrance, CA
Posts: 53
Likes: 0
Received 0 Likes
on
0 Posts
Getting back to work after a trip to Scotland. It sucks to see my poor truck sitting for so long!
I fully disassembled the head, but before I pulled the cam I measured the thrust clearance (end play) just to be thorough. I set up my dial indicator and zero�ed it with the cam pushed completely to the rear of the head, then pushed it all the way forward and saw a clearance measurement of 0.003 inch which is right at the low end of the standard range (0.0031 � 0.0071). Max is 0.0098.


Cleaned the head extensively, getting all the gasket material off and all the carbon out of the combustion chambers and ports, and off of the valve faces. I used a combination of foaming gasket remover, a steel gasket scraper, purple power degreaser, toothbrushes and scotch-brite pads. I�ll probably have the head cleaned by a machine shop to be sure there is nothing lurking in any of the oil or coolant passages.

With a now-spotless sealing surface I used an 18� precision straight edge and feeler gauges to check head flatness per the factory service manual. The max allowable gap is 0.006 inch and I was only able to barely get the 0.0015 gauge under the straight edge in the worst spot. Intake and exhaust manifold flange flatness checked out fine also.

I ordered all new exhaust hardware (studs, nuts, etc) so pulling the original studs out of the head was in order. Most of them came out fine after soaking in penetrating oil and a bit of MAPP torch heat, but one was stubborn. I got creative and welded one of the flange nuts onto the stud upside-down since the double nut technique wasn�t enough to break it loose. This ended up working great.

Pulled the water pump, oil pump and front cover. The water pump and its cavity in the cover just had some gooey concentrated coolant left over. It was reddish so I assume it was the original Toyota �Red� coolant. The oil pump looks perfect but I haven't measured clearances yet.

The cam chain guides are looking good with just some light grooves but I think it would be silly not to replace them with steel guides given the known failure rate of the plastic parts. I may or may not do a double-row chain conversion on this engine; to keep costs in check I�m tempted to use the original single-row chain and sprockets. I�ll need to look into the average lifetime of the stock chain to decide if it�s worth the money I�ll save.


I also pulled the #1 piston and rod a few weeks ago to take a closer look. The crank journal looks great to my eyes.

The rod bearing may not be so great though. Does this look like an acceptable amount of wear for a super-low-mileage engine? It seems a bit excessive to me. Bearing wear would explain why the oil analysis showed high lead and copper. The oil pan and pickup tube were banged up in the collision that killed the original donor truck, so I�m thinking the engine may have continued to run after the accident for a while with low oil pressure. I can�t think of any other reason for bearing wear here. At any rate a new set of rod bearings (and maybe mains) would be cheap insurance.


Here�s the #1 piston & rod after some light cleaning. The oil control ring was not gunked up at all; there was just some normal carbon buildup on the crown. A soak in purple power fixed that. I still have the other three pistons & rods to pull and then the main caps. Got to keep the momentum going�I�m trying to imagine how sweet my truck will drive with a fresh engine when it�s all done!


I fully disassembled the head, but before I pulled the cam I measured the thrust clearance (end play) just to be thorough. I set up my dial indicator and zero�ed it with the cam pushed completely to the rear of the head, then pushed it all the way forward and saw a clearance measurement of 0.003 inch which is right at the low end of the standard range (0.0031 � 0.0071). Max is 0.0098.
Cleaned the head extensively, getting all the gasket material off and all the carbon out of the combustion chambers and ports, and off of the valve faces. I used a combination of foaming gasket remover, a steel gasket scraper, purple power degreaser, toothbrushes and scotch-brite pads. I�ll probably have the head cleaned by a machine shop to be sure there is nothing lurking in any of the oil or coolant passages.
With a now-spotless sealing surface I used an 18� precision straight edge and feeler gauges to check head flatness per the factory service manual. The max allowable gap is 0.006 inch and I was only able to barely get the 0.0015 gauge under the straight edge in the worst spot. Intake and exhaust manifold flange flatness checked out fine also.
I ordered all new exhaust hardware (studs, nuts, etc) so pulling the original studs out of the head was in order. Most of them came out fine after soaking in penetrating oil and a bit of MAPP torch heat, but one was stubborn. I got creative and welded one of the flange nuts onto the stud upside-down since the double nut technique wasn�t enough to break it loose. This ended up working great.
Pulled the water pump, oil pump and front cover. The water pump and its cavity in the cover just had some gooey concentrated coolant left over. It was reddish so I assume it was the original Toyota �Red� coolant. The oil pump looks perfect but I haven't measured clearances yet.
The cam chain guides are looking good with just some light grooves but I think it would be silly not to replace them with steel guides given the known failure rate of the plastic parts. I may or may not do a double-row chain conversion on this engine; to keep costs in check I�m tempted to use the original single-row chain and sprockets. I�ll need to look into the average lifetime of the stock chain to decide if it�s worth the money I�ll save.
I also pulled the #1 piston and rod a few weeks ago to take a closer look. The crank journal looks great to my eyes.
The rod bearing may not be so great though. Does this look like an acceptable amount of wear for a super-low-mileage engine? It seems a bit excessive to me. Bearing wear would explain why the oil analysis showed high lead and copper. The oil pan and pickup tube were banged up in the collision that killed the original donor truck, so I�m thinking the engine may have continued to run after the accident for a while with low oil pressure. I can�t think of any other reason for bearing wear here. At any rate a new set of rod bearings (and maybe mains) would be cheap insurance.
Here�s the #1 piston & rod after some light cleaning. The oil control ring was not gunked up at all; there was just some normal carbon buildup on the crown. A soak in purple power fixed that. I still have the other three pistons & rods to pull and then the main caps. Got to keep the momentum going�I�m trying to imagine how sweet my truck will drive with a fresh engine when it�s all done!


