
Machine shop advice re: 3.0 head gasket replacement
 10-20-2010, 09:07 AM
#1
Registered User
Thread Starter
Machine shop advice re: 3.0 head gasket replacement
I have a question about getting my 3vze heads machined. I am in the process of replacing my head gaskets @ 174,000 miles. Aside from some valve tick and a slight oil seep where the head meets the block at cylinder #6, the engine ran great until my water pump gave out. It seemed like a good idea to go ahead and do head gaskets since the entire front of the engine is already off for the timing belt/water pump job. I will be eliminating the crossover and installing headers as well.
Here is where I’m at in the process currently.

After lots of searching and reading, conventional wisdom suggests that aluminum heads need to be resurfaced before reinstallation. I have found a couple of local machine shops that can do that.
One shop (Top Gun in Clinton, TN) advised that he would clean the heads, fluid test them to make sure all valves seal properly, and resurface for flatness for approx. $50 per head. If he finds any problems, of course the price goes up depending on what needs to be done. He told me he does not need the cams for the job, and I would adjust the valves when I reassemble everything.
However, a mechanic friend advises that at 174K miles, I should get a valve job for good measure. He indicates the machine shop he uses (Johnny Sherrod in Knoxville, TN) will clean, test and resurface the head, grind the valves back to 45 degrees, replace the valve stem seals (supplied by me), and would make sure the valve clearance was within spec as part of the job. He would charge approx. $130 per head. He would need to have the cams as well to adjust the valve clearance. My friend explained that during the valve grind, the machinist will measure and allow for the thickness of the valve adjusting discs (“pills” he called them) to make sure the valve clearance is adjusted correctly in the end.
As I said, this is new territory for me, never done this before. My question is this: should I get a valve job while the heads are off, or should I simply have them cleaned and resurfaced?
I know lots of folks here have done this job and had their heads machined. Lots of threads indicate “got my heads back from the machine shop today” with pics of beautiful clean heads ready to install, but I have not found many specifics about what they had the machine shop do. I would appreciate any advice. With some good weather and cooperation from my kids, I’ll have my heads off by this weekend and can hand them over to the machine shop first part of next week.
Thanks for reading.
Here is where I’m at in the process currently.
After lots of searching and reading, conventional wisdom suggests that aluminum heads need to be resurfaced before reinstallation. I have found a couple of local machine shops that can do that.
One shop (Top Gun in Clinton, TN) advised that he would clean the heads, fluid test them to make sure all valves seal properly, and resurface for flatness for approx. $50 per head. If he finds any problems, of course the price goes up depending on what needs to be done. He told me he does not need the cams for the job, and I would adjust the valves when I reassemble everything.
However, a mechanic friend advises that at 174K miles, I should get a valve job for good measure. He indicates the machine shop he uses (Johnny Sherrod in Knoxville, TN) will clean, test and resurface the head, grind the valves back to 45 degrees, replace the valve stem seals (supplied by me), and would make sure the valve clearance was within spec as part of the job. He would charge approx. $130 per head. He would need to have the cams as well to adjust the valve clearance. My friend explained that during the valve grind, the machinist will measure and allow for the thickness of the valve adjusting discs (“pills” he called them) to make sure the valve clearance is adjusted correctly in the end.
As I said, this is new territory for me, never done this before. My question is this: should I get a valve job while the heads are off, or should I simply have them cleaned and resurfaced?
I know lots of folks here have done this job and had their heads machined. Lots of threads indicate “got my heads back from the machine shop today” with pics of beautiful clean heads ready to install, but I have not found many specifics about what they had the machine shop do. I would appreciate any advice. With some good weather and cooperation from my kids, I’ll have my heads off by this weekend and can hand them over to the machine shop first part of next week.
Thanks for reading.
Last edited by Wrenchinjoe; 10-20-2010 at 09:09 AM.
 10-20-2010, 11:13 AM
#3
Contributing Member
Join Date: Apr 2006
Location: TENN Native Languishing in Virginia
Posts: 4,787
Likes: 0
Received 34 Likes
on
14 Posts
Pay for the valve job/etc., too. Well worth your while.
Are you going to do the bottom end, too, or is that it?
I'd seriously consider replacing the front oil seal & oil pump & I'd DEFINITELY replace both idler pulleys.
Are you going to do the bottom end, too, or is that it?
I'd seriously consider replacing the front oil seal & oil pump & I'd DEFINITELY replace both idler pulleys.
The following users liked this post:
Wrenchinjoe (11-20-2010)
10-20-2010, 12:08 PM
#4
Registered User
Thread Starter
Thanks TN Rabbit. I was not planning to do the bottom end, rather simply trying to replace head gaskets in case that oil seep at cylinder #6 was an indication of one failing.
You bring up a good point though. Another school of thought is that a refurbished head on a tired set of piston rings causes blow-by. I have read these short blocks are over-engineered and should remain tight enough to handle a top-end rebuild, so long as it has been cared for.... but I don't really know whethe the PO was as caring as me
I have been reading up and collecting parts for months. So far I already have the Toyota timing belt, Aisin water pump and Gates idler pulleys, and new head bolts from engnblder.com. Just this week I ordered a gasket set from toyotapartszone.com along with a knock sensor pigtail. I think the oil pump front seal is included, but if not I'll pick that up separately.
Thanks for the feedback, that is one more vote for a valve job.
Last edited by Wrenchinjoe; 10-20-2010 at 12:09 PM.
10-20-2010, 05:20 PM
#5
Contributing Member
Join Date: Apr 2006
Location: TENN Native Languishing in Virginia
Posts: 4,787
Likes: 0
Received 34 Likes
on
14 Posts
Do a compression test before you pull the cams/heads & if your compression is still high (173 psi is stock) then I wouldn't worry about it. After you pull the heads, see how the cylinders look. Mine had ZERO wear even after 218,000 miles...
10-25-2010, 10:14 AM
#6
Registered User
Thread Starter
Got the heads off this weekend! As soon as the gasket set is delivered I will be taking them to the machine shop.


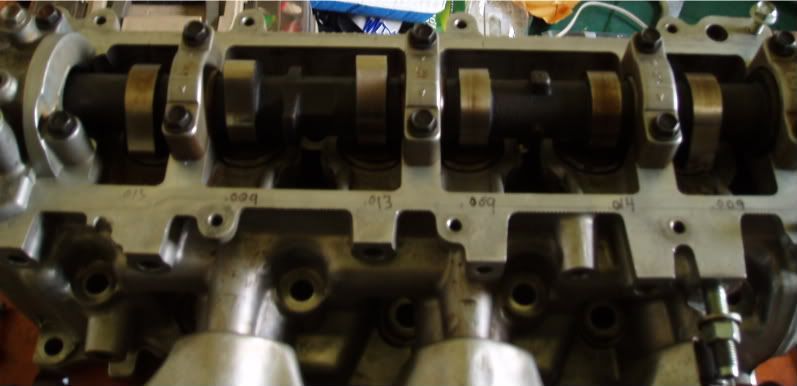
Why is there more tarnish on the intake cam lobe for #1 (2nd from left in this pic)?
TNRabbit, since I already had the timing belt off, I did not do a compression test. However the cylinders look pretty good to my rookie eyes. There is no evidence of coolant in the cylinders (except a little that leaked in while pulling the head) and carbon build up appears minimal.
Passenger side:

Driver side:

I'll post back when I get them back from the machine shop. Hopefully from here on out it is just cleaning and re-assembly.
Why is there more tarnish on the intake cam lobe for #1 (2nd from left in this pic)?
TNRabbit, since I already had the timing belt off, I did not do a compression test. However the cylinders look pretty good to my rookie eyes. There is no evidence of coolant in the cylinders (except a little that leaked in while pulling the head) and carbon build up appears minimal.
Passenger side:
Driver side:
I'll post back when I get them back from the machine shop. Hopefully from here on out it is just cleaning and re-assembly.
Last edited by Wrenchinjoe; 10-25-2010 at 12:10 PM.
10-25-2010, 06:37 PM
#7
So heat, that's why. It's commonly known that heat, which causes the thermal breakdown of the oil, is what causes such tarnishing(a.k.a. varnish).
Make sense?
Mine looks that way too. Though this pic doesn't show it as well.
Last edited by MudHippy; 10-26-2010 at 06:35 PM.
The following users liked this post:
Wrenchinjoe (11-20-2010)
Trending Topics
10-25-2010, 07:01 PM
#8
Registered User

Join Date: Sep 2007
Location: San Francisco East Bay
Posts: 8,254
Likes: 0
Received 822 Likes
on
649 Posts
Did you break your knock sensor pig tail? Not surprising; it's in a location that's tough on insulation. But you should replace it with a dealer part anyway. You sure don't want to have to dig back in there just to replace that wire.
10-25-2010, 07:51 PM
#9
Registered User
Thread Starter
Makes sense MudHippy, thanks. I can totally see why #6 gets so hot as it is surrounded by the exhaust manifold and the crossover pipe, but I wonder why #1 gets so hot? Seems like up at the front of the engine the ventilation would help a little. I get it though, excess heat creates tarnish.
Scope, the knock sensor pigtail was brittle but intact. I snipped the wire on purpose to keep the connector engaged on the sensor to keep it clean. I have ordered a new pigtail from toyotapartszone.com for $11, it should be delivered with the gasket set
Thanks for the feedback.
Scope, the knock sensor pigtail was brittle but intact. I snipped the wire on purpose to keep the connector engaged on the sensor to keep it clean. I have ordered a new pigtail from toyotapartszone.com for $11, it should be delivered with the gasket set
Thanks for the feedback.
10-26-2010, 01:10 PM
#10
Registered User

Join Date: Dec 2008
Location: Petaluma, CA
Posts: 11
Likes: 0
Received 0 Likes
on
0 Posts
I wouldn't be surprised if the heads needed to be machined but I would check them with a straight edge first and see if they are within spec before doing unnecessary work. Valve job is probably a good idea. Also want to check the heads for cracks
10-26-2010, 03:58 PM
#11
Registered User
Thread Starter
Thanks cummins6speed, I appreciate the tip.
The PO had the head gaskets replaced by Beaman Toyota in Nashville, TN under warranty at approx. 90,000 miles. So the heads have already been off once, but I have no idea whether they were machined at that time. I will tell the machine shop all this to make sure they take this into account and to ensure the heads can be resurfaced.
Also, I have read that some dealers did not reliably replace head bolts when they did warranty HG replacements, but I will. It is apparent that one of the 10mm cam bearing caps bolts was lost during that dealer HG replacement and the mechanic substituted a bolt with the same thread count but a 13mm head..., definately NOT OEM. I will replace that too.
Thanks again.
Last edited by Wrenchinjoe; 10-27-2010 at 05:02 AM.
10-27-2010, 05:12 AM
#13
Registered User
Thread Starter
TNRabbit, ok that helps. I assumed that resurfacing meant shaving some minimal material off the mating surfaces. The machine shop can certainly take care of that on the heads..., but I was not planning to pull the block. I have read that Scotch-Brite pads used gingerly to clean the block mating surface is acceptable, but do you have any better recommendations as to how a shade tree mechanic can resurface (or at least prepare) the block in the driveway?
Thanks.
Thanks.
Last edited by Wrenchinjoe; 10-27-2010 at 05:13 AM.
10-27-2010, 11:14 AM
#14
...but I was not planning to pull the block. I have read that Scotch-Brite pads used gingerly to clean the block mating surface is acceptable, but do you have any better recommendations as to how a shade tree mechanic can resurface (or at least prepare) the block in the driveway?
Thanks.
Thanks.
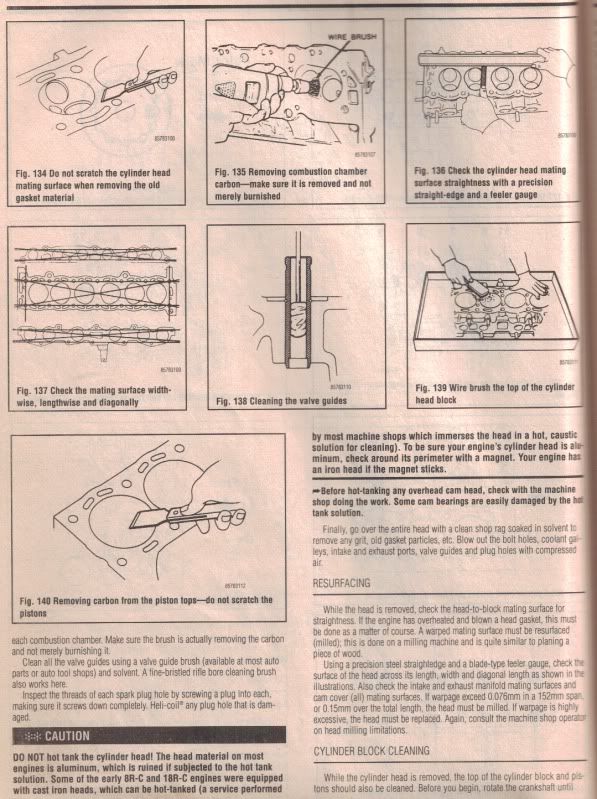
I left mine in the truck. I did pretty much what is says to do on the page below. You could use scotch-brite, but I chose not to because I was concerned about it getting into places it shouldn't. What I mean by that is that the stuff sheds little bits of itself while your using it. Kinda like sand paper that way. Which I also wouldn't use for it. Just use a fine bristle wire brush, don't matter brass or steel, you can't hardly hurt the block. Seriously though, don't go too crazy with a wire brush on it, but there's a pretty wide margin for error. I used a fine steel brush attached to a variable-speed drill just like the one in the pic(shown used for cleaning the valves, which I did with it too). Stick some rags in/cover the coolant and oil passages, so stuff that's flying around don't end up in them. And do the same on all the cylinders so they don't end up full of crap either. Doing the job right takes some time, and it's a pain in the neck/back literally(not so much ITA, but a bit). Not that bad though, I've done way worse.
Last edited by MudHippy; 10-27-2010 at 11:20 AM.
The following users liked this post:
Wrenchinjoe (11-20-2010)
10-27-2010, 01:49 PM
#15
Contributing Member
Join Date: Apr 2006
Location: TENN Native Languishing in Virginia
Posts: 4,787
Likes: 0
Received 34 Likes
on
14 Posts
I would add to Mud Hippy's advice you need to REMOVE THE HOOD if you haven't done so already~
First stuff rags into all the water/oil passages & piston holes to catch any of the crap you'll be scraping/rubbing off. Make sure they're big enough not to FALL IN~
Use the old HG bolts & cut slots lengthwise on them with a Dremel tool, @ 3 or 4 around the bolt (to allow liquid to escape), then wire brush off any rough edges. Liberally spray PB Blaster (you can get a 1 gallon can & spray bottle at Advance Auto for $24) into all the head bolt holes & allow to sit overnight if possible, or at least a half hour. Next, run the bolt(s) all the way into & back out of the holes several times. You can blow out the excess PB Blaster if necessary with canned air or a air hose. Do this 2 or 3 times and MAKE SURE you get ALL the crap out of the holes.
When you get ready to put the heads back on, use ant-seize on the bolt threads, then tighten per the FSM to 33 lb/ft, then tighten 1/4 turn, then loosen them ALL THE WAY BACK OUT, then repeat the procedure, tightening the last 1/4 turn, then you can probably go another 1/8 turn (I did with no problems). Be sure to use the correct tightening order from the FSM. Don't try to go the entire 1/4 turn on each bolt, take them in little increments. You can put a dent (chisel) or permanent marker mark at the front of each bolt after the 33 ft/lb to verify how far you've gone.
This will seat the head & allow the bolts to more evenly torque.
The following users liked this post:
Wrenchinjoe (11-20-2010)
10-27-2010, 07:02 PM
#16
Registered User
Thread Starter
Wow, thanks guys. That is tremendously helpful information and it gives me some confidence to take the next few steps.
My gasket set arrived today - SWEET! I am going to try to drop my heads off at the machine shop either tomorrow or the next day now that I have the valve stem seals. So this weekend, weather permitting, I can take my time cleaning the block and chasing the head bolt threads. I can also take care of some other things like replacing my fuel injector connectors (nearly all of which broke) and clean some of the other parts before they go back on.
Hopefully the valve clearances come back from the valve job in spec, but I think I would be foolish not to check that. So I will endure that rite of passage as well. I have been really enjoying New Belgium's Hoptober Golden Ales lately... thanks Razed
Thanks again for all the great feedback.
10-27-2010, 09:05 PM
#17
Contributing Member
Join Date: Apr 2006
Location: TENN Native Languishing in Virginia
Posts: 4,787
Likes: 0
Received 34 Likes
on
14 Posts
You have to check the valve clearances with the HEAD INSTALLED. I was able to swap 3 of mine around & bring them all within FSM spec, but that's rare. Removing the shims with the cam on requires a special tool, too.
10-27-2010, 09:25 PM
#18
Contributing Member
Join Date: Apr 2006
Location: TENN Native Languishing in Virginia
Posts: 4,787
Likes: 0
Received 34 Likes
on
14 Posts
Both installed. If I'm not mistaken, there are values for cold only:
Valve clearance (Cold):
Intake
0.18 – 0.28 mm (0.007 – 0.011 in.)
Exhaust
0.22 – 0.32 mm (0.009 – 0.013 in.)
Valve clearance (Cold):
Intake
0.18 – 0.28 mm (0.007 – 0.011 in.)
Exhaust
0.22 – 0.32 mm (0.009 – 0.013 in.)
Last edited by TNRabbit; 10-27-2010 at 09:33 PM.
10-28-2010, 06:19 AM
#19
Registered User
Thread Starter
When adjusting these valves, should you try to get closer to 0.18 mm or 0.28 mm (intake), or closer to 0.22 mm or 0.32 mm (exhaust)? Should you err to the tight or loose end of the range?
The reason I ask, when I adjusted the valves on my Civic @ 130K miles, the spec range left me with some noisy lifters. I adjusted them a second time and erred a couple of thousanths on the tight side and it purrs very nicely.
The reason I ask, when I adjusted the valves on my Civic @ 130K miles, the spec range left me with some noisy lifters. I adjusted them a second time and erred a couple of thousanths on the tight side and it purrs very nicely.
10-28-2010, 07:35 AM
#20
Contributing Member
Join Date: Apr 2006
Location: TENN Native Languishing in Virginia
Posts: 4,787
Likes: 0
Received 34 Likes
on
14 Posts
As the 3vze valve TIGHTEN over time, you'd be better off on the open side. Mine fall in a range from minimum to maximum, but all within tolerance. Hardly any change over 200k+, I wasn't going to worry about it...


