
Fuel Guage Not Working, Fixed, and then broke again!
 03-06-2013, 04:12 PM
#1
Registered User
Thread Starter
Join Date: Feb 2013
Location: Hampton VA
Posts: 167
Likes: 0
Received 0 Likes
on
0 Posts
Fuel Guage Not Working, Fixed, and then broke again!
Well, I have been getting this 88 4 runner up and running. Like any older car it is a can of worms. I got a great deal on it so I cannot complain. Anyways it had some serious electrical issues, most of which have been fixed. The coolant gauge and fuel gauge did not work. I found that the thermostat was stuck open and that fixed the No heat and coolant gauge.
I then checked to make sure the pulsed voltage was making it to the sending unit, and it was. So I ordered a sending unit from Toyota yesterday, and it came in today. Proceeded to drop the tank tonight after work. It is not a bad job, especially with a lift and a transmission jack. I got the old sending unit out and tore the shield off of the resistor. This is what I found.


Sorry for the crappy cell phone pics.
So all was well for about 10 minutes, then the gauge dropped down to empty. So now I will have to dig back in and figure out if the float sunk or there is high resistance in the connector. I did fill it up and there was no change, but it is too darn cold, windy and wet to check it out tonight.
On the plus side the gauge was pegged at the bottom, well below E when the sending unit was broken. The fact that it is now sitting on E tells me there is high resistance somewhere, or the float gave up the ghost. Really sad if that is the case, since the part is brand new OE. But I will get in there and diag this thing tomorrow.
On a good note the Pro Comp add a leaf came int, and I am still waiting for the alarm system, and the rear Rancho Shocks to come in. I guess I am going to have to get some more pictures and start a build thread!
I then checked to make sure the pulsed voltage was making it to the sending unit, and it was. So I ordered a sending unit from Toyota yesterday, and it came in today. Proceeded to drop the tank tonight after work. It is not a bad job, especially with a lift and a transmission jack. I got the old sending unit out and tore the shield off of the resistor. This is what I found.
Sorry for the crappy cell phone pics.
So all was well for about 10 minutes, then the gauge dropped down to empty. So now I will have to dig back in and figure out if the float sunk or there is high resistance in the connector. I did fill it up and there was no change, but it is too darn cold, windy and wet to check it out tonight.
On the plus side the gauge was pegged at the bottom, well below E when the sending unit was broken. The fact that it is now sitting on E tells me there is high resistance somewhere, or the float gave up the ghost. Really sad if that is the case, since the part is brand new OE. But I will get in there and diag this thing tomorrow.
On a good note the Pro Comp add a leaf came int, and I am still waiting for the alarm system, and the rear Rancho Shocks to come in. I guess I am going to have to get some more pictures and start a build thread!
 03-07-2013, 05:52 PM
#3
Registered User
Thread Starter
Join Date: Feb 2013
Location: Hampton VA
Posts: 167
Likes: 0
Received 0 Likes
on
0 Posts
Well it is working.
Not quite sure what happened. I went out this morning and disconnected the sending unit from the harness, and measured the resistance of the sender. It measured 91 ohms, which would indeed be empty.
I was planning on pulling the pump out so I could see if the float was working, since I do not have a jack or the tools here at the condo to do that kind of work. I went ahead and sprayed the Deoxit into the connector and made a run to get an antenna mount for my ham radio. I made it less than a half mile and the gauge was reading full.
So I put about 10 miles on it, came home and it was fine. I then took a 70 mile trip to pickup some 2001 tundra rims for 150 bucks off of craigslist and it was fine the whole way. So not really sure, but I am not going to break it back open unless it acts up again.
I have about 100 mile drive to do tomorrow so I will update on how it is working when I get home tomorrow night.
If you need some testing info, I can take some screen captures and post them.
Dave
Last edited by stanprophet; 03-07-2013 at 05:54 PM.
03-12-2013, 04:10 PM
#5
Registered User
Thread Starter
Join Date: Feb 2013
Location: Hampton VA
Posts: 167
Likes: 0
Received 0 Likes
on
0 Posts
Ok so for the last week or so the gauge has been intermittent, and it seems to be worse. So I did some more testing, and the resistance once again showed around 100 ohms. I checked the voltage output with a test light to ground and the gauge was fluctuating. Since I cannot really drop the tank at the condo, I decided to pull the fuel pump out so I could take a peak inside.
I looked in and the float was at the bottom!
So I was able to reach in and grab the arm, the arm was wedged on the bottom of the tank. Then I remembered there was a small dent in the bottom of the tank from the PO that must have beat it with a hammer trying to get the gauge to work. As the fuel was sloshing around the float would get washed under and stick to the bottom of the tank. And as the fuel level dropped it became more frequent.
So my fix was to slightly bend the arm, and recheck the sweep. Just took a small bend and it worked like a charm, no more sticking while at the bottom of the sweep and the gauge is working fine.
I will post some testing info below for those trying to diagnose their fuel gauge being inoperative.
Last edited by stanprophet; 03-12-2013 at 04:35 PM.
03-12-2013, 04:32 PM
#6
Registered User
Thread Starter
Join Date: Feb 2013
Location: Hampton VA
Posts: 167
Likes: 0
Received 0 Likes
on
0 Posts
This is for an 89, but should be about the same across the EFI 1 gen years.
Here is the schematic:

The gauge cluster voltage regulator will pulse a voltage, this will show on a voltmeter as about 11 volts pulsed about one time per second. This voltage will pass through the gauge. The Fuel sending gauge is a variable resistor, as the resistance changes the current flowing through the gauge will increase as resistance decreases. The gauge just measures the current flow in the circuit.
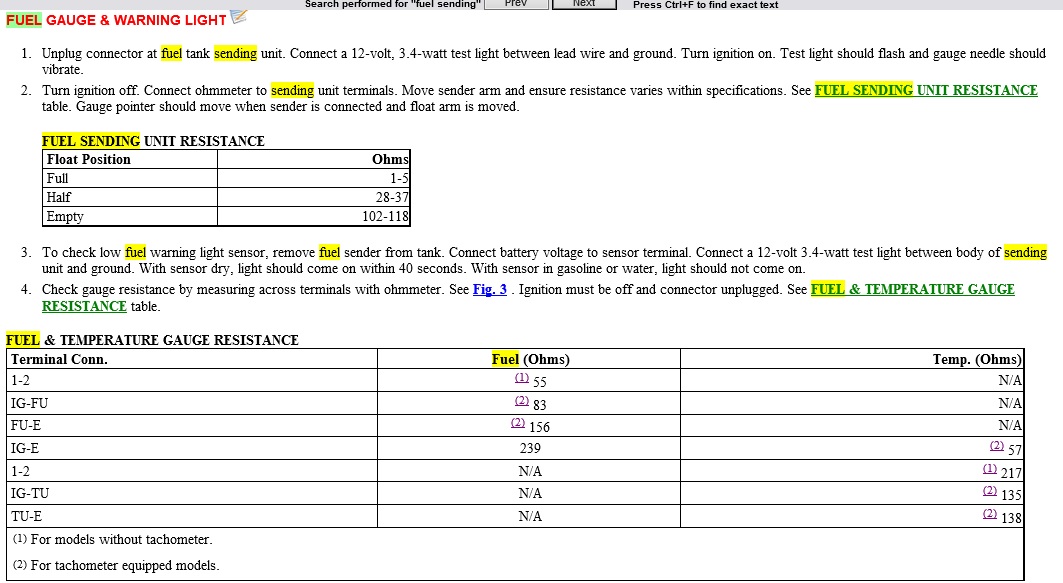
Just to expand on the above instructions. The sending unit will be the flat 3 wire connector, not the round 2 wire. The round 2 wire will be for the fuel pump.
The center wire is for the fuel light, and when grounded with a test light, the lite will be bright, and the fuel light on the dash will illuminate.
The fuel sending unit will be the Yellow-Red wire, this will be the wire sending voltage from the gauge. To measure the resistance of the sending unit, use a DVOM and measure the two outside wires in the connector going to the fuel sending unit. The resistance value should be compared to the table above.
To check the resistance of the gauge:

Measure the terminals listed in the resistance chart, the pins are listed above.
Here is the schematic:
The gauge cluster voltage regulator will pulse a voltage, this will show on a voltmeter as about 11 volts pulsed about one time per second. This voltage will pass through the gauge. The Fuel sending gauge is a variable resistor, as the resistance changes the current flowing through the gauge will increase as resistance decreases. The gauge just measures the current flow in the circuit.
Just to expand on the above instructions. The sending unit will be the flat 3 wire connector, not the round 2 wire. The round 2 wire will be for the fuel pump.
The center wire is for the fuel light, and when grounded with a test light, the lite will be bright, and the fuel light on the dash will illuminate.
The fuel sending unit will be the Yellow-Red wire, this will be the wire sending voltage from the gauge. To measure the resistance of the sending unit, use a DVOM and measure the two outside wires in the connector going to the fuel sending unit. The resistance value should be compared to the table above.
To check the resistance of the gauge:
Measure the terminals listed in the resistance chart, the pins are listed above.
Last edited by stanprophet; 03-12-2013 at 04:37 PM.

Thread
Thread Starter
Forum
Replies
Last Post
voiddweller
86-95 Trucks & 4Runners (Build-Up Section)
19
05-02-2016 09:10 PM
bigblue82
General Electrical & Lighting Related Topics
10
07-06-2015 08:27 AM
saphirekosmos
Newbie Tech Section
1
06-22-2015 10:26 AM


