Body lift on an 85
 06-25-2008, 05:26 PM
#1
Registered User
Thread Starter
Join Date: Sep 2006
Location: Good 'ole Georgia
Posts: 1,801
Likes: 0
Received 0 Likes
on
0 Posts
Body lift on an 85
Wondering what to expect when installing this on my rnr. It's a 3" lift so I know it's going to stress a few things like brake lines, electrical, and any cables like the speedometer and e-brake. Also the steering shaft, gas filler neck (possibly) and the kit did include a gas tank "breather" extension, as well as radiator drop brackets. Just trying to get a few helpful tips or hints or just plain any advice would be great. This will be my first time installing a body lift, but I do have an idea as far as what removing the body will be like, (I know I won't have to totally remove the body) as I preformed a cab swap on my old p/u. So, what have yall encountered when installing body lifts?
Last edited by hmmwv15; 06-25-2008 at 05:28 PM.
 06-25-2008, 05:32 PM
#2
Registered User
Join Date: Jan 2008
Location: Parker, CO
Posts: 317
Likes: 0
Received 0 Likes
on
0 Posts
I've never done a Toyota, I did a 3 inch on a Nissan pickup. Your electrical should be fine. Check all of your hard break line mounting before you go jacking the body up. Loosin up all of the body mounts and then do one side at a time, lube all your bolts night before. Just a few things from my experience, i'm sure others will chime in with theres. Nice looking 4 runner by the way.
06-25-2008, 06:33 PM
#3
Registered User
Thread Starter
Join Date: Sep 2006
Location: Good 'ole Georgia
Posts: 1,801
Likes: 0
Received 0 Likes
on
0 Posts
Why thank you, I can post a bigger pic if you like.
Yeah I haven't really had a chance (or the motivation) to really look at the truck and what I'll be stressing yet, been too tired after work. I may (instead of stretching the coils in the hard line) take a few extra days/weeks whatever it takes to figure out how to mod the brake lines so I don't have to stretch them. I don't know yet. Maybe I'll post a before and after pic when I get the body lift on.
Yeah I haven't really had a chance (or the motivation) to really look at the truck and what I'll be stressing yet, been too tired after work. I may (instead of stretching the coils in the hard line) take a few extra days/weeks whatever it takes to figure out how to mod the brake lines so I don't have to stretch them. I don't know yet. Maybe I'll post a before and after pic when I get the body lift on.
 06-25-2008, 08:26 PM
#5
Registered User
Join Date: Jan 2008
Location: Parker, CO
Posts: 317
Likes: 0
Received 0 Likes
on
0 Posts
I really don't think you should have any issues with the brake lines, just a suggestion to "monitor" progress while jacking up the body, just to make sure nothing is binding. The length of mine was maxed out after I installed my lift, but I didn't have any issues. IFS suspension lifts are virtually worthless, but thats another topic.
06-26-2008, 05:39 AM
#6
The taller the body lift the more issues you are going to have.
If you are going to do the body lift replace the body mount bushings while you are at it.
Body lifts are not hard just a PITA sometimes to install.

If you are going to do the body lift replace the body mount bushings while you are at it.
Body lifts are not hard just a PITA sometimes to install.
06-26-2008, 06:55 AM
#7
You can get a pretty good list of potential issues on the web page section below:
- http://www.4crawler.com/4x4/ForSale/...o.shtml#Taller
- http://www.4crawler.com/4x4/ForSale/...o.shtml#Taller
Trending Topics
06-26-2008, 01:36 PM
#8
Registered User
Thread Starter
Join Date: Sep 2006
Location: Good 'ole Georgia
Posts: 1,801
Likes: 0
Received 0 Likes
on
0 Posts
No reason, or none that I'd like to admit for getting a body lift first. I'll just be getting some 2" springs later on for the suspension lift.
I don't have IFS, I got an 85! but I'm still worried about the brake lines. I'm worried about the body lift itself. I'm just like that. Even when doing regular maintenance I think to myself: "Well I hope this works" even when installing say a new alternator. Only time I actually say that I did something right is between a few weeks to a few months when it's still working. I'm wierd like that.
I have read all about the install process, I guess I'm just trying to figure out what anyone may have experienced while installing theirs. I know that I will be stressing a lot of things with a 3" but I guess it's too late now. Heinsights 20:20 (should have gotten a 2")
Great info 4crawler, will read this in detail! Jeez your a great source of info. Thanks, this is what I was looking for!
I'll just be getting some 2" springs later on for the suspension lift.I don't have IFS, I got an 85! but I'm still worried about the brake lines. I'm worried about the body lift itself. I'm just like that. Even when doing regular maintenance I think to myself: "Well I hope this works" even when installing say a new alternator. Only time I actually say that I did something right is between a few weeks to a few months when it's still working. I'm wierd like that.
I have read all about the install process, I guess I'm just trying to figure out what anyone may have experienced while installing theirs. I know that I will be stressing a lot of things with a 3" but I guess it's too late now. Heinsights 20:20 (should have gotten a 2")
Great info 4crawler, will read this in detail! Jeez your a great source of info. Thanks, this is what I was looking for!
07-13-2008, 04:06 PM
#9
Registered User
Thread Starter
Join Date: Sep 2006
Location: Good 'ole Georgia
Posts: 1,801
Likes: 0
Received 0 Likes
on
0 Posts
It went on in about 3 hours, only thing left to figure out is the steering shaft. I should have my 2" springs by the end of the week!
Before:

After:

Before:
After:
07-13-2008, 04:26 PM
#10
07-13-2008, 04:27 PM
#11
Registered User
My body lift was only one inch, but they all cause the same worries as far as I am concerned. I PB Blasted everything for two weeks and didn't have any issues. My only problem was not being able to get the pressed on washers inside the cab off ( 3 on each side ). So I went to the store and bought some grade 8 washers, extra ones too, and added them to the top of the white spacer and got an inch & 3/8ths lift out of it. Everything came up roses and nothing needed to be addressed afterward. Left the radiator alone, all the brake lines left alone, 4W-LO shifter and auto tranny shifter needed no attention. Did it by myself and really took my time, 5.5 hours start to finish. My first body lift... Got it from 4Crawler. I am pleased with the results, Left the standard body mounts in place. For 21 years old, they looked good. I can replace them later.
 07-13-2008, 05:43 PM
#13
Registered User
Join Date: Aug 2007
Location: Ocala National forest FL.
Posts: 153
Likes: 0
Received 0 Likes
on
0 Posts
I did a 3in B/L on a 85 ford IFS and the breaks were fine. the only thang to worry about would be the radiator and the shroud. also and if its standard then the shift stick, but if its auto then you need to lengthin theshifter rod to the tranny. But thats what i love about my 85 P/U. SOLID AXEL!
07-14-2008, 02:37 PM
#14
Registered User
Thread Starter
Join Date: Sep 2006
Location: Good 'ole Georgia
Posts: 1,801
Likes: 0
Received 0 Likes
on
0 Posts
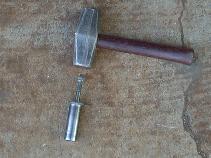
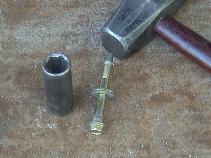
Read the instructions once again and modified the steering shaft. Easy as pie to do, but I'm going to get someone to weld it a bit also. Basically just drilled out the stock rivets that connect the inner and outer shafts, pushed the inner out about 1 1/4" drilled new holes and installed the rollpins in the kit, sealed it with silicone sealant to hold them in place. All I did to prep for the lift was apply liquid wrench on top and bottom of the bolts about 5 minutes before hand. Already had the flooring out to access the bolts. loosened the steering shaft and radiator, disconnected the heater hoses to move the clutch line below them, no mods to fuel filler. Brake lines stretched at the coils easily also. need to get a few vaccuum lines that are stretched ever so slightly. only problems are that the rear bumper sits so low. Good news is that I should have 2" springs by the end of the week. the shifter boots are confusing me, some said I could invert them but that doesn't work (unless I'm doing it wrong?) the kit didn't come with the shifter extension, but I may just deal with it, no big deal anyway (makes me feel like its a short shift  ) The stock washers were a breeze to get off, just used the same method as 4crawlers, only problem is that the new bolts were skinnier than the old ones so they stock washer made no difference, just spun like regular. radiator drops went in last, broke a stud off of one so that ticked me off a bit. But I figured it would be an all day project, so it surprised me that we had it done before lunchtime.
Can't really think of anything else, the only real problem I can think of (hopefully won't discover any more) is the steering shaft. So if anyone sees this thread in the future and needs answers, I highly reccommend 4crawlers site, great info there and I will try and answer any as well.
) The stock washers were a breeze to get off, just used the same method as 4crawlers, only problem is that the new bolts were skinnier than the old ones so they stock washer made no difference, just spun like regular. radiator drops went in last, broke a stud off of one so that ticked me off a bit. But I figured it would be an all day project, so it surprised me that we had it done before lunchtime.Can't really think of anything else, the only real problem I can think of (hopefully won't discover any more) is the steering shaft. So if anyone sees this thread in the future and needs answers, I highly reccommend 4crawlers site, great info there and I will try and answer any as well.
Last edited by hmmwv15; 07-14-2008 at 02:39 PM.
07-14-2008, 02:55 PM
#15
Registered User
if you say you should have gone with a 2 inch bl, you should have just measured off an inch and cut the spacers down 1 inch. Voila! you have a 2 inch bl now.
Looking good tho man. keep it up
Looking good tho man. keep it up
07-30-2008, 06:02 PM
#18
Registered User
Join Date: May 2007
Location: Maryland
Posts: 144
Likes: 0
Received 0 Likes
on
0 Posts
I know it was asked but you didn't give an answer. Why the 3" body plus 2" suspension lift? Wouldn't it have just been easier, cheaper and better to just do a 4"-5" suspension lift?
07-30-2008, 06:18 PM
#19
Registered User
Join Date: Jun 2008
Location: Small town, CO.
Posts: 180
Likes: 0
Received 0 Likes
on
0 Posts
I would take that kit off and throw it in the trash!!! I used to work in a salvage yard. one day a toy came in that got in a front end collision and the bolts for the body lift sheared off.... if you like sliding down the road in the cab while the frame is behind you then keep it. other wise take it off!! put chevy springs in the rear and toy rears up front and you got a good cheap lift.
Last edited by wrnchplr; 07-30-2008 at 08:48 PM. Reason: Spelling
07-30-2008, 06:26 PM
#20
Any idea what body lift kit that was? Likely one that had too large a center hole in the lift block or undersized blocks or under grade bolts or something like that that let the body slide around too much. Or perhaps the body had rust damage around some of the body mount locations, a buddy of mine had that problem on his pickup and some of the body lift blocks (Performance Acc. brand - small diameter) actually punched up through the rusty floor:
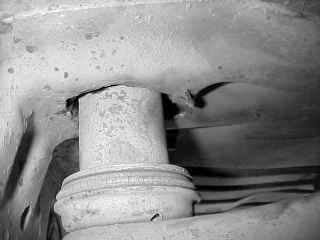
Compare that block to one that is the proper diameter for the body mount bushing:

- http://www.4crawler.com/4x4/ForSale/...andardUltimate
I was in a front end collision with my '85 with a 3" body lift and hit hard enough to total the other vehicle. I saw no damage on my lift and even lifted the body and pulled out all the lift blocks, bolts and body mount bushings just to have a look (the kit had been on for 4-5 years at that point) and all looked like the day it was installed. I just put everything back together and it has been fine since then.
Compare that block to one that is the proper diameter for the body mount bushing:
- http://www.4crawler.com/4x4/ForSale/...andardUltimate
I was in a front end collision with my '85 with a 3" body lift and hit hard enough to total the other vehicle. I saw no damage on my lift and even lifted the body and pulled out all the lift blocks, bolts and body mount bushings just to have a look (the kit had been on for 4-5 years at that point) and all looked like the day it was installed. I just put everything back together and it has been fine since then.


