22R Desmog Tutorial
 10-23-2014, 12:22 PM
#261
Registered User

Join Date: Sep 2011
Posts: 11
Likes: 0
Received 0 Likes
on
0 Posts
2) Sub/Idle Advance - From the vacuum port on the distributor closest to the head to the vacuum port on the intake manifold. For the manifold port I installed a 1/4" NPT Male to 3/16" barb fitting on one of the existing holes on the intake manfold (temporarily plugged earlier).
Last edited by DansOtter; 10-23-2014 at 12:35 PM.
 10-23-2014, 12:26 PM
#262
Registered User
Join Date: Sep 2014
Posts: 55
Likes: 0
Received 0 Likes
on
0 Posts
He installed a new barn into one of the existing holes:
2) Sub/Idle Advance - From the vacuum port on the distributor closest to the head to the vacuum port on the intake manifold. For the manifold port I installed a 1/4" NPT Male to 3/16" barb fitting on one of the existing holes on the intake manfold (temporarily plugged earlier).
2) Sub/Idle Advance - From the vacuum port on the distributor closest to the head to the vacuum port on the intake manifold. For the manifold port I installed a 1/4" NPT Male to 3/16" barb fitting on one of the existing holes on the intake manfold (temporarily plugged earlier).
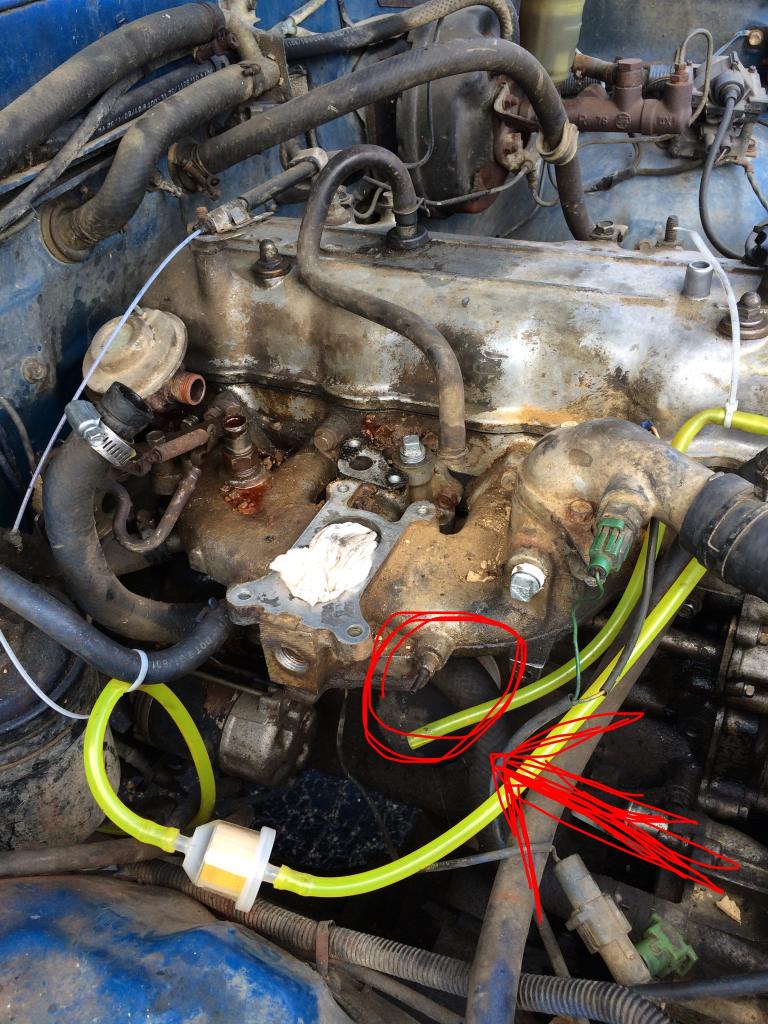
So can I use the port I have circled in the picture and put the barb in it and attach my vacuum to it?
 10-23-2014, 03:43 PM
#264
Registered User
Join Date: Sep 2011
Posts: 11
Likes: 0
Received 0 Likes
on
0 Posts
Here's a little more info on what those vacuum ports do from pg 9:
That manifold (in the above pic) is from a 20r, but a barb there should serve the same purpose.
As for size, majority of the bolt sizes around the head and intake manifold are M8x1.25. But you'd have to pull whatever was in that port and take it to the hardware store with you. And I'd say the smaller hardware stores would probably have a better selection of metric stuff... Unlike lowes.
If you have too hard of a time finding the right one you could always drill out the existing hole and tap it with a more common thread count.
Glad that I could help! Some of the block off plates aren't absolutely necessary, but They do clean it up a bit. As for your advance question, one is your idle advance and one is your main advance. The idle advance just advances the timing under normal manifold vacuum at idle and the main advance is what advances the timing with increased carb vacuum through the RPM range.
As for size, majority of the bolt sizes around the head and intake manifold are M8x1.25. But you'd have to pull whatever was in that port and take it to the hardware store with you. And I'd say the smaller hardware stores would probably have a better selection of metric stuff... Unlike lowes.
If you have too hard of a time finding the right one you could always drill out the existing hole and tap it with a more common thread count.
10-23-2014, 03:46 PM
#265
Registered User
Join Date: Sep 2014
Posts: 55
Likes: 0
Received 0 Likes
on
0 Posts
Here's a little more info on what those vacuum ports do from pg 9:
That manifold (in the above pic) is from a 20r, but a barb there should serve the same purpose.
As for size, majority of the bolt sizes around the head and intake manifold are M8x1.25. But you'd have to pull whatever was in that port and take it to the hardware store with you. And I'd say the smaller hardware stores would probably have a better selection of metric stuff... Unlike lowes.
If you have too hard of a time finding the right one you could always drill out the existing hole and tap it with a more common thread count.
Last edited by Yoda38052; 10-23-2014 at 03:47 PM.
10-23-2014, 07:25 PM
#266
Registered User
Join Date: Sep 2011
Posts: 11
Likes: 0
Received 0 Likes
on
0 Posts
10-23-2014, 07:34 PM
#267
Registered User
Join Date: Sep 2011
Posts: 11
Likes: 0
Received 0 Likes
on
0 Posts
I'm wondering now... Since I've desmogged it seems to be running rich with my Aisin no matter what I do. Even if I turn my mixture screw all the way in. Should I look into a fuel pressure regulator to take my psi back a pound or two and not drown my carb? Any thoughts?
10-27-2014, 05:10 PM
#268
Registered User

Join Date: Oct 2014
Posts: 3
Likes: 0
Received 0 Likes
on
0 Posts
10-27-2014, 05:46 PM
#269
Registered User
Join Date: Sep 2014
Posts: 55
Likes: 0
Received 0 Likes
on
0 Posts
10-28-2014, 06:57 AM
#270
Here you go. Kind of tough to see, but in the picture below it is the pipe that wraps around the back side of the engine mount. The bung that the heater core runs too is right above the "N" in my reminder to tighten my engine mount.
 11-09-2014, 06:47 PM
#271
Registered User

Join Date: Nov 2014
Posts: 2
Likes: 0
Received 0 Likes
on
0 Posts
Smog pump
Hi there, I hope this isn't a repeat question but I first read pumpkins tutorial on desmogging 22r. He mentioned removing the smog pump. But in your tutorial I don't recall you writing about this. My question is: is the smog pump a requirement to remove? I have A/C in my rig and I would rather leave the belts alone for now if possible? Thank you
11-09-2014, 07:07 PM
#272
Registered User
Join Date: Sep 2014
Posts: 55
Likes: 0
Received 0 Likes
on
0 Posts
Hi there, I hope this isn't a repeat question but I first read pumpkins tutorial on desmogging 22r. He mentioned removing the smog pump. But in your tutorial I don't recall you writing about this. My question is: is the smog pump a requirement to remove? I have A/C in my rig and I would rather leave the belts alone for now if possible? Thank you
11-09-2014, 07:54 PM
#273
Registered User
Join Date: Nov 2014
Posts: 2
Likes: 0
Received 0 Likes
on
0 Posts
Thank you, that's kind of what I had in mind. And I believe I read about someone on here doing the same thing. Anyone else agree or have tried this method?
11-22-2014, 07:53 AM
#275

Finally giving up on smog lol
Got a 1984 4Runner cali emissions.
I read your tread two or three times just one question. Will I need the 11 or 8 bolt water block plate on post # 10? I spent so much money on smog leag header, rebuilding engine and it was my first ever job by my self lol... So could I block off most if not all smog components? And just to clarify since the emissions stuff only talks with itself I shouldn't have to get a federal emissions ecu once I'm done right?
Ps anyone know how weber doesn't sell a carb legal weber 32/36 yet LCE engineering sells one?
Last edited by user 82300; 11-22-2014 at 07:54 AM. Reason: Added text
11-22-2014, 09:18 AM
#277
Gotcha. I was curious if I could not use the water block plate on bottom of manifold. I don't have a garage at the place im at nkw so trying to do as much as I can without having to leave it all torn apart inside itself in driveway lol... I'll go look at the manifold just in case tho.
11-22-2014, 09:47 AM
#279
Gotcha. I didnt see this covered in the thread. my 1984 has a sort of egt probe in the cat. I was able to find one from davesoffroad performance. but is it no longer required when i complete the dsmog? i spent tons of time and money trying to get this thing smog-able but tired of fighting and registered in Idaho by my dad so no smog or even inspections lol.
so to recap:
is the water block kit that either 8,9, or 11 bolts necessary to complete desmog?
do i need to keep the 02 sensor and or heat sensor on the cat?
(the o2 sensor was originally in oem manifold, but it was moved to base of header when installed. and does the heat sensor for the cat need to remain? ive got no problem keeping them just curious etc.
Last edited by user 82300; 11-23-2014 at 10:31 AM.
11-27-2014, 10:52 AM
#280
About to order everything up and even with holiday discounts about $703 with shipping lol. Anyone interested in my smog stuff? Everything but carb and possibly smog pump. Even all new Silicone Vaccum lines on stuff haha. Pics soon of goodies and work being done
Ps I'll put stuff on my build thread so I don't gumb up this one lol.
Ps I'll put stuff on my build thread so I don't gumb up this one lol.
Last edited by user 82300; 11-27-2014 at 11:01 AM.


