
TG Front springs too high?
 Jun 11, 2013 | 03:59 PM
#1

Thread Starter
Registered User
Joined: Jan 2012
Posts: 8
Likes: 0
From: Hawaii
TG Front springs too high?
Recently did the SAS on my 89 pickup with the TG HD 3"springs. Now from what it seems, the 3in springs are really high compared to my friend who has a 3in lift in his truck. Granted he does have an 84 pickup and using pro comp springs but still, shouldnt it be in the same ball park? From the bottom of the hanger to the ground measures 32 inches, I dont if that helps. So I guess my question is, is this normal? and what would be my options on leveling out the rear?
Jun 11, 2013 | 04:24 PM
#2
Registered User
Joined: Apr 2009
Posts: 5,592
Likes: 24
From: Dixon, Ca
Because of the location of the front hanger, its really a 4 in lift. I am doing an SAS with a 3 inch spring and will anticipate the height. I already have 3 inch rear springs and plan on adjusting the rear height with a bit longer shackle or adding a flat leaf or 2.
Jun 11, 2013 | 04:40 PM
#4
Registered User
Joined: Apr 2012
Posts: 2,817
Likes: 2
From: Los Angeles CA
dont know why but my brand new 4" AllPro Lift came out the same. i had to do a couple of things to bring up my rear end to the same level as the front. but yea. Check out the past few pages on my page if you wanna see what i did to fix my problem.


Trending Topics
Jun 12, 2013 | 02:09 AM
#9
Thread Starter
Registered User
Joined: Jan 2012
Posts: 8
Likes: 0
From: Hawaii
So in a sense it's more a less closer to a 5 inch then? Hanger plus the shackle. So would a 3" spring for the back work? Or should I just get a 4" just to be on the safe side? Also I still have warranty on the springs. So if worse comes to worse ill just pull a leaf out when the warranty ends.
 Jun 12, 2013 | 11:42 AM
#13
Registered User
Joined: Apr 2012
Posts: 2,817
Likes: 2
From: Los Angeles CA
Hey Kalama. I just re read through this thread and seen that you said something about removing one of the front leafs to bring the front height down. But I can't help to think, I'm sure you like the height the front is sitting at now right?
So what you are Pretty much aiming for is that you wanna bring your rear height up to level it out with the front not lower the front. Am i right??? If this is the case then I have a few methods you can use to fix. Just let me know. I had this same exact problem with my SAS'd 89 4Runner. Oh and also when you say you got a 3" lift you do mean that you changed out both front and rear springs with new leafs right? Just trying to get more information to better help you out.
So what you are Pretty much aiming for is that you wanna bring your rear height up to level it out with the front not lower the front. Am i right??? If this is the case then I have a few methods you can use to fix. Just let me know. I had this same exact problem with my SAS'd 89 4Runner. Oh and also when you say you got a 3" lift you do mean that you changed out both front and rear springs with new leafs right? Just trying to get more information to better help you out.
Last edited by Redeth005; Jun 12, 2013 at 11:55 AM.
Jun 12, 2013 | 01:41 PM
#14
Thread Starter
Registered User
Joined: Jan 2012
Posts: 8
Likes: 0
From: Hawaii
Hey Kalama. I just re read through this thread and seen that you said something about removing one of the front leafs to bring the front height down. But I can't help to think, I'm sure you like the height the front is sitting at now right?
So what you are Pretty much aiming for is that you wanna bring your rear height up to level it out with the front not lower the front. Am i right??? If this is the case then I have a few methods you can use to fix. Just let me know. I had this same exact problem with my SAS'd 89 4Runner. Oh and also when you say you got a 3" lift you do mean that you changed out both front and rear springs with new leafs right? Just trying to get more information to better help you out.
So what you are Pretty much aiming for is that you wanna bring your rear height up to level it out with the front not lower the front. Am i right??? If this is the case then I have a few methods you can use to fix. Just let me know. I had this same exact problem with my SAS'd 89 4Runner. Oh and also when you say you got a 3" lift you do mean that you changed out both front and rear springs with new leafs right? Just trying to get more information to better help you out.
Jun 12, 2013 | 04:01 PM
#16
Registered User
Joined: Apr 2012
Posts: 2,817
Likes: 2
From: Los Angeles CA
Fix your rear sag issue.
Well some of the things that All Pro suggested for me to do was return my 4" lift springs and get 5" lift springs but i honestly didnt wanna wait for that, then they told me another thing i can do is get my shackels 1" longer(which would be a very cheap alternative.) I ended up going a different route then these 2 suggestions.
I apoligize ahead of time, i don't mean to Hijack your thread but just wanna give you some helpful info that i had to learn by myself. And you can take it or leave it whatever you want to.
----------------------------------------------------------------------------------
So like i previously said I had the same exact problem with my All Pro 4" lift. One thing I did with my AllPro 4" lift was) add one stock leaf spring to my leaf pack along with the overload leaf and 2 small spacers(all off the stock leafs).
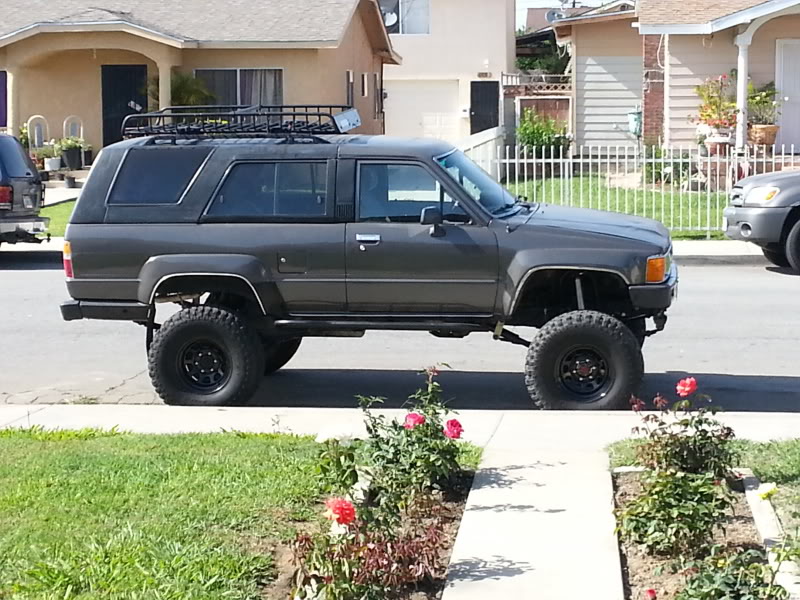
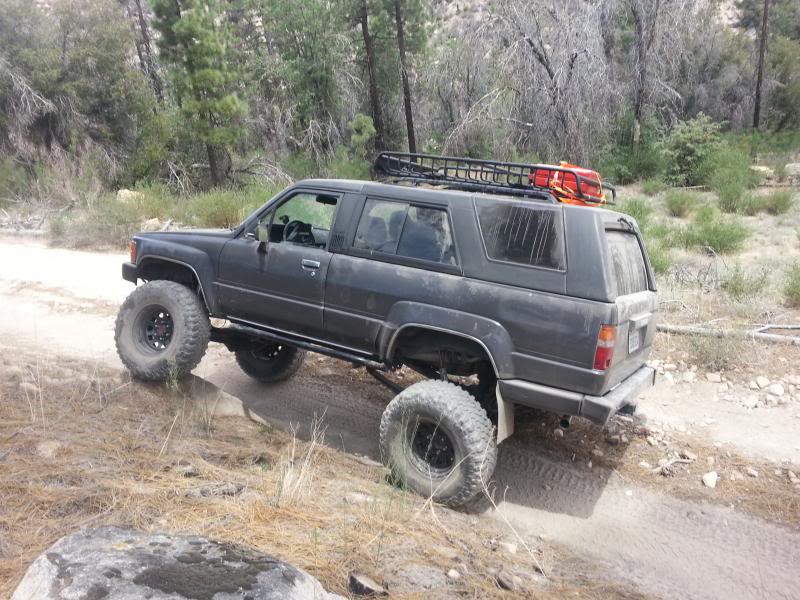
This is what my lift looked like after the 4 inch lift was installed. Brand new springs and still having the rear sag.

I didnt like that major sag issue because I do carry lots of stuff in the bed of my truck from time to time and if I figured it it is already sagging with just the weight of the Hard top, roof rack, and tire on it now then how the heck will it be when I load my truck up with all the camping gear the rear steel plate bumper/tire carrier. Nooo way.... it'll be horrible. So I removed the rear leaf springs. And I took apart my old stock rear leafs.
The following with just be copy and paste from posts i did on my thread.
------------------------------------------------------------------------------------------------------------------------------------------------------------------------------------------------------------------------------------------------------
So I plan to use the bottom 2 springs and the 2 small plates in between them. See how arched these are?
Now look at how flatter these are due to being longer leaf springs. (The middle 2 springs are for the rear)
First off I'd like to say that doing this isn't too hard of a job. Its just a total pita when trying to re-align the spring with the axle because once you drop the axle it moves forward or back. Nothing a little kicking can't fix lol this is my 3rd time putting springs back on so I'd better be a pro by now haha.
Anyway here are the pix.
First thing was to round off the new grade 8 bolt end so that it is able to fit into the spring perch on the axle. The left we have the new bolt and on the right is the old. The bolts are going to need to be longer because you're adding more leafs.
Once you have the leaf spring removed use a C-clamp to hold the leaf spring tightly together so you do not have any pressure on the bolt and nut while you remove it. In order to remove the bolt use a socket for the nut and pressure pliers for the round bolt. Once you take off the bolt that holds everything together then take out the straps on each side of the leaf spring. then loosen your C-Clamp. When you remove the C-clamp your whole leaf spring will come undone and look a bit like this.
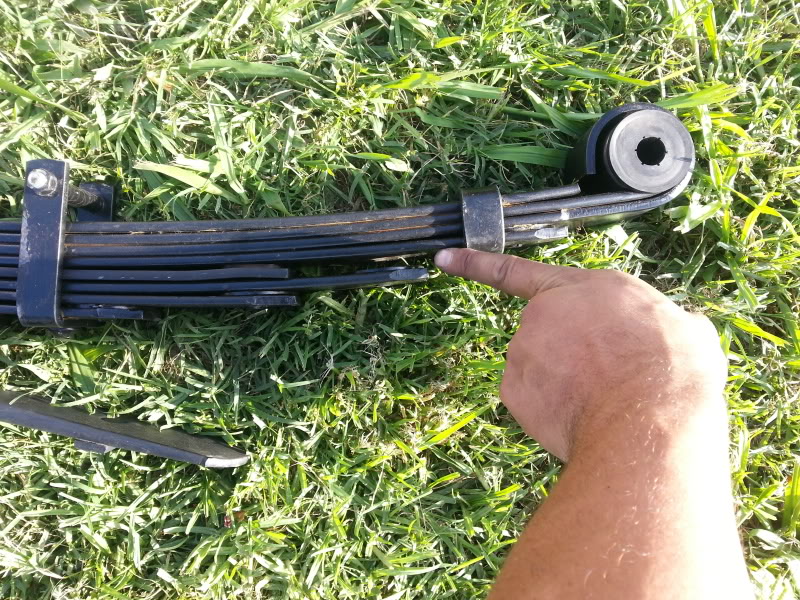
As you can see The leaf with the arrows is the one i added in the middle of the leaf springs. I also added the bottom overload spring that you see. In order to re-align and re-tighten the leaf springs make use a longer bolt then what you plan to use so you can tighten them down and compress then with a c-clamp after then you can go ahead and swap in the actual smaller bolt that you plan to use.
As you can see... I ran into one little problem. I came up short on the spot where I placed my extra leaf.
This simply will not do.
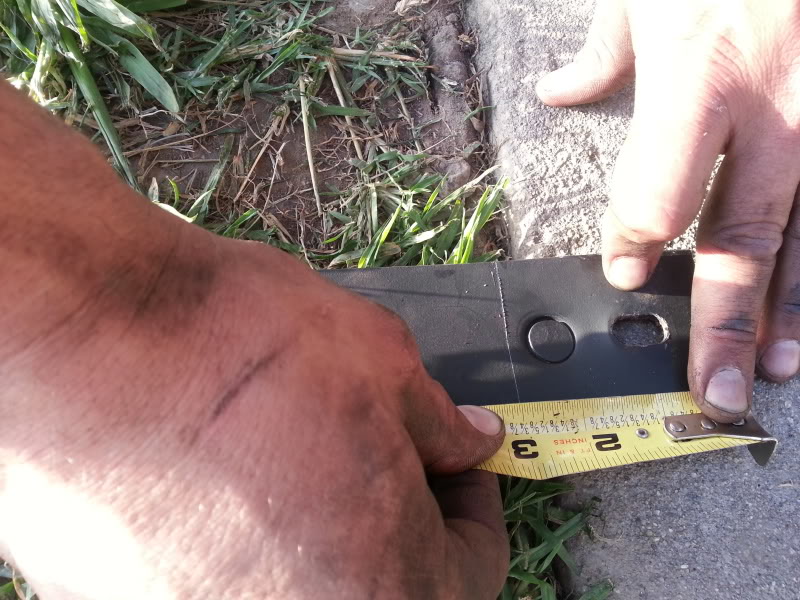
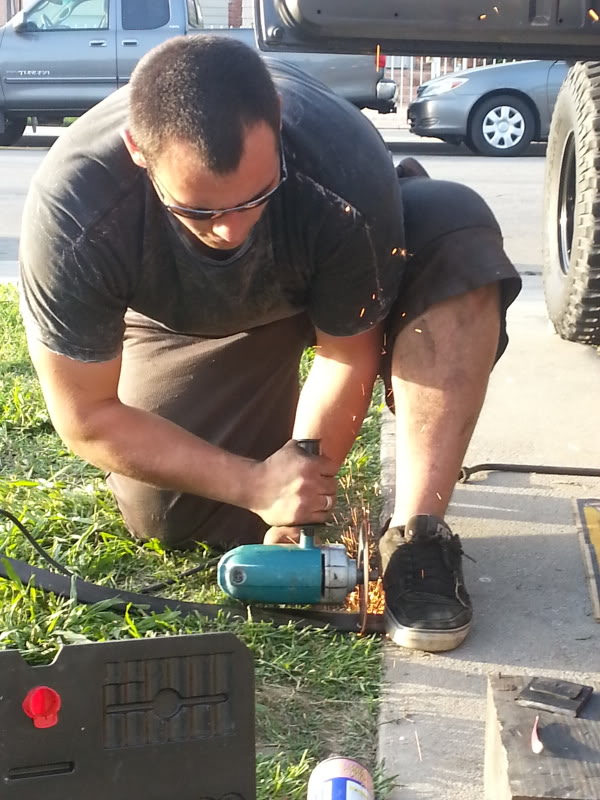
So I took the leaf springs apart yet again and moved my additional leaf down more spring. Then it turned out my spring was too long after. So I had to cut off 2&3/4" on the longer side of the leaf. The short side was perfect length.
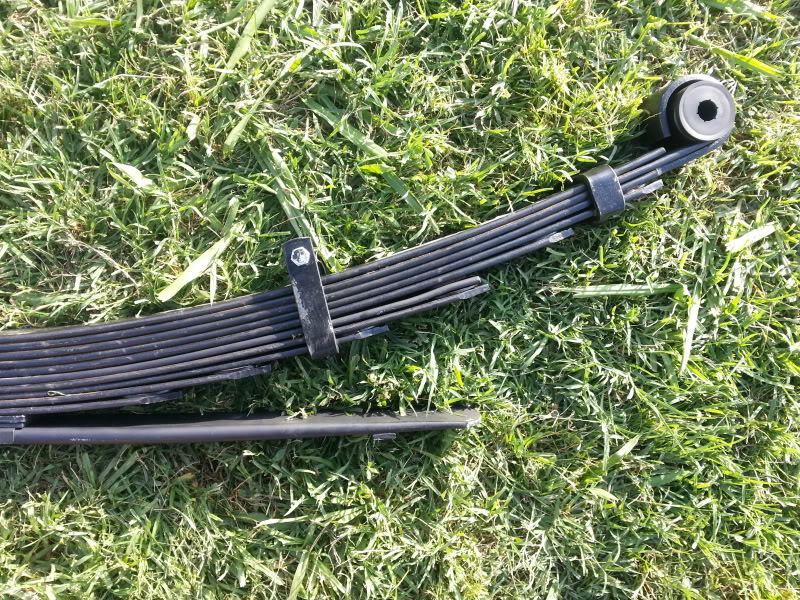
Problem all fixed. They came out looking great. Just use the longer bolt again to align the leaf springs and c-clamp to compress your springs. Once conpressed swap out the longer bolt and put in the bolt that you rounded in the beginning. Once the bolt is tight you can put your straps back in and remove your c-clamp
Here is my finished job already installed.

The only problem with doing this is that since the leafs are stacked up pretty thick your parking brake line won't fit correctly. It'll only fit while going either over the top or under the leaf sping. It'll stay slightly pulled even though its not engaged if you try to connect it. So I left it disconnected for the time being. At least until I figure out a way to mod the place where the brake line connects to on the drum. I need to make the lines a bit higher to clear the leaf springs so I can run it along the top of the spring. I'm thinking that I might also need longer brake lines. I need to inspect it some more. So as of now my parking brake is 1st gear. At least till I figure out what I can do.
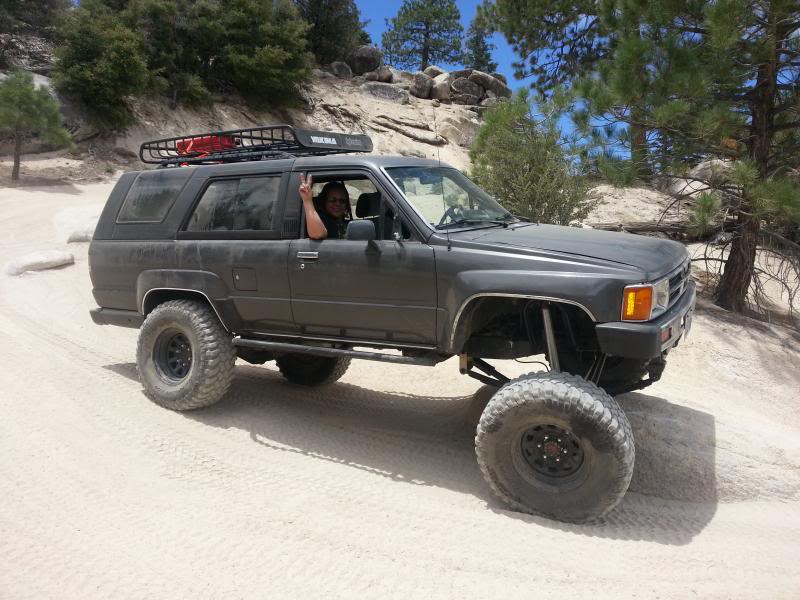
This is the before and after shots
Before:
and after:
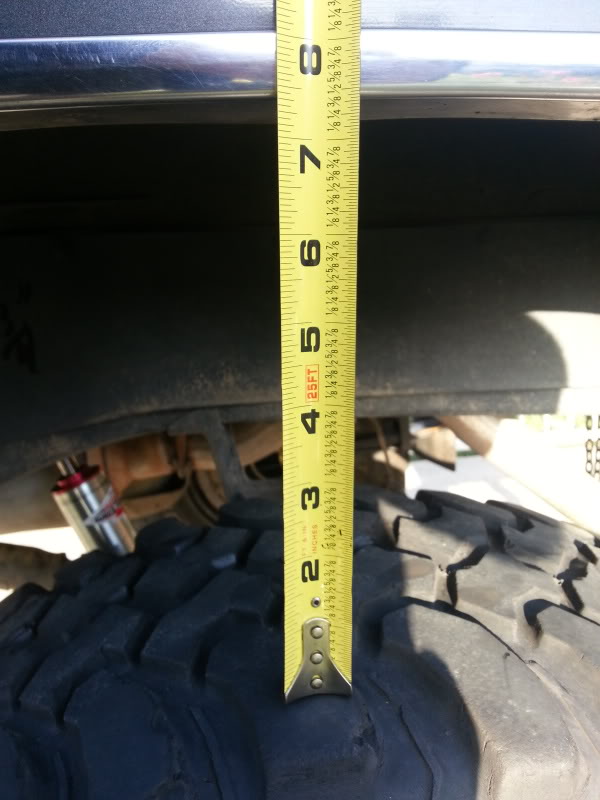
Measurments from the tire to the fender Before and after
Before: when the leafs were first put in it sat at 7&3/8"
After: now it sits just a lil' bit over 9&1/4"( the truck was slanted due to the gutter so i went ahead and measured the driver side as well and that one came out to 9")
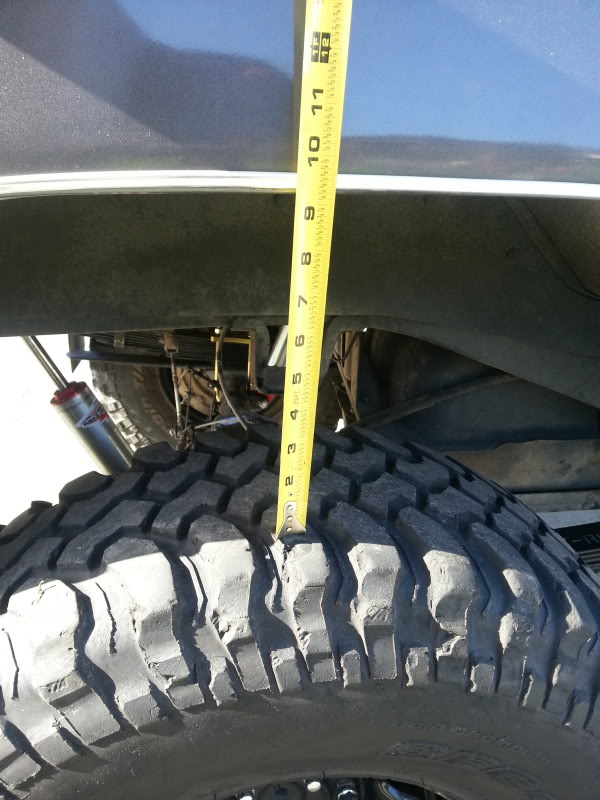
So by doing this mod i got about 2" - 2&1/4 more in height when compared to when i installed the All Pro Leaf springs brand new.
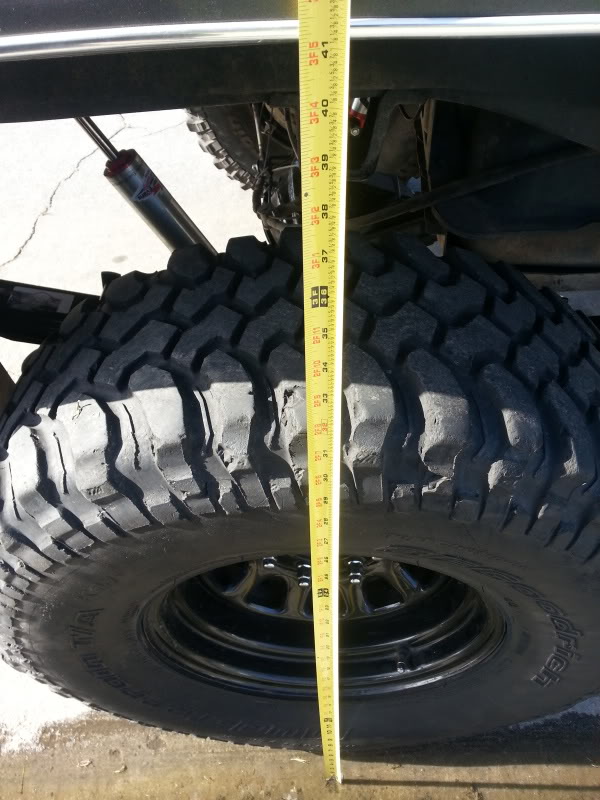
Also Here is a picture from the ground to the fender. It's about 41&1/8"
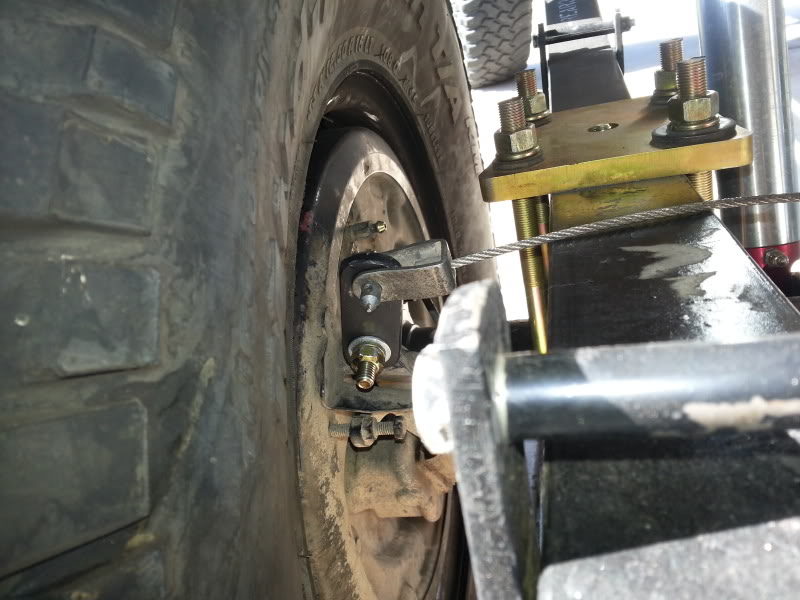
I know i mentioned once i did this mod that i couldnt use my Handbrake so i i did this quick easy fix to solve that minor problem.(and it works great)
Alright guys i finished the brake line extensions. not too bad. And was a lot easier then i thought it'd be.
Passenger side: (Rear View)
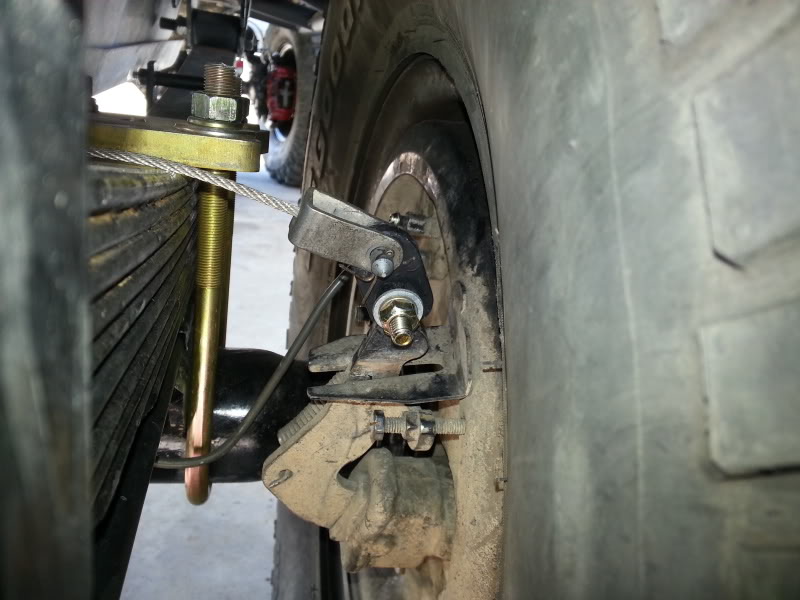
Passenger Side: (Front View)

Driver Side: (Rear View)
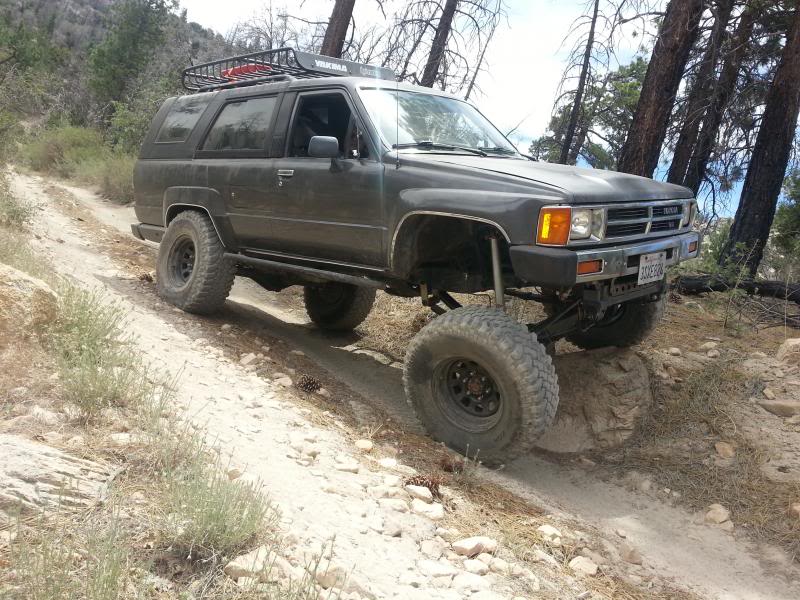
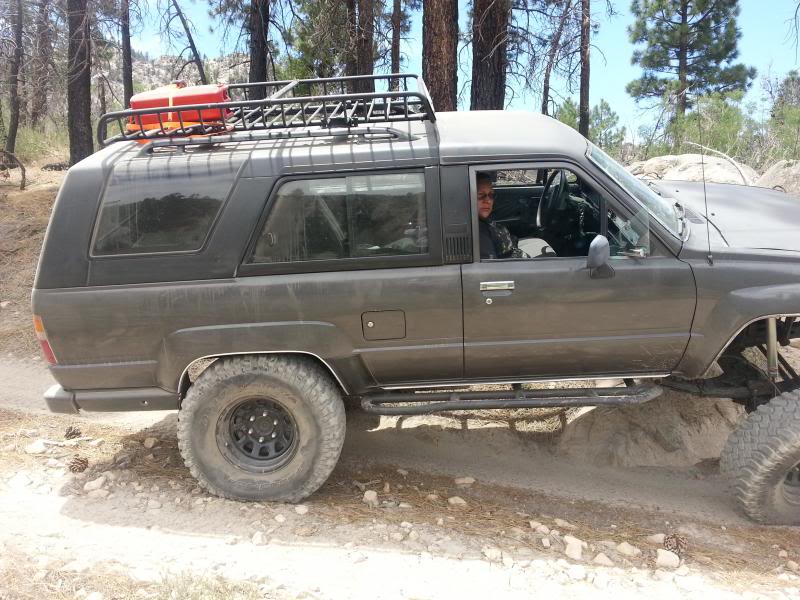
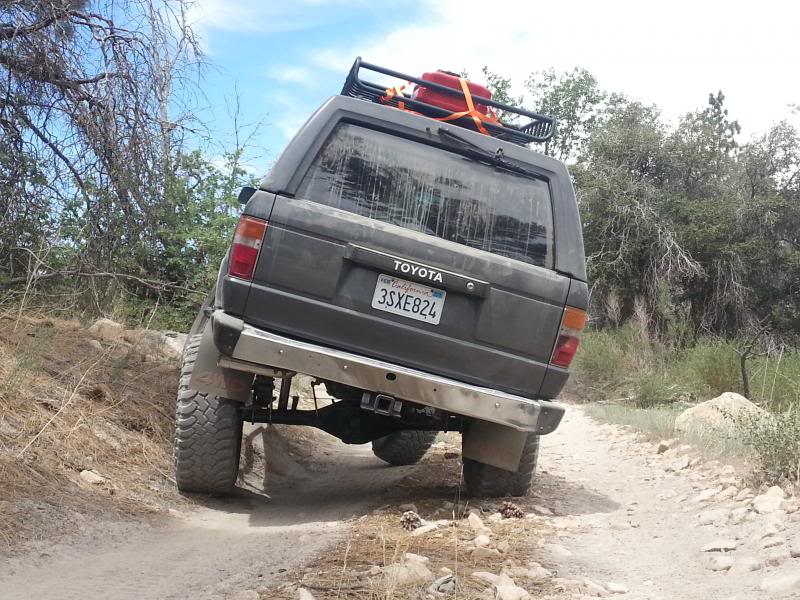
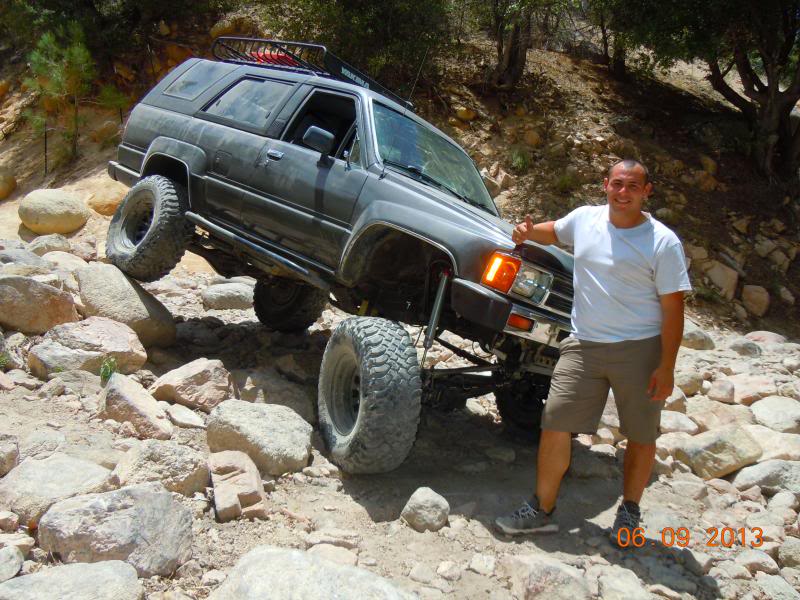
Yes the rear does feel a bit stiffer but it really isnt anything that is intolerable. And for those of you people wondering well i bet it's performance is gonna suck offroad now that he has added leafs and maybe it wont flex as well but these leafs performed great this past weekend in our Big Bear CA Off-Road trip this past sunday.
Here is my proof top you that you are still gonna have great flex and articlation.
This is after the mods i did shown in this post.

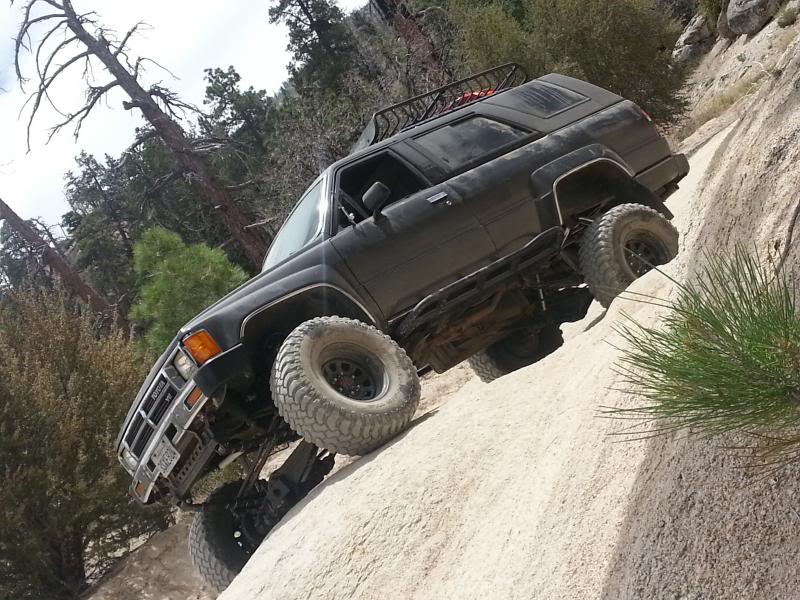
and some live video(sorry the truck kept turning off on me, i wasnt getting enough air into the engine. after the videos i adjusted the throttle body and it was perfectly fine)
------------------------------------------------------------------------------------------------------------------------------------------------------------------------------------------------------------------------------------------------------------------------------------
Like i said, sorry for Hijacking your thread. but i just wanted to show you something you can do that will definitely work. Hope it helps you decide what you wanna do with your rig.
I apoligize ahead of time, i don't mean to Hijack your thread but just wanna give you some helpful info that i had to learn by myself. And you can take it or leave it whatever you want to.
----------------------------------------------------------------------------------
So like i previously said I had the same exact problem with my All Pro 4" lift. One thing I did with my AllPro 4" lift was) add one stock leaf spring to my leaf pack along with the overload leaf and 2 small spacers(all off the stock leafs).
This is what my lift looked like after the 4 inch lift was installed. Brand new springs and still having the rear sag.
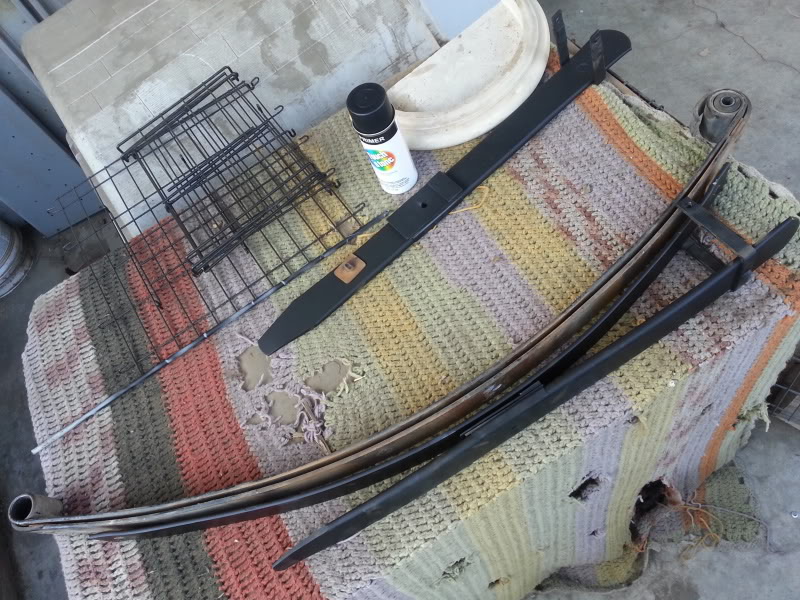
I didnt like that major sag issue because I do carry lots of stuff in the bed of my truck from time to time and if I figured it it is already sagging with just the weight of the Hard top, roof rack, and tire on it now then how the heck will it be when I load my truck up with all the camping gear the rear steel plate bumper/tire carrier. Nooo way.... it'll be horrible. So I removed the rear leaf springs. And I took apart my old stock rear leafs.
The following with just be copy and paste from posts i did on my thread.
------------------------------------------------------------------------------------------------------------------------------------------------------------------------------------------------------------------------------------------------------
So I plan to use the bottom 2 springs and the 2 small plates in between them. See how arched these are?
Now look at how flatter these are due to being longer leaf springs. (The middle 2 springs are for the rear)
First off I'd like to say that doing this isn't too hard of a job. Its just a total pita when trying to re-align the spring with the axle because once you drop the axle it moves forward or back. Nothing a little kicking can't fix lol this is my 3rd time putting springs back on so I'd better be a pro by now haha.
Anyway here are the pix.
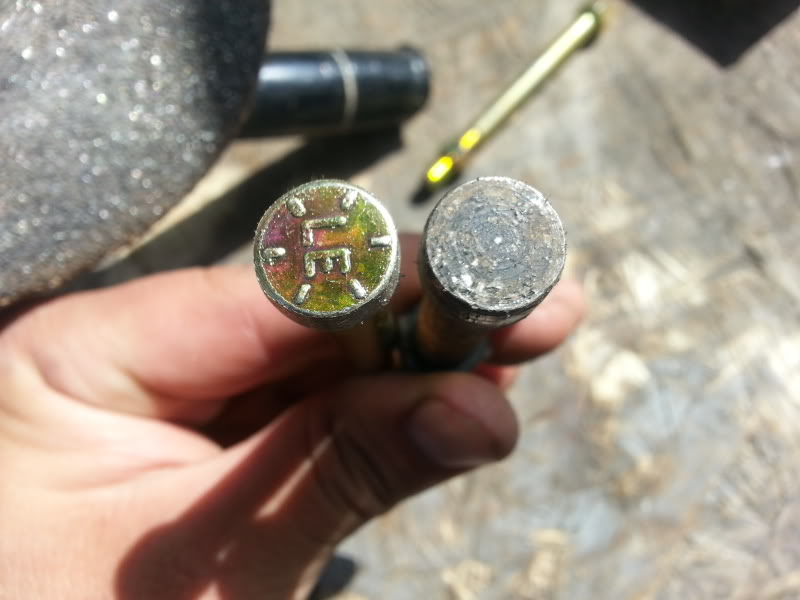
First thing was to round off the new grade 8 bolt end so that it is able to fit into the spring perch on the axle. The left we have the new bolt and on the right is the old. The bolts are going to need to be longer because you're adding more leafs.
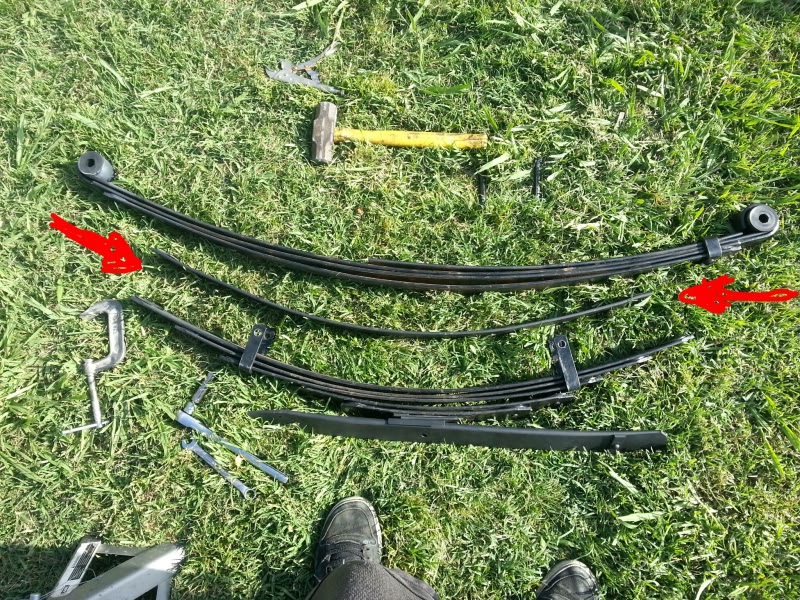
Once you have the leaf spring removed use a C-clamp to hold the leaf spring tightly together so you do not have any pressure on the bolt and nut while you remove it. In order to remove the bolt use a socket for the nut and pressure pliers for the round bolt. Once you take off the bolt that holds everything together then take out the straps on each side of the leaf spring. then loosen your C-Clamp. When you remove the C-clamp your whole leaf spring will come undone and look a bit like this.

As you can see The leaf with the arrows is the one i added in the middle of the leaf springs. I also added the bottom overload spring that you see. In order to re-align and re-tighten the leaf springs make use a longer bolt then what you plan to use so you can tighten them down and compress then with a c-clamp after then you can go ahead and swap in the actual smaller bolt that you plan to use.
As you can see... I ran into one little problem. I came up short on the spot where I placed my extra leaf.
This simply will not do.
So I took the leaf springs apart yet again and moved my additional leaf down more spring. Then it turned out my spring was too long after. So I had to cut off 2&3/4" on the longer side of the leaf. The short side was perfect length.
Problem all fixed. They came out looking great. Just use the longer bolt again to align the leaf springs and c-clamp to compress your springs. Once conpressed swap out the longer bolt and put in the bolt that you rounded in the beginning. Once the bolt is tight you can put your straps back in and remove your c-clamp
Here is my finished job already installed.
The only problem with doing this is that since the leafs are stacked up pretty thick your parking brake line won't fit correctly. It'll only fit while going either over the top or under the leaf sping. It'll stay slightly pulled even though its not engaged if you try to connect it. So I left it disconnected for the time being. At least until I figure out a way to mod the place where the brake line connects to on the drum. I need to make the lines a bit higher to clear the leaf springs so I can run it along the top of the spring. I'm thinking that I might also need longer brake lines. I need to inspect it some more. So as of now my parking brake is 1st gear. At least till I figure out what I can do.
This is the before and after shots
Before:
and after:

Measurments from the tire to the fender Before and after
Before: when the leafs were first put in it sat at 7&3/8"

After: now it sits just a lil' bit over 9&1/4"( the truck was slanted due to the gutter so i went ahead and measured the driver side as well and that one came out to 9")

So by doing this mod i got about 2" - 2&1/4 more in height when compared to when i installed the All Pro Leaf springs brand new.
Also Here is a picture from the ground to the fender. It's about 41&1/8"

I know i mentioned once i did this mod that i couldnt use my Handbrake so i i did this quick easy fix to solve that minor problem.(and it works great)
Alright guys i finished the brake line extensions.
not too bad. And was a lot easier then i thought it'd be.Passenger side: (Rear View)

Passenger Side: (Front View)

Driver Side: (Rear View)

Yes the rear does feel a bit stiffer but it really isnt anything that is intolerable. And for those of you people wondering well i bet it's performance is gonna suck offroad now that he has added leafs and maybe it wont flex as well but these leafs performed great this past weekend in our Big Bear CA Off-Road trip this past sunday.
Here is my proof top you that you are still gonna have great flex and articlation.
This is after the mods i did shown in this post.


and some live video(sorry the truck kept turning off on me, i wasnt getting enough air into the engine. after the videos i adjusted the throttle body and it was perfectly fine)
------------------------------------------------------------------------------------------------------------------------------------------------------------------------------------------------------------------------------------------------------------------------------------
Like i said, sorry for Hijacking your thread. but i just wanted to show you something you can do that will definitely work. Hope it helps you decide what you wanna do with your rig.
Last edited by Redeth005; Jun 12, 2013 at 04:04 PM.
Jun 12, 2013 | 08:49 PM
#17
Thread Starter
Registered User
Joined: Jan 2012
Posts: 8
Likes: 0
From: Hawaii
Thats some pretty good info redeth! Might actually consider building the pack like that, and no I dont have the stock springs. But it shouldnt be too hard or expensive to find a used set laying around. Might be awhile before I actually take apart the leafs as my schedule is just too hectic right now, but again, thanks for that info!
Jun 12, 2013 | 09:35 PM
#18
Registered User
Joined: Apr 2012
Posts: 2,817
Likes: 2
From: Los Angeles CA
Thats some pretty good info redeth! Might actually consider building the pack like that, and no I dont have the stock springs. But it shouldnt be too hard or expensive to find a used set laying around. Might be awhile before I actually take apart the leafs as my schedule is just too hectic right now, but again, thanks for that info!
Anyway if you go this route you will definitely be able to hold more weight in your rear. All i had to spend money on was longer Grade 8 bolts and nuts; i already had the springs and the metal for the brake line estensions, and paint. So Doing this project only costed me about $3 lol
 Totally worth every penny.

Thread
Thread Starter
Forum
Replies
Last Post
FS[GreatLakes]: Toyota collection part out
88sasturbotoy
Axles - Suspensions - Tires - Wheels
3
Jan 30, 2026 01:57 PM
Flying91
86-95 Trucks & 4Runners (Build-Up Section)
45
Apr 11, 2024 04:39 PM
coffey50
Offroad Tech
17
Jul 28, 2015 10:55 AM
toyoda8488
84-85 Trucks & 4Runners (Build-Up Section)
2
Jul 5, 2015 10:18 PM


