Advice requested for my first drum brake replacement job ever
 01-07-2018, 10:30 PM
#1
Registered User
Thread Starter

Join Date: Oct 2017
Posts: 49
Likes: 0
Received 0 Likes
on
0 Posts
Advice requested for my first drum brake replacement job ever
I haven't done drum brakes ever but I'm faced with these drum brakes where I'd just like to ask a couple of questions from those of you who have done drum brakes before.
1. I released (pressed the button and let down) the parking brake lever in the cabin and screwed these 2-inch long metric 8mm x 1.25mm threads bolts to pull the drum off the shoes.
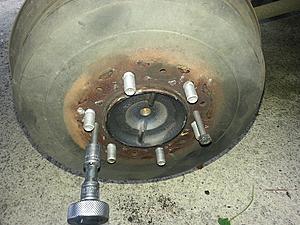
2. After blowing the dust out (and not breathing it in), I could see that the front shoe was worn down to about a millimeter or less (after 175K miles) at the bottom right (where the rest of both shoes was very thick considering the number of miles), so I'm going to buy new shoes and replace them.
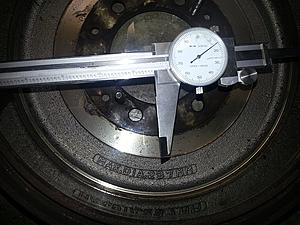
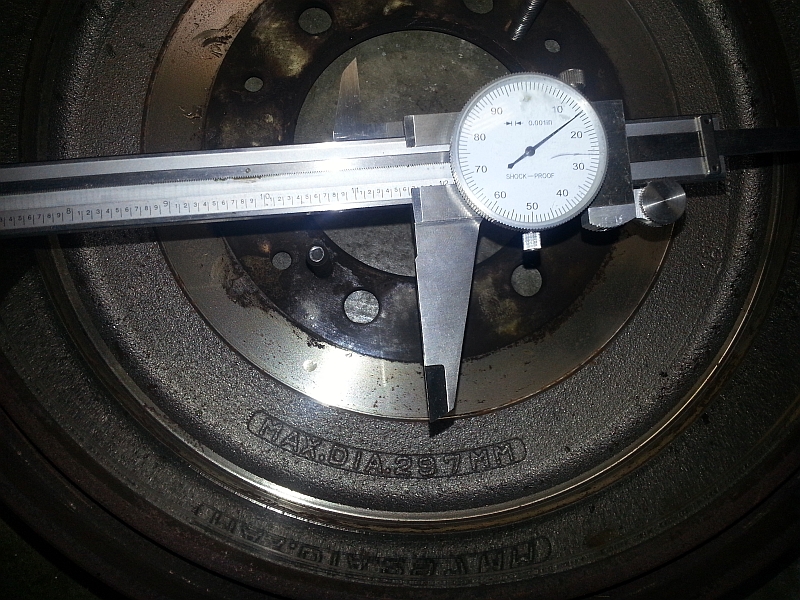
3. I measured the drum to be 2mm smaller than the maximum diameter:
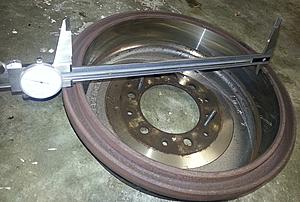
4. Where the maximum diameter of 297mm was stamped on the drum itself:
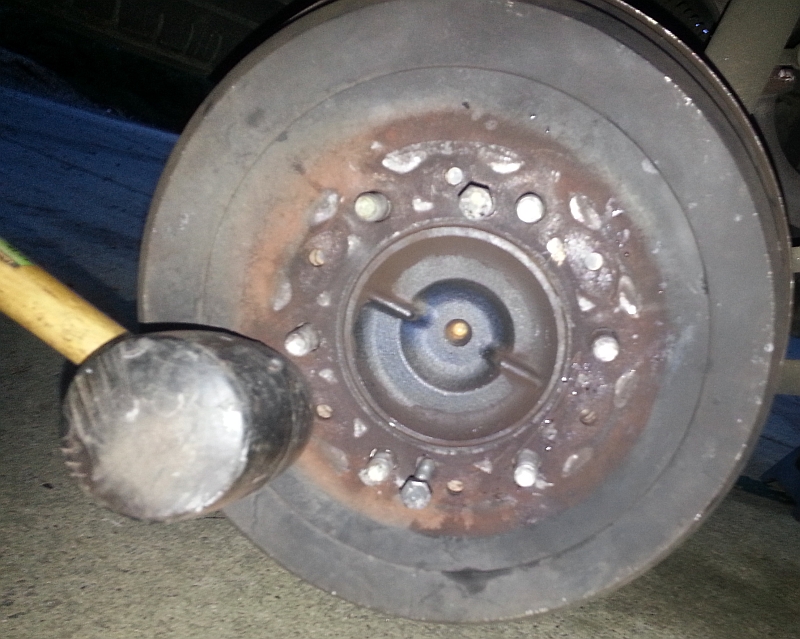
5. It was hard to get the drum back on even with the parking brake released from the cabin, so I had to use a mallet to bang it back on:

The main question is whether I'm supposed to *disconnect* the cable for the parking brake when working on the drums, and particularly when I put the new shoes on after I buy them.
Also, only one shoe is worn, and it's the front shoe, and it's been on there for 175K miles, but I wonder if the shoes can be switched, so that the front shoe is in the rear and the rear shoe is in the front, since they wore so unevenly (sort of like rotating tires).
I'd also like to know what the hot/cold friction goal is for these shoes (like G/G, or F/F, or whatever).
But mainly I'm not sure what the procedure is for the parking brake cable.
Can you advise what I need to know that's not intuitive?
1. I released (pressed the button and let down) the parking brake lever in the cabin and screwed these 2-inch long metric 8mm x 1.25mm threads bolts to pull the drum off the shoes.

2. After blowing the dust out (and not breathing it in), I could see that the front shoe was worn down to about a millimeter or less (after 175K miles) at the bottom right (where the rest of both shoes was very thick considering the number of miles), so I'm going to buy new shoes and replace them.

3. I measured the drum to be 2mm smaller than the maximum diameter:

4. Where the maximum diameter of 297mm was stamped on the drum itself:
5. It was hard to get the drum back on even with the parking brake released from the cabin, so I had to use a mallet to bang it back on:
The main question is whether I'm supposed to *disconnect* the cable for the parking brake when working on the drums, and particularly when I put the new shoes on after I buy them.
Also, only one shoe is worn, and it's the front shoe, and it's been on there for 175K miles, but I wonder if the shoes can be switched, so that the front shoe is in the rear and the rear shoe is in the front, since they wore so unevenly (sort of like rotating tires).
I'd also like to know what the hot/cold friction goal is for these shoes (like G/G, or F/F, or whatever).
But mainly I'm not sure what the procedure is for the parking brake cable.
Can you advise what I need to know that's not intuitive?
 01-07-2018, 11:55 PM
#2
I always start by backing the brake adjusters all the way off
Allows the drums to come off much easier and be installed
Since I always replace the bell crank brackets and clean the bell cranks I need to disconnect the cables.
New shoes New Hardware and New Drums
Make sure the adjusters are clean and lightly lubed working smooth
Put it all back together adjust the shoes
Depends if you had to change wheel cylinders
01-08-2018, 09:25 AM
#3
Registered User

If the adjustment at the hand lever is remotely correct, the bell cranks at the rear wheel should be resting on their stops, not pulled out. At which point, it's the automatic adjuster inside that is keeping the shoes positioned. On drums where they've worn and developed a ridge, the drum can still be difficult to pull. And there's really not a good way to back that adjuster off with the drum on.
The automatic adjuster is a little one-way ratchet hooked to a lever that the parking brake bell crank pulls inside the drum. If the shoes are loose enough in the drum, the lever pulls far enough to click onto the next tooth on the adjuster, then when the brake is released the spring tension (hopefully) turns the adjuster slightly, tightening them. If there's not enough slack, the adjuster doesn't move far enough to engage the next tooth, and the adjustment remains the same.
The adjuster is on top of the axle shaft, under the wheel cylinder. In general, if the drum didn't come off easily I'd back it off before reassembling. And if you're putting new shoes on I'd back it all the way off. Once the drum is back on the parking brake lever needs to be pulled and released a bunch to readjust the brake. If you listen carefully (and it's fairly quiet where you're working on the car) you can head the difference between the brake shoes moving (they're a bit squeaky) and them moving plus the adjuster ratcheting forward a notch. It makes a distinct 'click' as the hand brake lever goes up if it's still adjusting. Unlike some cars, it's the handbrake that accomplishes the automatic adjusting on these brakes.
The adjusters can get stiff and fail to work properly. They're just a threaded bolt inside a threaded tube. They get exposed to moisture, heat, dust. If they're not operating smoothly, you need to take them out, apart, and clean the threads really well, and them relube them with some high temp grease (there's grease made especially for use on brakes).
Take careful note of how all the springs and cables and levers are attached and routed before you take anything apart, it's not entirely intuitive.
01-08-2018, 10:44 AM
#4
Registered User
Thread Starter
Join Date: Oct 2017
Posts: 49
Likes: 0
Received 0 Likes
on
0 Posts
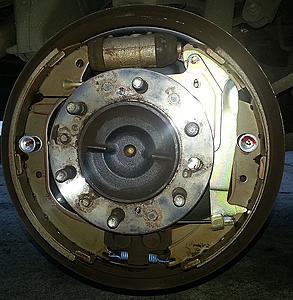
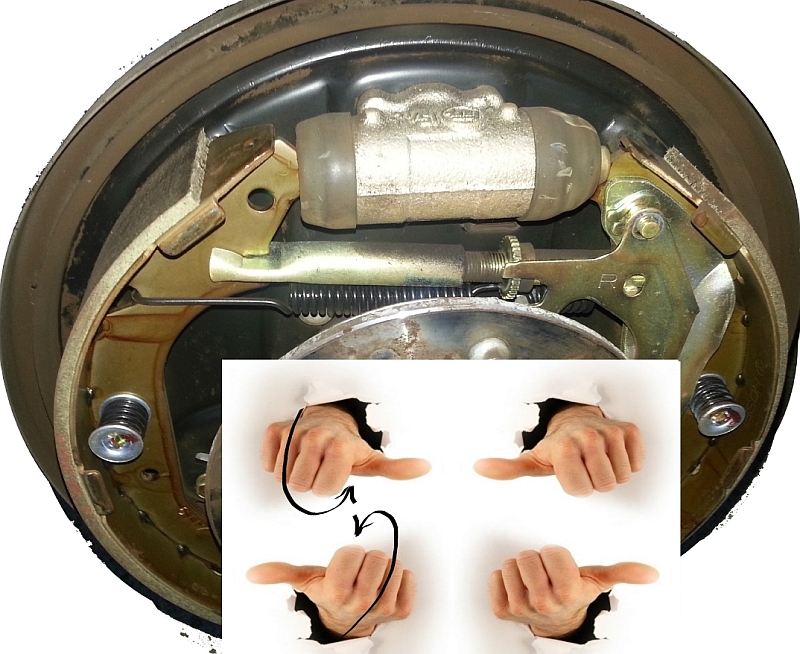
I should have backed it off a bit at least, where I now see that star adjuster clearly in the top center right of the photo below:

Bell cranks? Which part is the bell crank? Googling, I see it's a small part near the bottom.
Is the bell crank visible in this closeup?

I don't see any indication that a new drum is needed since it measures with 2mm to spare.
I don't see leaks in the cylinder.
What else would I look for to see if it needs new hardware?
Thanks. I'll clean it all out and lube it as there are many lube points.
The funny thing about brakes, at least disc brakes, is that you can lube it all you want - but it's dry in just a few months.
Is the bell crank visible in this closeup?
I don't see any indication that a new drum is needed since it measures with 2mm to spare.
I don't see leaks in the cylinder.
What else would I look for to see if it needs new hardware?
Thanks. I'll clean it all out and lube it as there are many lube points.
The funny thing about brakes, at least disc brakes, is that you can lube it all you want - but it's dry in just a few months.
Last edited by SodiumFlouride; 01-08-2018 at 10:54 AM.
01-08-2018, 10:53 AM
#5
Registered User
Thread Starter
Join Date: Oct 2017
Posts: 49
Likes: 0
Received 0 Likes
on
0 Posts

The automatic adjuster is a little one-way ratchet hooked to a lever that the parking brake bell crank pulls inside the drum. If the shoes are loose enough in the drum, the lever pulls far enough to click onto the next tooth on the adjuster, then when the brake is released the spring tension (hopefully) turns the adjuster slightly, tightening them. If there's not enough slack, the adjuster doesn't move far enough to engage the next tooth, and the adjustment remains the same.
Thanks for pointing that out because it's not intuitive.
This makes sense analagous to how we back out the piston in disc brakes when we replace them with new pucks.
Once the drum is back on the parking brake lever needs to be pulled and released a bunch to readjust the brake. If you listen carefully (and it's fairly quiet where you're working on the car) you can head the difference between the brake shoes moving (they're a bit squeaky) and them moving plus the adjuster ratcheting forward a notch. It makes a distinct 'click' as the hand brake lever goes up if it's still adjusting. Unlike some cars, it's the handbrake that accomplishes the automatic adjusting on these brakes.
I wonder why they put drum brakes on in the first place as they sure seem more complex than are disc brakes.
The adjusters can get stiff and fail to work properly. They're just a threaded bolt inside a threaded tube. They get exposed to moisture, heat, dust. If they're not operating smoothly, you need to take them out, apart, and clean the threads really well, and them relube them with some high temp grease (there's grease made especially for use on brakes).
 01-08-2018, 12:52 PM
#6
Registered User
The bellcrank is the whole lever that transfers the pull of the parking brake cable on the outside to the inside, where it pulls that cable attached to the lever - the lever that both does the auto adjusting and pries the shoes outward to engage them in parking brake mode.
I'm not sure why Toyota stuck with drums in the back for so long. I think a drum brake is slightly cheaper to make (simpler machining), but it's not like Toyota was pinching pennies on the 4Runner engineering. They had a fat profit margin to work with. I guess when everything is working properly they work better as a parking brake than many disc brakes do? Not sure really.
I don't think you can swap the shoes front to rear, only one of them has the pin that holds the parking brake/adjuster lever (IIRC). The other just has a hole where the pin would go.
01-08-2018, 05:49 PM
#7
Registered User
not all Toyota trucks have bellcranks for the emergency brake. If you have a cable running across the rear axle from drum to drum you do, if the cables are in a Y configuration one to each wheel (like my 95 4runner) you don't. Also there is a rubber plug on the backing plate that allows you to adjust the rear brakes with a "spoon" and you can back them off, it's just difficult. You have to reach in with a tool and push the adjuster lever off of the star wheel while you use the spoon to back off the adjuster. I use a bent screwdriver that I curved to almost a 90* angle just for loosening the brakes to help remove drums. By the look of your shoes they were probably not adjusted tight enough and did not wear evenly. when you rebuild your brakes adjust them as tight as you can and still be able to install the drum, then reach through with a brake adjuster spoon or whatever you can come up with to rotate the adjuster as you spin the drum/tighten the adjuster and spin the drum again. you are shooting for just a little drag when the shoes just make contact with the drum.
Trending Topics
01-09-2018, 09:35 AM
#8
Registered User
I wouldn't manually adjust - there's a chance of overtightening. Just put it together loose and then work the parking brake lever up and down and let it auto-adjust to the correct setting.
01-09-2018, 12:23 PM
#9
Registered User
Thread Starter
Join Date: Oct 2017
Posts: 49
Likes: 0
Received 0 Likes
on
0 Posts
The bellcrank is the whole lever that transfers the pull of the parking brake cable on the outside to the inside, where it pulls that cable attached to the lever - the lever that both does the auto adjusting and pries the shoes outward to engage them in parking brake mode.
The local dealer doesn't carry a rebuild kit for the cylinders but they're $102 each so I'm not sure if I'll replace these (which seem to be in good shape).
The local dealer has the shoes at $157 a set - but - they don't know what the friction ratings are.
For something as critical as friction material, to not know the friction ratings means I can't compare with any other brake shoes.
Does anyone know what the cold/hot friction ratings are for the Toyota brake shoes? (By USA law the friction rating has to be printed on the box or on the shoe itself).
I'm not sure why Toyota stuck with drums in the back for so long. I think a drum brake is slightly cheaper to make (simpler machining), but it's not like Toyota was pinching pennies on the 4Runner engineering. They had a fat profit margin to work with. I guess when everything is working properly they work better as a parking brake than many disc brakes do? Not sure really.
Toyota probably just stuck with what was working and, anyway, you can't argue with 175K miles on a set of shoes!
Now all I need to do is figure out the cold/hot friction rating for these Toyota shoes because it's impossible to compare shoes without knowing that basic fact.
Anyone here have a pair in hand? The cold/hot rating must, by USA law, be printed somewhere on the shoe itself or on the packaging.
01-09-2018, 12:29 PM
#10
Registered User
Thread Starter
Join Date: Oct 2017
Posts: 49
Likes: 0
Received 0 Likes
on
0 Posts
I'm responsible for "fixing the brakes" so I'll be buying new shoes for sure, and maybe I'll find a rebuild kit for the cylinders.
The dealer doesn't sell one.
Anyone know if a rebuild kit exists aftermarket that you trust?
Also there is a rubber plug on the backing plate that allows you to adjust the rear brakes with a "spoon" and you can back them off, it's just difficult. You have to reach in with a tool and push the adjuster lever off of the star wheel while you use the spoon to back off the adjuster. I use a bent screwdriver that I curved to almost a 90* angle just for loosening the brakes to help remove drums.
Plus you can't see anything when you're doing it.
Plus it could be all rusted up.
I gave up long ago on adjusting from the outside, but if a drum won't come off or go on, then adjusting is what I'll have to do.
The DIRECTION to adjust though, always confuses the heck out of me.
Is there a simple way to remember which way to adjust?
By the look of your shoes they were probably not adjusted tight enough and did not wear evenly. when you rebuild your brakes adjust them as tight as you can and still be able to install the drum, then reach through with a brake adjuster spoon or whatever you can come up with to rotate the adjuster as you spin the drum/tighten the adjuster and spin the drum again. you are shooting for just a little drag when the shoes just make contact with the drum.
But when I replace the shoes, I'm going to follow your advice.
Right now I'm just looking for better/cheaper shoes than the unknown friction rating $157 OEM shoes at the dealer.
01-09-2018, 12:30 PM
#11
Registered User
Thread Starter
Join Date: Oct 2017
Posts: 49
Likes: 0
Received 0 Likes
on
0 Posts
I have TRIED adjusting these things from the outside and it's just sheer madness since you don't have a clue which way to go.
I like the idea of putting them on and just lifting the parking brake until they are adjusted tightly.
01-09-2018, 12:40 PM
#12
Registered User
"The problem with adjutsting is that you never know, from the outside, which way to turn the adjuster.
Plus you can't see anything when you're doing it.
Plus it could be all rusted up.
I gave up long ago on adjusting from the outside, but if a drum won't come off or go on, then adjusting is what I'll have to do.
The DIRECTION to adjust though, always confuses the heck out of me.
Is there a simple way to remember which way to adjust?"
Yes there is an easy way, try to move it without releasing the lever, if it doesn't move or you really have to force it you are either going against the adjuster lever or it's seized up. if it moves and you hear a ratcheting sound you are tightening the brakes (expanding the shoes). it takes a lot to adjust your rear brakes after replacement if you are just trying to do it with the parking brake lever. I prefer to adjust them by hand until I can just put the drum on, then I crank them further with a spoon until I can't rotate the drum and I back it off until the drum rotates easily. Works every time.
 01-10-2018, 12:17 PM
#14
Registered User
Thread Starter
Join Date: Oct 2017
Posts: 49
Likes: 0
Received 0 Likes
on
0 Posts
(I have no indiction of faulty brake operation.)
In this case, since I will be taking the drum off, I can cheat to figure out the adjustment direction just by twisting it as I lube it to see which way it goes!
On what the cold & hot friction coefficients are for the Toyota shoes, I called three dealers today, none of which felt like opening a box to read the codes to me (I don't blame them).
All three didn't even know what I was talking about (which is kind of sad since friction is the primary purpose of a brake shoe) but they're dealers so they only probably have one friction coefficient shoe available anyway so I don't blame them for not knowing much about what they sell.
However, I found a clue to the Chase Test J866a OEM friction coefficient on Amazon.
I looked at the zoomable photos on Amazon, where out of about a score of choices for the specific vehicle entered, 3 of the photos had the Chase Test J866a numbers visible which are legally mandated to be printed in every shoe.
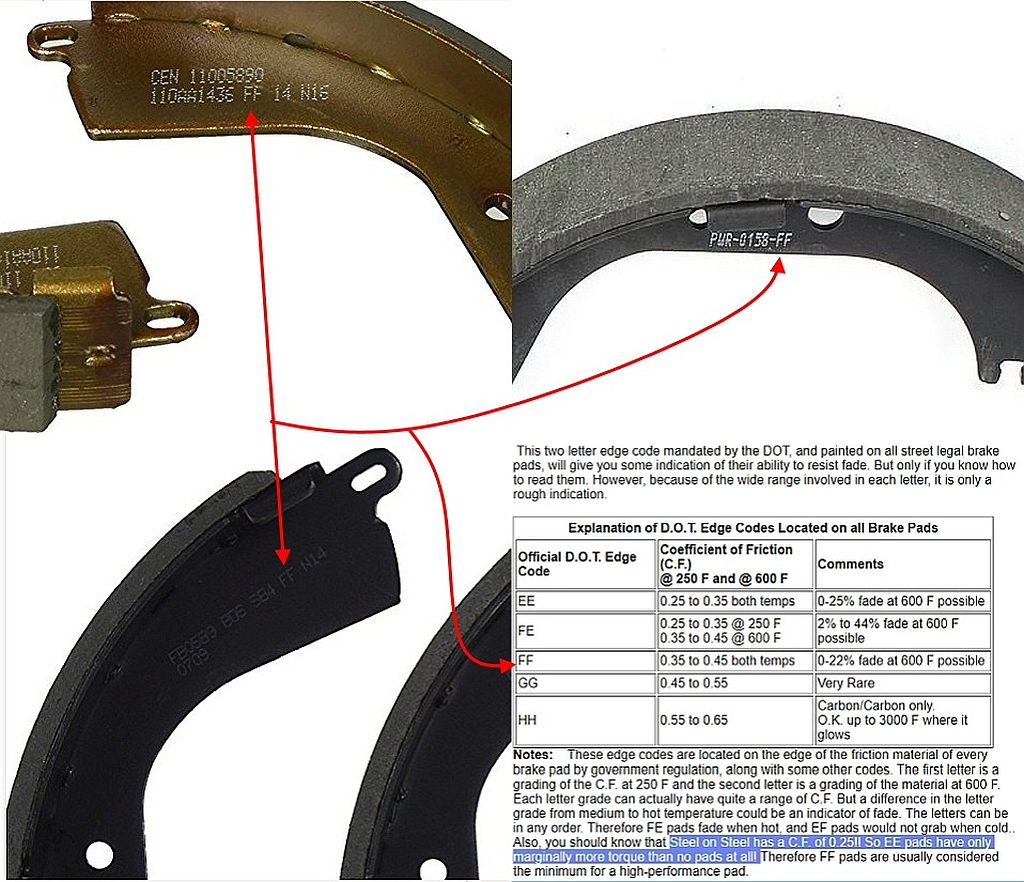
All were Chase Test SAE J866a FF friction ratings.
C = Up to 0.15u
E = 0.15u to 0.25u
E = 0.25u to 0.35u
F = 0.35u to 0.45u <== Amazon shoes for this vehicle are FF it seems
G = 0.45u to 0.55u
H = 0.55u to 0.65u
Z = Unclassified
http://faculty.ccbcmd.edu/~smacadof/DOTPadCodes.htm
http://www.hotrod.com/articles/hrdp-...ad-technology/
https://netrider.net.au/threads/unde...ratings.88551/
1. $16.09 Centric 110.05890 Drum Brake Shoe
2. $21.99 Power Stop B589 Autospecialty Brake Shoe
3. $29.14 Bosch BS589 Blue Disc Brake Shoe Set
This doesn't prove the Chase Test J866a friction coefficient for the Toyota OEM shoes is FF, but it strongly implies that they are (if Amazon is correct that these are OEM replacements) but I can't run my own tests like the police did here with EE and FF pads.
https://www.justnet.org/pdf/EvaluationBrakePads2000.pdf
Last edited by SodiumFlouride; 01-10-2018 at 12:20 PM.
01-16-2018, 09:58 AM
#15
Registered User
Thread Starter
Join Date: Oct 2017
Posts: 49
Likes: 0
Received 0 Likes
on
0 Posts
I have since found out that the original shoes have the AMECA Edge Code (also called DOT Edge Codes) of NBK LN508 FF.
That means three things to us with absolute 100% certainty:
That means three things to us with absolute 100% certainty:
- They are manufactured by "Nisshinbo Automotive Manufacturing, Inc."
- They have FF coefficients of friction in the SAE J866 Chase Test
- C = Up to 0.15u
- E = 0.15u to 0.25u
- E = 0.25u to 0.35u
- F = 0.35u to 0.45u <== Toyota OE shoes cold and various states of hot friction
- G = 0.45u to 0.55u
- H = 0.55u to 0.65u
- Z = Unclassified
- The AMECA registration number 160426 means they are *exactly* the same friction material as any shoe in the USA with these AMECA Edge Codes:
- NAC D9011 FF
- NAC LN508 FF
- NAC N2009 FF
- NBK D9011 FF
- NBK LN508 FF
- NBK N2009 FF
- NSA D9011 FF
- NSA LN508 FF
- NSA N2009 FF
- NSC D9011 FF
- NSC LN508 FF
- NSC N2009 FF
- SABC D9011 FF
- SABC LN508 FF
- SABC N2009 FF
- SAC D9011 FF
- SAC LN508 FF
- SAC N2009 FF
- SABC LN508 FF
01-17-2018, 08:19 AM
#16
Registered User
Thread Starter
Join Date: Oct 2017
Posts: 49
Likes: 0
Received 0 Likes
on
0 Posts
Here's more information for people who want to make a more intellegent decision about the difference between two brake shoes or pads that are in your hands or online.
Here's a picture of an OEM set of Toyota brake shoes on the vehicle, where the point is that every shoe & pad has the AMECA Edge Code printed on it, by law, in the USA.
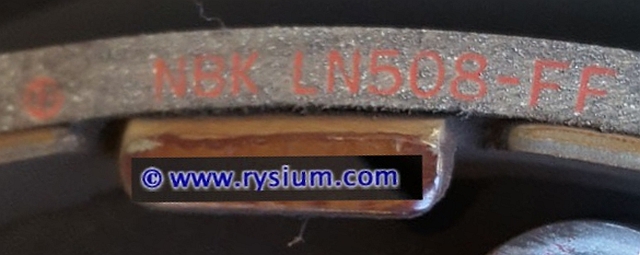
The nice thing about the DOT Edge Codes" (also called AMECA Edge Codes) is that they tell you three things outright and they make great search terms!
I was hoping this number would be a "holy grail" where I could use it to better compare two brake shoes in my hands.
To get a better handle on how to interpret the numbers, I called the main number at AMECA.ORG in Maryland at 202-898-0145 and spoke to the engineer in charge of that "AMECA Edge Code Markings" cross reference.
It was a long discussion, the net of which is that this code isn't really for the consumer. The engineer said it's kind of like the so-called "serial number" on a tire, or on a package of baked beans, where if something goes wrong, the government has a way of tracking down whose fault it is. In addition, he said that the SAE J866 Chase Test is really a quality metric, and not a performance metric, even though friction is an outcome of the Chase Test.
The engineer did give me all sorts of personal insight into how to buy brake pads but overall, he said you can't extrapolate very much real-world decision-making data from the DOT Edge Code.
Of course, if you miraculously find two pads with the same DOT Edge Code, then there's a 100% chance that it's the same friction material.
Or, if you find any pads with any of the 19 DOT edge codes that cross reference to the same AMECA registration number 160426 then they too are exactly the same friction material.
That's because the AMECA registration number 160426 is for a specific 1-inch square piece of friction material that can be used on any brake pad or shoe.
But that's really as far as a consumer can go with the edge code, he said.
He knew about all three of the Michigan police studies of EE and FF brake pads, where those in-depth police cruiser tests also said it's hard to extrapolate real-world performance from just the EE or FF friction code they tested.
The AMECA engineer said that there are from 10 to 30 compounds in a brake friction material, where he opined that Toyota spends enormous energy with what he called the Tier 1 companies (e.g., Nisshinbo for Toyota) optimizing the compound for each vehicle; but the engineer said that the aftermarket suppliers (e.g, Centric, Wagner, Akebono, Axxis, etc.) centralize on about a half dozen to a few more than a half dozen formulas for all their offerings.
In summary, the AMECA Edge Code is only "slightly" useful to a consumer, as it tells the consumer the most information only if numbers match, but if they don't match, the only three things it tells the consumer are the manufacturer, the friction coefficient, and the registration number for the specific friction material.
BTW, I was tempted to call the Nisshinbo senior principle engineer himself (Tsuyoshi Kondo, +1-586-997-1000, tkondo@nisshinboauto.com) who submitted the 1-inch squares for our particular friction material on October 31st 2017 for repeat testing, but I didn't have the nerve to call him for more information, especially after the AMECO engineer told me this information is mostly for law enforcement and government use, and not really intended for consumer use.
The one thing the AMECA engineer told me over and over again though, is that what we'd want for comparitive purposes, has been studied and studied by the "smartest guys on the planet", and nobody can agree because of conflicting interest.
So he symphathized with our needs.
Here's a picture of an OEM set of Toyota brake shoes on the vehicle, where the point is that every shoe & pad has the AMECA Edge Code printed on it, by law, in the USA.
The nice thing about the DOT Edge Codes" (also called AMECA Edge Codes) is that they tell you three things outright and they make great search terms!
I was hoping this number would be a "holy grail" where I could use it to better compare two brake shoes in my hands.
To get a better handle on how to interpret the numbers, I called the main number at AMECA.ORG in Maryland at 202-898-0145 and spoke to the engineer in charge of that "AMECA Edge Code Markings" cross reference.
It was a long discussion, the net of which is that this code isn't really for the consumer. The engineer said it's kind of like the so-called "serial number" on a tire, or on a package of baked beans, where if something goes wrong, the government has a way of tracking down whose fault it is. In addition, he said that the SAE J866 Chase Test is really a quality metric, and not a performance metric, even though friction is an outcome of the Chase Test.
The engineer did give me all sorts of personal insight into how to buy brake pads but overall, he said you can't extrapolate very much real-world decision-making data from the DOT Edge Code.
Of course, if you miraculously find two pads with the same DOT Edge Code, then there's a 100% chance that it's the same friction material.
Or, if you find any pads with any of the 19 DOT edge codes that cross reference to the same AMECA registration number 160426 then they too are exactly the same friction material.
That's because the AMECA registration number 160426 is for a specific 1-inch square piece of friction material that can be used on any brake pad or shoe.
But that's really as far as a consumer can go with the edge code, he said.
He knew about all three of the Michigan police studies of EE and FF brake pads, where those in-depth police cruiser tests also said it's hard to extrapolate real-world performance from just the EE or FF friction code they tested.
The AMECA engineer said that there are from 10 to 30 compounds in a brake friction material, where he opined that Toyota spends enormous energy with what he called the Tier 1 companies (e.g., Nisshinbo for Toyota) optimizing the compound for each vehicle; but the engineer said that the aftermarket suppliers (e.g, Centric, Wagner, Akebono, Axxis, etc.) centralize on about a half dozen to a few more than a half dozen formulas for all their offerings.
In summary, the AMECA Edge Code is only "slightly" useful to a consumer, as it tells the consumer the most information only if numbers match, but if they don't match, the only three things it tells the consumer are the manufacturer, the friction coefficient, and the registration number for the specific friction material.
BTW, I was tempted to call the Nisshinbo senior principle engineer himself (Tsuyoshi Kondo, +1-586-997-1000, tkondo@nisshinboauto.com) who submitted the 1-inch squares for our particular friction material on October 31st 2017 for repeat testing, but I didn't have the nerve to call him for more information, especially after the AMECO engineer told me this information is mostly for law enforcement and government use, and not really intended for consumer use.
The one thing the AMECA engineer told me over and over again though, is that what we'd want for comparitive purposes, has been studied and studied by the "smartest guys on the planet", and nobody can agree because of conflicting interest.
So he symphathized with our needs.
01-19-2018, 08:22 AM
#17
Registered User
For the best braking (effective, smooth, AND quiet), go with OEM shoes and/or pads. They are the best, in spite of the marketing BS of the non-OEM industry.
Brakes are important, especially when your kid is behind the wheel, so don't scrimp on pads/shoes.
As already mentioned, the bell-crank is in the upper left of your parts breakdown image (behind the brake backing plate).
No need to detach the PB cable from that bell-crank.
The Haynes manual does show how to adjust the parking brake (2 adjustment locations).
The parking brake lever pivots on, and is attached to, the rear shoe, so it needs to be detached from
the old shoe and re-attached to the new shoe.
Don't forget to lube (with dabs of lithium grease) the 4 points on the backing plate that the shoes ride on.
The properly assembled, entire brake-shoe-spring-etc assembly should 'slide' a bit when you grab it with 2 hands and twist.
Those 4 points should be nice and smooth, with no ridges.
BTW, I think you are over-analyzing the whole thing. JUST DO IT.
01-19-2018, 05:23 PM
#18
Registered User
Thread Starter
Join Date: Oct 2017
Posts: 49
Likes: 0
Received 0 Likes
on
0 Posts
To that end, I called Centric at 626-961-5775 and asked for technical support, who confirmed what you said in that the "OEM Quality" equivalent Centric shoes and pads are:
- Rear shoes, Centric Part Number 11105890, ceramic
- Front pads, Centric Part Number 10504360, ceramic
Centric kindly gave me the DOT Edge Codes after calling the warehouse who read them off the shoes & pads:
- CENTRIC 11105890 shoes = 111AA9101FF30N17 which means 111AA formula, 9101 factory, FF friction, 30th week of 2017, N type material (low copper)
- CENTRIC 10504360 pads = 15AA2256FE48A17 which means 15AA formula, 2256 factory, FE friction, 48th week of 2017, A type material (high copper)
Looking the numbers up in the December 8th, 2017 AMECA cross reference, the Centric rear shoes have a registered material of #161379 which matches these two AMECA Edge Codes:
- CEN 111AA9101 FF
- CEN 112AA9101 FF
- CEN 15AA2256 GF (this is not EF which is what is printed on the pad and is most likely an AMECA mistake)
- CEN 15AA8241 GF
- AMECA +1-202-898-0145
- CENTRIC +1-626-961-5775
He told me a lot of other stuff also, such as the fact they don't sell to Rock Auto nor to Amazon, so if you get Centric parts there, it's through a reseller of some sort.
The technical engineer did tell me that Centric puts all brake shoes on a dyno and tests them thoroughly to assure they meet OEM Quality, but it's not like a manufacturer gives them a spec. They just know how brake shoes and pads should work.
What PBR/Axxis/MetalMasters, Centric, and AMECA all essentially told me is that all the brake marketing is complete BS, where everyone who *thinks* they know how to choose a brake friction material by "eye" is fooling themselves. There is no way to tell other than to use them on the vehicle you care about using the driving style you care about with a pedal force you care about and observe the noise, dusting, pedal force, stopping power, and wear for yourself.
BTW, I came up with this fun rule for an easy way, without spinning the adjuster, to tell which way the adjuster goes.
It's just a fun rule, which I wouldn't take too seriously, because most of us know how to twist a bolt instinctively by now.
The original right-hand rule is an electromagnetic basic rule that all physicicists and electrical engineers know, but the RHR also works well when you're upside down as it works for bolts too (it's the same end result as "righty tighty lefty loosy").
If you want a normally threaded bolt to go in or out, you place your thumb in line with the bolt and in the direction that the bolt needs to go, and your right hand fingers will always curl in the direction that you need to spin a normally threaded bolt.
It's the same here, where you have to treat the adjuster as a bolt, where going "in" is going to the "rear" of the vehicle.
Facing the adjuster bolt from either the outside of the vehicle looking toward the lug bolts or from underneath looking toward the backing plate, you "hitch hike" with your thumb pointing toward the rear to adjust the shoes "inward", and you hitchhike toward the front to adjust the shoes outward.
- Remove = hitchhike to the rear
- Adjust = hitchhike to the front
 01-19-2018, 05:27 PM
#19
Registered User
Thread Starter
Join Date: Oct 2017
Posts: 49
Likes: 0
Received 0 Likes
on
0 Posts
Since I'm going to do the fronts also, I had called Toyota at 800-331-4331 who put me in contact with a helpful dealer who read off the edge code for our front pads, which were "AK PA533 EE A17". That cross references to Akebono E cold and E hot friction material of Type A (high copper) content of registered formulation #170537 (which 4 other Akebono edge codes used also).
That Toyota-preferred dealer was so helpful that he volunteered that Toyota only sources from two manufacturers for all their brake shoes and pads, which we found out independently are Nisshinbo (for our rear) and Akebono (for our fronts).
Personally I don't prefer E coefficient friction (bearing in mind that E is only marginally better than steel on steel) so I'll use the previously listed pads with the higher F friction coefficient for both cold (grab) and hot (fade) - but the desired friction coefficient pair is a personal decision everyone makes on their own merits so don't let this information sway you either way.
If others need it, here are the friction materials compared by the numbers:
- OE Front: Akebono, AMECA #170537, AK PA533 EE A17 (type A high copper)
- AM Front: Centric PN 10504360, AMECA #161379, 111AA 9101 FF 30N17 (type N low copper)
- OE Rear: Nisshinbo, AMECA #160426, NBK LN508 FF
- AM Rear: Centric PN 11105890, AMECA #161583, 15AA 2256 FE 48A17 (type A high copper)

Last edited by SodiumFlouride; 01-19-2018 at 05:47 PM.
01-19-2018, 05:53 PM
#20
Registered User
Thread Starter
Join Date: Oct 2017
Posts: 49
Likes: 0
Received 0 Likes
on
0 Posts
I get your point, but I have plenty of time to do the brakes.
If all I wanted to do was replace the brakes, I'd drop the vehicle off at the dealer.
I'm trying to LEARN about them.This is a Toyota tech site so that's why I'm here. For tech.
BTW, for replacing the rear drum brakes, these two videos are great, as is the attached DIY.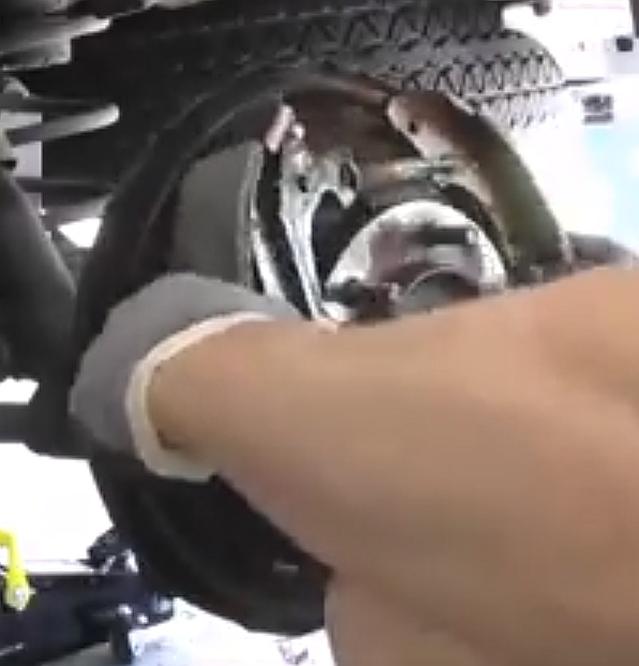
If all I wanted to do was replace the brakes, I'd drop the vehicle off at the dealer.
I'm trying to LEARN about them.This is a Toyota tech site so that's why I'm here. For tech.
BTW, for replacing the rear drum brakes, these two videos are great, as is the attached DIY.


