When you click on links to various merchants on this site and make a purchase, this can result in this site earning a commission. Affiliate programs and affiliations include, but are not limited to, the eBay Partner Network.
I found an old thread of someone who took their truck to Toyotafiberglass and had him put the quarters on. He also replaced the A pillars with metal. It looked like he had some so check with Slacker. I guess you'll need someone who welds. Here's the thread:
Thanks for the link, Nervo. I will certainly keep this option on the table. There is a guy up here who has a number of parts trucks and he very well may be willing to let me cut some donor pillars out of one. As for the welding, you're right, I'd find some help as my skills are far from what would be needed to take this approach.
Originally Posted by RAD4Runner
ladybugRC, if you find out any into regarding this, please share.
I sure will RAD- just starting to read some threads it seems that there is some debate about how to best prep for applying urethane. I read through the FAQs from the POR-15 site (http://www.por15.com/POR-15-FAQS_ep_61.html) and it seems they're confident it works well with most top coats and with body filler though they don't specifically mention urethane. I agree that this would be an ideal approach as there would not be multiple layers of paint and primer etc. I was also interested to read that you can use POR under body filler- gives me some other ideas for this repair.
The owner of a local auto glass shop is a friend of mine and I trust his opinion. I'm hoping to get him over to my shop this week to help me remove the windshield and get his input on how to address this mess. I'll let you all know what he thinks.
I thought it might be good to distract myself from the pillar project.
I spent a couple of hours pulling out the rest of the interior:
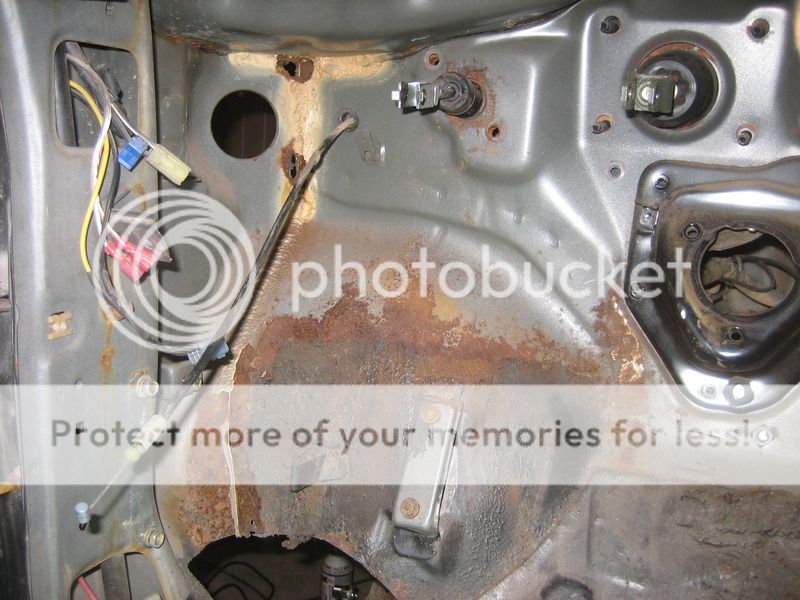
Pretty clean overall. There are a few rusty spots to address as well as a hole by the clutch pedal. Seems to be a common place to rust through. I'll cut it out and patch it up.
I have all my interior parts sitting and waiting for a good proper cleaning:
I thought it might be good to distract myself from the pillar project.
I spent a couple of hours pulling out the rest of the interior:
Pretty clean overall. There are a few rusty spots to address as well as a hole by the clutch pedal. Seems to be a common place to rust through. I'll cut it out and patch it up.
BTW, if your carpet is soaked with brake fluid from leaking clutch master cylinder, scrubbing with Fast Orange hand cleaner and then rinsing or washing with water and soap worked well for me. Then I threw the carpet in front-loading washer (no agitator) for good cleaning.
RAD: Thanks for the carpet cleaning tips- good guess on the leaking clutch master... I was planning to put the carpet in a front load washer per your suggestion.
I also read your write-up on relocating the switches, hadn't considered it before but I will now! I probably ought to revisit the many MODs you've written about.
Last night I found some more holes in the floor, started cutting them out:
I get to practice my welding some more.
Also time to buy another quart of POR-15.
Joe - there is probably some rot higher up in the footwell there, above the fuse panel where the wire harness goes through a big grommet in the inner fender. Mine has it on both sides, I just knocked down all the loose rust, wire wheeled it, POR-15'd it and then I put fiberglass patch on it. Looking back, I probably should have cut it and welded in some new metal. I have 2 or 3 quarter size holes in my driver's floor that I am working on now, I'm going to weld some new metal in there, I've welded several things in the past, but never sheet metal, so I'm sortof dragging my feet.
You are doing a great job. I havent got to sit down and read your thread all the way thru just yet and have some catching up to do. I just did a quick glance as I am heading to the shop. Subscribing.
Hey Cory, thanks. I am planning to wire wheel like crazy- inside and out- and see what condition the metal is down there. I was thinking along the lines of a larger sheet of metal welded to the outside (after POR on the existing metal with the rust cut/ground out) that covers it all up then seam sealing the crap out of it so it doesn't get any more exposure to moisture. I'm not going to be picky about how it looks on the inside of the fender. The body work on this truck is certainly my weakness but fortunately I'm not too picky about it- my main focus was getting the drivetrain rocking. I want it to be reliable more than I want it to look perfect. I figure with the fiberglass quarters and new fenders, plus getting the doors into shape, it'll look pretty darn good anyway. And if I don't have to worry about rust for a few years I'm happy. This is going to be a daily driver after all and I will be using it for work and hauling the kids around so it will inevitably take some abuse.
Thanks as always for the advice!
Terry, thanks for the encouragement- your builds have provided me with information along the way, thanks!
I had the same rust up there on the firewall on each side and also on the driver's side floor. I used fiberglass to fill the firewall holes because it doesn't show and I feel that the resin seals up better than a bunch of spot welds. Not only that but welding up there is a real pain just due to the location and what's all around there. And if you can't get to the back of the panel you weld after you're finished, it'll be bare metal and more likely to rust than before. As for the floor, I cut out a really big hole, welded in a new piece of metal, then slathered the absolute crap out of it with seam sealer and undercoat. Since you'll never see it when it's done, enjoy the fact that it can be ugly and just make it functional.
I had the same rust up there on the firewall on each side and also on the driver's side floor. I used fiberglass to fill the firewall holes because it doesn't show and I feel that the resin seals up better than a bunch of spot welds.
Okay, thanks, I follow what you're saying. I went back and read your thread:
Originally Posted by arlindsay1992
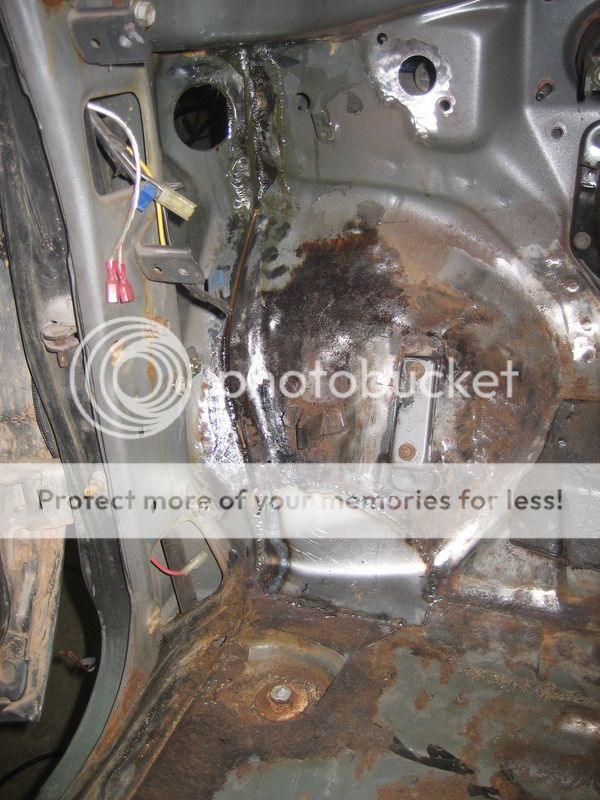
Dash, pedals, and harness all pulled so I can easily access the rust. Cut out a section of the floor that was rusted out.
New metal welded on the floor. Layered some fiberglass mat to patch the holes at the top near the cowl. The fiberglass was layed in two layers both inside and outside to seal up the holes after cutting out the rust.
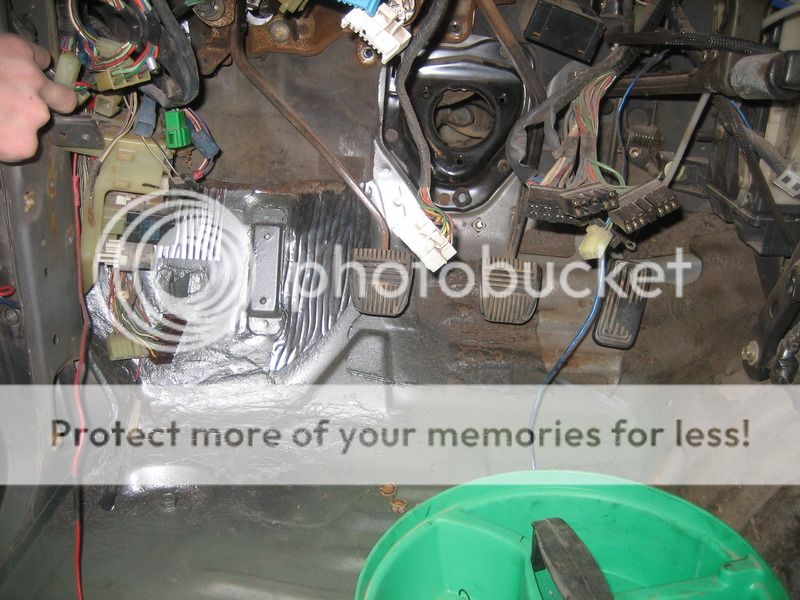
Pedals, column, and wiring is all back in. Smothered some glass reinforced filler on the floor to seal up the metal patch then painted it with some rattle can stuff that is similar to the truck's color. Doesn't need to look pretty under the carpet.
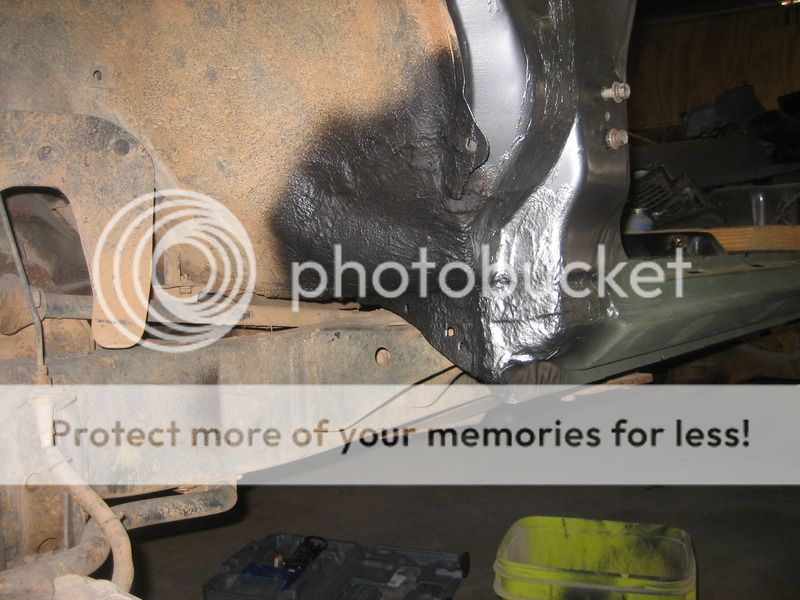
And how it looks from outside. Hammered the pinch weld in prep for the future SAS. Smeared some glass reinforced filler here too to smooth everything out. Then sprayed some 3M rubberized undercoat to match the factory finish. Sprayed some more rattle can in the area where it might show once assembled.
I wasn't planning to pull the dash and access so much of the firewall. Though now you and Cory have pointed out the possibility (likelihood) of rust up there...
Your method of using the fiberglass seems like it would be better than just welding new metal over the top of everything- I guess I'm getting impatient and want to get on with this thing.
I'll consider pulling the dash and seeing what is up there. Your repair looks great and I think I may go along those same lines. I'll go ahead and spot weld some small patches on the spots I cut out and go from there.
I missed my July 4th deadline and then I sort of hoped to at least have this thing back on the road before winter but now I'm just not so sure about that either. After all the time I've already invested I know the best course of action is to take my time and finish this thing out right.
Thanks to all of you I just might actually do that.
I'm glad that another 4Runner is getting fixed up but I feel bad knowing you're going through the same issues I went through. I ended up missing quite a few deadlines. Something always came up. I just kept saying to myself that if I don't do it now it won't get done. And if I do end up getting around to problems later, they'll be worse.
My friend Steve, who has been doing auto glass for 20+ years, stopped by this afternoon and we pulled the windshield out.
It was installed using butyl and that stuff is nasty. (A tip: it cleans off your hands really well with brake cleaner.)
We talked about the A pillar repair- he thought cutting out the bad metal, welding in some new and body filling over it would be the standard approach- same way it was repaired last time someone was working on this truck.
After removing the butyl and taking a scraper to some of the metal I'm starting to get a better idea of just how bad things are.
There is some good news: most of the really nasty stuff is isolated to the upper corner of the sill.
When I removed some of the body filler I started to find good metal just a little way down the pillar so I don't think I will disturb most of it. I'll cut out the really bad spots, spray it down really well with phosphoric acid, POR it, body fill it back up and paint.
Steve liked the idea of putting POR on the sill considering that vehicles come factory with paint there. He says when it comes time to install the new glass we will apply a primer for the urethane adhesive and it will be ready to rock.
I will also be joining the club of folks who ditch the chrome window trim and replace it with a rubber gasket. Steve is encouraging me to paint the truck before installing the new windshield as well. Considering I have things so broken apart, it makes sense to paint it now.
Good i hope mine doesn't look that bad when i get the window out. I would suggest not putting por on then filling. Put filler on bare metal. If you don't plan on putting metal back in the holes then use long stand fiber filler instead of regular as it has water proof properties plus it is stronger.
Bouncing back to the windshield area:My friend Steve, who has been doing auto glass for 20+ years, stopped by this afternoon and we pulled the windshield out.
Crazy rust. I hope you get it fixed well. Regarding the trim, I replaced the chrome with rubber trim but trim only covers the edge of glass now. I cut out the flap to expose the gap between body and glass so I can easily rinse inside the gap and let it dry quicker.
Please ask Steve what he thinks of POR-directly on metal, then Urethane windshield adhesive directly on the POR-15, instead of layer after layer of primer, body filler and paint.
Please ask Steve what he thinks of POR-directly on metal, then Urethane windshield adhesive directly on the POR-15, instead of layer after layer of primer, body filler and paint.
I did ask him about this option: he supports it, though he said there is an adhesive primer that must be used before install. I will ask him for more details on that product.
ehatch, I'm with you on not using filler on top of POR- I did find it interesting that according to POR's website it is okay. I was considering pouring it down the inside of all that nasty stuff before welding in new metal to try and protect it from the inside. I am not sure how effective that would be however. Next time I get over there I plan to just start cutting and grinding away and I'll take it from there!
I did ask him about this option: he supports it, though he said there is an adhesive primer that must be used before install. I will ask him for more details on that product.
Thanks, Joe. Yes, I understand about the primer.
ehatch, I'm with you on not using filler on top of POR- I did find it interesting that according to POR's website it is okay.
+1.
Saw that on POR's website, too. Agrees with concept of less layer interfaces to fail.
Website mentions that the thickness of urethane adhesive bead will take care of irregularities on the surface.
Just got done reading thru your thread. I seen you mention aluminum half moons. I have never heard of them. The rubber ones leak on me most of the time with and without sealant on them. Not much but enough to have a little on the motor. Curious as to how yours are holding up?
You have done some really great work on yours. Great job!!!
 09-12-2016, 04:02 AM