
my 89 4runner buid-up
 Mar 22, 2008 | 12:13 PM
#102
Thread Starter
Registered User
Joined: Jan 2008
Posts: 88
Likes: 0
Mar 22, 2008 | 12:17 PM
#103
Thread Starter
Registered User
Joined: Jan 2008
Posts: 88
Likes: 0
im going to paint the frame and then build me a front bumper. backs almost done just have to paint it and bolt it on and i will prolly buy the sliders. but after all that i will write up a post on how much i have in the truck total. thanks guys
Apr 4, 2008 | 06:12 PM
#104
Thread Starter
Registered User
Joined: Jan 2008
Posts: 88
Likes: 0
well had to take some time off cause i have been sick but got the back bumper on today and will have some pics up like tomorrow nite. I still have to do sum work cause i got the rite side down a half an inch lower how i dont know.
Apr 5, 2008 | 03:12 PM
#105
Thread Starter
Registered User
Joined: Jan 2008
Posts: 88
Likes: 0
new bumper. pic heavy
It was almost 70 out today so i got a few pictures of the back bumper so let me know what you guys think. member it was my first time useing a pipe bender so not everything went like it should have.
Here is one from the side, after mounting it i think i should of just butted it right up against the body.
[IMG] [/IMG]
Hers the drivers side, you can notice how i kinda got the front of the pipe pointing up. yeah thats cause i guess i didnt get my bends on each side the same.
[IMG]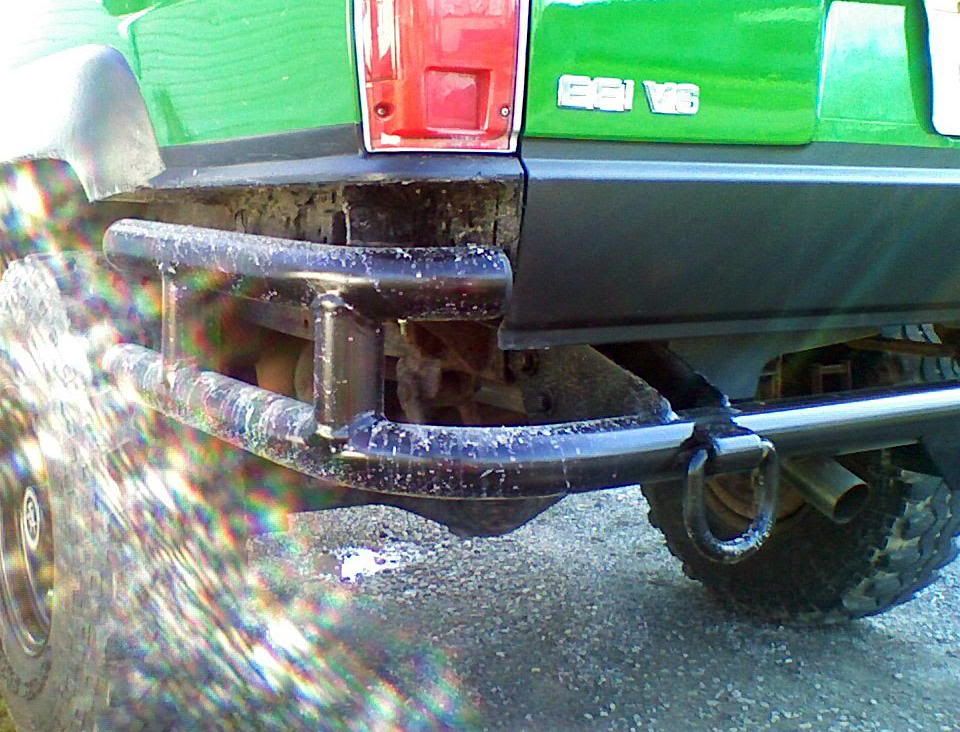 [/IMG]
this kinda shows you how far it sticks out
[IMG] [/IMG]
heres a few more you can tell the driver side is futher down in the first one
[IMG] [/IMG]
[IMG] [/IMG]
overall im happy with it for now I just have to do i little bit more bracing so that if i ever want to use i winch or pull anything with the bumper i will know it will be safe.
Here is one from the side, after mounting it i think i should of just butted it right up against the body.
[IMG]
[/IMG]Hers the drivers side, you can notice how i kinda got the front of the pipe pointing up. yeah thats cause i guess i didnt get my bends on each side the same.
[IMG]
[/IMG]this kinda shows you how far it sticks out
[IMG]
[/IMG]heres a few more you can tell the driver side is futher down in the first one
[IMG]
[/IMG][IMG]
[/IMG]overall im happy with it for now I just have to do i little bit more bracing so that if i ever want to use i winch or pull anything with the bumper i will know it will be safe.
Apr 10, 2008 | 10:46 PM
#106
Thread Starter
Registered User
Joined: Jan 2008
Posts: 88
Likes: 0
Well I took off early today due to rain and decided to do some work to the toy. My right front caliper wouldnt work so that gave me something to do so i just replaced them both and also some new pads
[IMG] [/IMG]
[IMG] [/IMG]
[IMG]
[/IMG][IMG]
[/IMG]
 [/IMG]
 [/IMG]
Apr 10, 2008 | 10:57 PM
[/IMG]
Apr 10, 2008 | 10:57 PM
#109
Thread Starter
Registered User
Joined: Jan 2008
Posts: 88
Likes: 0
I also put me in a new tach today. I think it took me longer to decide where i wanted it then it did to install it but it turned out fine. I thought it might be a little to big but it looks fine and kinda gives off a nice little glow.
[IMG] [/IMG]
[IMG]
[/IMG]
Apr 10, 2008 | 11:03 PM
#110
Thread Starter
Registered User
Joined: Jan 2008
Posts: 88
Likes: 0
Well after i got the brakes and the tach installed my buddy and i decided to take the truck out and play a little and test it out and i must say that i was very impressed with how it did. the big puddles in the roads cleaned most of the mud from underneith and made it easy as heck to wash. Let me know what you think
[IMG] [/IMG]
[IMG] [/IMG]
[IMG] [/IMG]
[IMG]
[/IMG][IMG]
[/IMG][IMG]
[/IMG]
Apr 11, 2008 | 06:16 PM
#114
Registered User
Joined: Aug 2005
Posts: 420
Likes: 0
From: PDX, Oregon
Good on ya for going after this build mate. First gen runners are just so classic and cool. I agree that everyone that can be saved should. Simple, utilitarian and tough as nails they really are 3/4 scale Land Cruisers IMO. Can't wait to see the final product.
Cheers
Dave
I must've gotten lucky, Got my 89 for 1500, replaced the suspension with OME: 500 then replaced the 22re with a brand spanking new one for 1300. All in I'm looking at 3300 dollars and I pretty much have a new truck seeing as the body is still in great shape. I'm going to 33's and getting I think an E-locker and I'll call it good. What I can't get over is how after 250k the body is nearly dev oid of rattles and squeeks. Other than the rear window/gate that makes a few noises here and there it is still a rock solid truck after all these years.
The thing about old yotas is that really once you replace something with quality parts you're looking at another 200k untill they really need to be gone over again.
Cheers
DAve
Cheers
Dave
Fix it, fix it!! Save all 1st gen 4runners! Seriously though, I would go over it in detail before spending anything on it. If the frame is realy OK, then go through the mechanicals-suspension-brakes-steering-etc. Then go after the body. If you really want a 1st gen 4runner, have a limited budget (but have time/skill/a place to keep it inside), and are somewhat insane (like myself), it is worth it. If you have about 4-5 grand burning a hole in your pocket, keep this one for parts, and buy one that needs little. My 1987 cost me 2600, but I've already dumped about 1500 more into it, and that is just the beginning. I figure it'll cost me close to 10,000 more to have it right, and that is still with a 22re/ auto. I love the 1st gens, but like any old Toyota, parts costs will eat you up. Good luck to you!!
The thing about old yotas is that really once you replace something with quality parts you're looking at another 200k untill they really need to be gone over again.
Cheers
DAve
Apr 11, 2008 | 09:07 PM
#116
Thread Starter
Registered User
Joined: Jan 2008
Posts: 88
Likes: 0
Really the only things i got left to do right now is a tune up on the motor, I mean it run okay but its only getting about 11 to the gallon and i now it should get at least 15. The caliper was locked up so thats y i replaced them so im hoping that will help a little bit. if not im going to be putting new plugs and plug wires on it and when you first start it up it has a loud wine until it warms up so i think it might need a timing belt and water pump but we will see. One last thing, you guys with the 3.0 what is you idle set at. I think mine is way to high.
thanks
thanks
Apr 23, 2008 | 05:21 PM
#117
Thread Starter
Registered User
Joined: Jan 2008
Posts: 88
Likes: 0
Well I havent posted anything in awhile so i thoguth i would add a few more pics of some things i had done. Finally got my trail gear sliders on. and i found a brush gaurd on craigslist for twenty bucks. so i sanded and painted it until i can figure out what kind of bumper i want to go with up front. let me know what you think.
[IMG] [/IMG]
[IMG] [/IMG]
[IMG] [/IMG]
[IMG] [/IMG]
[IMG]
[/IMG][IMG]
[/IMG][IMG]
[/IMG][IMG]
[/IMG]
Apr 24, 2008 | 08:36 PM
#119
Thread Starter
Registered User
Joined: Jan 2008
Posts: 88
Likes: 0


