Custom front winch bumper and rear


 01-25-2006, 04:00 AM
#24
Registered User
Thread Starter
Join Date: Jul 2004
Location: Barcelona (Spain)
Posts: 917
Likes: 0
Received 0 Likes
on
0 Posts
Not yet...
Metal is between 3mm (0.1181'') the cosmetic parts and 8mm (0.315'') the winch cradle.
I don't know exactly how is the project now, I think the shop is plasmaing the metal.
David
Metal is between 3mm (0.1181'') the cosmetic parts and 8mm (0.315'') the winch cradle.
I don't know exactly how is the project now, I think the shop is plasmaing the metal.
David
 02-02-2006, 09:58 PM
#26
Registered User
Thread Starter
Join Date: Jul 2004
Location: Barcelona (Spain)
Posts: 917
Likes: 0
Received 0 Likes
on
0 Posts
Not many...
We've the bumper drawn in AutoCAD:


I don't want to have my license plate over the winch fairlead, and we've two kinds of front license plates, both are rectangular...
I plan to put my turn signals inside the side markers and then put the smallest plate we can use in one side.
David
We've the bumper drawn in AutoCAD:
I don't want to have my license plate over the winch fairlead, and we've two kinds of front license plates, both are rectangular...
I plan to put my turn signals inside the side markers and then put the smallest plate we can use in one side.
David
02-03-2006, 06:09 AM
#27
Registered User

Join Date: Oct 2003
Location: Littleton, CO
Posts: 290
Likes: 0
Received 0 Likes
on
0 Posts
O/T: Autocad is about the worst cad program evAr, you should check out solidworks for 3D modeling like this. You could do some stress analysis in a few minutes once you got the bumper drawn (which is about 20x easier in SW than autocad). You set the mounts to be restrained and then put a load on the winch plate or the shackle hangers and then it does all the work and gives you a pretty picture with colors. Blue shows little stress then there's a rainbow up to red, where you might need some reinforcing. You can also seperate all the parts and made a drawing with all the dimensions for when you're ready to start building.
Bumper looks good though!
Bumper looks good though!
Last edited by yellowspeedracer; 02-03-2006 at 06:11 AM.
02-03-2006, 06:17 AM
#28
Registered User
Thread Starter
Join Date: Jul 2004
Location: Barcelona (Spain)
Posts: 917
Likes: 0
Received 0 Likes
on
0 Posts
Well, I don't know exactly wich program used my friend to draw them... I supposed it was Autocad.
I know Solid Works, it's nice. A friend of mine with a Suzuki Grand Vitara (I think in the USA is Tracker, the rounded model) designed his skidplate with Solid Works and then give all Suzukists the drawings to be able to fab them in any shop.
David
I know Solid Works, it's nice. A friend of mine with a Suzuki Grand Vitara (I think in the USA is Tracker, the rounded model) designed his skidplate with Solid Works and then give all Suzukists the drawings to be able to fab them in any shop.
David
02-07-2006, 11:26 AM
#29
Registered User
Join Date: Jun 2005
Location: Minnesota
Posts: 378
Likes: 0
Received 0 Likes
on
0 Posts
Wow, this is almost exactly what Ive been planning on doing this summer to my 1st gen 4Runner. How do you plan on mounting it to the truck? Solidworks is a great program, if you do manage to draw up the bumper in solidworks I'm sure there are plenty of people here on the forums who wouldnt mind taking a look at that. Great work so far!
02-07-2006, 11:59 AM
#30
Registered User
THe ONE thing i wish my ARB had was intergrated light holes. I dont need the blinkers in it as you modify your side markers to work at turnsignals also.
so what you do after you have it tack welded in place is cut the hole in it and weld in like a 3" section of 6" pipe (or however big your lights are). It allows you to recess the light slightly and give you that killer custom look.
least IMO
so what you do after you have it tack welded in place is cut the hole in it and weld in like a 3" section of 6" pipe (or however big your lights are). It allows you to recess the light slightly and give you that killer custom look.
least IMO
 02-07-2006, 02:00 PM
#33
Registered User
Thread Starter
Join Date: Jul 2004
Location: Barcelona (Spain)
Posts: 917
Likes: 0
Received 0 Likes
on
0 Posts
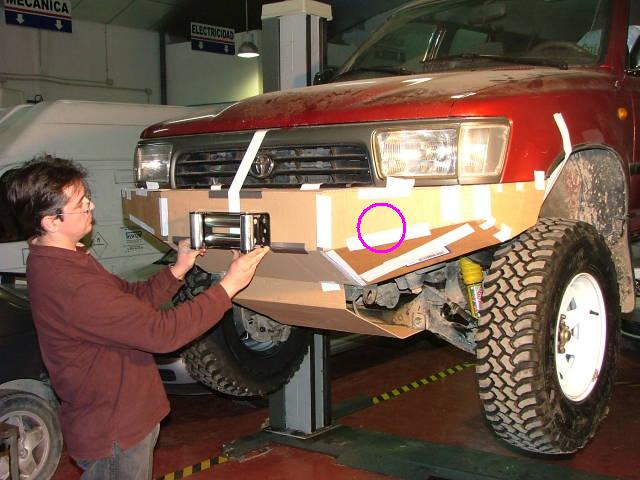
I'm going to put in my truck modified pre-92 clearance lights with the turn signals embedded.
The cut metal is delayed 'til friday, my friend will spend the weekend welding the bumper together.
The light holes... We must simulate the smallest license plate we can put (Here is mandatory to have front plate and you can only use small format one if you accomplish three supposits) and then look if the holes can be done.
I'll post pics as soon as I've new ones.
David
02-19-2006, 12:40 AM
#34
Registered User
Thread Starter
Join Date: Jul 2004
Location: Barcelona (Spain)
Posts: 917
Likes: 0
Received 0 Likes
on
0 Posts
Finally, the metal cut is done!
Laser cut is nice, the cuts are simply perfect.


Two more days and we'll have the first build, TIG and MIG welded.
David
Laser cut is nice, the cuts are simply perfect.
Two more days and we'll have the first build, TIG and MIG welded.
David

 02-19-2006, 01:22 PM
#38
Registered User
Thread Starter
Join Date: Jul 2004
Location: Barcelona (Spain)
Posts: 917
Likes: 0
Received 0 Likes
on
0 Posts
Nope... We're fabbing them in the shop of a friend, but the laser cuts are being done by an external shop.
Anyways they're not too expensive, they charge us for cutting weight, not for cut complexity so this is cool.
The welding process will be done in my friend's shop by his brother, he's an expert with the welder!
David
Anyways they're not too expensive, they charge us for cutting weight, not for cut complexity so this is cool.
The welding process will be done in my friend's shop by his brother, he's an expert with the welder!
David


