
TACODOC's 2005 Tacoma Build-Up Thread
 Aug 23, 2011 | 05:04 PM
#21
Thread Starter
Registered User
Joined: Jan 2010
Posts: 62
Likes: 0
From: SoCal
Load Management
All the comforts of home. I get asked how do I possibly pack so many amenities and so much gear into a 5 foot bed?
It's all about organization!
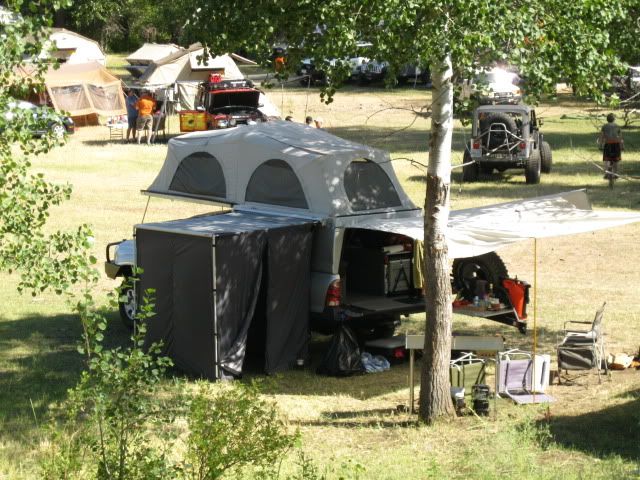
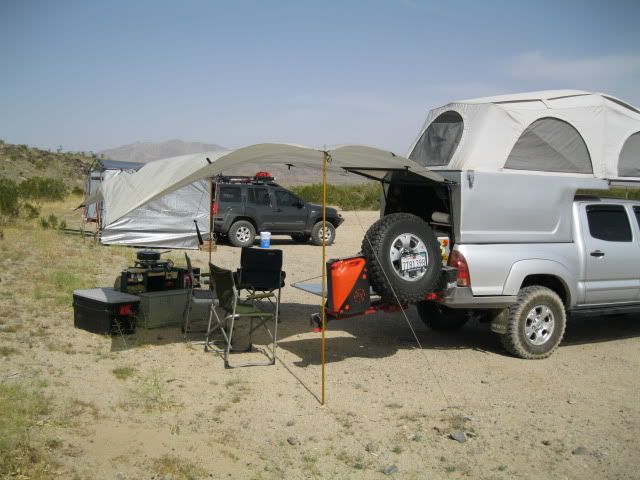
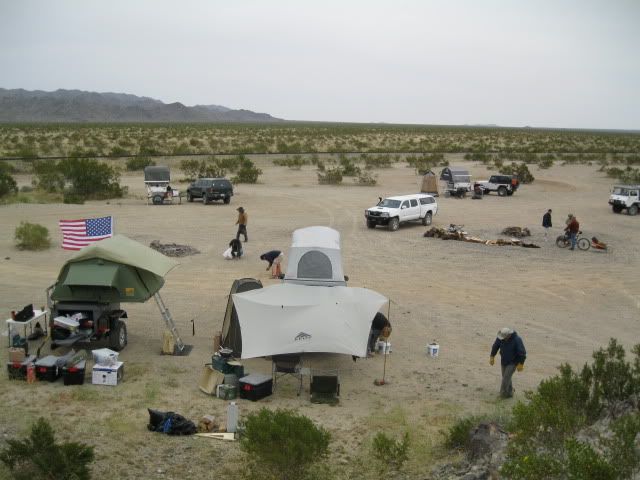
Gear bombs in camp or in the back of the truck annoy me! Here are some pics of how I manage my gear. All the campsite gear pictured above at the Rally packs up in minutes and fits neatly into the FlipPac, everything must have it's place and remain undamaged or it can add unwanted stress to any trip.
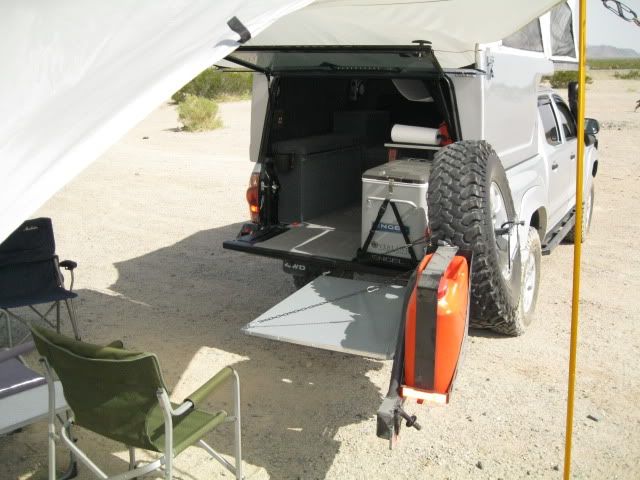
The med bag, Engel, wag bag toilet and ARB Bushranger X-Jack and many other things like the rain fly, tools, fuel cells, MRE's, bedding and the shower enclosure are stored in the truck full time so they are never forgotten (all are stowed inside the built in boxes/module pictured) .
When breaking camp the first things loaded up are the kitchen in Action Packers. I can stack up to SIX of the smaller Action Packers along that front row but my typical load is the three pictured here (one is hiding under the pillows on the right) - one for COFFEE, one for kitchen (pan/plates/Snow Peak Baja Li stove, etc etc), and one for the Snow Peak single BBQ box and accessories. Then I add the Zodi Extreme shower, old school sleeping bag, two full size pillows and sun shade.
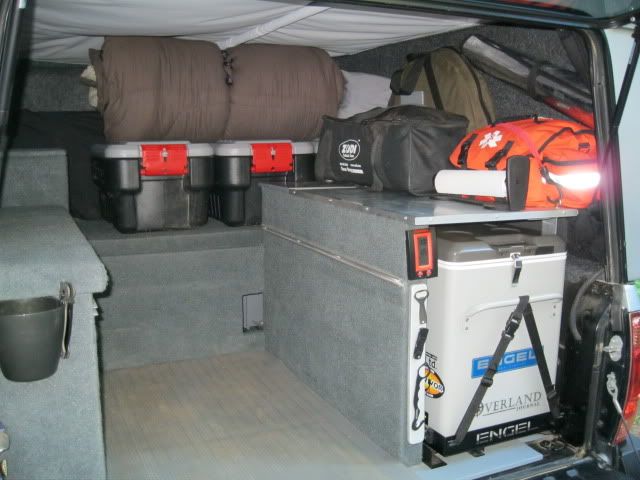
The lower gear area was designed to hold two of the large Action Packers under the gear deck. I typically only need one of these for dry goods etc but can add a second for longer trips or more of the small ones up above. I like them because they are LIGHT, ubiquitous and inexpensive.

Now the gear deck has been slid into the channels to provide a second layer of storage which I use for camp chairs, firewood, supplies or even MORE gear. This also allows for a nice spot to transport my complete Snow Peak Iron Grill Table (IGT) pictured on the left by the chairs. I like this configuration as it keeps my water jugs down low and accessible and makes a nice "trunk" to throw dirty boots etc into if needed on the fly. All the assorted gear pictured in the camp pics posted above from the WA Rally fits in with room to spare, I lived 10 days in the truck with this arrangement and my only limitation was fuel and water, one grocery run at the beginning of the trip was plenty. This was a great shakedown run for future long range unsupported trips into wild...
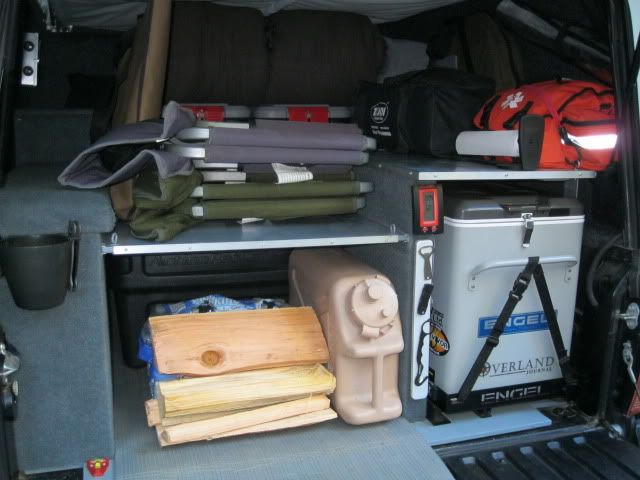
I have yet to run out of space with the FlipPac even with the family "adding" the usual last minute blankets, bags, balls, stuffed animals etc that usually happens when the Loadmaster (me) isn't looking...
It's all about organization!
Gear bombs in camp or in the back of the truck annoy me! Here are some pics of how I manage my gear. All the campsite gear pictured above at the Rally packs up in minutes and fits neatly into the FlipPac, everything must have it's place and remain undamaged or it can add unwanted stress to any trip.
The med bag, Engel, wag bag toilet and ARB Bushranger X-Jack and many other things like the rain fly, tools, fuel cells, MRE's, bedding and the shower enclosure are stored in the truck full time so they are never forgotten (all are stowed inside the built in boxes/module pictured) .
When breaking camp the first things loaded up are the kitchen in Action Packers. I can stack up to SIX of the smaller Action Packers along that front row but my typical load is the three pictured here (one is hiding under the pillows on the right) - one for COFFEE, one for kitchen (pan/plates/Snow Peak Baja Li stove, etc etc), and one for the Snow Peak single BBQ box and accessories. Then I add the Zodi Extreme shower, old school sleeping bag, two full size pillows and sun shade.
The lower gear area was designed to hold two of the large Action Packers under the gear deck. I typically only need one of these for dry goods etc but can add a second for longer trips or more of the small ones up above. I like them because they are LIGHT, ubiquitous and inexpensive.
Now the gear deck has been slid into the channels to provide a second layer of storage which I use for camp chairs, firewood, supplies or even MORE gear. This also allows for a nice spot to transport my complete Snow Peak Iron Grill Table (IGT) pictured on the left by the chairs. I like this configuration as it keeps my water jugs down low and accessible and makes a nice "trunk" to throw dirty boots etc into if needed on the fly. All the assorted gear pictured in the camp pics posted above from the WA Rally fits in with room to spare, I lived 10 days in the truck with this arrangement and my only limitation was fuel and water, one grocery run at the beginning of the trip was plenty. This was a great shakedown run for future long range unsupported trips into wild...
I have yet to run out of space with the FlipPac even with the family "adding" the usual last minute blankets, bags, balls, stuffed animals etc that usually happens when the Loadmaster (me) isn't looking...
Aug 23, 2011 | 05:05 PM
#22
Thread Starter
Registered User
Joined: Jan 2010
Posts: 62
Likes: 0
From: SoCal
Back Burner Mods Completed
Like many here, I have a garage full of projects waiting to be completed. Today I tackled a couple 
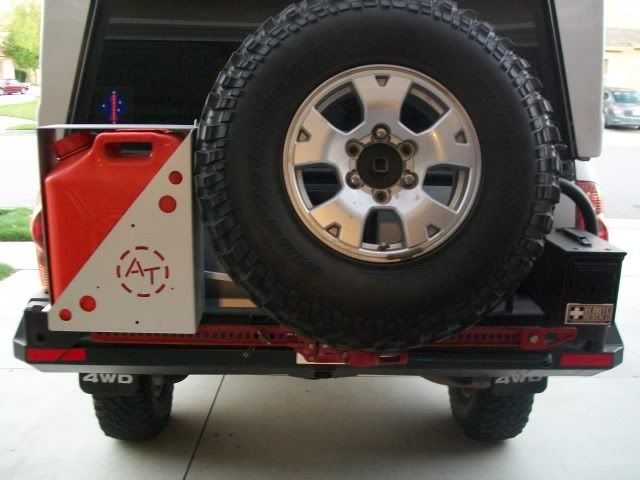
Swapped out my heavy steel AT can holder for their new gen aluminum one - probably weighs 1/3 that of the steel one
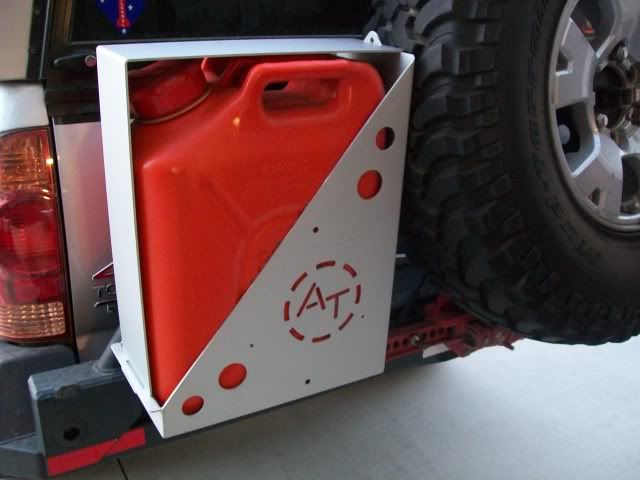
Removed the license plate bracket from the spare for fitment to the can holder.
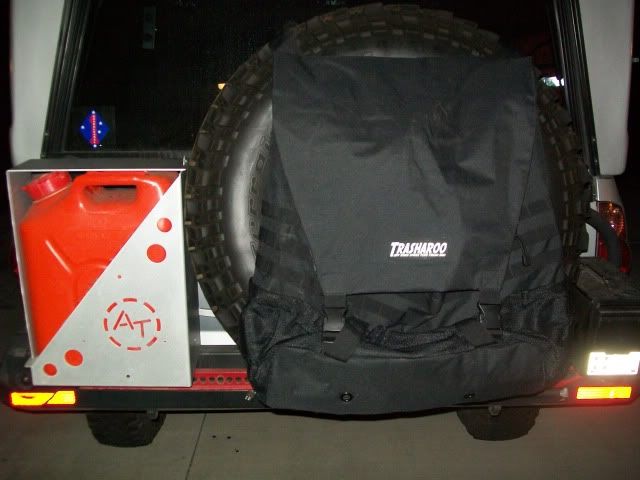
This frees up room for a Trasharoo and a future project where I intend to hack up a Yakima bike rack and make a removable mount in the center of the wheel there.
Finally mounted the Trasharoo. I got that at Toys for Tots last year in Pomona and just got around to mounting it.
This will make it easier to carry trash/garbage and no more trash bags rustling in the night when the wind comes up
Swapped out my heavy steel AT can holder for their new gen aluminum one - probably weighs 1/3 that of the steel one
Removed the license plate bracket from the spare for fitment to the can holder.
This frees up room for a Trasharoo and a future project where I intend to hack up a Yakima bike rack and make a removable mount in the center of the wheel there.
Finally mounted the Trasharoo. I got that at Toys for Tots last year in Pomona and just got around to mounting it.
This will make it easier to carry trash/garbage and no more trash bags rustling in the night when the wind comes up

 Aug 24, 2011 | 12:34 AM
#26
Doc, ... is she single? hahaha. BEA-UUUUUUUU-TIFUL RIG! Great pics of your adventures... Just simply one of the most enjoyable threads I've read in a long time! LOVE the flip pack...
That is one EXPEDITION READY BEAST!
That is one EXPEDITION READY BEAST!
Aug 25, 2011 | 11:17 AM
#27
Thread Starter
Registered User
Joined: Jan 2010
Posts: 62
Likes: 0
From: SoCal
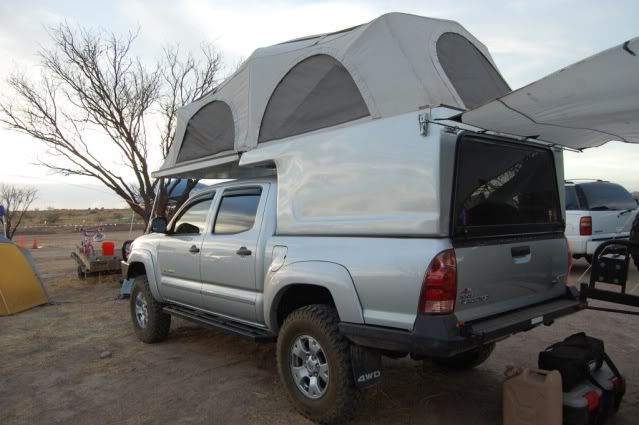
Overland ExPo 2011, Amado, AZ
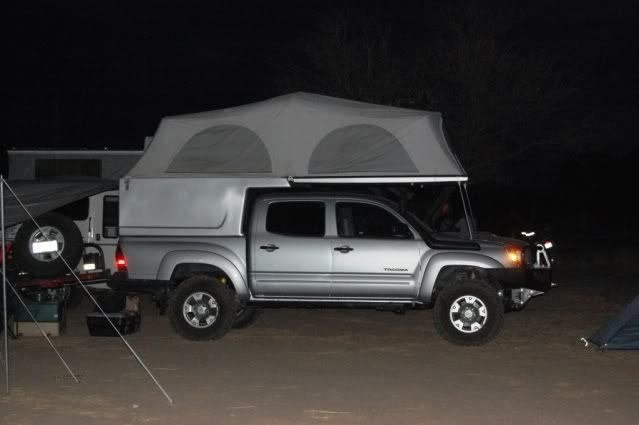
Sealed up during the day to keep the dust out, note the new cleaner look sans decals
Generous shade area provided by Kelty, Gear's new Snow Peak Iron Grill Table in the foreground
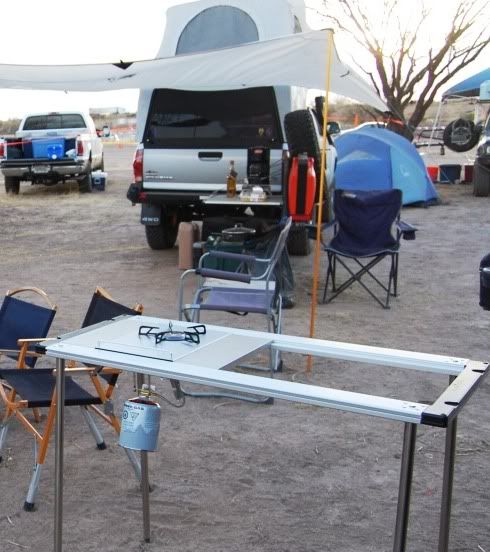
Fine tequilas enroute to happy hours with Al Walter

Nightfall in Amado, AZ
Generous shade area provided by Kelty, Gear's new Snow Peak Iron Grill Table in the foreground
Fine tequilas enroute to happy hours with Al Walter
Nightfall in Amado, AZ
Last edited by Fink; Aug 25, 2011 at 11:38 AM.
Aug 25, 2011 | 11:21 AM
#28
Thread Starter
Registered User
Joined: Jan 2010
Posts: 62
Likes: 0
From: SoCal
Sexy...
... Winchline!
I'm replacing my steel cable with this 80ft Viking 3/8 synthetic line with Safety Thimble and Winch Saver, light as a feather!
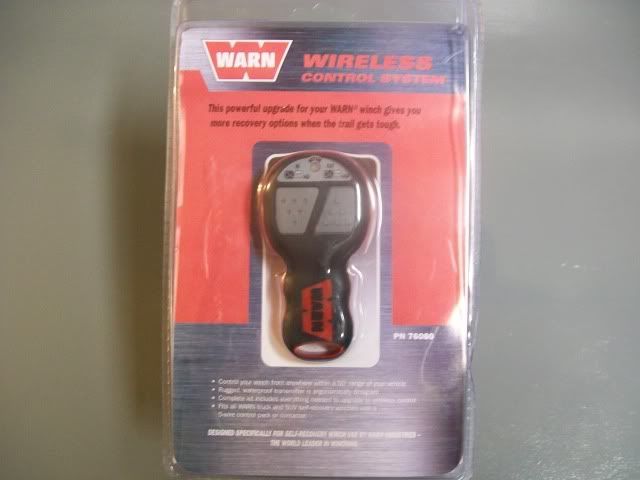
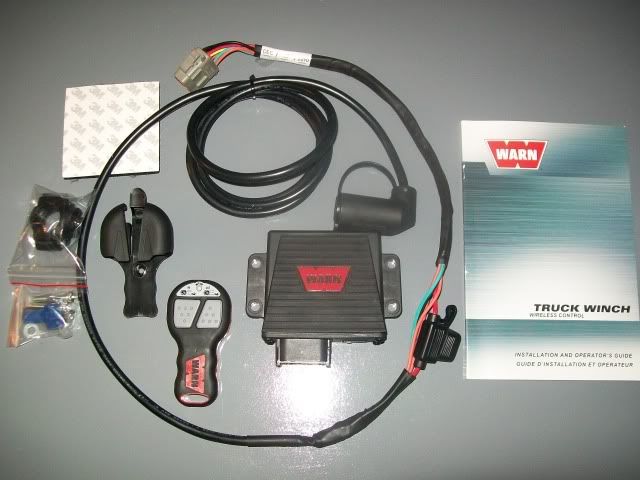
Upgraded to the Viking Delrin rollers and I'm in the process of relocating the solenoid box to under the hood. Next up will be the Warn wireless remote
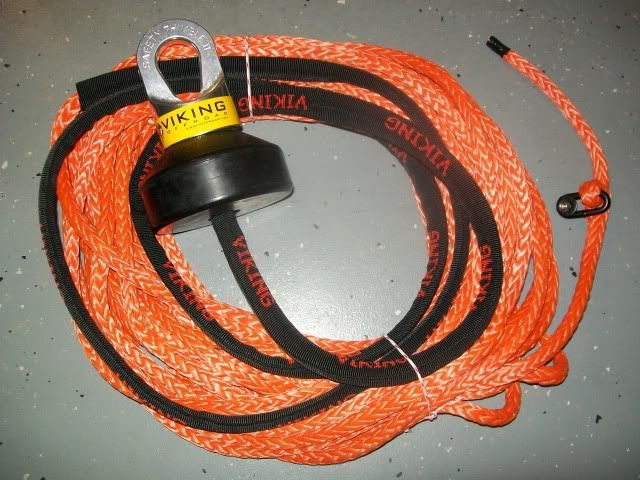
Viking Delrin rollers and Viking synthetic line (3/8 x 80ft) with Safety Thimble. Rated at about 17,000 lbs I tore down the winch while it was off the truck for a clean and lube. The release lever is smooth like butter now, you can see it shining in this pic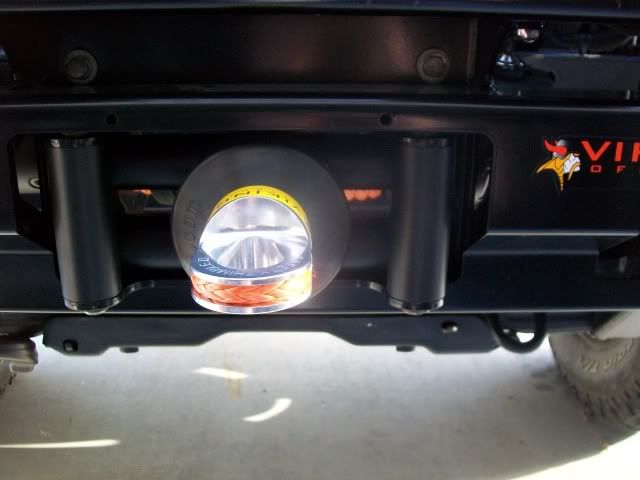
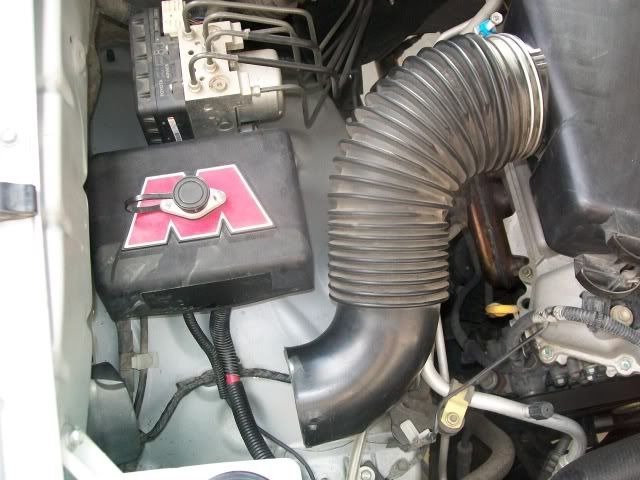
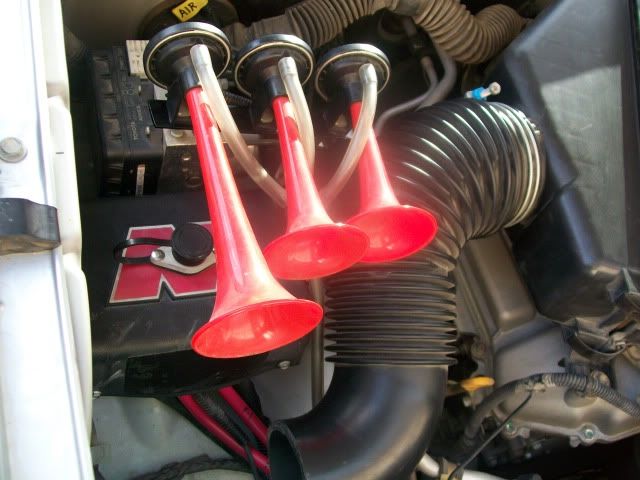
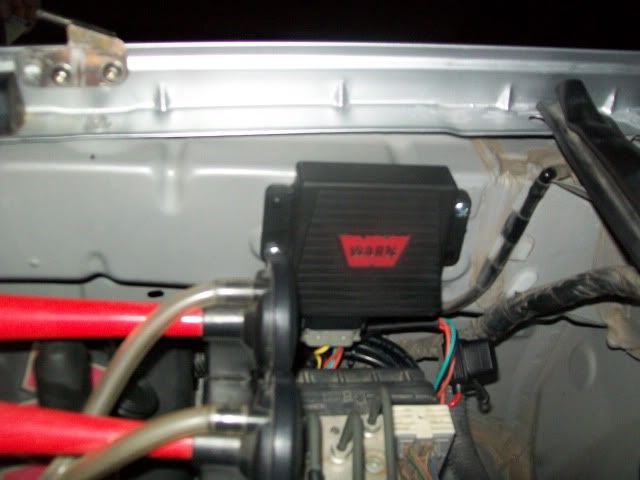
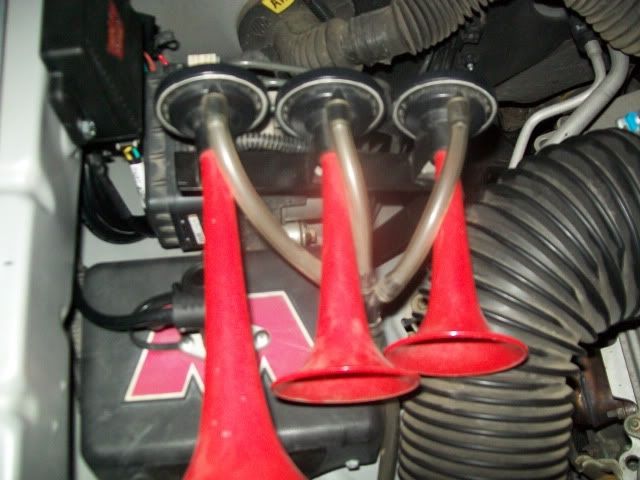
Relocated the winch solenoid pack under the hood, ran all new cables etc. Started to change the snorkel connection too, I need about 6-7 inches of 3 inch exhaust pipe to finish the connection. This will be more flexible and less of a PITA than my old solid pipe setup when it's time to change air filters.
Made a new bracket for the Hella air horns and re-installed. Just enough room!
I'm replacing my steel cable with this 80ft Viking 3/8 synthetic line with Safety Thimble and Winch Saver, light as a feather!
Upgraded to the Viking Delrin rollers and I'm in the process of relocating the solenoid box to under the hood. Next up will be the Warn wireless remote
Viking Delrin rollers and Viking synthetic line (3/8 x 80ft) with Safety Thimble. Rated at about 17,000 lbs I tore down the winch while it was off the truck for a clean and lube. The release lever is smooth like butter now, you can see it shining in this pic
Relocated the winch solenoid pack under the hood, ran all new cables etc. Started to change the snorkel connection too, I need about 6-7 inches of 3 inch exhaust pipe to finish the connection. This will be more flexible and less of a PITA than my old solid pipe setup when it's time to change air filters.
Made a new bracket for the Hella air horns and re-installed. Just enough room!
Last edited by TACODOC; Aug 25, 2011 at 05:00 PM.
 Aug 25, 2011 | 04:37 PM
#30
Thread Starter
Registered User
Joined: Jan 2010
Posts: 62
Likes: 0
From: SoCal
Viair 400C Installed!
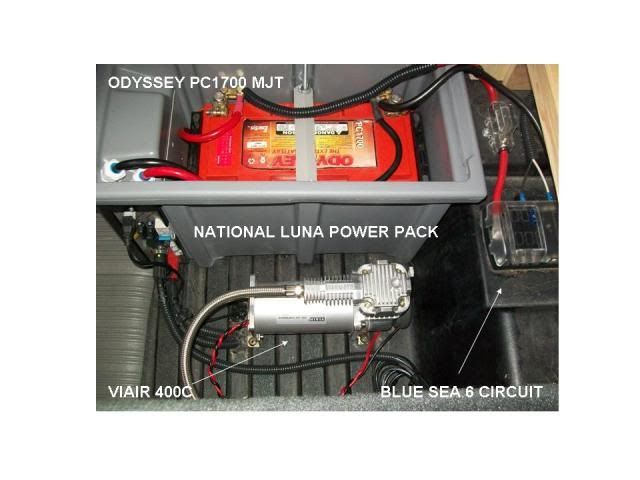
Today I upgraded the battery in my National Luna Power Pack from my old OEM Toyota battery to the Odyssey PC1700 MJT.
I also started fitment of my Viair 400C air system back there in the FlipPac. As you can see, air and power are pretty much a non-issue now
Here is a pic from today:
Got it all wired up, now to run the air line and bulkhead fitting and I'm done! As you can see, I'm leaving plenty of airspace around it there in the systems compartment and still have room for future additions or storage. It's amazing how much storage room I have now with the FP.
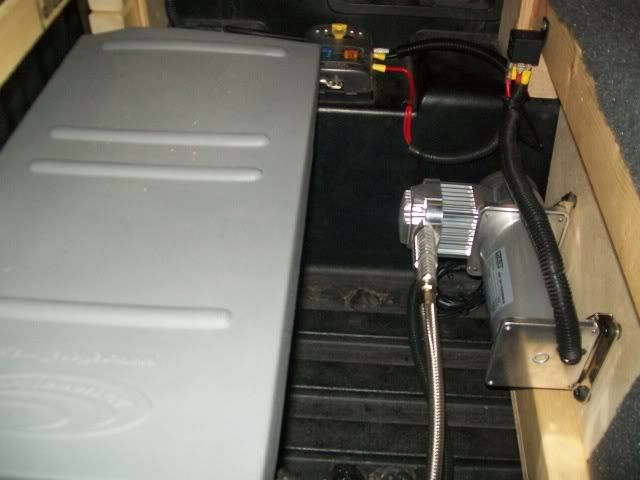
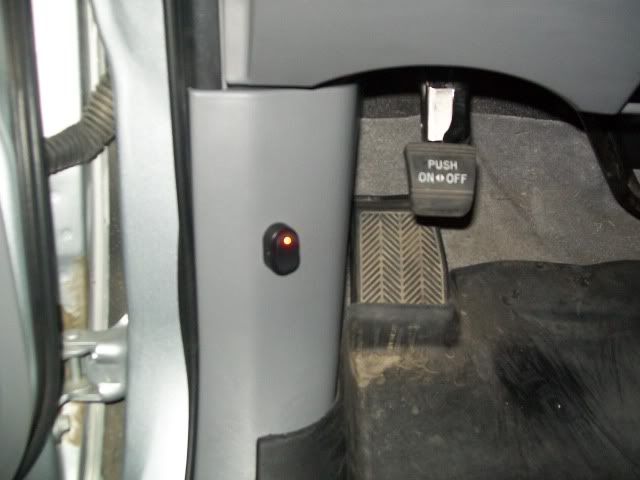
Remote on/off switch for the compressor at the drivers door, bulkhead fitting will be on rear bumper most likely. No more opening the hood and connecting stuff to air up - just plug in the coil hose and turn it on!
*Edit* I posted this in the camper build but am placing it here as well since some things apply to both truck and camper
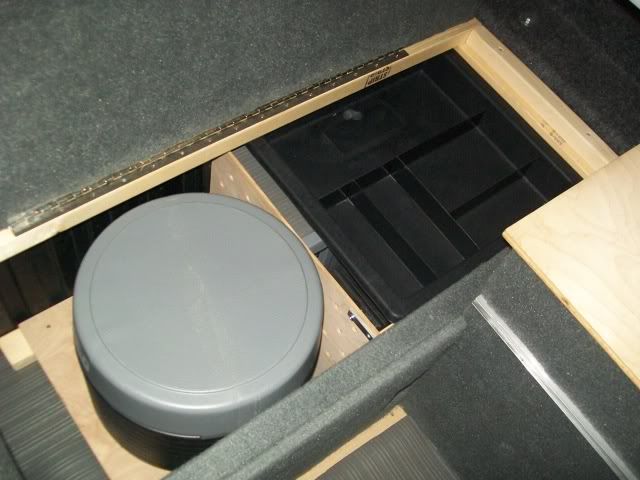
Finished out the "utility compartment" inside the FP, note the toolbox tray and divider keeping the electric and air apart from the commode. This was a safety concern for me as I wanted things kept apart and not sliding around.
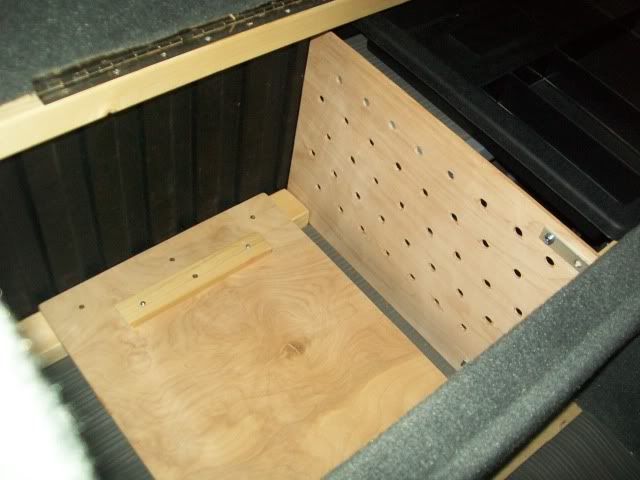
Lightweight divider wall with air holes and 1.5 inch lift for the commode that doubles as a shower deck in camp.
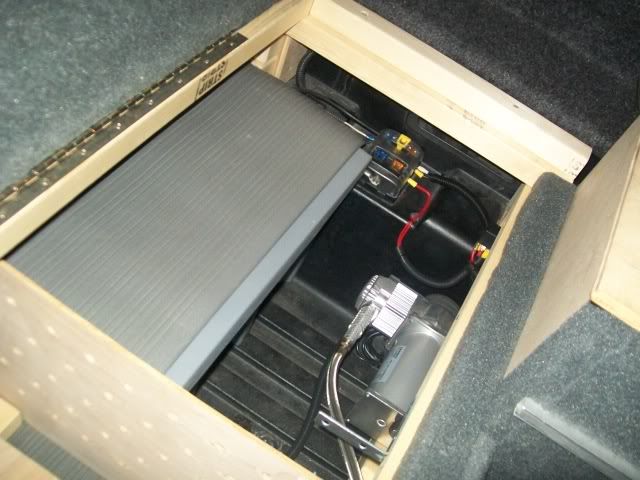
Completed utilities compartment (for now) with National Luna Power Pack, Blue Seas 6 circuit fuse block powering the LED camper lighting and air, and Viair 400C air compressor. Compressor has a remote switch at the drivers seat and is plumbed to the rear bumper for no-fuss air use.
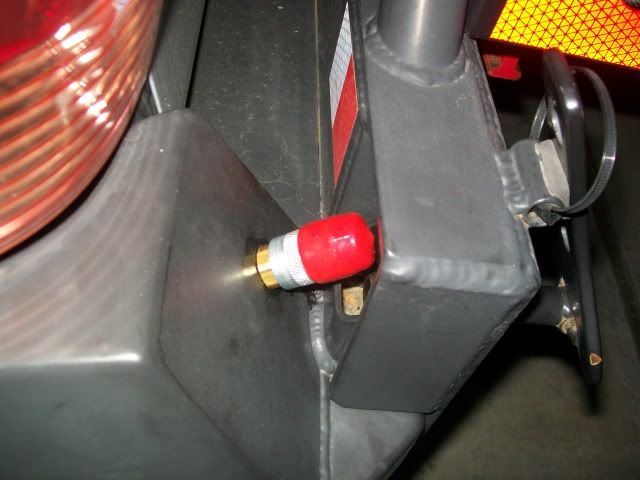
Exterior air quick connect, armored and protected from mischief when the swingout is closed
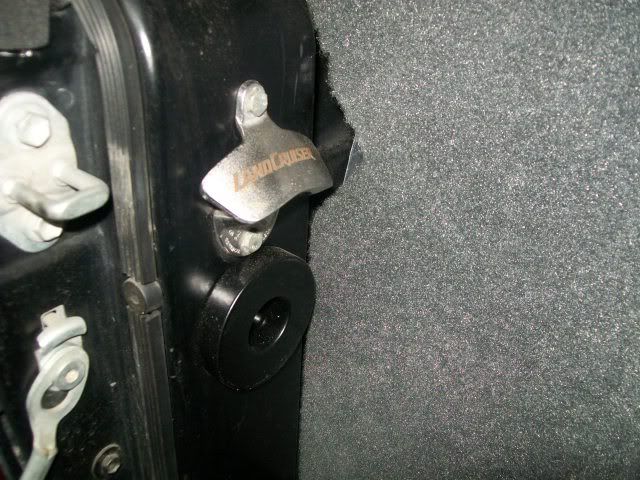
Added a hefty magnet to catch those pesky bottle caps in camp.
Full camper build here: http://www.expeditionportal.com/foru...ad.php?t=34407
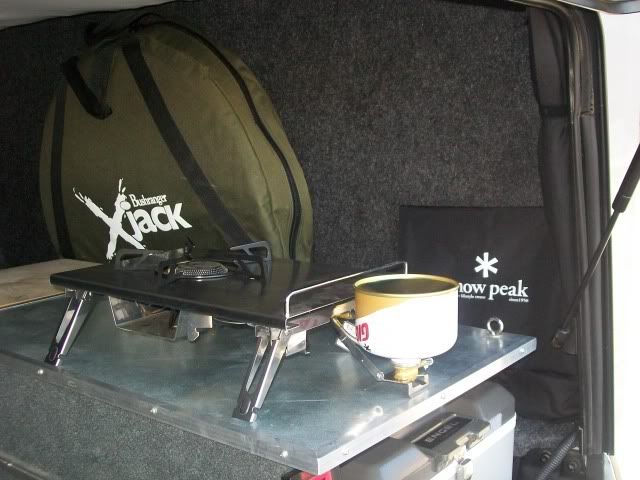
I've been looking at different ways to use this central shelf as a table in camp.
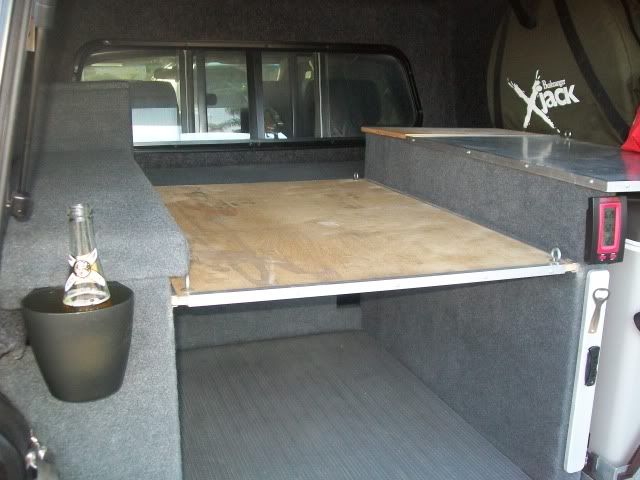
So, I was talking to XJ Mike and he had this idea to use some channel aluminum.
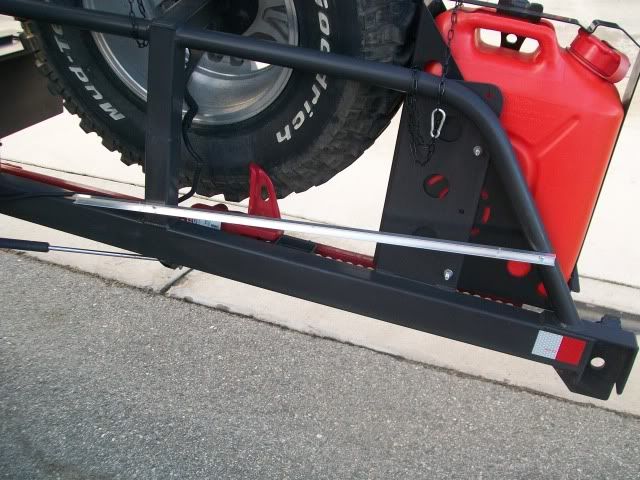
Added a couple lengths of small chain and some small carabiners and - voila! Table in camp!
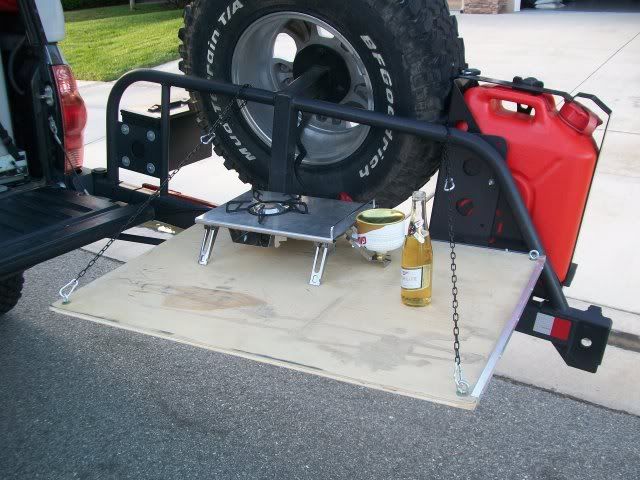
I got this lightweight Snow Peak Giga Power Plate Burner Li at the Hollister Rally.
Now I have to carry only one type of fuel canister since my trusty Jet Boil takes the same style, and these work better at higher altitudes and colder temps
http://www.snowpeak.com/stoves/campi...er-gs-400.html
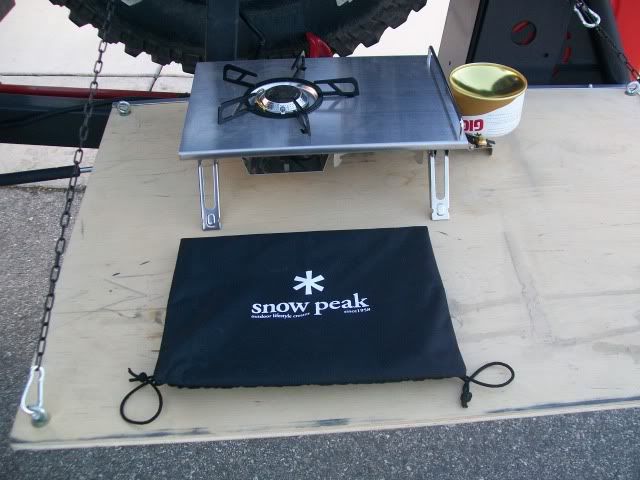
One of the reasons I got this stove - the small footprint and low profile easily lends itself to use inside the FP in inclement weather.
Very nice
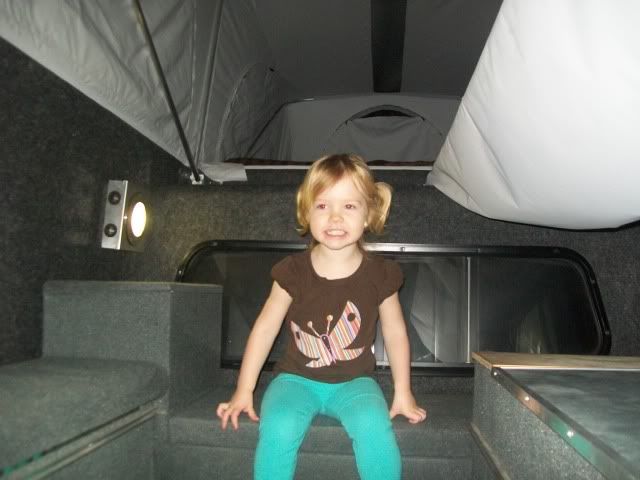
One of the reasons for the whole build - Savannah the Happy Camper!!!
I also started fitment of my Viair 400C air system back there in the FlipPac. As you can see, air and power are pretty much a non-issue now
Here is a pic from today:
Got it all wired up, now to run the air line and bulkhead fitting and I'm done! As you can see, I'm leaving plenty of airspace around it there in the systems compartment and still have room for future additions or storage. It's amazing how much storage room I have now with the FP.
Remote on/off switch for the compressor at the drivers door, bulkhead fitting will be on rear bumper most likely. No more opening the hood and connecting stuff to air up - just plug in the coil hose and turn it on!
*Edit* I posted this in the camper build but am placing it here as well since some things apply to both truck and camper
Finished out the "utility compartment" inside the FP, note the toolbox tray and divider keeping the electric and air apart from the commode. This was a safety concern for me as I wanted things kept apart and not sliding around.
Lightweight divider wall with air holes and 1.5 inch lift for the commode that doubles as a shower deck in camp.
Completed utilities compartment (for now) with National Luna Power Pack, Blue Seas 6 circuit fuse block powering the LED camper lighting and air, and Viair 400C air compressor. Compressor has a remote switch at the drivers seat and is plumbed to the rear bumper for no-fuss air use.
Exterior air quick connect, armored and protected from mischief when the swingout is closed
Added a hefty magnet to catch those pesky bottle caps in camp.
Full camper build here: http://www.expeditionportal.com/foru...ad.php?t=34407
I've been looking at different ways to use this central shelf as a table in camp.
So, I was talking to XJ Mike and he had this idea to use some channel aluminum.
Added a couple lengths of small chain and some small carabiners and - voila! Table in camp!
I got this lightweight Snow Peak Giga Power Plate Burner Li at the Hollister Rally.
Now I have to carry only one type of fuel canister since my trusty Jet Boil takes the same style, and these work better at higher altitudes and colder temps
http://www.snowpeak.com/stoves/campi...er-gs-400.html
One of the reasons I got this stove - the small footprint and low profile easily lends itself to use inside the FP in inclement weather.
Very nice
One of the reasons for the whole build - Savannah the Happy Camper!!!
Last edited by TACODOC; Aug 25, 2011 at 04:51 PM.
Aug 25, 2011 | 04:49 PM
#31
Thread Starter
Registered User
Joined: Jan 2010
Posts: 62
Likes: 0
From: SoCal
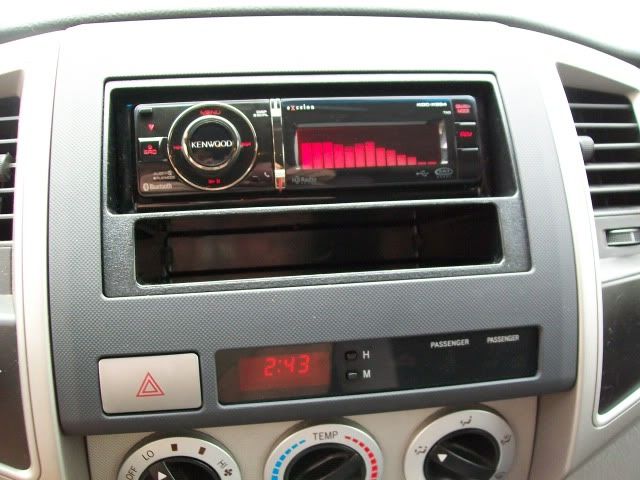
Enter the Kenwood Excelon KDC-994: http://www.crutchfield.com/s_113KDCX...4.html?tp=5684
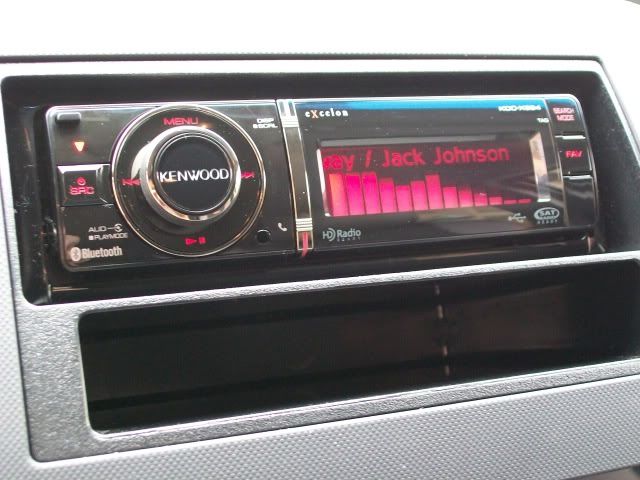
The iPod gets tucked away on a charging cable via USB, all iPod controls work flawlessly via the Kenwood "click wheel" or the OEM steering wheel audio controls. Blutooth works with the iPhone 3GS perfectly, tiny mic is installed on the steering column and the stereo speakers are used for phone audio. Display has several visual options other than the one shown, and colored lighting can be adjusted to match your OEM dash lighting or to your tastes. Crutchfield includes detailed instructions as well as the free dash kit (shown) and wiring harness for plug and play. Faceplate is non-motorized (less to break IMO) and is removable for anti-theft (it goes in my console vault), when the faceplate is out a red light flashes letting crackheads know that it is not worth their time and there is also a security code feature so it wont work if stolen once you set it. The Excelon line also has a 2 year warranty which is rare nowadays on electronics.
Very nice deck for only $299 shipped. Next up will be a newer GPS, but the old Magellan still works great for me.
Aug 25, 2011 | 04:55 PM
#32
Thread Starter
Registered User
Joined: Jan 2010
Posts: 62
Likes: 0
From: SoCal
Useful tech links from TTORA and elsewhere!
Recalls/Technical Service Bulltetins
Recalls:
Floor Mats: Click Here for More Info on Floor Mat Recall
TSB�s (Technical Service Bulletin)
How to Handle a TSB: Info on what a TSB is and How to Handle One
Rear Leaf Spring TSB: Click Here for more info on the Leaf Spring TSB
Auto Transmissions TSB for 05+: Info on Auto Trans TSB
Engine Ticking Noise TSB: Engine Ticking Noise TSB
Tailgate Reinforcement TSB: Tailgate TSB
6-speed Manual Transmission Clutch difficult Engaging
TS-SB-0385-09
2007-2010 FJC
2005-2010 Tacoma
Actual Service Bulletins:
T-EG011-07: 05-07 Tacoma: 1GR-FE Engine Intermittent "No Start" Condition (Revised)
T-EG025-07: 05-07 Tacoma (2TR-FE): Crankshaft Oil Seal Leak
T-BO004-07: 05-07 Tacoma: Bent Rear Tail Gate
T-EG059-05: 05-06 Tacoma: M.I.L. "ON" DTC P0171, P0174, P2195, or P2197
T-EG046-06: 05-06 Tacoma (1GR-FE): Air Intake Hose Rattle
T-EG025-06: 05-06 Tacoma: M.I.L. "ON" DTC P043E, P043F, P2401, P2402, & P2419
T-EG021-06: 05-06 Tacoma: Exhaust Ticking Noise
T-TC006-06: 05-06 Tacoma: Clutch Pedal Feel Improvement
T-TC004-06: 05-06 Tacoma: Clutch Pedal Squeak Noise
T-BO022-06: 05-06 Tacoma: Driver's Side Dash Lower Panel Poor Fit
T-AI-0617-W: 06-08 Tacoma TVIP V5 RS3200 PLUS Owners Guide Rev. A
Common Issues/Problems:
Issues with Balancing Tires:
Balancing Wheels/Tires (Hub/Lug Centric Debate) Link
Gas Mileage Issues/Problems and Questions
There are a lot of threads that have been started on this topic, seems like there is a new one every week, so if you are having a issue with this please read these threads first then post in one of these threads (we don�t need to create anymore duplicate threads on this topic)
Gas Mileage Thread 1
Gas Mileage Thread 2
Having an Issue with Post Lift Vibrations? Try These Links:
Post Lift Vib Link 1
Post Lift Vib Link 2
Post Lift Vib Link 3
Post Lift Vib Link 4
Post Lift Vib Link 5
Cracked Frame � Motor Mount Failure
Motor Mount Failure Link 1
Motor Mount Failure Link 2
Air Bag Light Is ON, Why?
Air Bag Light Link
Failed Support for Composite Bed
Bed Support Cracked Link
6spd Manual Trans Issues
Grinding While Shifting Link
6spd Manual Trans �Chirping Noise Issue� AKA Throwout Bearing
TTORA Link to Chirping Noise
Tacoma World Chirping Noise Link
Rear End Failures
Rear End Failure Link 1
Rear End Failure Link 2
Wheel Bearing / Idler Pulleys Failures
Wheel Bearing and Idler Pulley Link 1
Wheel Bearing Link 2
Suspect Water In Oil? Funky Residue in Filler Neck
Moisture Residue In Oil Filler Neck Link
How to Replace CV Axels
Directions with Pics on How to Replace a CV Axle
Common Truck Modifications:
Need Help Picking a Lift?
Questions and links for suspensions - click here
Tire Size Options With Lift
35�s and 3� Lift: 35" Tires on 3" lift Link 1
35" Tires on 3" lift Link 2
35 MT/R�s 1�Lift: 35" Tires on 1" lift
36�s and 3� Lift: 36" Tires on 3" lift
255/85/16: 255/85/16
TIRE AND WHEEL FITMENT GUIDE
Link To Wheel and Tire Fitment Guide
Wheel Spacers
Click Here for More Info on Wheel Spacers
2005+ Locker Mod
Click Here for More Info on Locker Mod
Diff Breather Extension
Link for extending your Diff Breather
Illuminated 4x4 Dial for '05+ Tacoma (OEM Parts $$$)
Directions for Illuminated 4x4 Dial
Traction Control (ATRAC hack) Write-up
ATRAC Hack Link
What�s the Biggest Tire You Can Fit on Stock Ride Height?
Tire Size Link
Snorkel on New Gen Tacoma
Install Directions Link
Shackle Flip Mod
Shackle Flip Mod Link 1
Shackle Flip Mod Link 2
Shackle Flip Mod Link 3
Different Types of Lifts Installed
Comparing Different Lift Options for 05+
Donahoes and Deavers Install on 07
Donahoes and Dakars Install on a 05
Old Man Emu Install
Solid Axel Swap Install
Long Travel Install
What to Consider After Lifting Your Truck
After Lift Extending Bump Stop Directions
Bigger Tires Now Rub on Body Mount
Fixing Issue of Tire Rubbing on Body Mount Link 2
Fixing Issue of Tire Rubbing on Body Mount Link 2
Torn CV Boot: Option for Replacing the Whole CV Axel
Directions on how to Install a New CV
Installing Extended Rear Brake Lines
Directions on Installing Extended Brake Lines
Adding a Crawler to a 05+
Crawler Install Directions
Sway-Bar Removal
Sway Bar Removal Link 1
Sway Bar Removal Link 2
Tire Pressure Monitoring System Bypass
TPMS Bypass Link 1
TPMS Bypass Link 2 (Toyota Nation)
What You Need to Know About Re-Gearing 05 and up
Regear 05+ Link 1
Regear 05+ Link 2
Regear 05+ Link 3
Armor (Sliders, Bumpers and Beyond)
List of Rear Bumper MFGRS: Rear Bumper List
List of Slider MFGRS: Slider List
Skid Plates
ShrockWorks Tacoma Winch Bumper
Assorted Front Bumper Pics
All-Pro Plate Front Bumper
All Pro Plate Rear Bumper
Armortech Off-road Rear Bumper
ARB Front Bumper
4xInnovation Sliders
Armortech High Clearance Rear Bumper
CBI High Clearance Rear Bumper
Tacoma Auxiliary Battery Install
AUX Battery Install Link 1
AUX Battery Install Link 2
Speedometer Recalibration After Bigger Tires
How to Recalibrate Your Speedo
Superchargers
Superchargers Link 1
Superchargers Link 2
Re-Route Exhaust
Exhaust Reroute Link
Oil Filter Recommendations
Oil Filter Guide
Common "How To" Questions:
How to reset the Maintenance Required Light:
1. Start truck
2. Make sure Odometer is set to ODO xxxxx
3. Turn key to full off position
4. Push odometer button and hold
5. turn key back to on position
6. Continue holding the odometer button
7. Dashes will appear where the mileage should be located, the dashes will then disappear one by one. Hold button tell they are all gone!
1 sec(- - - - -) 1.5sec(- - - -).. (- - -).. (- -).. (-)
When the dashes are gone the odometer will blink your current miles once, and the maintenance required light will turn off.
How To Reset the Check Engine Light:
1. Turn off truck
2. Open hood
3. Disconnect negative battery cable from terminal
4. Wait 2 minutes
5. Reconnect negative battery cable
6. Close hood
7. Start truck
8. Check engine light should be off!
Note:
The Maintenance Required Light is different than the Check Engine Light
Directions For Engaging 4LO In Your Tacoma:
1) If you have a Automatic Transmission you must be stopped and in Neutral.
2) If you have a Manual Transmission you must be stopped and the clutch must be in all the way.
Still Not Working? Have you Read your Owners Manual? Or the Info Card in the Visor? How about trying one of these?
Great Links to Toyota Nation�s 05+ Resources
2005+ Tacoma Modification DIY Articles
FREE Service Guide & Vehicle History PDF Glove Box Booklet
05+ Tacoma FAQ's
TSB List for 2005+ Tacoma
Aug 25, 2011 | 05:02 PM
#33
Thread Starter
Registered User
Joined: Jan 2010
Posts: 62
Likes: 0
From: SoCal
SoCal Desert Rendezvous 2011
The new setup is working GREAT! The Kelty Cartarp stood up to some impressive gusts and strong, steady winds. It's a keeper. The Camp Mate chuck box works very well BUT... I think I'm going to sell it since I came home with a truck full of Snow Peak (the Iron Grill Table ).
).
Aug 25, 2011 | 05:05 PM
#34
Thread Starter
Registered User
Joined: Jan 2010
Posts: 62
Likes: 0
From: SoCal
Garmin Nuvi 3750 Review
First let me say I hated Garmin and their expensive proprietary software (bad experience with my first Garmin GPS) before I bought this one so I was very skeptical right from the get go and mainly bought this one based on Magellan's recent switch from NAVTEQ to TeleAtlas (the mapping software service that TomTom uses). I really like the old NAVTEQ driven Maggellan crossover that I have but it was time to get a newer unit and now Garmin is the only maker with NAVTEQ maps... anyway, here's a quick rundown:
1. Best GPS I've ever used. Easy user interface.
2. Has maps of US, Canada, and Mexico built in. Planning a trip to Panama? No problem, basic worldmap with major highways and such built in. Can scroll across the globe.
3. Off road applicable. For example, it shows every trail in Death Valley to include Mengel Pass and the trail to the Briggs and Stone cabins! Looking for Mikes Sky Rancho? No problem. VERY impressive IMO.
4. Can enter lat/long coords and route to them, turn by turn only works on named/numbered roads.
5. Can pre-load your trips (up to 10 lat/long coord waypoints IIRC) before you leave, and have multiple pre-loaded trips saved in advance.
6. "Where am I" feature gives you instant lat/long, elevation etc.
7. "Bread crumbs" - When this feature is turned on it leaves a green crayon trail behind you showing everywhere you have driven. I've left this on for a few days now, pretty cool feature.
8. Mini SD capability for expanded memory or additional maps (haven't got that far yet).
9. Unit is very thin and light, can mount just about anywhere IMO (not weather proof though), excellent screen and daylight readability.
I give this GPS 4 out of 5 stars
Aug 25, 2011 | 05:07 PM
#35
Thread Starter
Registered User
Joined: Jan 2010
Posts: 62
Likes: 0
From: SoCal
Diff Drain Plug Carnage!
Well, seems as if I had that drain plug on a bit tight... I rounded the 24mm bolt head trying to remove it... Note to self: Use a torque wrench for the recommended 36 ft lbs next time Mongo!
Enter my buddy Mike. After a few go 'rounds with an impact and several unsuccessful tries at welding a nut onto the stripped bolt head, we gave in and made a trip down to Harbor Freight to find a better option - we were almost out of ideas. Mike came up with a possible fix so I got a set of expendable wrenches...
After hammering a 7/8 wrench (just a tad smaller than 24mm) into the ring, Mike zaps it on there.
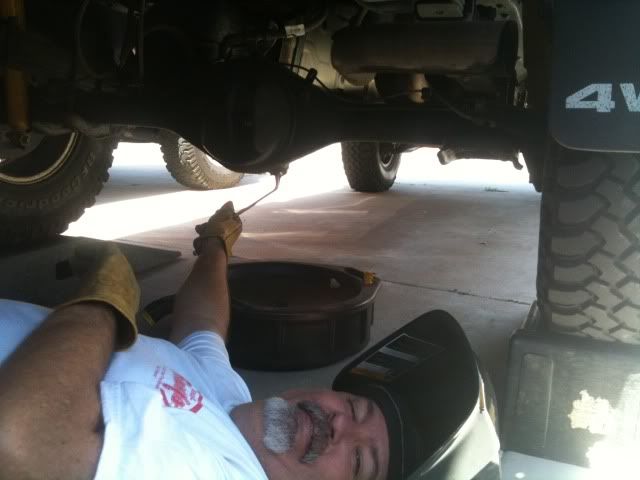
It came of by hand once the welds were in place. Saved!

Enter my buddy Mike. After a few go 'rounds with an impact and several unsuccessful tries at welding a nut onto the stripped bolt head, we gave in and made a trip down to Harbor Freight to find a better option - we were almost out of ideas. Mike came up with a possible fix so I got a set of expendable wrenches...
After hammering a 7/8 wrench (just a tad smaller than 24mm) into the ring, Mike zaps it on there.
It came of by hand once the welds were in place. Saved!
Last edited by TACODOC; Aug 26, 2011 at 05:02 PM.
Aug 25, 2011 | 05:10 PM
#36
Thread Starter
Registered User
Joined: Jan 2010
Posts: 62
Likes: 0
From: SoCal
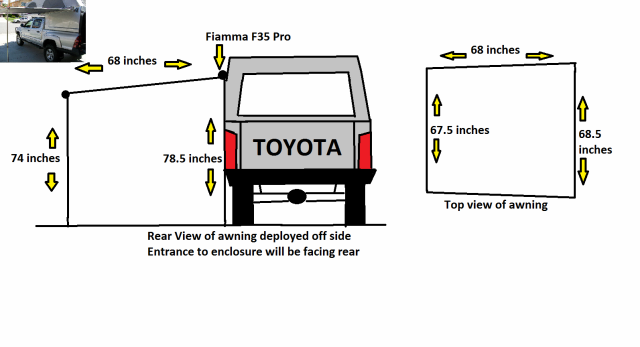
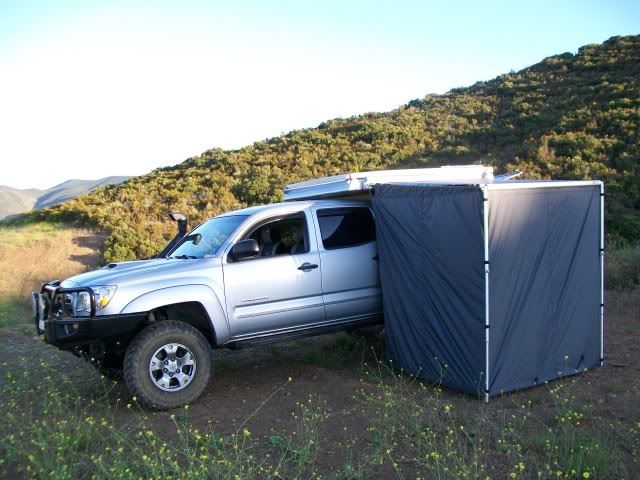
The Wanigan Project
This is my original design sketch.
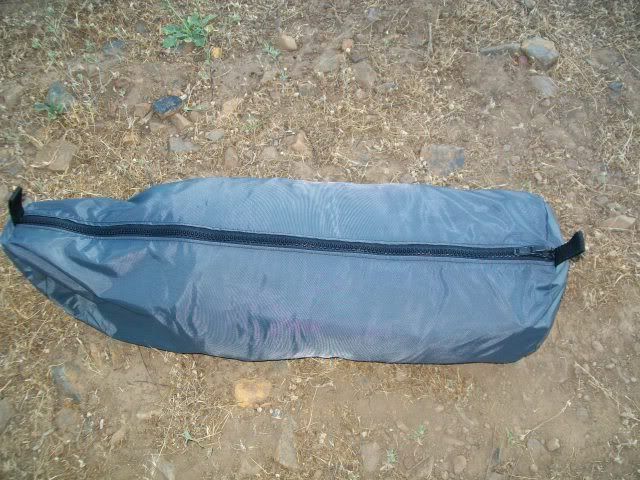
Here's the bag it came in, very well made with a big fat zipper. Enclosure made by: http://www.slosails.com/
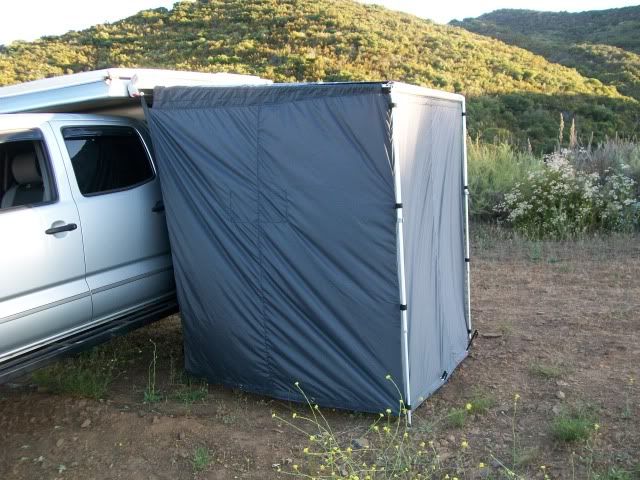
Deployed, 4 sided enclosure. Totally private.
This enclosure will be a multi-purpose room for showering, bathroom, or even sleeping kids.
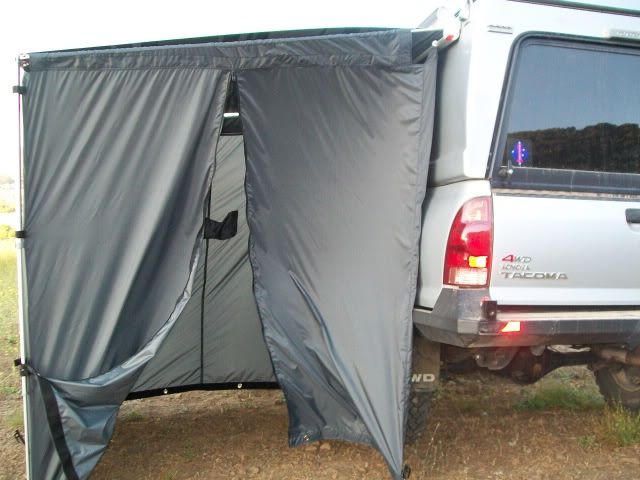
Front wall, note the big grommets all along the bottom that allow the use of the big Snow Peak stakes, this thing isn't going anywhere.
Entrance, note the big fat zipper with pulls on both sides and the big pocket sewn on the far wall for items like soap, shampoo, iPod, etc.
Hooks attach inside wall to Fiamma case, inside wall provides extra privacy as well wind protection.
Hooks have grommets which allow the mounting of lights or just about anything on that wall like a Thule RV wall organizer.
I'm also going to add some 550 cord along there threaded via the grommets for hanging towels.
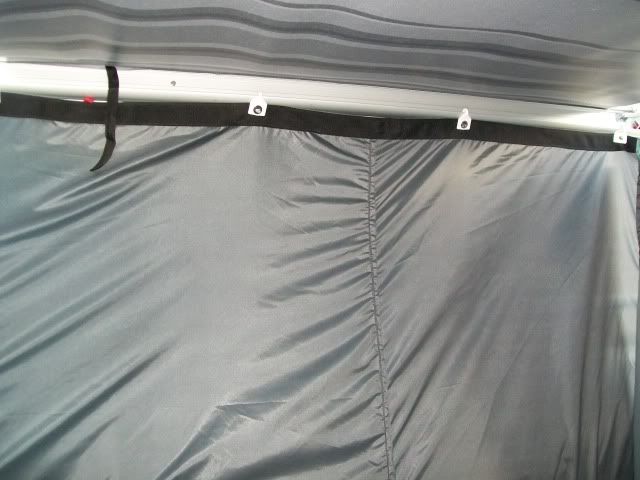
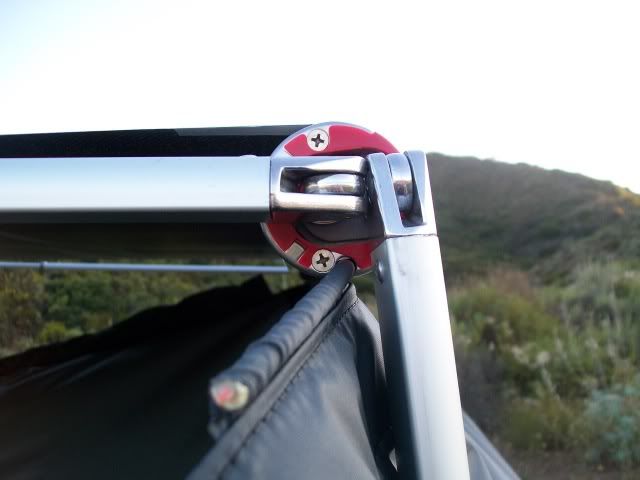
Inside corner mounting details. Note how the velcro wraps around the bars for max privacy and wind proofing.
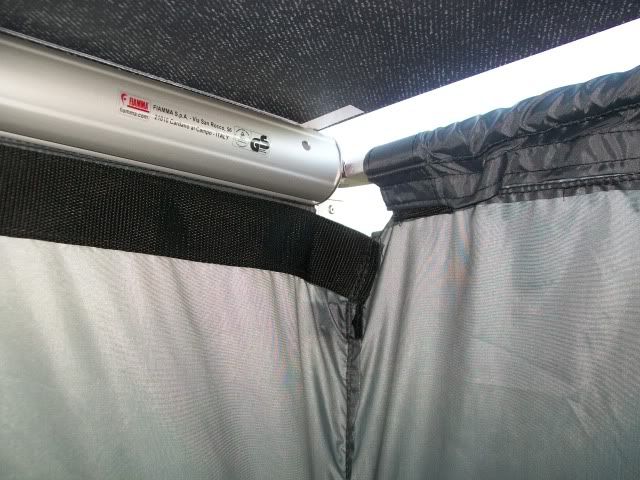
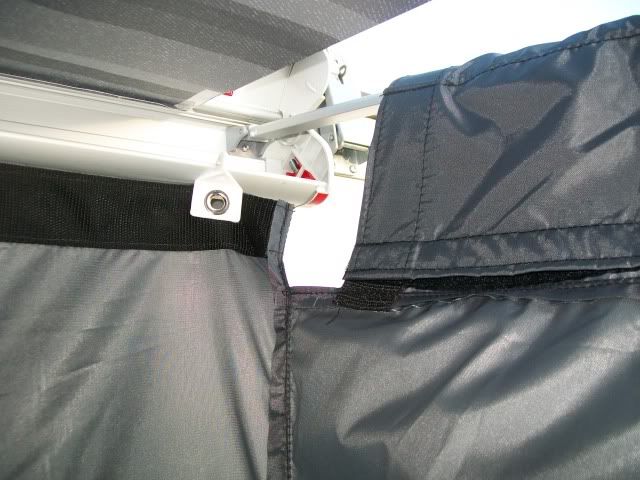
Shown here during enclosure mounting, the 7mm channel in the Fiamma allows the use of this "rope" for mounting and a completely sealed front edge.
Here's the bag it came in, very well made with a big fat zipper. Enclosure made by: http://www.slosails.com/
Deployed, 4 sided enclosure. Totally private.
This enclosure will be a multi-purpose room for showering, bathroom, or even sleeping kids.
Front wall, note the big grommets all along the bottom that allow the use of the big Snow Peak stakes, this thing isn't going anywhere.
Entrance, note the big fat zipper with pulls on both sides and the big pocket sewn on the far wall for items like soap, shampoo, iPod, etc.
Hooks attach inside wall to Fiamma case, inside wall provides extra privacy as well wind protection.
Hooks have grommets which allow the mounting of lights or just about anything on that wall like a Thule RV wall organizer.
I'm also going to add some 550 cord along there threaded via the grommets for hanging towels.
Inside corner mounting details. Note how the velcro wraps around the bars for max privacy and wind proofing.
Shown here during enclosure mounting, the 7mm channel in the Fiamma allows the use of this "rope" for mounting and a completely sealed front edge.
Aug 25, 2011 | 05:16 PM
#37
Thread Starter
Registered User
Joined: Jan 2010
Posts: 62
Likes: 0
From: SoCal
In the summer of 2010 a guy by the name of Chip Haven did some research to see what it would cost to build my truck and camper from scratch today - my how the time and dollars have flown by 
The best part of this is that I scratched and saved to pay CASH for all my mods and gear...
...no credit cards were harmed during this build!
Here is the thread:
http://www.expeditionportal.com/foru...ad.php?t=47207
Link to Summer 2010 issue of the Overland Journal, feature vehicle "The Fifth Element" 
http://www.overlandjournal.com/index...le=Summer_2010
The best part of this is that I scratched and saved to pay CASH for all my mods and gear...
...no credit cards were harmed during this build!
Here is the thread:
http://www.expeditionportal.com/foru...ad.php?t=47207
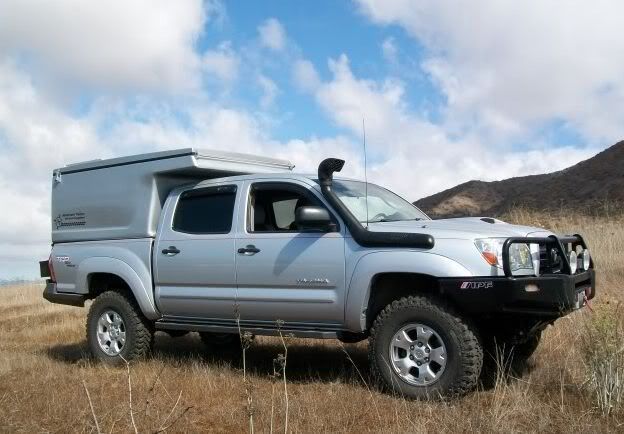
In the Summer 2010 Overland Journal, there's an article about a well-equipped camper owned by forum member Tacodoc. The truck has many upgrades that make it more capable off-road. The camper is an Adventure Trailers Flip-Pac, tailored to meet Tacodoc's needs. The result is a go-anywhere adventure travel vehicle with enough creature comforts and conveniences to make a trip of several weeks a pleasure. And the truck just looks cool!
Read about the truck build here (1300+ posts)
http://www.expeditionportal.com/foru...read.php?t=521
Read about the Flip-Pac installation here
http://expeditionportal.com/forum/sh...ad.php?t=34407
The OJ article has a list of the major components used to customize the vehicle. What's missing is how much the project cost to complete.
So I did a little searching online. My cost estimate to duplicate Tacodoc's vehicle today: $56,207.
The summary is below. The details appear at the end of this post.
Comments and corrections, please!
Chip Haven
1. 2011 Toyota Tacoma TRD SR5 double cab 4x4 ... $31,000
2. Modifications to truck ... $8477
3. Flip-Pac Camper and camping equipment ... $7011
4. Taxes on the above ... $3719 (8% sales tax)
4. Labor to assemble ... $6000 (60 hours, $100 an hour)
5. Total ($31,000 + $8477 + $7011 + $3719 + $6000) = $56,207
-----------------------------------------
Modifications to truck total $8477
Nitro 4.88 gears $200 front, $240 rear $440
Donahoe 2.5 inch adjustable coil-over shocks $1050
OME Dakar leaf springs $400
OME N182 rear shocks $360
BF Goodrich 255/85 R16 MT/KM tires (185 x 5) $925
ARB bull bar $856
CBI high clearance rear bumper w/ tire carrier $1600 wild guess
Bentup square tube sliders $300
Warn M8000 winch $760
ARB Bushranger X-Jack inflatable jack $200
IPF 968 driving lights (2 @ 125) $250
TRD Sport hood and grille $600 wild guess
Safari Snorkel SS135HF $305
Hella air horns $45
Cobra 75-WX-ST CB radio $96
Wilson Trucker 5000 antenna $50
Console vault $240
-----------------------------
Camper and camping equipment $7011
Adventure Trailers Flip-Pac camper w/ LED $4460
color match paint $600
Odyssey 1700 MJT battery $350
Engle MT45 refrigerator $800
National Luna Power pack w batt monitor $520
Blue Sea fuse block, 6 circuits $36
Sound deadening Edead and Fatmat $125 estimate
2.5 lb ABC fire extinguisher and bracket $50
portable toilet $70 estimate
not included:
shelving made of carpeted plywood
storage boxes to organize gear
http://www.overlandjournal.com/index...le=Summer_2010
Last edited by TACODOC; Aug 26, 2011 at 05:08 PM.
Aug 25, 2011 | 05:32 PM
#38
Thread Starter
Registered User
Joined: Jan 2010
Posts: 62
Likes: 0
From: SoCal
Overland Journal Summer 2010
The Chris Marzonie (aka BajaTaco) photo shoot at Joshua Tree
Here are a few more pics, including a couple of previously unseen photos that didn't make it into the Overland Journal.
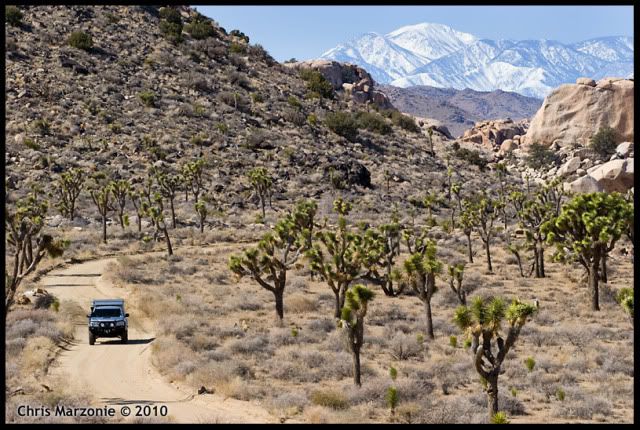
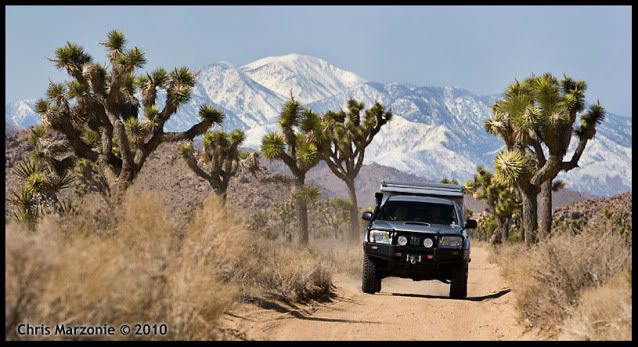
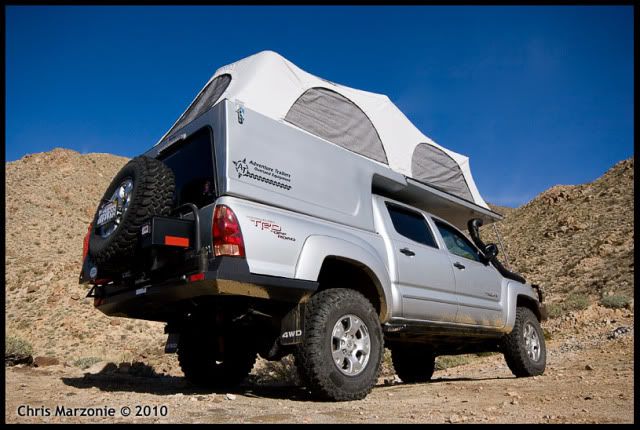
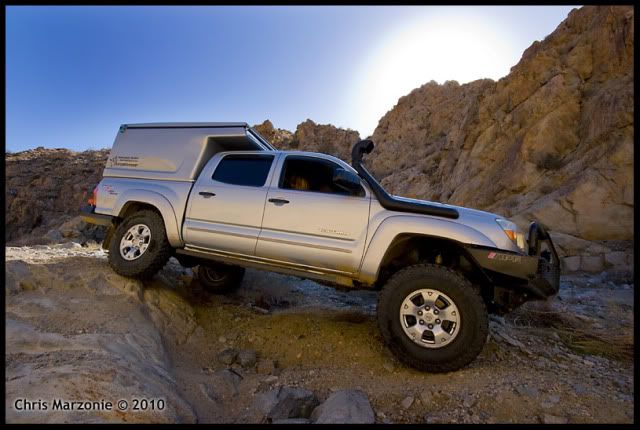

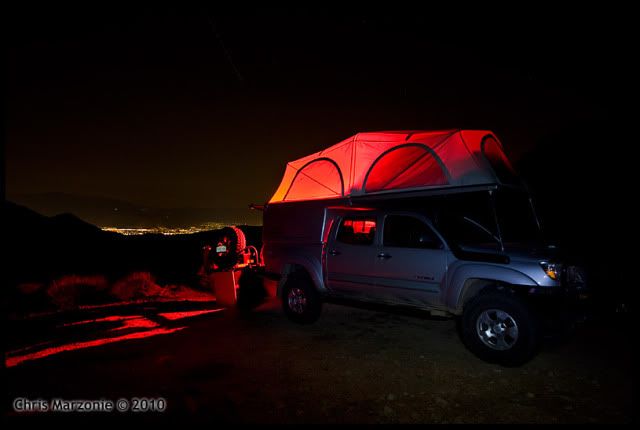
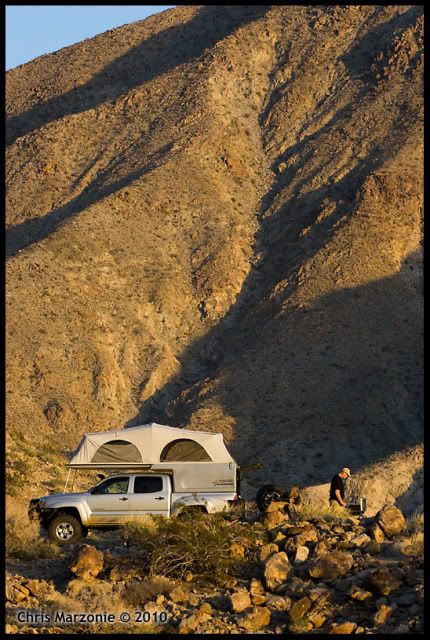
Photos courtesy of Chris Marzonie aka BajaTaco
Here are a few more pics, including a couple of previously unseen photos that didn't make it into the Overland Journal.
Photos courtesy of Chris Marzonie aka BajaTaco
Last edited by TACODOC; Aug 25, 2011 at 05:33 PM.
Aug 25, 2011 | 11:58 PM
#39
Co-Founder/Administrator
iTrader: (1)
Joined: May 2002
Posts: 32,242
Likes: 21
From: Auburn, Washington
Very nice.
I did not know Warn finally came out with a wireless winch control.
I bought the Ramsey one back when I had my 2nd gen 4Runner, then transferred it over to the FJ after my old winch and new ARB bumper were installed.
Looks like you are getting a lot of use out of the rig this year.
I did not know Warn finally came out with a wireless winch control.
I bought the Ramsey one back when I had my 2nd gen 4Runner, then transferred it over to the FJ after my old winch and new ARB bumper were installed.
Looks like you are getting a lot of use out of the rig this year.


