
Custom 3rd with TJM Locker Install
 Jan 4, 2012 | 09:50 PM
#1
Thread Starter
Registered User
Joined: May 2008
Posts: 23
Likes: 0
From: Soooo Cal
Custom 3rd with TJM Locker Install
Installation of a custom 3rd Member with a pre-installed TJM locker.
My 2000 4Runner has 160,000 miles and the rear axle had started to get noisy (pulling out those stumps couldn't have helped) . For a long time it was just a bearing noise. On or off the gas, the sound didn't change. More recently, it started to act like the typical rear end going bad. There would be that characteristic gear noise when I backed off the gas. This noise worsened quickly in the course of a couple of months, so I knew it was time to take care of this.
I opted to purchase a custom 3rd from Just Differentials with a pre-installed TJM locker. Some other options would have been to send my 3rd out and just have it rebuilt or try to repair the pinion nose bearing only without touching the gears. I don't know if the actual gears would have been damaged from the bearing going out like that for that amount of time. Just Differentials was great to deal with. They shipped out my custom 3rd very quickly, and quickly answered all of my questions.
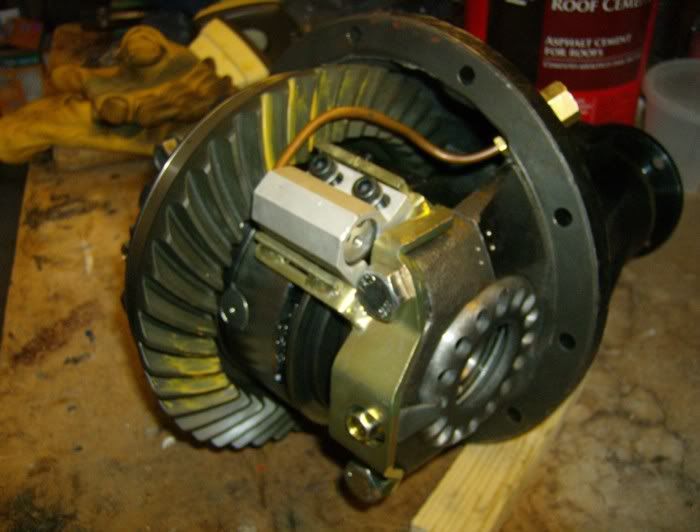
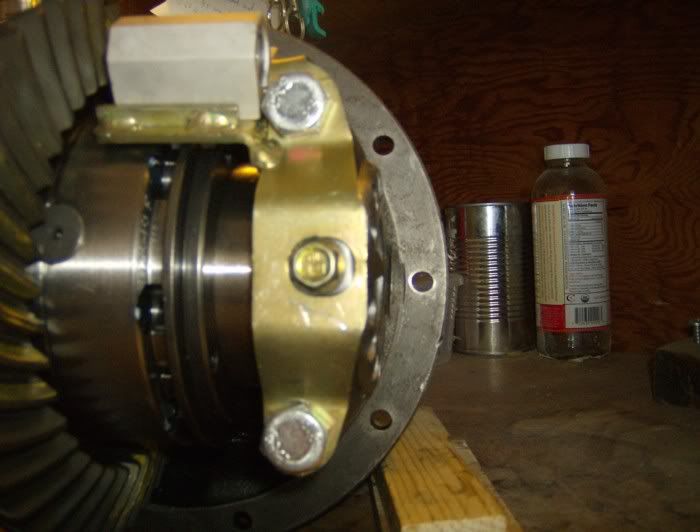
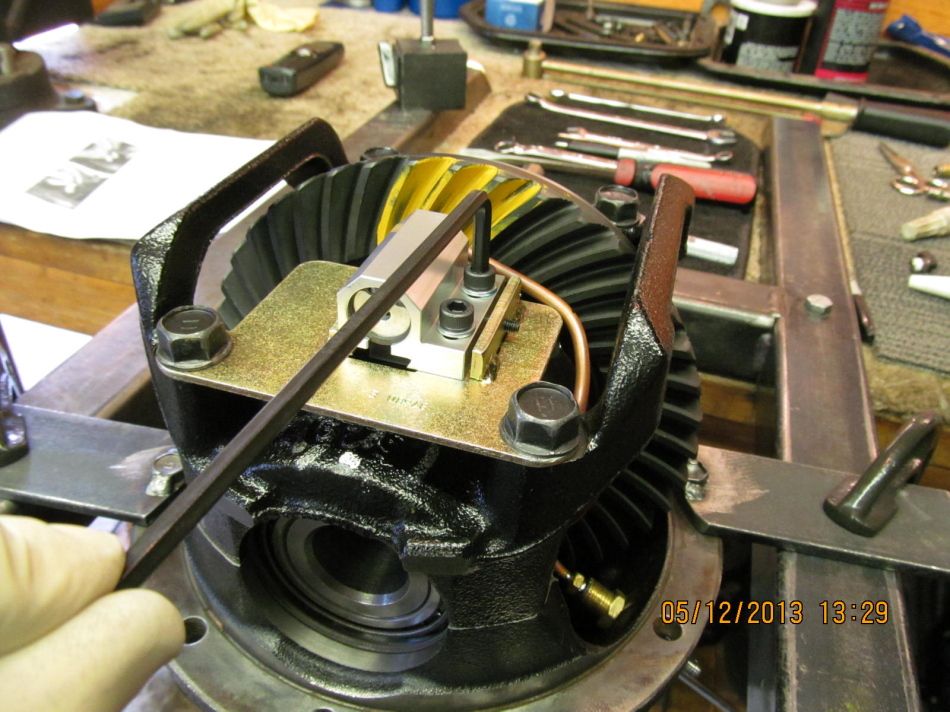
Here is a basic picture of the 3rd with the TJM locker. As you can see, the actuator is a piston which not buried inside the locker mechanism. I like that feature. It means that, if necessary, the actuator can be replaced without dis-assembling the entire locker and having to reset the bearings, etc. It also means that the actuator is isolated from the diff oil so you shouldn't get any oil mist in your air system. I consider this to be a very good design (and I'm a mechanical engineer).
Disassembly:
I'm sure all the required disassembly steps for the removal of a third member have been covered many times here so I'll just cover the highlights.
I hope it goes without saying to securly support the vehicle on quality jack stands before getting under. To get some working room, I jacked up the rear axle and supported it with two jack stands, then jacked up the body a bit more using a jack and block of wood under the frame mounted trailer hitch. I suported the frame with two more jack stands. This allows you to see and reach all around the axle and 3rd member.
Detach the drive shaft flange from the 3rd member. There are four bolts with nuts. These are TIGHT or should be. I used a piece of rope to tie the end of the drive shaft up and out of the way.
Remove the rear wheels, brake drums and, axles. Detach the parking brake cables and the brake line. One trick....some folks like to tie a baggy on the end of the brake line to try to stop all the fluid from running out. I used some rubber vacuum caps...the kind of cap you would use to close off a vacuum fitting on a manifold for example. I think it's the 3/16 inch size. It fits right on the end of the brake line. You can press one into the brake slave cylinder also, to keep it clean. Just check to make sure \there are no rubber shavings in there when you pull out the cap.
Remove the four bolts that hold the brake backing plate to the axle ends. Now CAREFULLY pull out the axle. Support it so it doesn't drag across the seal.
Remove the 10 nuts that hold the 3rd member to the diff housing. It weighs 50 - 60 lbs, so don't let it drop onto your face. Have your floor jack in place to set it on, then lower it down and pull it out form under the truck.
I may have forgotten something, but when your're in there dissassembling things, it's pretty self explanatory what to take off next.
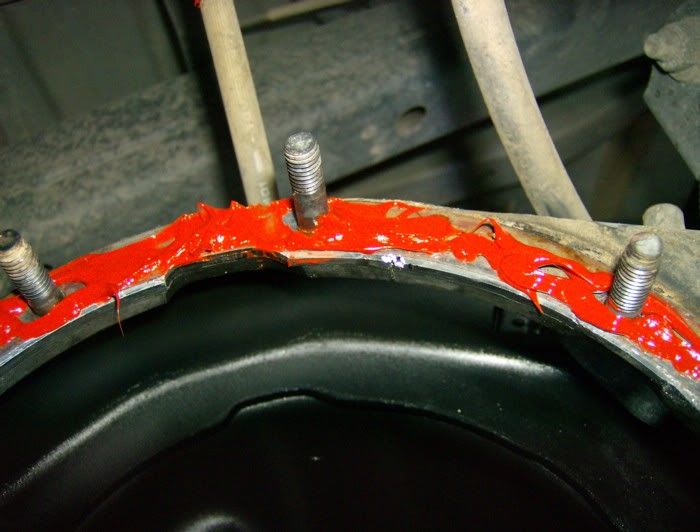
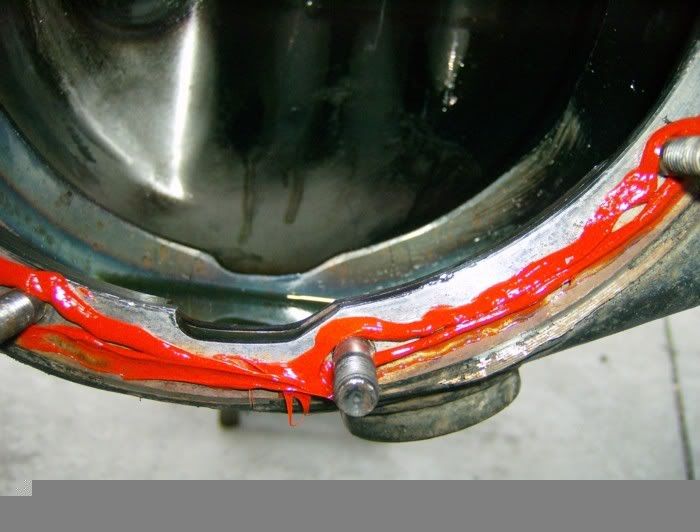
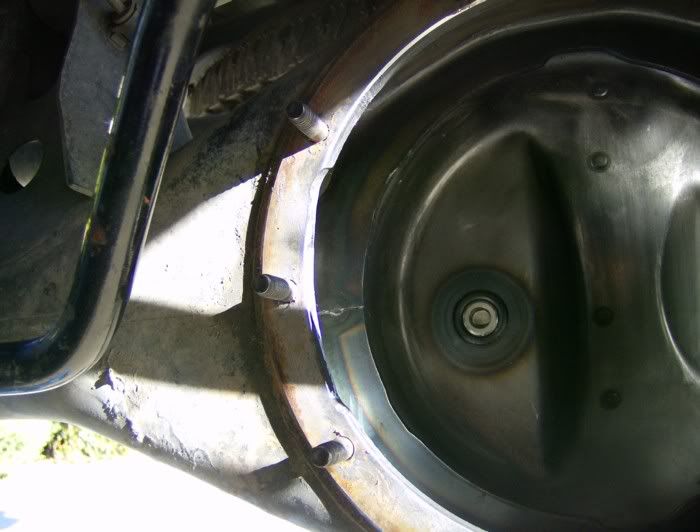
At this point, I thought I would be able to put in the new 3rd and start re-assembling my 4Runner so I put on the RTV and lifted the 3rd in place. And it wouldn't go in. It looked like the shoulder of the ring gear carrer was bumping into the rim of the diff housing, and sure enough, in the next two pictures you can see the scuff marks from the ring carrier.
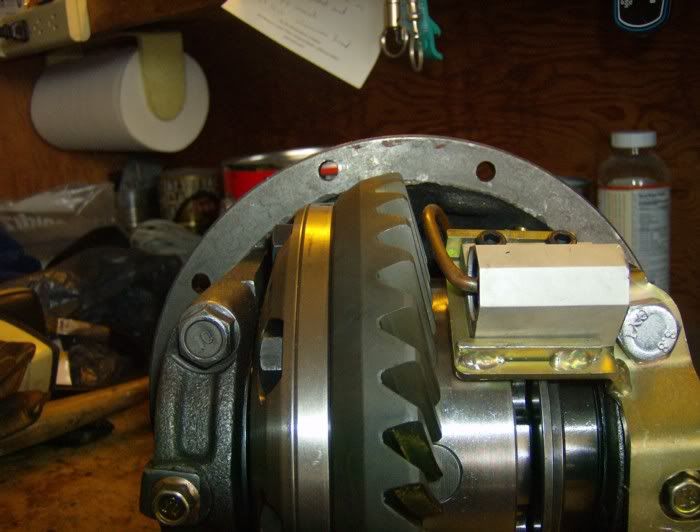
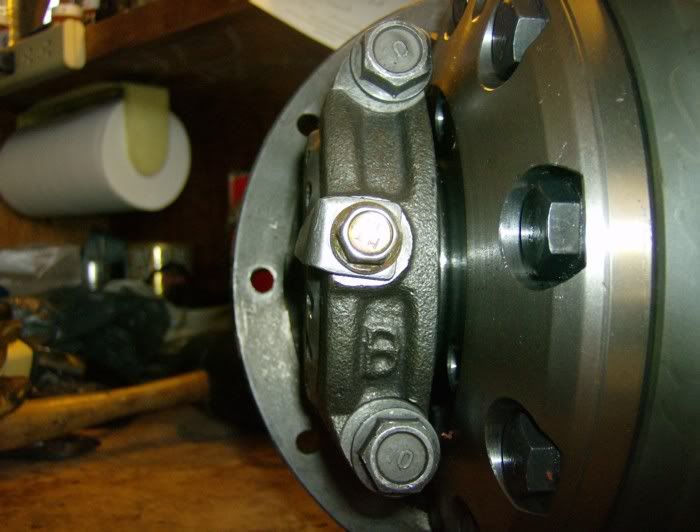
So I started looking at the new 3rd. The next series of photos is an attempt to show how "close to the edge" the ring gear, ring gear carreir and bearing caps are. I tried to line up the camera carefully to show this, but it is what is.
Grinding:
So I started grinding, and grinding, and grinding.

First I ground notches for the ring gear carrier and deepened the existing notches for the ring gear in the rim of the diff housing. This photo shows those notches to the right of the existing ones.
Then I did a test fit and found that the bearing caps were hitting on the two sides, so I ground some relief there.
Not so easy to see because of the light, but here's the one on the passenger side. The other side is similar.
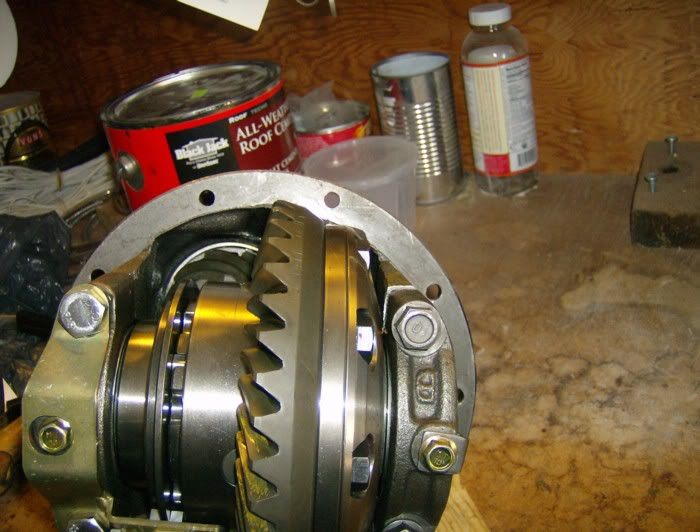
Ok, that got the 3rd into the diff housing, but it was at least 1/8 inch shy of closing. I ended up grinding out the whole inside lip. That's the overhang where the dome is welded onto the back I ground this edge flush with the inside surface of the dome. I also ground the dome quite a bit in the area of the actuator. Being careful because it will leak if you grind through and you will need to weld a bulge, or something on the outside to fix it.
I don't think it would be worthwhile to try to come up with a pattern or anything. It's sort of a trial and error effort. What happens is during a test fit, parts making contact get scuffed up and you can see what is hitting. The diff housing is soft, mild steel and shows these marks pretty well.
I also ground the whole outside edge of the TJM actuator bracket and the bolts that hold it. That's the gold colored part in the photos. I used a file, not the grinder to round off the outside corners of the aluminum actuator where it made contact with the dome. At this point, I was into the third day of this project and wasn't taking pictures. I was focused (pardon the pun) on getting the job done. So I don't have pictures of the finished product. Sorry about that...just couldn't keep running for the camera.
Reassembly:
Reassembly is pretty straighforward when everything finally fits together. One thing I want to note however, is I found some conflicting information regarding the torque for the 10 nuts that hold on the 3rd. I saw 18 ft-lb, 54 or so ft-lb and one person in a post somewhere said 33. As near as I could tell, the torque for my configuration (no factory e-locker) is supposed to be fifty something. That seemed awfully high to me. I used a felpro gasket with Permetex 2B non-hardening form-a-gasket and torqued the bolts to 20ft-lb. Checked them the next morning and got a small turn, maybe 1/8 of turn. Some folks like RTV. I like this old school Permetex paste that I've been using for years. I spread a nice thin, even layer on the diff housing with a popsicle stick. Lay the gasket on and trim it to match the opening, spread another layer of Permetex on the gasket and close 'er up and torque the nuts.
Since I limited the brake fluid loss, bleeding was pretty easy. I'm a big fan of pressure bleeding. The problem with brake pedal bleeding is that it pushes the master cylinder seals into new territory where there could be some corrosion to chew up the seals. I used a Motive Products Model 1101 Round Universal Adapter with a generic 1 gallon garden sprayer for pressure. That saves a little $$ on the tank, but there is no pressure gauge, so go easy on the pump so you don't blow up your plastic master cylinder reservoir. I tried mighty-vac bleeding last time I had the axles off but it didn't work as well as the pressure method.
I test drove it today and can safely say that it is very smooth and quiet. I also listened to the old and new 3rds with a mechanics stethoscope with the truck on jack stands, running and there was an incredible difference. The new one goes, "sssssssss". The old one went, "GRRRRRRRRR". I'm happy to have solved that problem.
I like the design and construction of the TJM locker and the service provided by Just Differentials. I'm a bit disappointed, however, at the amount of grinding it took to get it to fit it into the diff housing. I feel that TJM should have done a better job with the design. I suppose there could be some differences in the diff housings and maybe I have one that's a bit tight, but Toyota was one of the pioneers in those manufacturing practices that result in very consistent parts. Oh, well, maybe Genichi Taguchi San was on vacation when they designed the differential production line. There could be some differences.
I haven't installed any air yet, so I can't comment on how the locker works yet. I put a short length of hose on the air fitting with a bolt in the end to keep dirt out.
Overall, I'm not sure I can recommend this to a DIY installer. I wish I had better news since I like the TJM design so well. It would be interesting to find out if others have had to do so much fitting to install this locker. Also, with that much grinding, I would really recommend taking out the entire differential so that it could be washed out properly. It would also be much easier and safer to not have to lay under the truck with the grinder. You can get used to it, but that 10,000 RPM wonder is right in your face and there's no place to go if something comes unglued. I cleaned the diff housing the best I could with air hose, shop vac and oily rag, but I'm a little concerned. My plan is to do a few oil changes on the diff on short intervals of no more than, say 5k miles. Hopefully any remaining metal will find it's way to the magnet without being picked up by the gears. I know, I know...that's awfully hopeful.
Well, I guess if you have the guts and the patience to do all that grinding, I wouldn't shy away from the TJM. They've been in use about as long as the ARB from what I understand.
My 2000 4Runner has 160,000 miles and the rear axle had started to get noisy (pulling out those stumps couldn't have helped) . For a long time it was just a bearing noise. On or off the gas, the sound didn't change. More recently, it started to act like the typical rear end going bad. There would be that characteristic gear noise when I backed off the gas. This noise worsened quickly in the course of a couple of months, so I knew it was time to take care of this.
I opted to purchase a custom 3rd from Just Differentials with a pre-installed TJM locker. Some other options would have been to send my 3rd out and just have it rebuilt or try to repair the pinion nose bearing only without touching the gears. I don't know if the actual gears would have been damaged from the bearing going out like that for that amount of time. Just Differentials was great to deal with. They shipped out my custom 3rd very quickly, and quickly answered all of my questions.
Here is a basic picture of the 3rd with the TJM locker. As you can see, the actuator is a piston which not buried inside the locker mechanism. I like that feature. It means that, if necessary, the actuator can be replaced without dis-assembling the entire locker and having to reset the bearings, etc. It also means that the actuator is isolated from the diff oil so you shouldn't get any oil mist in your air system. I consider this to be a very good design (and I'm a mechanical engineer).
Disassembly:
I'm sure all the required disassembly steps for the removal of a third member have been covered many times here so I'll just cover the highlights.
I hope it goes without saying to securly support the vehicle on quality jack stands before getting under. To get some working room, I jacked up the rear axle and supported it with two jack stands, then jacked up the body a bit more using a jack and block of wood under the frame mounted trailer hitch. I suported the frame with two more jack stands. This allows you to see and reach all around the axle and 3rd member.
Detach the drive shaft flange from the 3rd member. There are four bolts with nuts. These are TIGHT or should be. I used a piece of rope to tie the end of the drive shaft up and out of the way.
Remove the rear wheels, brake drums and, axles. Detach the parking brake cables and the brake line. One trick....some folks like to tie a baggy on the end of the brake line to try to stop all the fluid from running out. I used some rubber vacuum caps...the kind of cap you would use to close off a vacuum fitting on a manifold for example. I think it's the 3/16 inch size. It fits right on the end of the brake line. You can press one into the brake slave cylinder also, to keep it clean. Just check to make sure \there are no rubber shavings in there when you pull out the cap.
Remove the four bolts that hold the brake backing plate to the axle ends. Now CAREFULLY pull out the axle. Support it so it doesn't drag across the seal.
Remove the 10 nuts that hold the 3rd member to the diff housing. It weighs 50 - 60 lbs, so don't let it drop onto your face. Have your floor jack in place to set it on, then lower it down and pull it out form under the truck.
I may have forgotten something, but when your're in there dissassembling things, it's pretty self explanatory what to take off next.
At this point, I thought I would be able to put in the new 3rd and start re-assembling my 4Runner so I put on the RTV and lifted the 3rd in place. And it wouldn't go in. It looked like the shoulder of the ring gear carrer was bumping into the rim of the diff housing, and sure enough, in the next two pictures you can see the scuff marks from the ring carrier.
So I started looking at the new 3rd. The next series of photos is an attempt to show how "close to the edge" the ring gear, ring gear carreir and bearing caps are. I tried to line up the camera carefully to show this, but it is what is.
Grinding:
So I started grinding, and grinding, and grinding.
First I ground notches for the ring gear carrier and deepened the existing notches for the ring gear in the rim of the diff housing. This photo shows those notches to the right of the existing ones.
Then I did a test fit and found that the bearing caps were hitting on the two sides, so I ground some relief there.
Not so easy to see because of the light, but here's the one on the passenger side. The other side is similar.
Ok, that got the 3rd into the diff housing, but it was at least 1/8 inch shy of closing. I ended up grinding out the whole inside lip. That's the overhang where the dome is welded onto the back I ground this edge flush with the inside surface of the dome. I also ground the dome quite a bit in the area of the actuator. Being careful because it will leak if you grind through and you will need to weld a bulge, or something on the outside to fix it.
I don't think it would be worthwhile to try to come up with a pattern or anything. It's sort of a trial and error effort. What happens is during a test fit, parts making contact get scuffed up and you can see what is hitting. The diff housing is soft, mild steel and shows these marks pretty well.
I also ground the whole outside edge of the TJM actuator bracket and the bolts that hold it. That's the gold colored part in the photos. I used a file, not the grinder to round off the outside corners of the aluminum actuator where it made contact with the dome. At this point, I was into the third day of this project and wasn't taking pictures. I was focused (pardon the pun) on getting the job done. So I don't have pictures of the finished product. Sorry about that...just couldn't keep running for the camera.
Reassembly:
Reassembly is pretty straighforward when everything finally fits together. One thing I want to note however, is I found some conflicting information regarding the torque for the 10 nuts that hold on the 3rd. I saw 18 ft-lb, 54 or so ft-lb and one person in a post somewhere said 33. As near as I could tell, the torque for my configuration (no factory e-locker) is supposed to be fifty something. That seemed awfully high to me. I used a felpro gasket with Permetex 2B non-hardening form-a-gasket and torqued the bolts to 20ft-lb. Checked them the next morning and got a small turn, maybe 1/8 of turn. Some folks like RTV. I like this old school Permetex paste that I've been using for years. I spread a nice thin, even layer on the diff housing with a popsicle stick. Lay the gasket on and trim it to match the opening, spread another layer of Permetex on the gasket and close 'er up and torque the nuts.
Since I limited the brake fluid loss, bleeding was pretty easy. I'm a big fan of pressure bleeding. The problem with brake pedal bleeding is that it pushes the master cylinder seals into new territory where there could be some corrosion to chew up the seals. I used a Motive Products Model 1101 Round Universal Adapter with a generic 1 gallon garden sprayer for pressure. That saves a little $$ on the tank, but there is no pressure gauge, so go easy on the pump so you don't blow up your plastic master cylinder reservoir. I tried mighty-vac bleeding last time I had the axles off but it didn't work as well as the pressure method.
I test drove it today and can safely say that it is very smooth and quiet. I also listened to the old and new 3rds with a mechanics stethoscope with the truck on jack stands, running and there was an incredible difference. The new one goes, "sssssssss". The old one went, "GRRRRRRRRR". I'm happy to have solved that problem.
I like the design and construction of the TJM locker and the service provided by Just Differentials. I'm a bit disappointed, however, at the amount of grinding it took to get it to fit it into the diff housing. I feel that TJM should have done a better job with the design. I suppose there could be some differences in the diff housings and maybe I have one that's a bit tight, but Toyota was one of the pioneers in those manufacturing practices that result in very consistent parts. Oh, well, maybe Genichi Taguchi San was on vacation when they designed the differential production line. There could be some differences.
I haven't installed any air yet, so I can't comment on how the locker works yet. I put a short length of hose on the air fitting with a bolt in the end to keep dirt out.
Overall, I'm not sure I can recommend this to a DIY installer. I wish I had better news since I like the TJM design so well. It would be interesting to find out if others have had to do so much fitting to install this locker. Also, with that much grinding, I would really recommend taking out the entire differential so that it could be washed out properly. It would also be much easier and safer to not have to lay under the truck with the grinder. You can get used to it, but that 10,000 RPM wonder is right in your face and there's no place to go if something comes unglued. I cleaned the diff housing the best I could with air hose, shop vac and oily rag, but I'm a little concerned. My plan is to do a few oil changes on the diff on short intervals of no more than, say 5k miles. Hopefully any remaining metal will find it's way to the magnet without being picked up by the gears. I know, I know...that's awfully hopeful.
Well, I guess if you have the guts and the patience to do all that grinding, I wouldn't shy away from the TJM. They've been in use about as long as the ARB from what I understand.
Last edited by Rich_O; Jan 4, 2012 at 10:35 PM.
Jan 5, 2012 | 07:49 AM
#3
Thread Starter
Registered User
Joined: May 2008
Posts: 23
Likes: 0
From: Soooo Cal
I understand that TJM had a presence in the US market some years ago and didn't quite make it because of poor marketing or whatever...and now they are trying to get it going again.
Just Differentials doesn't actually list them on their website for custom built Toyota 3rd members but provided the option for a TJM or ARB locker in their quote.
On their website, the basic Toyota 8" V6 new custom 3rd member with an open diff starts at $999. Add an ARB for $500, add a TJM for $400 and there are is also the option to get a solid pinion spacer sleeve instead of the crush type for $25. I stayed with my stock ratio 4.10 since I am not planning to get in to the front diff and am not planning to change the tire size on this vehicle. Some ratios cost a little more than stock.
I didn't price the ARB and TJM lockers separate from the custom 3rd.
It would be interesting to know if any other lockers required grinding the diff housing to be able to fit them in...anybody? To me it seems a little extreme to have to do this, but maybe it's normal. It is "custom" after all, to install a locker.
Last edited by Rich_O; Jan 5, 2012 at 07:56 AM.
Jan 5, 2012 | 05:43 PM
#4


Rich-
Thanks for the details. No other locker requires any grinding at all from my experience. I wonder if there is a fundamental difference in the axle housing hole they have down in Australia verses yours?
edit---I see how close the actuator is to the ring teeth....how close the copper tube is also to the teeth. What happens if 529 or even 571 gears are installed in place of those thin 410 gears? It doesn't look like thick gears would clear.
Last edited by ZUK; Jan 5, 2012 at 05:50 PM.
Jan 5, 2012 | 07:51 PM
#5
Thread Starter
Registered User
Joined: May 2008
Posts: 23
Likes: 0
From: Soooo Cal
Some applications have the actuator oriented the other way. I guess it just depends on the space available for the locking ring, whether you push it or pull it onto the carrier or something like that. I don't know exactly what It looks like inside. I think it pushes a locking ring onto the side gear to lock it to the carrier. Or pulls on the ones with the tube near the ring gear and allows a spring to push the lock ring the other way.
I did see a thread where the guy had 5.something gears with the actuator oriented with the air tube next to the ring gear. I think it was in a Land Cruiser. It seemed like he had some trouble getting everything right. The tube was very, very close to the ring gear even with a pretty extreme looking bend at the actuator. Mine has at least 1/8 inch clearance with 4.10 gearing.
They really should put a tight 90deg fitting where the tube is attached to the actuator, or have the tube attached on the side somehow.
I don't remember what forum it was, but an online search for "TJM Pro Locker" will probably get you there.
As I wrote, I expected a pretty high level of consistency from Toyota. Odd, but I'm sure the answer will turn up sometime. Meanwhile it runs great. I changed the oil and got some metal off the magnet this morning and will probably change it again tomorrow. Depending on how it looks I hope I'm good until my next scheduled change in about 5k. I definitely needed a better way to wash it out after all that grinding. Well if my axle seals go, I'll know why....
 BTW, jeff@justdifferentials.com says he is available to answer any questions anybody might have.
I did see a thread where the guy had 5.something gears with the actuator oriented with the air tube next to the ring gear. I think it was in a Land Cruiser. It seemed like he had some trouble getting everything right. The tube was very, very close to the ring gear even with a pretty extreme looking bend at the actuator. Mine has at least 1/8 inch clearance with 4.10 gearing.
They really should put a tight 90deg fitting where the tube is attached to the actuator, or have the tube attached on the side somehow.
I don't remember what forum it was, but an online search for "TJM Pro Locker" will probably get you there.
As I wrote, I expected a pretty high level of consistency from Toyota. Odd, but I'm sure the answer will turn up sometime. Meanwhile it runs great. I changed the oil and got some metal off the magnet this morning and will probably change it again tomorrow. Depending on how it looks I hope I'm good until my next scheduled change in about 5k. I definitely needed a better way to wash it out after all that grinding. Well if my axle seals go, I'll know why....
BTW, jeff@justdifferentials.com says he is available to answer any questions anybody might have.
Last edited by Rich_O; Jan 5, 2012 at 07:59 PM.
Jun 7, 2013 | 03:53 PM
#6
Tjm pro locker
Hey Rich-
I know this thread is 1.5 years old.....Just wanted to add a TJM locker install to this thread that I recently did for Bill who lives 20 miles from me. I probably should have ordered and waited for the British tap to arrive but I took a shortcut in regards to the brass bulkhead that passes thru the 3rd. Anyways, I do like the overall simplicity of the TJM. No clearance issues reported from Bill when he installed this 8.4" 3rd into his 1996 T100 truck. And he has yet to find the time to finish plumbing the air hose and such.
Ken
http://www.gearinstalls.com/tjmlocker.htm
This link has a massive 130 pictures loading

Last edited by ZUK; Jun 7, 2013 at 04:21 PM.


Thread
Thread Starter
Forum
Replies
Last Post
RedRunner_87
95.5-2004 Tacomas & 96-2002 4Runners (Build-Up Section)
84
Jun 1, 2021 01:51 PM
FS[PacSouthWest]: 2- 8"3rd members:4.88 ratchet lockers,new setup kit, rear axle rebuild kit,diff armor
jerusry
Axles - Suspensions - Tires - Wheels
1
Oct 19, 2015 05:28 PM
MTLroadierunner
86-95 Trucks & 4Runners
1
Jul 20, 2015 03:07 PM
toyoda8488
84-85 Trucks & 4Runners (Build-Up Section)
2
Jul 5, 2015 10:18 PM


