When you click on links to various merchants on this site and make a purchase, this can result in this site earning a commission. Affiliate programs and affiliations include, but are not limited to, the eBay Partner Network.
All you need to tell if the vacuum is switching is a Mark I thumb. Remove each hose in turn from diff at VSV and apply thumb. Repeat with 4wd engaged. Should move from one side to the other.
But now it does sound like you have a diff issue.
I don't like your test of bypassing the VSV to manifold output line (can you output vacuum?) because you also bypass the reservoir, and you're not pulling much vacuum at idle. I like to charge up the system by twisting the throttle plate a few times, engage 4wd on the J-shift, ...and then switch the hoses quickly. That allows strong vacuum from the reservoir to flow to the actuator. Then do the drive back and forth thing. You'll feel it if the frot diff engages even if the switch is broken.
Unlike the fancier models, on our rigs the switch on the front diff just lights the light, it's not needed for mechanical engagement.
when I bypassed the VSV's I connected to the vacuum line that fed the VSV's - reservoir still connected
yes, I have a wiring diagram & did notice the switch only fed power to the dash indicator
vacuum diaphragm rusted - 4x4 side OK, 2x2 not - epoxy fixed this
vacuum hoses from switches to diaphragm leaking - replaced
vacuum switch for 2x2 side not functioning - checking to see if he can service it
i have the infamous flashing 4wd light on a 2000 limited 4Runner. I have checked all sensors except ones on very top of transfer case and all were good. I also used a battery charger to apply voltage to the actuator and it will cycle back and forth once and will not do again unless I drive it and cycle again with a battery charger. Otherwise after one cycle of movement from the actuator it will only buzz. Is moving just one cycle correct or should I be able to jump it and move back and forth multiple times with a battery charger?
I also have removed the cover on the actuator motor and magnets are in place as they should be. Should I be able to turn the motor by hand or will it resist turning?
Wow. There is a TON of information here on this. First of all, I want to say thank you to the folks on this forum and over at T4R for all of the insight into this issue.
I recently took a trip with my 2001 4Runner Limited. We got on some mild ORV trails so I decided to kick the 4WD on. When I hit the button the lights started flashing but I didn't hear anything happening under the truck. Tried the rocking back and forth method and still nothing. So after about a month of researching and troubleshooting the issue I finally was able to get it fixed. I understand that there are a lot of posts here but I'm hoping that someone might benefit from my experience.
First off, it is important to note that the 2001-2002 4Runner 4WD system is slightly different from the earlier years so please make sure you do your research. In my research, I found that the T-Case actuator on the 01-02 4Runner is identical to the actuator that was used in the Sequoia from 01-04. With that being said, I stumbled across this video that was absolutely essential in diagnosing and fixing my issue. Please watch this if you are having issues with your 4WD, it will give you a very good understanding of where everything is located and how EXACTLY it operates. Link here:
After watching this video SEVERAL times I was able to pinpoint that my A.D.D. actuator was intermittently not working and that my T-Case actuator motor was failing and the actuator was out of time with the T-Case. Initially I crapped my pants learning that the T-Case actuator is over $1000 from Toyota and that the T-Case needs to be removed and opened in order to replace it. But, going back to the video mentioned above, you can see that the only portions of the T-Case actuator that can fail, or are prone to wear, are the motor, worm gear and rotary contacts, which all reside inside the REMOVABLE black plastic housing of the actuator. So, I ended up finding a used T-Case actuator that was removed from a 03 Sequoia that was in an accident. It came from down south so it was rust free and much cleaner than the actuator on my rig. The part came in, I swapped the housing with motor and rotary contacts onto the old actuator after manually rotating the gear inside the actuator to the correct position... (move the gear so the three "fork" contacts attached to it create continuity between ground and the mode loop the replacement actuator was in). After that I also swapped the 2 T-Case position switches from the replacement unit into my old actuator. Side note here... I tested my switches and they checked out fine but I figured since the replacement actuator came with the switches and they were in better shape than mine it was worth it to go ahead and swap them too. Also, this actuator cost me $250 which, considering those switches will cost you at least $100 from Toyota, and the fact that the new actuator is over $1000, I was happy to shell out the cash.
The second part of this is the A.D.D. actuator. I was able to find one on EBAY for about $170. It was a legit, brand new, in the box, TOYOTA OEM part. Dealer wants about $300 for these so look around before you buy. They can be found for cheaper. Anyway, replacing this was actually the hardest part. This actuator is stuffed on the backside of the front diff with the P/S rack and cross member just inches behind it. TIGHT SPACES on this, get your extensions and swivel joint sockets out! I've read that it's nearly impossible to wrangle this actuator out of that spot so I decided to remove the right front half shaft and the A.D.D. tube on the right side of the diff. I'll admit, it was a pain getting the tube off (you'll need and E14 torx socket to do it) but once it was out the actuator has a nice opening on that side to slide out from. Put everything back together (make sure to use FIPG on the mating surfaces of the actuator and the diff housing).
Replacing these items fixed my rig. This is probably worst case scenario. Replacing both actuators at the dealer would have cost me THOUSANDS. For about $400 and several hours of my time/labor I was able to fix mine. IT CAN BE DONE! There's a lot of info here, and I hope that this will be useful to someone who might also be having this issue.
Last edited by Sweaty_Butcher; Jun 16, 2018 at 03:45 AM.
Is there a link or guide to breaking open a 99/00 limited actuator to clean it out and lube everything so it's not sticky?
I replaced the front and tcase actuator sensors, did troubleshooting on the front vacuum and connectors, everything I could think of. Nothing fixed the blinking 4x4 lights.
I finally got under there, disconnected the 6 pin connector for the transfer case, and jumped pins 2 and 3 to force the actuator to move.
It was sluggish, but moved a little better after being exercised a few times. My guess is that the actuator seized up after sitting in a cold shop for a few months during the motor swap. It still doesn't like moving in and out from the power supplied by the harness, it moves better when jumped directly from the battery.
For reference, here's the pin diagram and what pins to jump to get the actuator to move:
Also please email me everything posted earlier in this thread, as the links are now dead. I'll rehost everything and get new working links back up.
after replacing 3 of the switches checking the vacuum lines , jumping the tranfer case actuator wich seem to be working fine . i used the electrical diagrams to test the wiring and one of the wires from the actuator was not sending signal to the 4wd ecm . i decided to open it where the wiring goes in and it was a little dirty with old yellow grease . so i clean it up and tested it and now it was worsening . i had not signal to the 4wd ecm on two wires so i figure im on to something, first time i used gasoline to clean it cause i didn't have any eletrical cleaner . so i when i got some electrical cleaner and cleaned it again and use sandpaper to clean it good .. put some electricalgrease ,put it back together and.... now it works , first couple times took some backing up and going forward, and now after a few times . is working great,, i kind of went after the sensors cause when i tested the actuator with 12 v. it worked
I'm working through this thread as I've encountered a similar problem on my 02. I apologize for the dumb question as I'm a bit new to this, but how to I apply voltage to the pins on the actuator? I read a suggestion of "12 volts under a 2 amp load" but I'm not sure how to do that. Run wires from the battery?
I'm working through this thread as I've encountered a similar problem on my 02. I apologize for the dumb question as I'm a bit new to this, but how to I apply voltage to the pins on the actuator? I read a suggestion of "12 volts under a 2 amp load" but I'm not sure how to do that. Run wires from the battery?
there is a walk-thru in the service manual where you bring the car battery down or use the 12V pin from the harness and a relay and test the actuator pins. I�ll edit this post in a minute with the FSM page number.
I�ve seen the multitude of posts related to stuck in 4wd. I haven�t seen a problem similar to mine and I know this thread covers the problem.
In the morning, my �93 4Runner will start out in 4lo. After about mile or two, it will switch to 4hi and very shortly after it will drop to 2wd. I suspect is has to do with the vacuum hoses or pump. I don�t have to do anything except drive it slowly. Anyone have thoughts?
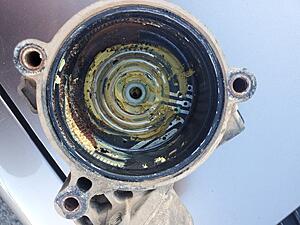
I pulled off my actuator cover and it looks like this:
The large gear on the actuator looked fine. There was no water in there either. But I think the crud by the worm gear on the cover might be causing some of my trouble. What's the best way to go about cleaning it? Any particular dielectric grease to use before reinstalling? OEM? I'm assuming it's safe to apply 12v to the various contacts until I figure out how to spin the worm gear, correct? I'm having trouble both with 4WD and the CDL - would cleaning up the gear (and the contacts) possibly help with both?
I pulled off my actuator cover and it looks like this:
What's the best way to go about cleaning it? Any particular dielectric grease to use before reinstalling? OEM? I'm assuming it's safe to apply 12v to the various contacts until I figure out how to spin the worm gear, correct? I'm having trouble both with 4WD and the CDL - would cleaning up the gear (and the contacts) possibly help with both?
clean all of that up with brake clean or electrical contact cleaner. Get all that dried yellow crud out of there. You can polish the metal contact traces with some #0000 steel wool. Then apply a coating of dialectic grease to the inside. I use Permatex, but what ever the parts store has or you have on hand will work. Don�t forget to clean and polish the three drag pins on the transfer case side.
clean all of that up with brake clean or electrical contact cleaner. Get all that dried yellow crud out of there. You can polish the metal contact traces with some #0000 steel wool. Then apply a coating of dialectic grease to the inside. I use Permatex, but what ever the parts store has or you have on hand will work. Don�t forget to clean and polish the three drag pins on the transfer case side.
My Issue: HELP !!!! I just got a 98 4Runner with only 140K. Can someone point me in the right direction in resolving my 98 4Runner issue? When I engage 4H it goes in silent but when it goes back to 2H (disengage) there is a loud bang (like a sled hammer bang). After pressing the 4WD (4H to 2H) there is a delay for about 30 second before it disengages as I drive down the road below 25mph. The 4wd light indicator goes on when I press the button and it goes off after the bang returning to 2H, the light never blinks. Can anyone help me troubleshoot what to look at to solve the hard disengagement of the 4WD? What has been done:
Changed Trans Oil
Changed Rear Diff oil
Changed Transfer case oil (was only � quart in case)
Check that front Diff is disengaged in 2H by rolling front drive shaft Action Plan:
1. Test Front Diff Switch
2. Test Brown Solenoid for Ohms and vacuum
3. Change front Diff Oil
4. Test other Switches
Last edited by 4Runner4vr; Jun 24, 2021 at 04:41 PM.
Just a quick note, you would do better to start your own thread with this problem. You'll get much more advice from folks if you do, rather than piggy-backing on another thread.
Having said that, it sounds to me, no pun intended, that the ADD actuator is either going bad, or needs lubrication. From having read the book, I don't think it's that difficult a task to accomplish. Have you tried stopping, and backing up about 3 meters before switching back to 2WD? That unloads the whole front set up, and allows everything to loosen it's self up, taking the tension off the ADD clutch.
Are you doing the shifting in and out of 4WD on pavement, or on something a little sliperyer? Gravel, a dirt road, something like that? It matters. do your best not to shift out of 4WD on pavement. It holds the front wheels, loading the ADD clutch, making it tougher to disengage it.
Or, just remove and check the ADD actuator, and check the clutch assembly, as well as the actuator itself. Take the 4 bolts off of it, and use a hammer handle to pry it off. Then, you can apply vacuum to the two ports to see how well it moves.
Here are the applicable parts from the FSM:
when I bypassed the VSV's I connected to the vacuum line that fed the VSV's - reservoir still connected
yes, I have a wiring diagram & did notice the switch only fed power to the dash indicator
mark
OMG, this unbelievablely helpful, I will get back to everyone on what I discover.


 Mar 31, 2016, 02:49 PM


 so i figure im on to something, first time i used gasoline to clean it cause i didn't have any eletrical cleaner . so i when i got some electrical cleaner and cleaned it again and use sandpaper to clean it good .. put some electricalgrease ,put it back together and.... now it works , first couple times took some backing up and going forward, and now after a few times . is working great,, i kind of went after the sensors cause when i tested the actuator with 12 v. it worked