
3rd Gen Bumper Light Mod
 Oct 5, 2009 | 10:03 AM
#21
Thread Starter
Registered User
iTrader: (1)
Joined: Jul 2009
Posts: 1,088
Likes: 0
From: Central, Arkansas
ok, so I have the parts and free day to do this mod. I bought two pigtail 7443 sockets which fit right into the stock location (twist and lock) but I'm having a problem with wiring. The 7443 socket has 3 and the 7440 has 2, we all know this. So, how do I know what color wire to tie into the old wires. The new wiring has a plain black, a green with yellow stripe, and a red with blue stripe. The stock wiring to the 7440 has a white with black and grey with black. Which wires connect to those?
Oct 5, 2009 | 06:03 PM
#22
Thread Starter
Registered User
iTrader: (1)
Joined: Jul 2009
Posts: 1,088
Likes: 0
From: Central, Arkansas
So I got things wired up today. They kept blinking fast (like the warning when a bulb is going out) I kept trying at it until I finally blew a fuse and couldnt figure out which fuse. I finally found it and then put the stock setup back until I can get some further research done on this. Any help would be nice....
Oct 6, 2009 | 08:55 PM
#25
Registered User
Joined: Sep 2009
Posts: 178
Likes: 0
From: East Alton, IL
I agree with Elton on this. Just check and see which wire is the low and that will be the running lights and the high will be the turn signals.
Now my dilemma is trying to get my DRL's to turn off when I turn the switch off. They just stay on until i turn my truck off. I cant fig out why though. Its like something bypasses the switch and keeps them on all the time.
Now my dilemma is trying to get my DRL's to turn off when I turn the switch off. They just stay on until i turn my truck off. I cant fig out why though. Its like something bypasses the switch and keeps them on all the time.
Last edited by 4runnerteen; Oct 6, 2009 at 08:56 PM.
Oct 7, 2009 | 08:15 AM
#26
Thread Starter
Registered User
iTrader: (1)
Joined: Jul 2009
Posts: 1,088
Likes: 0
From: Central, Arkansas
ok, well I'm back at it again this mornin tryin to figure everything out. I know I've got the right wires connected and it's still blinking fast. I blew the same fuse again, the tail 10amp fuse. I don't know if I keep blowing it bc I have the fog mod done and it's drawing too much from the fogs and and the new lights or that it's just drawing to much power from the mod I'm trying to do. Evidently the tail light fuse works for the corner lights as well. Would adding a resistor help or whats the deal here. I'm tired of buying fuses, lol
Last edited by JWaldz; Oct 7, 2009 at 08:20 AM.
Oct 7, 2009 | 09:29 AM
#29
Thread Starter
Registered User
iTrader: (1)
Joined: Jul 2009
Posts: 1,088
Likes: 0
From: Central, Arkansas
No, it's not an LED bulb. Just a normal bulb but the super white xenon. Well, for a fact I know the stock wiring works cus I've already put it back once before. I'm gonna keep trying until I figure this damn thing out.
Oct 7, 2009 | 10:05 AM
#30
Thread Starter
Registered User
iTrader: (1)
Joined: Jul 2009
Posts: 1,088
Likes: 0
From: Central, Arkansas
OK! After toying with the sockets and the bulbs and wondering why my HIGH output was not coming on I pushed on the bulbs and realized HEY, if i push hard enough the high comes on. The stupid sockets I bought from autolumination had these pieces on them that wouldnt allow the bulb to sit flush all the way in the socket. So i took a knife and cut them off. I think it had something to do with the bulbs I bought too cus the end pieces were plastic, it wasnt all glass. WOOHOO, my project is complete. I'll take some pics of the wiring and finish everything up. Thanks for all the help guys.
Oct 7, 2009 | 11:33 AM
#32
Thread Starter
Registered User
iTrader: (1)
Joined: Jul 2009
Posts: 1,088
Likes: 0
From: Central, Arkansas
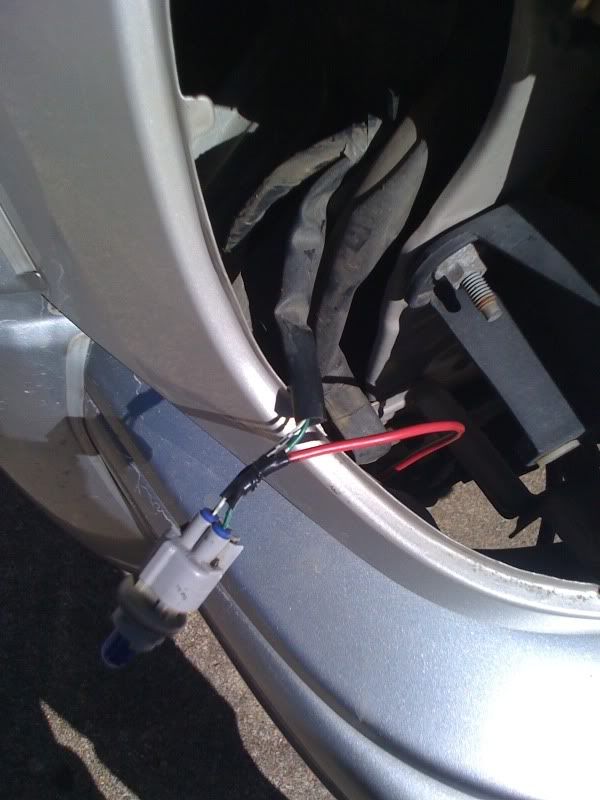
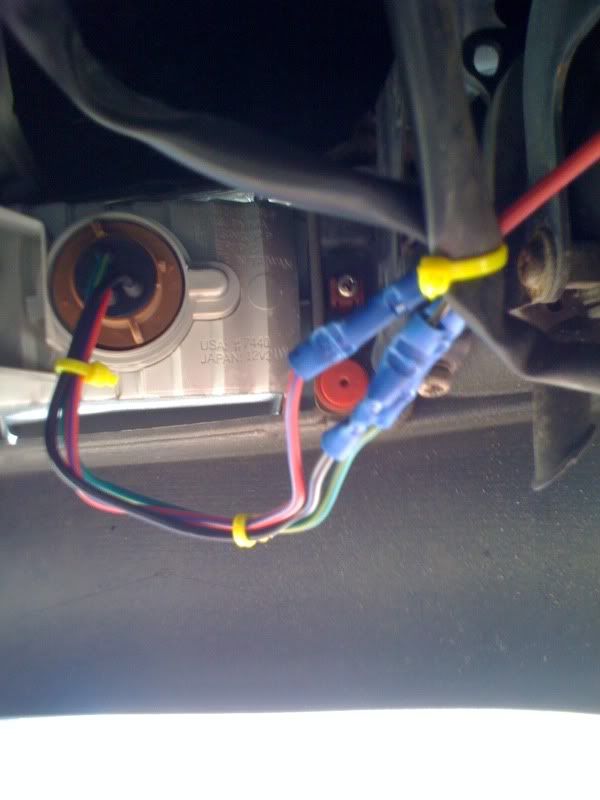
yea, me too! I feel pretty dumb when all along it wasnt the wiring, it was the socket. I'll take some pics at night for the mean time here is a couple of the wiring. Pretty self explanatory. High (green with yellow stripe) stays on the blinker circuit and low (red with blue stripe) is ran up to the side marker light. Black wire, grounded to an existing ground wire.
oh, and FYI the 7443 sockets I bought from autolumination plug right into the existing stock lamp. Just takes a little pressure to get it in and then twists like normal. If you go with a bulb that isn't all glass (plastic on the bottom insert) you might have to mod the socket like I did. Rather simple and easy
oh, and FYI the 7443 sockets I bought from autolumination plug right into the existing stock lamp. Just takes a little pressure to get it in and then twists like normal. If you go with a bulb that isn't all glass (plastic on the bottom insert) you might have to mod the socket like I did. Rather simple and easy
Last edited by JWaldz; Oct 7, 2009 at 11:37 AM.
Oct 7, 2009 | 01:19 PM
#33

[QUOTE=Ron Helmuth;51217319]okay I have been thinking about this a few days now-
3/ Ritzy Runner has done it the opposite way-with the sidemarkers serving dual function as turn signals. Perhaps this will give you the same type of results you seek and stay legal.
I searched his posts but found nothing regarding corner running lights doubling as signal lights. Something I'm considering since my signal lights appear to be difficult to see for oncoming drivers as they're tucked in behind and between the two tubes of my Smitty Built bumper
Oct 7, 2009 | 07:45 PM
#34
Thread Starter
Registered User
iTrader: (1)
Joined: Jul 2009
Posts: 1,088
Likes: 0
From: Central, Arkansas
Here's a pic I took tonight and a video...
It may look like it's blinking fast but it's not.. Im using my iPhone to shoot the vid.
http://www.youtube.com/watch?v=y7a-EEe-B4w
btw.. don't ridicule my southern accent. I know I have one, you dont have to let me know
It may look like it's blinking fast but it's not.. Im using my iPhone to shoot the vid.
http://www.youtube.com/watch?v=y7a-EEe-B4w
btw.. don't ridicule my southern accent. I know I have one, you dont have to let me know
Last edited by JWaldz; Oct 7, 2009 at 07:49 PM.
Oct 8, 2009 | 08:33 AM
#38
Thread Starter
Registered User
iTrader: (1)
Joined: Jul 2009
Posts: 1,088
Likes: 0
From: Central, Arkansas
well, i'm pretty sure its illegal around here but cops don't really care about it. The only thing they are absolutely strict on is window tint and not wearing ur seatbelt.
Oct 10, 2009 | 06:57 PM
#39
Contributing Member
Joined: Jan 2003
Posts: 10,916
Likes: 1
Been thinking about this for a while too. Thanks for giving it a go. So would you mind summarizing everything you did now that you got it all working? I think it would be great to have a final summary, including wiring tricks, to get this done. I tried to go through the thread but piecing it together wasn't much fun. Thanks again!
Oct 10, 2009 | 07:54 PM
#40
Thread Starter
Registered User
iTrader: (1)
Joined: Jul 2009
Posts: 1,088
Likes: 0
From: Central, Arkansas
Been thinking about this for a while too. Thanks for giving it a go. So would you mind summarizing everything you did now that you got it all working? I think it would be great to have a final summary, including wiring tricks, to get this done. I tried to go through the thread but piecing it together wasn't much fun. Thanks again!
I bought the 7443 sockets from autolumination.com (http://autolumination.com/7443_7440.htm) scroll pretty much all the way down and you will see them. I then bought a pair of 7443 xenon super white bulbs, but any 7443 bulbs will work. The snag I ran into was the fact that I bought a pair of bulbs that had plastic end pieces and wouldnt allow the bulb to sit all the way in. I'm sure any glass bulb with work fine. If not, anyone can pm me and I will explain more into detail about it.
The new socket will come with 3 wires. A black wire, a green wire with yellow stripe, and a red wire with blue stipe.
You're old socket contains 2 wires. A white with black (this is your ground), and a gray with black (it also might be green with a yellow stripe)
Be sure when you cut off your stock socket you leave enough wire to splice. The green wire with yellow stripe will connect to the stock green wire with yellow stripe you spliced after cutting off your stock socket (if it's not that color then it will be gray with a black stripe). Then connect the black wire to the white wire with a black stripe. Lastly run the red wire with blue stripe up to corner light green wire like in the picture.
What I did for an easier install was test all my wiring connection first to see if it all worked. After it was a go I took everything apart and placed my new 7443 socket in the light. It might take a little force to get it in there but it will go, I promise
Once it does, just twist and you're set. Then commence all the wiring again and you should be set. Any questions feel free to ask. I think in all I spent around 15 bucks with shipping.
Last edited by JWaldz; Oct 10, 2009 at 07:56 PM.


