
Mountain Cop's 1986 4Runner Build-Up Thread - "FireRunner"
 Jan 16, 2010 | 11:28 PM
#21
Thread Starter
Registered User
Joined: Nov 2009
Posts: 504
Likes: 2
From: Central Sierra Nevadas (Oakhurst)
Yeah... I should have thought of this before... I took another look at that fuse- but from the bottom this time. It is a 70 amp fuseable link that is actually screwed in. I bought another one.
Doh!
Found quite a few more shorts today (rear tail light clusters, front right marker lights and signals), but didn't find where the short actually occurred. I'm thinking of arming myself with several roles of electrical tape and just slicing open the wiring loom until I find the melted or worn spot. So far, everything LOOKS fine, but reads as not fine. I ran out of light before I could get to testing from the ends of the loom at the ECU. I think that will be my next step.
I downloaded the PDF shop manual, but I need to throw it on a thumb drive and print it out at work. I don't have a printer at the house and try to keep away from the computer while working on cars!
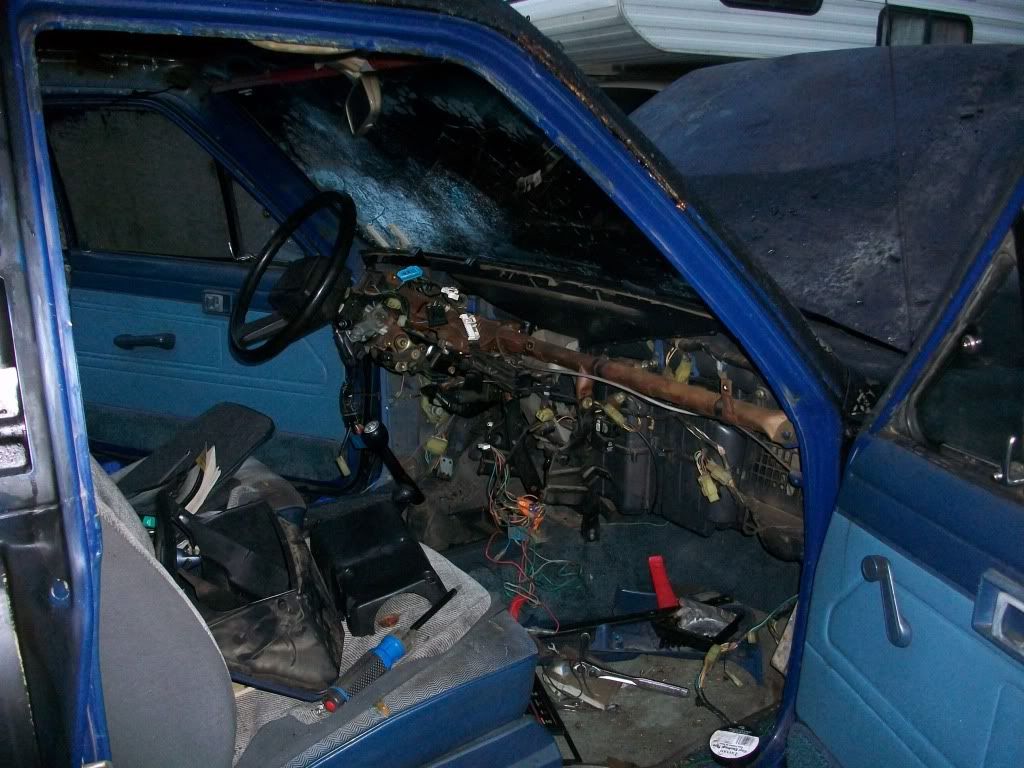
I did go ahead and start removing some of the melted pieces, as well as the lower metal facia. It is much easier to get to the wiring now. The smell of melted plastic really is nasty. 7 hours since I stopped working and I can still smell it.
More to follow. I'm hoping that this will be a bit more interesting once the vehicle actually does something other than sit there.
MC
Doh!
Found quite a few more shorts today (rear tail light clusters, front right marker lights and signals), but didn't find where the short actually occurred. I'm thinking of arming myself with several roles of electrical tape and just slicing open the wiring loom until I find the melted or worn spot. So far, everything LOOKS fine, but reads as not fine. I ran out of light before I could get to testing from the ends of the loom at the ECU. I think that will be my next step.
I downloaded the PDF shop manual, but I need to throw it on a thumb drive and print it out at work. I don't have a printer at the house and try to keep away from the computer while working on cars!
I did go ahead and start removing some of the melted pieces, as well as the lower metal facia. It is much easier to get to the wiring now. The smell of melted plastic really is nasty. 7 hours since I stopped working and I can still smell it.
More to follow. I'm hoping that this will be a bit more interesting once the vehicle actually does something other than sit there.
MC
Jan 17, 2010 | 01:30 PM
#23
Thread Starter
Registered User
Joined: Nov 2009
Posts: 504
Likes: 2
From: Central Sierra Nevadas (Oakhurst)
When I REALLY start to pull it apart, I am going to not only wear a mask, but spray it down repeatedly through the project. The carpet is all coming out, so hopefully that will also remove a lot of the smell and "death powder". If I'm lucky, the seats won't retain so much scent that the thing still stinks. Even so, I can remove them and clean them.
Good looking out, though! I appreciate it.
Good looking out, though! I appreciate it.
Jan 20, 2010 | 05:15 PM
#24
Thread Starter
Registered User
Joined: Nov 2009
Posts: 504
Likes: 2
From: Central Sierra Nevadas (Oakhurst)
A bit of success today. I put my good battery into it again and, having acquired a key, attempted to start the bugger. After replacing the positive terminal, I was able to get the car to turn over. I was also able to get a spark. The engine wouldn't fire, though.
Thinking back, I can't honestly say that I checked the fuel gauge... though I imagine that there is still gas in the tank. After a bit of poking and prodding, my test battery had begun to go down a bit. The 'runner's battery was toast. I found what I believed to be the fuel line (banjo fitting on EFI?). It smelled like gasoline, anyway. I cranked the truck over a couple of seconds, but was unable to get any fuel out. That is when the battery died. Now then, does this mean anything? Should fuel have spewed out of that hose while the truck was being cranked over?
What do you guys recommend for further testing? I'm a bit more familiar with the workings of carb'd engines.
The other thing I found that will need to be addressed is this. There is a plug in the fuseblock. It is the one on the right of my photo from the original post. This plug has three wires coming out of it. They go to the harness below the fuse block. One of the wires is grounded. This wire is the red one with the green stripe. It is located on the corner of the plug closest to the driver (rear left if facing ahead). This wire continues into the harness, through the fender and into the harness that goes above the inner fender heading back into the firewall. That is where I loose it. I didn't have time to get behind the glove box, but I imagine that I will have to in order to find the short. It didn't appear (though I could be wrong) that it was one of the wires that made it into the ECU, and it didn't appear to be heading back to the rear taillights.
Does anyone know where that wire goes? I've looked over several wiring diagrams, and I can't seem to find one which shows a red/green wire.
Jan 25, 2010 | 07:37 PM
#25
Thread Starter
Registered User
Joined: Nov 2009
Posts: 504
Likes: 2
From: Central Sierra Nevadas (Oakhurst)
(fresh charged battery)+(starter fluid)+(fuel pump plugged back in)=IT RUNS!
Yeah, I'm not really all that sure what I did different. I think that perhaps the battery was low when I tried before, or perhaps it was that I had the harness leading to the back of the truck (which includes the fuel pump power) disconnected, but I got it to fire with starter fluid today. It would run, then die, as though it had run out of gas. I traced the power to the gas pump and upon plugging it back in, started the truck as though it had never been in a fire at all.
I backed it out of its erstwhile crematorium, down the driveway and turned it around before backing it back into the garage and called it a night.
I realize now that I never confirmed that it was providing a charge. That will have to wait until Saturday at the soonest (depending largely upon whether my wife/daughter meets their due date of this Thursday.
The connection nearest the large fuses in my fuse block photo from my first post on this thread is unplugged. The Red/Green (possibly red/blue?) wire is still grounded. The car runs fine without this plug connected. It holds three wires. Can someone with a 86 or 87 'runner help me out by unplugging this plug and telling me what STOPS working? It will really help me trace the short. Thanks in advance.
all in all, I'm calling today a success. I need to come up with a headlight/taillight/brake light/ turn signal solution, and I need to replace the windshield. After that, it should be ugly but roadworthy (which means that I can remove it from the burned shell of a garage and actually start doing fun stuff to it.)
MC
Jan 30, 2010 | 06:55 PM
#26
Thread Starter
Registered User
Joined: Nov 2009
Posts: 504
Likes: 2
From: Central Sierra Nevadas (Oakhurst)
I left the battery in the car for a week, and when I took a look today, I found that it was dead. It jumped, but at anything over an idle, the battery light came on. I checked the voltage at the battery. When idling, it read 14.5 volts. If I raised the RPM, it ran up to 17 volts. I figure the regulator is out. That would explain the demise of the previous battery.
I figured out what the red/green wire from the fuse block ran to. It is the high beam wire. Strangely enough, when I flip the high/low beam switch, the red/yellow wire next to the red/green one also grounds. The red/yellow one is the low beam.
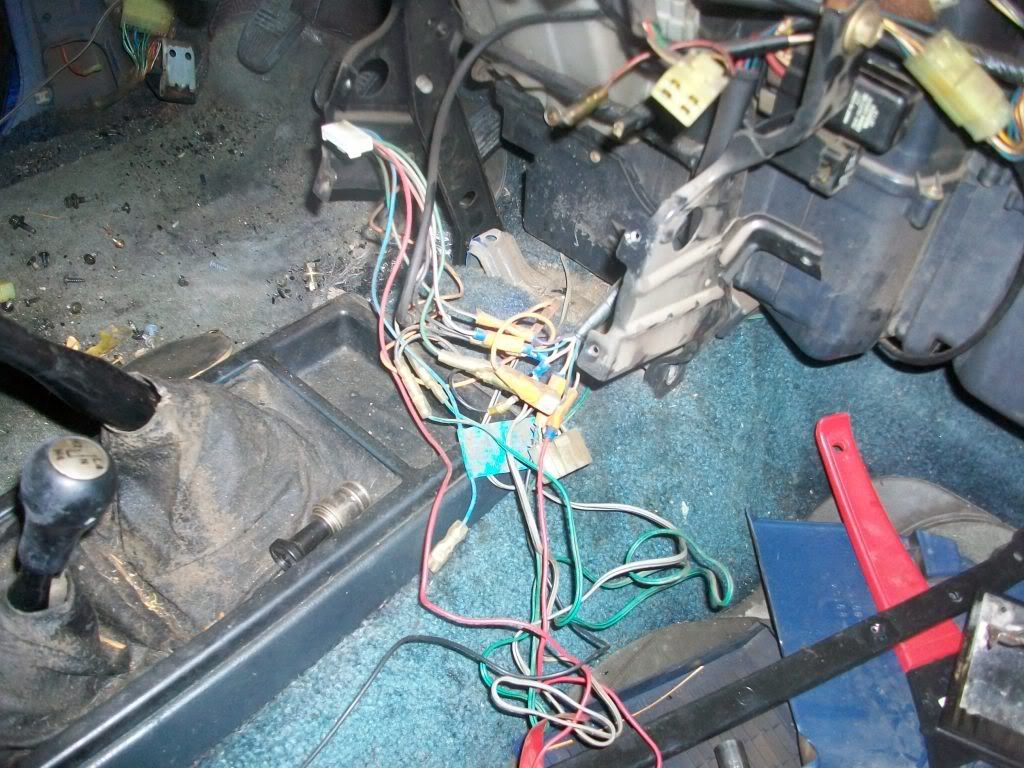
I pulled the steering column covers and unplugged the harness of wires going to the light/signal stem. With the harness unplugged, I again tested the red/green wire and the red/yellow wire. The red/green wire was still grounded. The red/yellow wasn't. I still need to find where the red/green wire grounds. I removed the glove box and the ECU. The wiring harness from the fuse block goes into the fender and through a hole to the rear of it that is barely visible and sits just above the ECU. It splits into two harnesses at that point. One harness appears to go up above the heater assembly in the dash, and ostensibly to the steering column. The other splits into the harnesses that plug into the ECU and a few assorted things close to the passenger area. I found one red/yellow wire going into the ECU, but no red/green one. I did find one red/green wire in the lower harness, but it wasn't grounded.
SOOO I think I need to pull the dash pad at least in order access the rest of the harness, and I have no idea how to do this. It's pretty brittle. I will search my FSM and see what I find. Any tips will be appreciated. I will try to remember the camera when I go over there next so I can document the dash removal (unless someone has covered it. I admit that I haven't searched yet. I will do so now.)
On a good note, the taillights appear to be fully functional.
MC
I figured out what the red/green wire from the fuse block ran to. It is the high beam wire. Strangely enough, when I flip the high/low beam switch, the red/yellow wire next to the red/green one also grounds. The red/yellow one is the low beam.
I pulled the steering column covers and unplugged the harness of wires going to the light/signal stem. With the harness unplugged, I again tested the red/green wire and the red/yellow wire. The red/green wire was still grounded. The red/yellow wasn't. I still need to find where the red/green wire grounds. I removed the glove box and the ECU. The wiring harness from the fuse block goes into the fender and through a hole to the rear of it that is barely visible and sits just above the ECU. It splits into two harnesses at that point. One harness appears to go up above the heater assembly in the dash, and ostensibly to the steering column. The other splits into the harnesses that plug into the ECU and a few assorted things close to the passenger area. I found one red/yellow wire going into the ECU, but no red/green one. I did find one red/green wire in the lower harness, but it wasn't grounded.
SOOO I think I need to pull the dash pad at least in order access the rest of the harness, and I have no idea how to do this. It's pretty brittle. I will search my FSM and see what I find. Any tips will be appreciated. I will try to remember the camera when I go over there next so I can document the dash removal (unless someone has covered it. I admit that I haven't searched yet. I will do so now.)
On a good note, the taillights appear to be fully functional.
MC
Feb 1, 2010 | 03:04 PM
#27
Thread Starter
Registered User
Joined: Nov 2009
Posts: 504
Likes: 2
From: Central Sierra Nevadas (Oakhurst)
Well, this thing has begun to cost some real money. Pick a part in Fresno charged me a whole $2.83 for a new clutch cylinder reservoir cap. Looks pimp too.
I was able to get all the windows except the windshield clean yesterday. I also removed the rest of the headliner, the melted visors, and the dash. I got started on finding the ground, but ran out of light. I was unable to replicate the overcharging issue. It maintained a steady 14.5v throughout the RPM range. The headlights are both good, and the harness appears to be fine.
Photobucket and my computer aren't getting along, or I would add a gratuitous "dash carnage" pic. It isn't real carnage, but it isn't pretty either.
The windshield leaks at the top corners. Not a big surprise. I can also get a new windshield at pick-a-part for 29.00. They have a few of them there that appear to be in good condition.
Still looking for a new right side marker light. Pick-a-part didn't have any.
I doubt I will get a chance to play with it today. My wife is currently two days overdue with our daughter, and I need to be on a short leash.

 Feb 1, 2010 | 07:03 PM
#33
Thread Starter
Registered User
Joined: Nov 2009
Posts: 504
Likes: 2
From: Central Sierra Nevadas (Oakhurst)
I have too many CalFire friends to give it the name of their competition's mascot, especially after CalFire and local volunteers are who saved it from the barn fire!
"Firerunner" seems to have stuck. I am planning on leaving something melted on the truck. It will probably be the taillight lenses. They look pretty awesome. I like how the license plate light shield on the tailgate turned out as well. It's like modern art or something, but the "yota" is still clearly visible. I'm also looking for the right size of an old fire extinguisher to modify for use as an air tank down the road. It seems fitting. Unfortunately, I don't think that the body is in a condition that would allow a fire-engine red paint scheme to look decent at all.
"Firerunner" seems to have stuck. I am planning on leaving something melted on the truck. It will probably be the taillight lenses. They look pretty awesome. I like how the license plate light shield on the tailgate turned out as well. It's like modern art or something, but the "yota" is still clearly visible. I'm also looking for the right size of an old fire extinguisher to modify for use as an air tank down the road. It seems fitting. Unfortunately, I don't think that the body is in a condition that would allow a fire-engine red paint scheme to look decent at all.
Feb 2, 2010 | 08:21 AM
#35
Contributing Member
Joined: Mar 2003
Posts: 11,334
Likes: 0
From: COTKU,Ontario,Canada
Congrats on the kid... your first?... don't worry my friend was almost a week late with her first... takes a little while for the first to "find the trail" so to speak... don't forget to post some pics in our babies/kids thread...
Feb 2, 2010 | 10:22 AM
#36
Thread Starter
Registered User
Joined: Nov 2009
Posts: 504
Likes: 2
From: Central Sierra Nevadas (Oakhurst)
Yeah, this is the first. Thats actually WHY I am getting back into Yotas. I have a couple of old motorcycles that occupied my time for a bit, but I wanted a vehicular hobby that I could share with kids. Things look like they will probably transpire today or perhaps early tomorrow morning.
Feb 2, 2010 | 10:54 AM
#37

Registered User
Joined: Mar 2008
Posts: 3,870
Likes: 4
From: Chico, California
my $0.02..
Grab a fire extinguisher and mount that bad boy right on the tranny hump.. or in arms reach.
Because with the possibility of any wire shorting out since being burnt it may be an issue.. And if not.. they are good to have.. Mine caught on fire the day i bought it and had some work to do to get it running..
good luck!
Whats the plans for this thing after you get it running?
Feb 2, 2010 | 01:22 PM
#38
Thread Starter
Registered User
Joined: Nov 2009
Posts: 504
Likes: 2
From: Central Sierra Nevadas (Oakhurst)
Yeah, I'm absolutely going to mount an extinguisher inside, but probably in the passenger inner kick area. I want it accessible from either side.
As far as plans... the goal is to make a durable, drivable getter and dog-hauler which is still capable on old fire roads and trails in the area. I'm not into lift, and I'm not into mud.
Due to funding, or lack thereof, I won't be doing much at first. Front sway removal probably. I'll drive it normally first just so I can see what the difference feels like. I may not put the dash back on and just build a diamond plate one. It looks like a Zuk mod may be in order. Perhaps BJ spacers and relaxed T-bars. I'd like a bit of flex, but not much, if any lift.
This is certainly a budget build. When I get around to OBA, it will be of the A/C compressor variety. I doubt I will replace the plastic grill or headlight buckets. I'm thinking of building a frame around them made of square tubing, then building a removable expanded metal screen that can be attached over it. This would protect the headlights and the radiator, and should be simple enough to build. There are other plans... but we all know how that goes. My most immediate goals are to 1.) Find and fix the grounded wire and 2.) replace the windshield. Making it drive has to occur before everything else. I'm not a fan of plastic or carpet, so those may get eliminated eventually as well.
Feb 2, 2010 | 10:33 PM
#39
Contributing Member
Joined: Mar 2003
Posts: 11,334
Likes: 0
From: COTKU,Ontario,Canada
If you want something classy and kid friendly instead of diamond plate why not go for a wood strip dash... kind of old fashioned barrel/wooden pipe type thing it would not get very hot in the sun and be safer to bump into... trust me kids bump into things {i did, you did, my friends kids do}
It would def. be one of a kind...
It would def. be one of a kind...


