
Gevo's 91 4Runner Build Thread
 Mar 14, 2014 | 07:29 AM
#201

Thread Starter
Registered User
Joined: Sep 2013
Posts: 1,631
Likes: 110
Finally got my ADD system (fuel pump) relay in. If you remember I had previously had issues with the 4x4 system not engaging the front hubs and I tested things out and attributed it to the relay. I couldn't find a schematic of the relay to test, so I bought another one ($30 used!!) . Unfortunately until I go to install this new one I never think that when I put the engine back in I didn't remember which VSV is to which end of the ADD system, and was supposed to figure it out later.... I remember this just as I am testing the new relay... which 'didn't work'... so I swap the hoses and.. it works.. lol. I have a $30 relay I can sell now. Seriously gotta work on my memory.
Mar 16, 2014 | 08:18 AM
#202
Thread Starter
Registered User
Joined: Sep 2013
Posts: 1,631
Likes: 110
Just dropping in to add some other small items I worked on yesterday.
FIrst, this stupid antenna...

Look at the fastening style under the fender... it had damaged the fender a little.. pissed me off! It's a little ahrd to see in the pic until you zoom in on it...

Regardless, new antenna installed, damaged pain area painted to prevent rust and sealed with some clear silicon.


THen, came the new door weatherstripping. Unless you are ok with cutting and shortening and patching like I did... don't get these ones that I got. It's from AM-autoparts on ebay...
The quality was actually pretty good.. the fitment.. not so much.

Both sides! But, I just rigged it to work. On the bottom side.

Next, interior center dome light. this is no good. also, from the heat, one of the contacts in the assembly had come off. Gonna go LED crazy on the doom lights sometime soon.

to this.

That concludes yesterday work. Once I get all of these little things into place, I can start on some upgrades!
I have ordered new springs and already have my new shocks for the rear. Will be putting those in very soon.
FIrst, this stupid antenna...
Look at the fastening style under the fender... it had damaged the fender a little.. pissed me off! It's a little ahrd to see in the pic until you zoom in on it...
Regardless, new antenna installed, damaged pain area painted to prevent rust and sealed with some clear silicon.
THen, came the new door weatherstripping. Unless you are ok with cutting and shortening and patching like I did... don't get these ones that I got. It's from AM-autoparts on ebay...
The quality was actually pretty good.. the fitment.. not so much.
Both sides! But, I just rigged it to work. On the bottom side.
Next, interior center dome light. this is no good. also, from the heat, one of the contacts in the assembly had come off. Gonna go LED crazy on the doom lights sometime soon.
to this.
That concludes yesterday work. Once I get all of these little things into place, I can start on some upgrades!
I have ordered new springs and already have my new shocks for the rear. Will be putting those in very soon.
Mar 17, 2014 | 12:20 AM
#203

Registered User
Joined: Mar 2013
Posts: 1,047
Likes: 1
From: Central TX
Not sure where you got your weatherstrips from, but these fit perfectly:
User error on my part required some adjustment, but they fit perfectly once getting them aligned properly throughout. All the tabs lined up perfectly too. Have had to shut my doors hard for the past year, but that's finally lessening...
Sorry, would have pointed you in the right direction had you asked.
Edit: AM auto parts is selling metro molded LM136. They should not have required any cutting based upon my experience.
Last edited by RSR; Mar 17, 2014 at 12:22 AM.
Mar 17, 2014 | 05:51 AM
#204
Thread Starter
Registered User
Joined: Sep 2013
Posts: 1,631
Likes: 110
RSR, I wish I had asked now.. 
Well, everything seemed to be fitting well until I cam around to that corner of the door and found the extra length. The passenger side was a little worse. And, yes, i'm sure I have the right one on the right door. I'll shoot the seller an email about it, but I made it work.. got a little lazy.
However, that cruise control button.. that is a different story! I found a camery shifter that had the same internals and purchased it from ebay. Gets in, I take test it out and it has the same problem as my button. lol. That is gonna be returned!
Mar 17, 2014 | 01:33 PM
#205
Registered User
Joined: Mar 2013
Posts: 1,047
Likes: 1
From: Central TX
Yes, I had about 3" extra first attempt too.
But start with putting it in the slots/grooves and then aligning the post tab holder thingies correctly -- they have 3 or so clicks (don't have to insert all the way to start, one click will do and the click thingies match up 1 to 1 to all the keeper holes for them on your door). And then start adjusting your slack around.
I think, memory not perfect, but a lot of that slack ends up at the corners where it gets pushed back and extends once you closer your door...
Mar 17, 2014 | 01:43 PM
#206
Thread Starter
Registered User
Joined: Sep 2013
Posts: 1,631
Likes: 110
I was delicate with it to begin with. As I said it was all lining up very well until it was about 8-10 inches to long. I thought, oh it's a hot day maybe it has expanded, but, that is way to much. I had one push pin leftover as well and no holes for it ( I just remembered that!)
( I just remembered that!)
Mar 23, 2014 | 10:17 AM
#208
Thread Starter
Registered User
Joined: Sep 2013
Posts: 1,631
Likes: 110
SO, I unexpectedly had to change my rear breaks yesterday.. I hate drum breaks, HATE! I had the wheels off to change the springs and shocks which went very well.. then I noticed one rear wheel had wayy to much resistance. I had a hell of a time removing the shoe, thanks to one of the two threaded holes that was working still... The shoes were all cracked up and I saw some fresh oil spot just beneath the cylinder housing.... peeled the seal back and walla.. lots of oil.. checked the other side, and broken springs with same leaky cylinder. booo...
Problem was I was at my parents (still don't have my own garage ) and my car was my ride back home So, at around 6:30 pm I went to the store, got new pads, new spring set and new cylinders. This was the first time I've ever done drum breaks. The removal was fine, the reassembly of the first one was a pain in the ass, but many lessons learned later.. the other side was much quicker. My biggest problem was adjusting the shoes enough to bleed the breaks. Then, I realized NOONE was home.. i tried to bleed them along without the suction tool.. didn't work... lol. FInally around 12 am someone got home and helped me bleed them.
All this took my attention off of the beautiful job with the new springs and shocks... which... amazing difference... can't wait for new shocks in the front soon
Some pictures, this has been done many times on here so ....

My back is killing me today!

New stuff. Luckily the cylinders were only 15 bucks each and spring set was 13 bucks

My (hopefully temporary) overdrive switch. I switched on the of openning covers near the dimmer switch with the coin holder and put the switch on the cover, on the center console, next to the rear window button. I hope to find a replacement switch for the shifter some day
And, I had to paint the whole center console black to since this cover was black... lol.. Now, most of the interior trim in the front is black.. I like it better. I'll have pics of the interior soon


She is coming along slowly to my standards.
Im am purchasing parts related to a full frond suspension, control arms and CV axle re-build. Once I get all the parts in, I will dedicate a weekend for that work.. and that stupid clicking sound will go away!
cheers!
Problem was I was at my parents (still don't have my own garage
) and my car was my ride back home So, at around 6:30 pm I went to the store, got new pads, new spring set and new cylinders. This was the first time I've ever done drum breaks. The removal was fine, the reassembly of the first one was a pain in the ass, but many lessons learned later.. the other side was much quicker. My biggest problem was adjusting the shoes enough to bleed the breaks. Then, I realized NOONE was home.. i tried to bleed them along without the suction tool.. didn't work... lol. FInally around 12 am someone got home and helped me bleed them. All this took my attention off of the beautiful job with the new springs and shocks... which... amazing difference... can't wait for new shocks in the front soon
Some pictures, this has been done many times on here so ....
My back is killing me today!
New stuff. Luckily the cylinders were only 15 bucks each and spring set was 13 bucks
My (hopefully temporary) overdrive switch. I switched on the of openning covers near the dimmer switch with the coin holder and put the switch on the cover, on the center console, next to the rear window button. I hope to find a replacement switch for the shifter some day
And, I had to paint the whole center console black to since this cover was black... lol.. Now, most of the interior trim in the front is black.. I like it better. I'll have pics of the interior soon
She is coming along slowly to my standards.
Im am purchasing parts related to a full frond suspension, control arms and CV axle re-build. Once I get all the parts in, I will dedicate a weekend for that work.. and that stupid clicking sound will go away!
cheers!
Apr 3, 2014 | 12:07 PM
#209
Thread Starter
Registered User
Joined: Sep 2013
Posts: 1,631
Likes: 110
During rests last weekend working on the breaks, I also did some cosmetic work.
Removed faded ugly bumper. luckily it was still in good condition. Painted to protect some small rusting portions.

Got some bedliner spray from lowes, prepared the plastic surface for paint and...

Looks pretty darn good guys. I recommend this!


Removed faded ugly bumper. luckily it was still in good condition. Painted to protect some small rusting portions.
Got some bedliner spray from lowes, prepared the plastic surface for paint and...
Looks pretty darn good guys. I recommend this!
Apr 6, 2014 | 02:17 AM
#210
Registered User
Joined: Mar 2013
Posts: 1,047
Likes: 1
From: Central TX
Looking good Gevo!
I'm thinking of changing my rear bumper to the all black standard option rather than the premium chrome it is now after whenever it is I get around to buying and installing an ARB bumper. I'm going to want to do the A arm bushings and put in OME/ARB torsion bars before the bumper though too and not looking forward to either project...
Debating doing steel black rims at that point too, might just paint the stock premium aluminum ones though.
Also, on the trucks, there's three holes where you can install a ball on the bumper (removable plastic caps cover) and one of the two POs apparently used it for enough towing to bend the bumper a little which is annoying (if you haven't noticed I'm something of a perfectionist -- a serious problem with old cars, haha). Not sure why they installed a ball there when the towing package came w/ a hitch...
Last edited by RSR; Apr 6, 2014 at 02:19 AM.
Apr 6, 2014 | 08:03 AM
#211
Thread Starter
Registered User
Joined: Sep 2013
Posts: 1,631
Likes: 110
Looking good Gevo!
I'm thinking of changing my rear bumper to the all black standard option rather than the premium chrome it is now after whenever it is I get around to buying and installing an ARB bumper. I'm going to want to do the A arm bushings and put in OME/ARB torsion bars before the bumper though too and not looking forward to either project...
Debating doing steel black rims at that point too, might just paint the stock premium aluminum ones though.
Also, on the trucks, there's three holes where you can install a ball on the bumper (removable plastic caps cover) and one of the two POs apparently used it for enough towing to bend the bumper a little which is annoying (if you haven't noticed I'm something of a perfectionist -- a serious problem with old cars, haha). Not sure why they installed a ball there when the towing package came w/ a hitch...
I'm thinking of changing my rear bumper to the all black standard option rather than the premium chrome it is now after whenever it is I get around to buying and installing an ARB bumper. I'm going to want to do the A arm bushings and put in OME/ARB torsion bars before the bumper though too and not looking forward to either project...
Debating doing steel black rims at that point too, might just paint the stock premium aluminum ones though.
Also, on the trucks, there's three holes where you can install a ball on the bumper (removable plastic caps cover) and one of the two POs apparently used it for enough towing to bend the bumper a little which is annoying (if you haven't noticed I'm something of a perfectionist -- a serious problem with old cars, haha). Not sure why they installed a ball there when the towing package came w/ a hitch...
RSR, if you ever get rid of the stock rims, please let me know. I have aftermarket rims now that I do not like and am looking for the stock rims.
Apr 9, 2014 | 01:29 PM
#212
Thread Starter
Registered User
Joined: Sep 2013
Posts: 1,631
Likes: 110
I posted pics in the pics thread elsewhere, but wanted to keep them here as well
So, I finally got to take my 4Runner out to the dirt this weekend since I bought it a few months back and rebuilt it... lots of work.. paid off!
Even with street/all terrain tires and stock height I am very please with it. I didn't get into any trouble and it pulled me up and out of everything. However, I do need lockers. No serious off-roading can happen without at least a rear locker... anyway, sharing some pics
steep smooth hills are no problem.

limitations

Surprisingly I made it this far. Need bigger tires!

Looking mostly good

So, I finally got to take my 4Runner out to the dirt this weekend since I bought it a few months back and rebuilt it... lots of work.. paid off!
Even with street/all terrain tires and stock height I am very please with it. I didn't get into any trouble and it pulled me up and out of everything. However, I do need lockers. No serious off-roading can happen without at least a rear locker... anyway, sharing some pics
steep smooth hills are no problem.
limitations
Surprisingly I made it this far. Need bigger tires!
Looking mostly good
Jun 5, 2014 | 11:49 AM
#214
Thread Starter
Registered User
Joined: Sep 2013
Posts: 1,631
Likes: 110
An update!
Captions and pictures say it all
Remove: Wheel, Bairings/hub, tie rods (inner & outer), Rotor, both ball joints, CV axle, shock absorber and brake pads. Goal, replace all these things (except wheel)

New Parts (rebuilt OEM CV axles, after much research this was the right decision)

!

Most parts back on. First set of rotors were incorrect size! Damn centric!

Next day, New Duralast gold ones installed. Turned out to be a great combo with the centric pads! No Noise, no fade, and very smooth.

Both sides done.. my GOD that was a LOT more work that I anticipated!

AC system was next. Filled it, nothing worked, no clutch engagement. Mechanic who was filling refrigerant said it's my amplifier and bypassed it, and cold air flowed in! Lasted that day, all refrigerent lost by next day. Refilled, checked for leaks.. nothing.. drove home, and checked again and the leak had sprouted. Changed discharge hose! Good, week now with no leaks. Took all electronic components out, cleaned contacts, put everything back in and amplifier is now working

Next items.
Finally found a new grille, not stock, we'll see how it goes. I'll install tomorrow.
I got new CB radio, old one didn't fit anywhere in the car. lol. Installing tomorrow
Captions and pictures say it all
Remove: Wheel, Bairings/hub, tie rods (inner & outer), Rotor, both ball joints, CV axle, shock absorber and brake pads. Goal, replace all these things (except wheel)
New Parts (rebuilt OEM CV axles, after much research this was the right decision)
!
Most parts back on. First set of rotors were incorrect size! Damn centric!
Next day, New Duralast gold ones installed. Turned out to be a great combo with the centric pads! No Noise, no fade, and very smooth.
Both sides done.. my GOD that was a LOT more work that I anticipated!
AC system was next. Filled it, nothing worked, no clutch engagement. Mechanic who was filling refrigerant said it's my amplifier and bypassed it, and cold air flowed in! Lasted that day, all refrigerent lost by next day. Refilled, checked for leaks.. nothing.. drove home, and checked again and the leak had sprouted. Changed discharge hose! Good, week now with no leaks. Took all electronic components out, cleaned contacts, put everything back in and amplifier is now working
Next items.
Finally found a new grille, not stock, we'll see how it goes. I'll install tomorrow.
I got new CB radio, old one didn't fit anywhere in the car. lol. Installing tomorrow
Jun 5, 2014 | 11:52 AM
#215
Thread Starter
Registered User
Joined: Sep 2013
Posts: 1,631
Likes: 110
A picture of my buddies and a 3 way tow up the initial bump at the bottom of this climb. Thanks to no lockers on my car... yet 

This is the bottom. Stock suspension travel didn't cut it. But, overall, it surprised everybody at how well it did the rest of the trail!

Great Pic.

I can pose to

This is the bottom. Stock suspension travel didn't cut it. But, overall, it surprised everybody at how well it did the rest of the trail!
Great Pic.
I can pose to
Jul 13, 2014 | 09:32 AM
#216
Thread Starter
Registered User
Joined: Sep 2013
Posts: 1,631
Likes: 110
Hi everyone who ventures to this thread
Just going to post a couple quick updates.
First of all, the AC system has been working without a hitch, blowing colder than my Audi. SOrry, no pictures to show cold air. lol
SO, after much research I decided on a CB radio antenna and mounting kit and location. I got rid of the temporary magnet base one and installed a FIrestik system. I mounted relatively low and since best performance requires 60% of the antenna to be above the roofline of the car, I got a 5 foot firestik one. (yet to be delivered!)
Here is my installation. My goal was for a clean, water proof, good looking installation.
I initiall tried to route the wire from the mount, in between the tail gate and body, through that hole on the inner side of the body where the tail gate comes to rest in the closed position. I saw this was a bad idea, and I had to plug that hole now.. oops
My goal was to route the coax cable through the drive side, I had 18-ft of cable to do this in. Turned out that firestiks kit was just right.

THen I removed the tail light assembly in efforts to find a better way of routing the cable... in the end I decided a strategically placed hole that will mostly be hidden behind the mount straight through the body is gonna be my best bet and also best for the cable itself. I didn't want to have a tight bend, or pinch, anywhere along the cable. So, as you see, I drilled right through the body and ran the cable through with the grommet. Looks good.

Here it is, mock fitting before final installation (those of you with a keen eye for details, the mounting washer and nuts are not in correctly in this pic, of course I changed it for final assembly!)

I then sealed the spaces around the grommet to ensure it is water proof. I am also going to paint the mount itself, black, so it doesn't stick out as much. And those 4 screws holding the mount onto the door frame need to be sealed up for waterproofing as well.
Here is where the radio is mounted (still). The location of the radio and mic holder are actually very convenient.

In addition, I purchased some shielded cable (two X 16 AWG dual shield) and ran the power and ground directly from the battery. WIth the old setup (and crappy magnet mount antenna) I was getting lots of noise. Once the AC clutch kicked in it was just a joke. I can't wait for the new antenna so I can try this sucker out! (not supposed to turn system on without the antenna load!)
Thanks for reading folks
Next items to work on... that pesky code 52 that became perminant At this point I have re-wired it from the end of the pigtail to the ECU with new shielded wire and separate ground to E1, and the code is still there. I ordered a new OEM knock sensor and pigtail (190 bucks!) that I am going to mount on the engine hanger until there is another reason to open the engine up. Once the relocated knock sensor is installed (pending delivery of the 12mm X 1.25 tap for threading) and it works, I have to go back to the shop that did the engine rebuild and see what I can get out since it's still in warranty.
Just going to post a couple quick updates.
First of all, the AC system has been working without a hitch, blowing colder than my Audi. SOrry, no pictures to show cold air. lol
SO, after much research I decided on a CB radio antenna and mounting kit and location. I got rid of the temporary magnet base one and installed a FIrestik system. I mounted relatively low and since best performance requires 60% of the antenna to be above the roofline of the car, I got a 5 foot firestik one. (yet to be delivered!)
Here is my installation. My goal was for a clean, water proof, good looking installation.
I initiall tried to route the wire from the mount, in between the tail gate and body, through that hole on the inner side of the body where the tail gate comes to rest in the closed position. I saw this was a bad idea, and I had to plug that hole now.. oops
My goal was to route the coax cable through the drive side, I had 18-ft of cable to do this in. Turned out that firestiks kit was just right.
THen I removed the tail light assembly in efforts to find a better way of routing the cable... in the end I decided a strategically placed hole that will mostly be hidden behind the mount straight through the body is gonna be my best bet and also best for the cable itself. I didn't want to have a tight bend, or pinch, anywhere along the cable. So, as you see, I drilled right through the body and ran the cable through with the grommet. Looks good.
Here it is, mock fitting before final installation (those of you with a keen eye for details, the mounting washer and nuts are not in correctly in this pic, of course I changed it for final assembly!)
I then sealed the spaces around the grommet to ensure it is water proof. I am also going to paint the mount itself, black, so it doesn't stick out as much. And those 4 screws holding the mount onto the door frame need to be sealed up for waterproofing as well.
Here is where the radio is mounted (still). The location of the radio and mic holder are actually very convenient.
In addition, I purchased some shielded cable (two X 16 AWG dual shield) and ran the power and ground directly from the battery. WIth the old setup (and crappy magnet mount antenna) I was getting lots of noise. Once the AC clutch kicked in it was just a joke. I can't wait for the new antenna so I can try this sucker out! (not supposed to turn system on without the antenna load!)
Thanks for reading folks
Next items to work on... that pesky code 52 that became perminant
At this point I have re-wired it from the end of the pigtail to the ECU with new shielded wire and separate ground to E1, and the code is still there. I ordered a new OEM knock sensor and pigtail (190 bucks!) that I am going to mount on the engine hanger until there is another reason to open the engine up. Once the relocated knock sensor is installed (pending delivery of the 12mm X 1.25 tap for threading) and it works, I have to go back to the shop that did the engine rebuild and see what I can get out since it's still in warranty.
Jul 19, 2014 | 01:26 PM
#217
Thread Starter
Registered User
Joined: Sep 2013
Posts: 1,631
Likes: 110
I wanted to post my own little code 52 semi-success story.
It started as an intermittent code and soon became permanent. Robs the crap out of the power! I did research and with no shortage of threads on here and other sites about this issue... I soon decided best way for me is to install one on the engine hook. First, I doubted it was the knock sensor or the pigtail since both were installed brand new during the Engine rebuild about 4500 miles ago. I tested the harness and it tested fine, but I thought that's not good enough. I bought this wire ( http://www.ebay.com/itm/181100245547?_trksid=p2059210.m2749.l2649&ssPageName=STRK%3AMEBIDX%3AIT ) and hooked it up temporarily, and still was getting the code 52. FYI, the right way to do it to know definitively that your wiring is NOT the issue is to wire the sensor wire all the way to the ECU harness connector, and the shielding wire to the E1 splicing right into the wire at the ECU harness end again. So, I ordered a new knock sensor from toyotapartszone.com ($175) and new pigtail, ordered the drill bit and tap (12 X 1/25) .. thanks to a thread by another user on here for that info! And, also, I decided to put a nut on the protruding threads from the back. Since the goal is to pick up the engine blocks' vibrations, you want the most 'solid' connection between the block and the knock sensor that you can get. ANyway, here are the pics. The problem is fixed! BEWARE, the 1991 engines somehow have 2 pigtails that match with the VIN, and one of them does NOT fit.. as I found out the hard way.

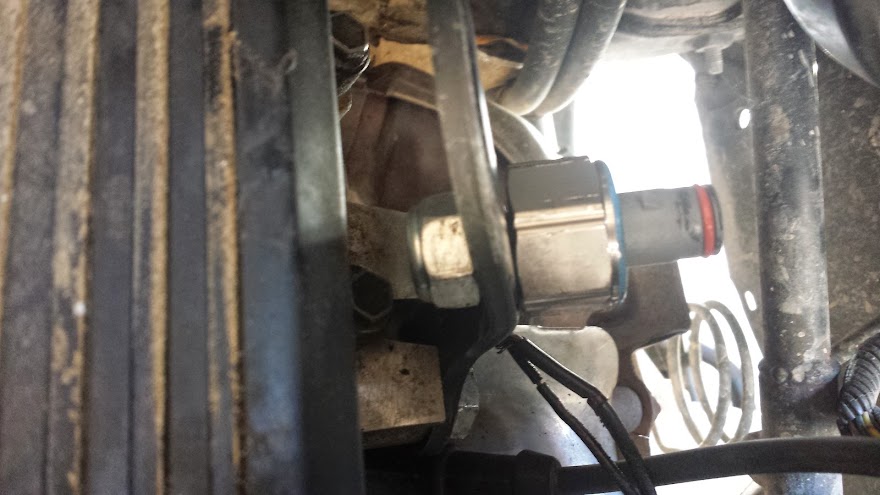
This is the wiring at the ECU connector. The wire on the left is the new wire. I did a lot of research before I purchased this. Use it, it works.
Good drilling and wiring!

It started as an intermittent code and soon became permanent. Robs the crap out of the power! I did research and with no shortage of threads on here and other sites about this issue... I soon decided best way for me is to install one on the engine hook. First, I doubted it was the knock sensor or the pigtail since both were installed brand new during the Engine rebuild about 4500 miles ago. I tested the harness and it tested fine, but I thought that's not good enough. I bought this wire ( http://www.ebay.com/itm/181100245547?_trksid=p2059210.m2749.l2649&ssPageName=STRK%3AMEBIDX%3AIT ) and hooked it up temporarily, and still was getting the code 52. FYI, the right way to do it to know definitively that your wiring is NOT the issue is to wire the sensor wire all the way to the ECU harness connector, and the shielding wire to the E1 splicing right into the wire at the ECU harness end again. So, I ordered a new knock sensor from toyotapartszone.com ($175) and new pigtail, ordered the drill bit and tap (12 X 1/25) .. thanks to a thread by another user on here for that info! And, also, I decided to put a nut on the protruding threads from the back. Since the goal is to pick up the engine blocks' vibrations, you want the most 'solid' connection between the block and the knock sensor that you can get. ANyway, here are the pics. The problem is fixed! BEWARE, the 1991 engines somehow have 2 pigtails that match with the VIN, and one of them does NOT fit.. as I found out the hard way.
This is the wiring at the ECU connector. The wire on the left is the new wire. I did a lot of research before I purchased this. Use it, it works.
Good drilling and wiring!
Jul 25, 2014 | 06:44 PM
#218
Registered User
Joined: Mar 2013
Posts: 1,047
Likes: 1
From: Central TX
Found it via this site: http://www.toyodiy.com/parts/p_U_199...PGEA_8410.html
84722 SWITCH, TRANSMISSION CONTROL
84722-35070-03 GRAY, TRIM1* 1 $86.51
84722-35070-04 BLUE, TRIM8* 1 $79.35
Enter your vehicle VIN there to look up specific parts for your rig. My single favorite site for looking up exact part #s.
And then I usually order from here since they allow you to look up by part #: toyotapartsoverstock.com
Here's my tranny parts page on the ToyotaPartsOverstock site: http://www.toyotapartsoverstock.com/...rimLevel=18380
When I know parts name but can't locate, it helps to just search that and then look at the pics -- I've also found parts for future generations that for all intents match parts on our rigs that have been "discontinued" but really not discontinued... My biggest win in that regards thus far has been in finding those air deflector C clips on the sunroof air deflector to hinge connection...
Last edited by RSR; Jul 25, 2014 at 06:52 PM.
Jul 26, 2014 | 09:02 AM
#219
Thread Starter
Registered User
Joined: Sep 2013
Posts: 1,631
Likes: 110
RSR, thanks a lot for that link.
Yes I use toyotapartsoverstock religiously to find parts in the diagrams, then I use toyotapartszone.com to match with VIN and also buy if I'm buying OEM. Toyotapartszone for sure has been the cheapest oem site i've found.
At this point, I have found that I am enjoying the non-stock overdrive switch. Don't ask me why, but something about flicking the switch and feeling that response in the car is satisfying ... that, and the switch on the website is pretty pricey!
I will for sure use the website for other parts in the future though.. it's inevitable
Yes I use toyotapartsoverstock religiously to find parts in the diagrams, then I use toyotapartszone.com to match with VIN and also buy if I'm buying OEM. Toyotapartszone for sure has been the cheapest oem site i've found.
At this point, I have found that I am enjoying the non-stock overdrive switch. Don't ask me why, but something about flicking the switch and feeling that response in the car is satisfying
... that, and the switch on the website is pretty pricey! I will for sure use the website for other parts in the future though.. it's inevitable


