Cr@ves4wheelin 1990 Hilux Build Up Thread
 05-05-2014, 08:01 AM
#61
Registered User
Finally got the other shock hoop done, I ran out of wire and had to get another roll on Friday. I would have painted it black, but everything is coming to a halt. Need to step back a little and try to recover some money, because I'm somehow spending more than I make. Probably the all the alcohol and gasoline lol. Anyways, the 3.0L I put up for sale on craigslist, so if you're in the Wyoming area, wink wink nudge nudge.


Anyways, it looks good!
 05-06-2014, 10:43 AM
#62
Registered User
Thread Starter
I've looked into it, the directions say it's optional, but I think it's there for the poeple who want to run secondary shocks. The primary coilover shock for this one is already supported by the shock tower the have you fabricate.
Attachment 136266
It's not a bad idea, but looking back on my old build thread when I had blazeland shock hoops, I think I should be alright without them. If not, I'll just do it after I get everything put together. That way the support tube won't be in my way earlier on.
Attachment 136266
It's not a bad idea, but looking back on my old build thread when I had blazeland shock hoops, I think I should be alright without them. If not, I'll just do it after I get everything put together. That way the support tube won't be in my way earlier on.
Last edited by cr@ves4wheelin; 01-08-2021 at 05:40 PM.
06-09-2014, 08:38 PM
#63
Registered User
Thread Starter
Alright, its been a while. Some bad things happened, but life goes on.
Here's a small update.
Attachment 133973
Attachment 133974
Attachment 133975
Attachment 133976
So, some of you may know you have to drill the tapered hole on the top of the spindle to 3/4". I thought it was going to be easy, I spent two days on it, several drill bits from home depot, and finally my drill press couldn't go on anymore. Finally, I swallowed my pride and went to the machine shop. They got it done, and I was happy. They said they kinda had a hard time too, so it made me feel a little better lol.
Anyhow, got em painted and it was done.
Mock Up
Attachment 133977
Attachment 133978
Started to paint
Attachment 133979
Attachment 133980
Bam
Attachment 133981
Last edited by cr@ves4wheelin; 01-08-2021 at 05:40 PM.
06-12-2014, 09:56 PM
#64
Registered User
Its coming along nicely! A trick to drilling out your spindles and steering arms is to use a four flute hogger bit. The tools cutting angle and the four flutes are designed to enlarge holes like your doing. I'm curious as to the procedure of cutting off the factory droop stop bracket and replacing it with a new one. Is this needed so it moves forward to sit directly under the tube? Is it set lower for more droop. Does it vary in location depending on if you run 2WD vs. 4WD?
06-16-2014, 10:02 PM
#65
Registered User
Thread Starter
Thanks for the tip blazen8.
And that's a really really good question, cause I was blindly following the diagram that total chaos gave me, so I never really thought about it lol. But going back a few pictures...
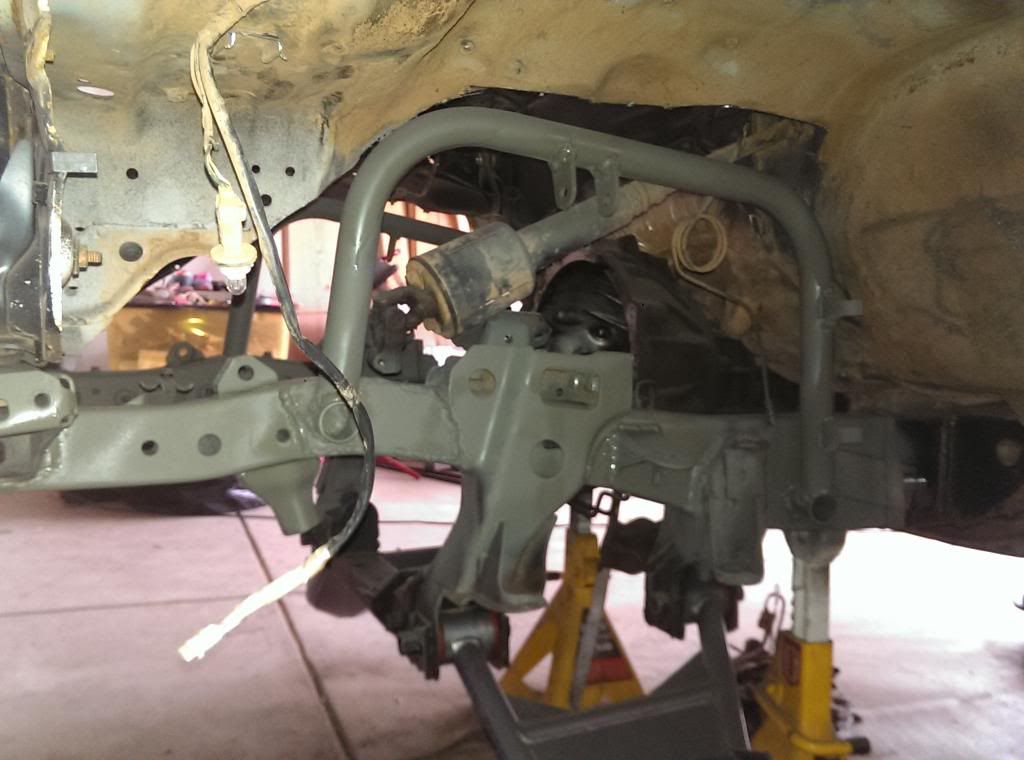
Yes to your first question, compared to the original control arm that goes straight out at a 90 degree angle from where it sits, the total chaos control arm goes straight out at an angle. You also have to elongate the holes for the lower bumpstops so they also have proper contact. Since the tubes are at a wider angle for the longer control arms.
Attachment 133409
For your second question, I honestly don't really think so. And if it was I didn't even notice. Thinking about the new bumpstops that come with the kit, it may be plausible. But like I said, I didn't notice it, nor think about it lol.
Between the 4WD or 2WD, Do mean if I got rid of the 4WD system?
And that's a really really good question, cause I was blindly following the diagram that total chaos gave me, so I never really thought about it lol. But going back a few pictures...
Yes to your first question, compared to the original control arm that goes straight out at a 90 degree angle from where it sits, the total chaos control arm goes straight out at an angle. You also have to elongate the holes for the lower bumpstops so they also have proper contact. Since the tubes are at a wider angle for the longer control arms.
Attachment 133409
For your second question, I honestly don't really think so. And if it was I didn't even notice. Thinking about the new bumpstops that come with the kit, it may be plausible. But like I said, I didn't notice it, nor think about it lol.
Between the 4WD or 2WD, Do mean if I got rid of the 4WD system?
Last edited by cr@ves4wheelin; 01-08-2021 at 05:40 PM.
06-16-2014, 10:37 PM
#66
Registered User
Thread Starter
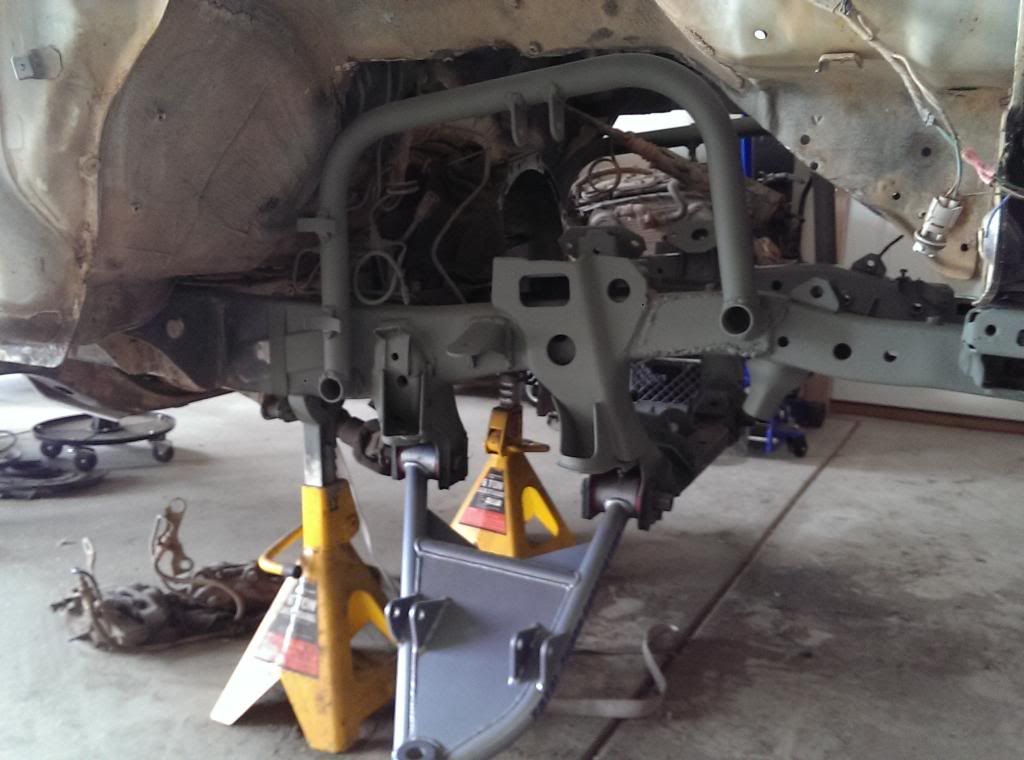
Just more pics, I think you guys understand without me explaining. It's 12:30, and I'm tired lol. Hopefully will get the truck on the ground pretty soon here.
Attachment 133397
Attachment 133398
Attachment 133399
Attachment 133400
Attachment 133401
Attachment 133402
Attachment 133403
Attachment 133404
Attachment 133405
Attachment 133406
Attachment 133407
Attachment 133408
Got an interview tomorrow after work for what will hopefully be my new full-time job. Wish me luck.
Last edited by cr@ves4wheelin; 01-08-2021 at 05:40 PM.
06-17-2014, 01:39 PM
#67
Registered User
Good luck with the job interview!
What I was asking about earlier about 2WD and 4WD concerns the CV Axle operation. TC states the Gen II kits Travel: 12" W/4WD and 13" W/O. I am assuming this is due to the T-100 CV axle assembly being the limiting factor and only allowing 12" of travel?
If someone is building a pre-runner and plans on never installing CVs you will cap off the spindle hole. In this configuration there is no CV in place as the limiting factor. Then the limiting factor becomes something else, probably the outer tie rod end? So you do the heim joint steering link upgrade, then something else becomes the limiting factor. This will continue on, each time you solve one problem another one pops up. This is just the process of maximizing the travel. But, as you progress you need to set the limits with bump/droop stops or limit straps for each step.
If you decide to keep 4WD and the T-100 CVs, then your likely setting the droop stop differently for attaining 12" of travel. If you didn't compensate for this and set the droop to get the full 13" of travel, it is likely as soon as you engage 4WD and let the suspension droop all the way, the CV will bind and break.
I am just wondering where and how TC has users set the limits to distinguish between 2WD and 4WD?
06-17-2014, 07:50 PM
#68
Registered User
Thread Starter
Thanks, I actually got it the job haha.
Anyways, that is true, and I completely over looked it. I welded the bumpstop in place where the arm would not touch make contact with anything else. And as far as set limits go, the diagram given does not give measurements. So basically, you just have to be smart about it lol.
This is the instructions: http://www.chaosfab.com/PDF/install/95200.pdf
06-17-2014, 07:53 PM
#69
Registered User
Thread Starter
Just got the calipers with new brake pads on, extended brake lines, and steering arms.
Attachment 133316
Attachment 133317
Attachment 133318
Attachment 133316
Attachment 133317
Attachment 133318
Last edited by cr@ves4wheelin; 01-08-2021 at 05:38 PM.
 06-20-2014, 08:41 PM
#72
Registered User
Thread Starter
Got my new E-brake Bellcranks. Tried to save the old ones and I broke it free. But the rust bubbled up the metal so much, they were useless. I even tried taking it apart, but the pin got was mashed somehow. Anyways, Drum Brakes are set up.
Old ones
Attachment 133142
Some new Parts
Attachment 133143
Attachment 133144
Took a while to jog my memory from the last time I did these, but after about 10 minutes, it all came back.
Attachment 133145
Attachment 133146
Attachment 133147
Attachment 133148
Attachment 133149
Attachment 133150
Old ones
Attachment 133142
Some new Parts
Attachment 133143
Attachment 133144
Took a while to jog my memory from the last time I did these, but after about 10 minutes, it all came back.
Attachment 133145
Attachment 133146
Attachment 133147
Attachment 133148
Attachment 133149
Attachment 133150
Last edited by cr@ves4wheelin; 01-08-2021 at 05:38 PM.
07-19-2014, 07:23 PM
#73
Registered User
Thread Starter
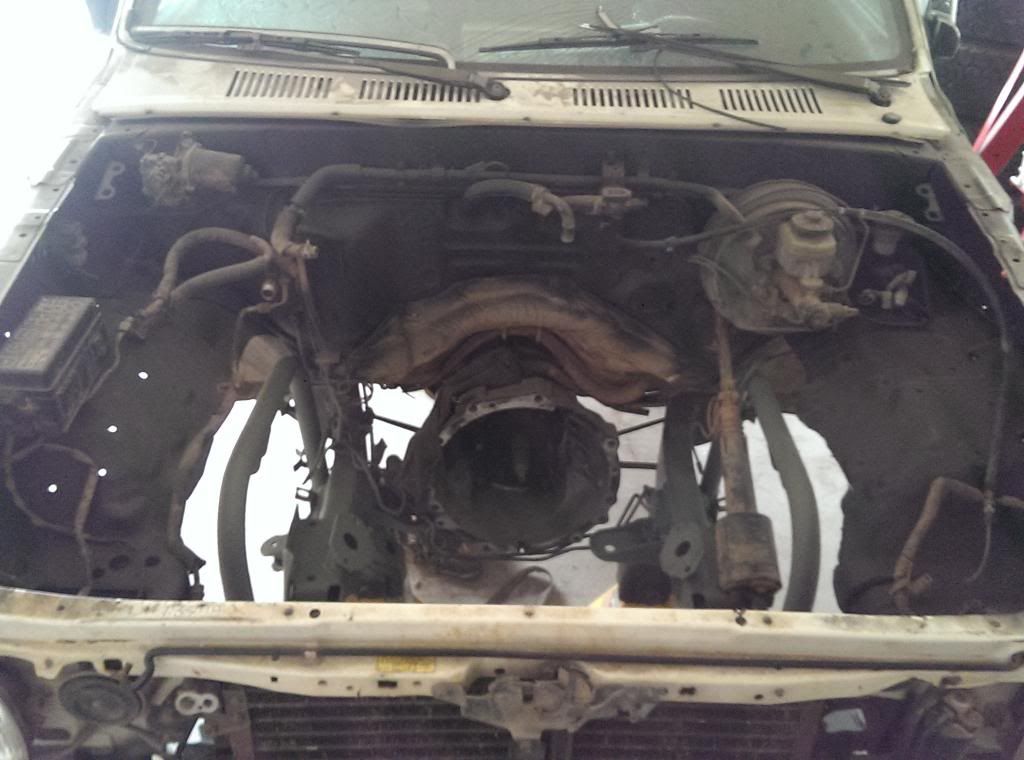
Just some things to add, I know it's been a long time. Got the truck back on all fours. Did some little things like replacing the fuel filter. Besides that, I've been doin a lot of shopping on ebay for 3.4 parts, since it seems the cheapest way to go. As for the gasket kit that came with the long block, a lot of hard to get to stuff I'm gonna use RTV sealant instead, things like oil pump and waterpump for example. So, just gettin what I can as long as money allows. Been mostly experimenting what else is transferable between the 3.0 and 3.4. It's pretty amazing, just seems like a bored out block with different heads, and all the other accessories. Anywho, here's some new pics.
Attachment 131834
Attachment 131835
Attachment 131836
Attachment 131837
Attachment 131838
Attachment 131839
Attachment 131840
Attachment 131841
Attachment 131842
Attachment 131843
Attachment 131844
Attachment 131834
Attachment 131835
Attachment 131836
Attachment 131837
Attachment 131838
Attachment 131839
Attachment 131840
Attachment 131841
Attachment 131842
Attachment 131843
Attachment 131844
Last edited by cr@ves4wheelin; 01-08-2021 at 05:38 PM.
07-28-2014, 10:38 PM
#75
Registered User
Thread Starter
Thanks Rattlewagon
Here's some more progress pics. More ebay parts and reusing some of the old bolts from the 3.0 block. The 3.0 is pretty much torn to just the heads and block now.
Attachment 131364
Attachment 131365
Attachment 131366
Attachment 131367
Attachment 131368
Here's some more progress pics. More ebay parts and reusing some of the old bolts from the 3.0 block. The 3.0 is pretty much torn to just the heads and block now.
Attachment 131364
Attachment 131365
Attachment 131366
Attachment 131367
Attachment 131368
Last edited by cr@ves4wheelin; 01-08-2021 at 05:38 PM.
08-11-2014, 07:41 PM
#76
Registered User
Thread Starter
Just a lot of cleaning up the garage. Still trying to sell stuff. Only need exhaust and clutch kit before I can get the motor in. Time and bills will tell, really hope I don't have to go through another winter season below 0 in the Chev. It's been an awesome truck, but man I was pretty lucky last year without 4WD.
Tearing down the old motor. Only reason because it's easier to move.
So if I put on a new headgasket, can I say I've replaced one before?
Attachment 130640
Gross lol
Attachment 130641
Looks like an engine swap wasn't much of a choice as it was destiny.
Attachment 130642
There's your problem.
Attachment 130643
Never would've noticed.
Attachment 130644
Put the hood on so it looks like less of a mess.
Attachment 130645
Glad I got all the stuff off the floor. Looks better now lol.
Attachment 130646
Rest of the frame painted.
Attachment 130647
Decided to put the interior somewhat back together. Fancy gadgets can wait.
Attachment 130648
Really nice to recline, I can actually get a good nights sleep in here.
Attachment 130649
Last edited by cr@ves4wheelin; 01-08-2021 at 05:38 PM.
08-21-2014, 09:52 PM
#79
Registered User
Thread Starter
Been doing some body stuff recently. First off I wanted to change headlight housings so I can change the bulb without removing the grill. Got a set off of ebay, it's one of those bright a$$ HID kits, and I won't be using the HID Xenon Bulbs. I don't really like em cause they require a ballast, they're way too bright for street use, and they only last 6 months. So anyways, what made me want to get these was the red LEDs that surround the headlamp. Kinda dumb to some folks, but I think it'll look alright after the trucks painted black.
I painted my hood black also.
Attachment 130053
For the poops and giggles, here's how bright these SOBs are. I couldn't even get eye level with it, way too bright. Would be good for off roadin at night though.
Attachment 130054
Then it was on too getting all the bolts outta the roof and tack weld the holes closed.
Attachment 130055
Attachment 130056
Attachment 130057
Attachment 130058
Attachment 130059
Double flared my first brake line. Took me 3 tries haha. Now my ABS delete is mostly complete.
Attachment 130060
Attachment 130061
Attachment 130062
This giganta-moth was stuck behind the garage light cover and was frying, so I saved him, and now he's chilling in the bellhousing.
Attachment 130063
Exhaust manifolds, one of the studs were broken, and it wasn't going anywhere.
Attachment 130064
Attachment 130065
Attachment 130066
Tried the welding the nut trick, which didn't work. Tried it 5 times.
Attachment 130067
Attachment 130068
Drilled it a little bit and used an extractor, which ended up snapping in half.
Attachment 130069
So I drilled out completely, and the outer shell of the stud came out.
Got the incredibly awesome crossover from ORS. Thank you guys, had no problems getting it on. The yota gods must have been smiling down on me, cause I figure I'd try threading in a new stud that came with it into the flange, and it actually held normally.
Attachment 130070
Attachment 130071
Attachment 130072
Attachment 130073
Attachment 130074
Attachment 130075
Right now I'm painting some more, since I can't really afford to do much else. Got the primer on, and I'm letting it dry before I paint it black and clear coat it.
Attachment 130076
Attachment 130077
Attachment 130078
Attachment 130079
Last edited by cr@ves4wheelin; 01-08-2021 at 05:38 PM.
08-22-2014, 10:50 PM
#80
Registered User
Thread Starter
First coat of Gloss Black. Normally, I use Rustoleum, but I used Duplicolor on the hood because that's what we have at work. Obviously, it wasn't worth it. But I won't redo that until I know for sure that the engine mounts will be just enough to get the motor to fit under the hood without any other modification. Pretty much SOL until my next pay check though. I'll be getting the ORS clutch kit and 3.4 Flywheel. After that, I can finally give this Yota a heart, and get most of it painted before the cold weather comes in again. Then, by the next pay after that, it's gonna be new fenders or the custom driveshaft. Then finally get the rest of the motor and hubs put together and have everything driveable before it starts getting -15 F out here.
Attachment 130037
Attachment 130038
Attachment 130037
Attachment 130038
Last edited by cr@ves4wheelin; 01-08-2021 at 05:38 PM.


