
Chefyota4x4's Ruby R3dRuM to "Suzy-Q the Silverback" Body Swap Thread!
 Feb 27, 2014 | 05:59 AM
#41
CamTom those are Outlaw ll's (2s). I think American Racing made them. There again some like them and some dont. Some think they are too 80s but these are 80s trucks. I like them and would like a set myself.
Feb 27, 2014 | 01:55 PM
#42
Registered User
Joined: Apr 2012
Posts: 2,817
Likes: 2
From: Los Angeles CA
SUBSCRIBED!!!
Hey Mark, Ive been away from YotaTech for a long while now. havent kept up with anybody but Instagram has allowed me to follow your progress. KEEP ME UPDATED ON IG! its much faster then the YT app. Anyway, progress is looking great Mark. I dont wanna sound like a Momma but boy am i sure proud of your progress! lol It is looking great. and i definitely like what ive been seeing for the past few weeks. Definitely a project i wouldnt think twice to avoid doing! So Congrats on having a bigger pair of.... well you know what i mean. Congrats on the great work. and Keep it up. Cant wait to see her back on the road again.
Like i said before im sorry i cant help you. I would have liked very much to join in every weekend like before but with school in the way its near to impossible to scrape up a couple of hours at all.
Feb 27, 2014 | 02:38 PM
#44
Registered User
Joined: Apr 2012
Posts: 2,817
Likes: 2
From: Los Angeles CA
I know you're working hard Mark. But i figure you could use a tease or motivation! haha If you haven't seen on Instagram yet, here is what i made for breakfast after arriving from school. You know you want some. 

This is a Hungry Man's breakfast feast!
Omelet has 2 thick strips of smoked bacon, 1 smoked sausage link, chopped onion, tomato, spinach, red & green bell peppers with a shredded four cheese middle and some more sprinkled on top.
2 seasoned hashbrown patties.
4 sweet cinnamon French Toast made with thick French toast bread. Topped with Smuckers boysenberry syrup. And a nice hot coffee & orange juice to top it off. I obviously didnt eat it all. Only ate half of everything. Gonna eat the other half tomorrow. Yum! That was so damn good. Totally hit “the spot”.
Last edited by Redeth005; Feb 27, 2014 at 03:47 PM.
Feb 27, 2014 | 07:21 PM
#45

Registered User


Joined: May 2008
Posts: 523
Likes: 1
Feb 28, 2014 | 12:07 AM
#46
Thread Starter
Registered User
iTrader: (5)
Joined: Jun 2009
Posts: 19,281
Likes: 20
From: Lake Havasu, AZ
Haha, you guys are cracking me up....
My other thread is by no means going away. Doesn't make sense since its only a body swap... While it sounded funny saying that last part lol. Hardly an only type of thing, but you know what I meant.
I'm really excited, and if everything goes according to plan, and if I can get a gantry over here, and if its not absolutely pouring rain, I should be able to swap the bodies Saturday!
Here's a few more videos to update this thread...
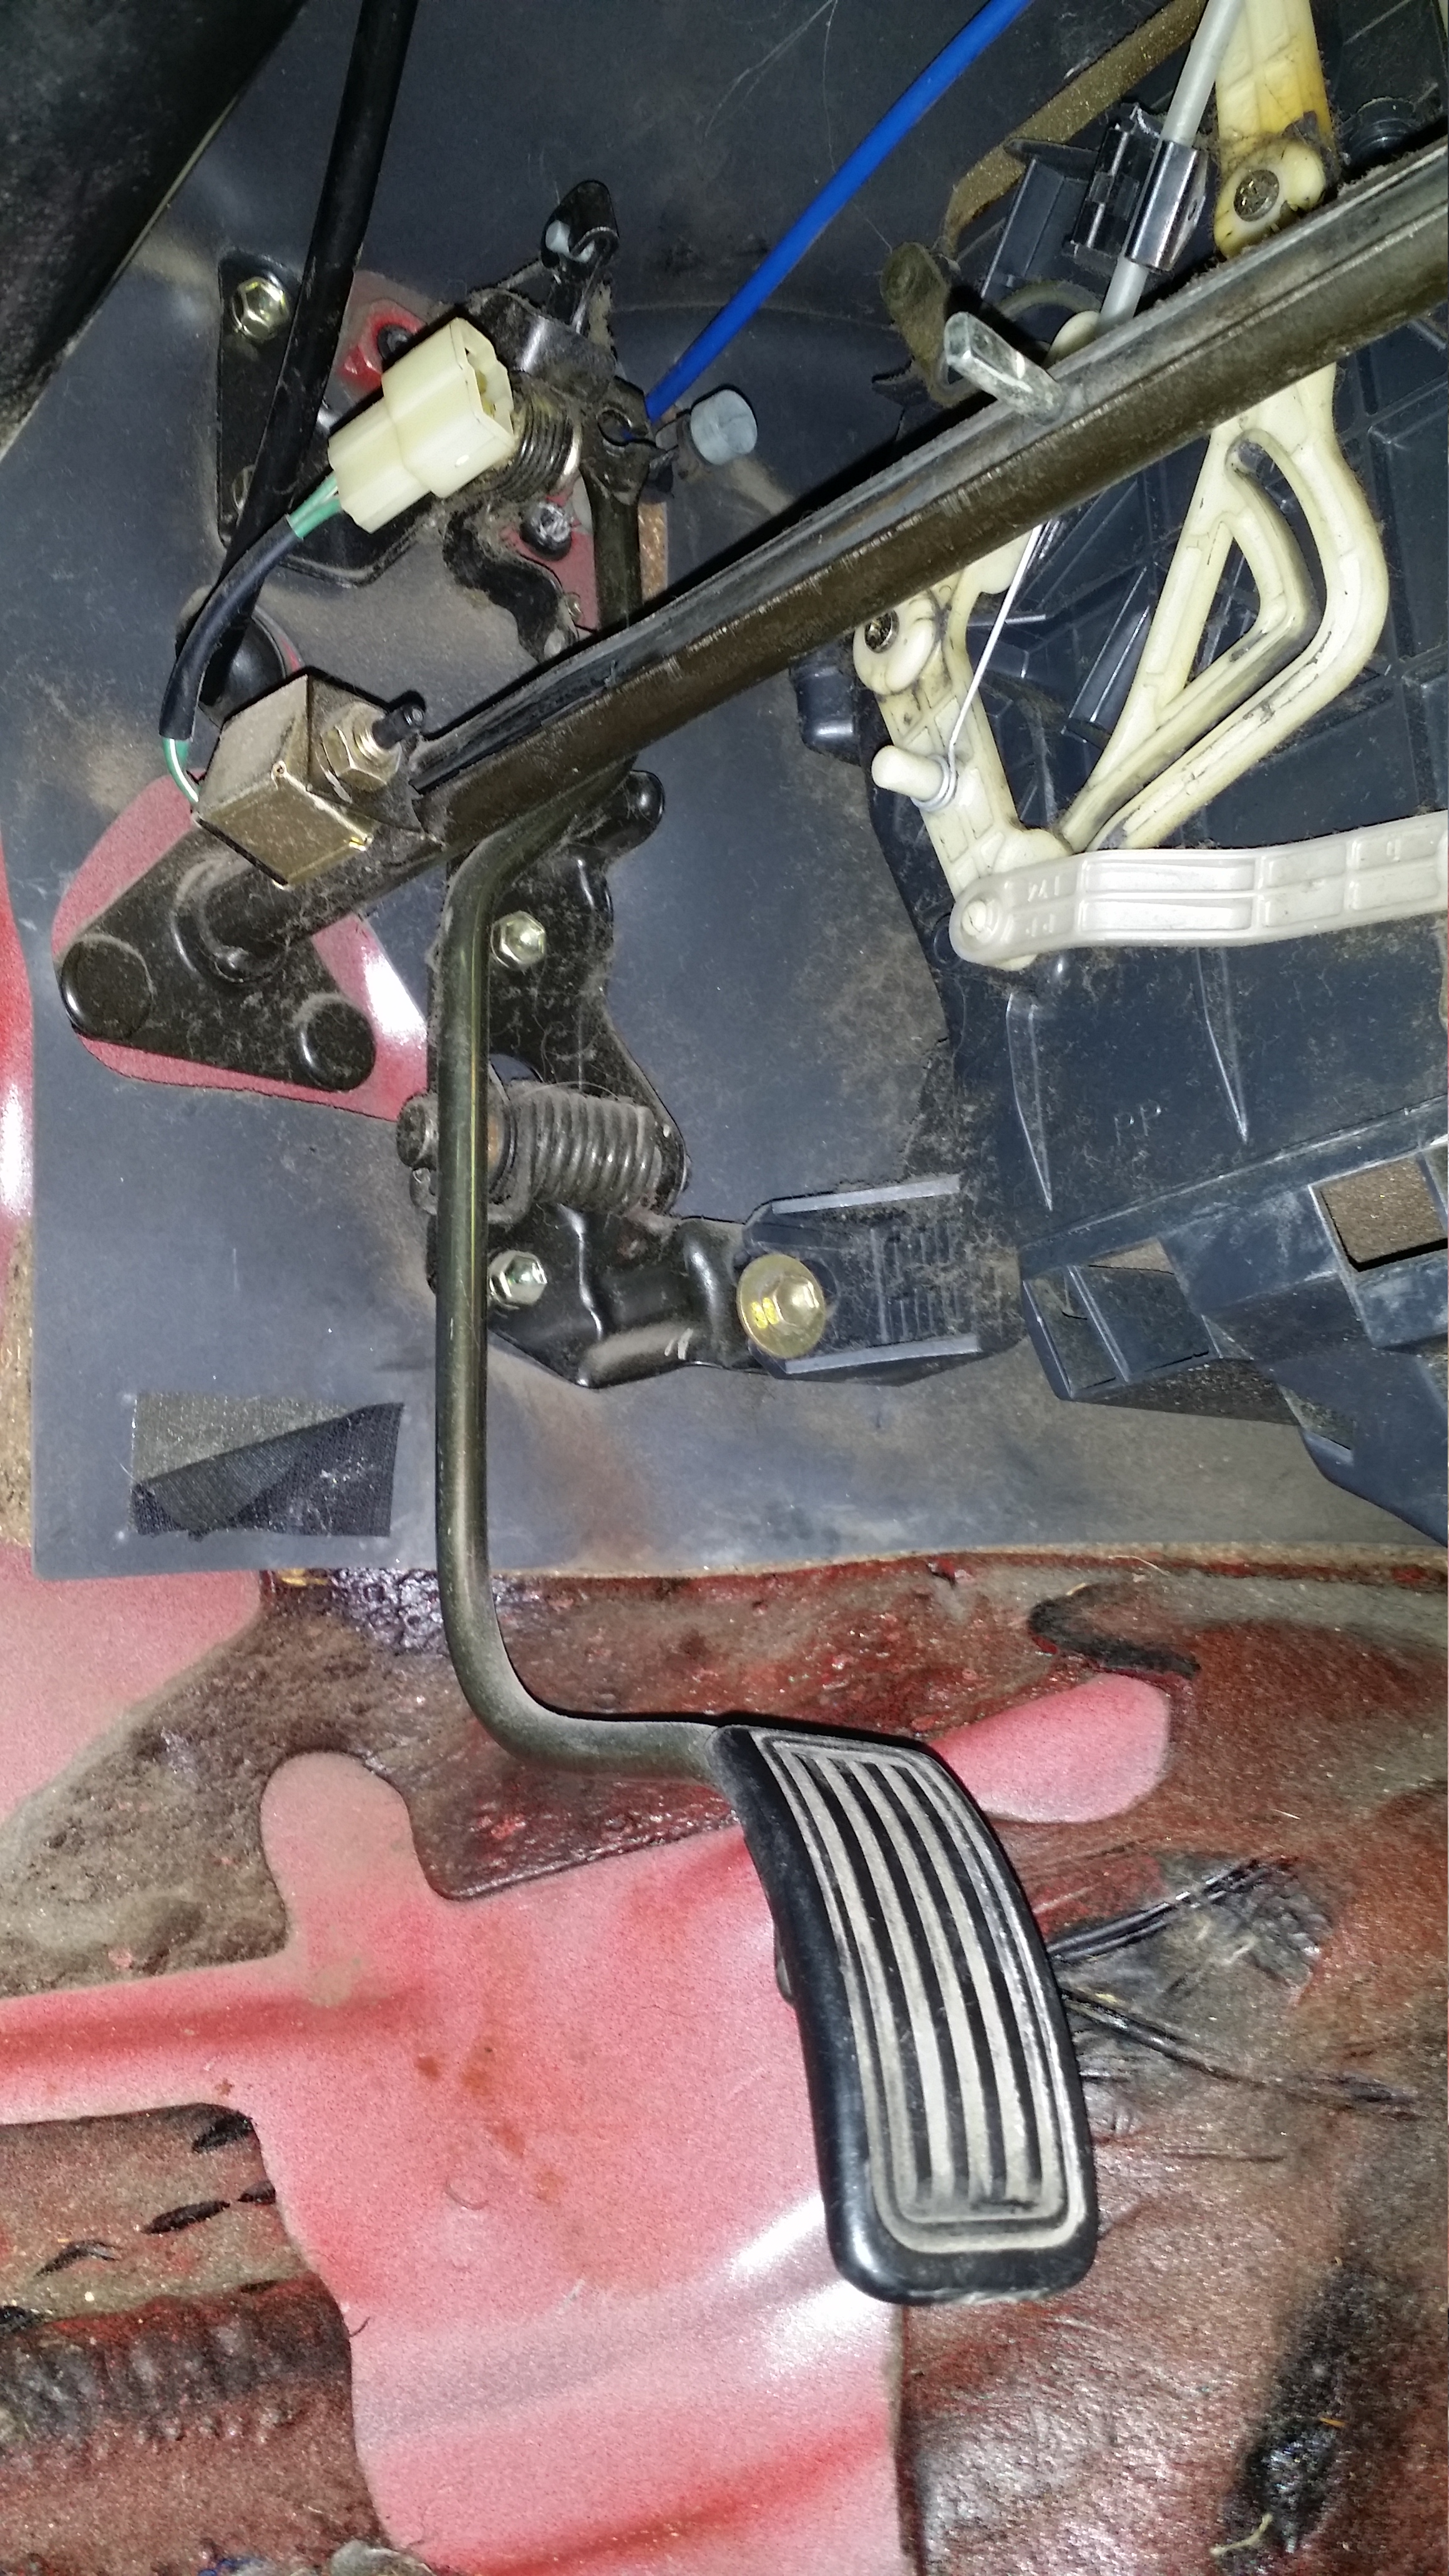
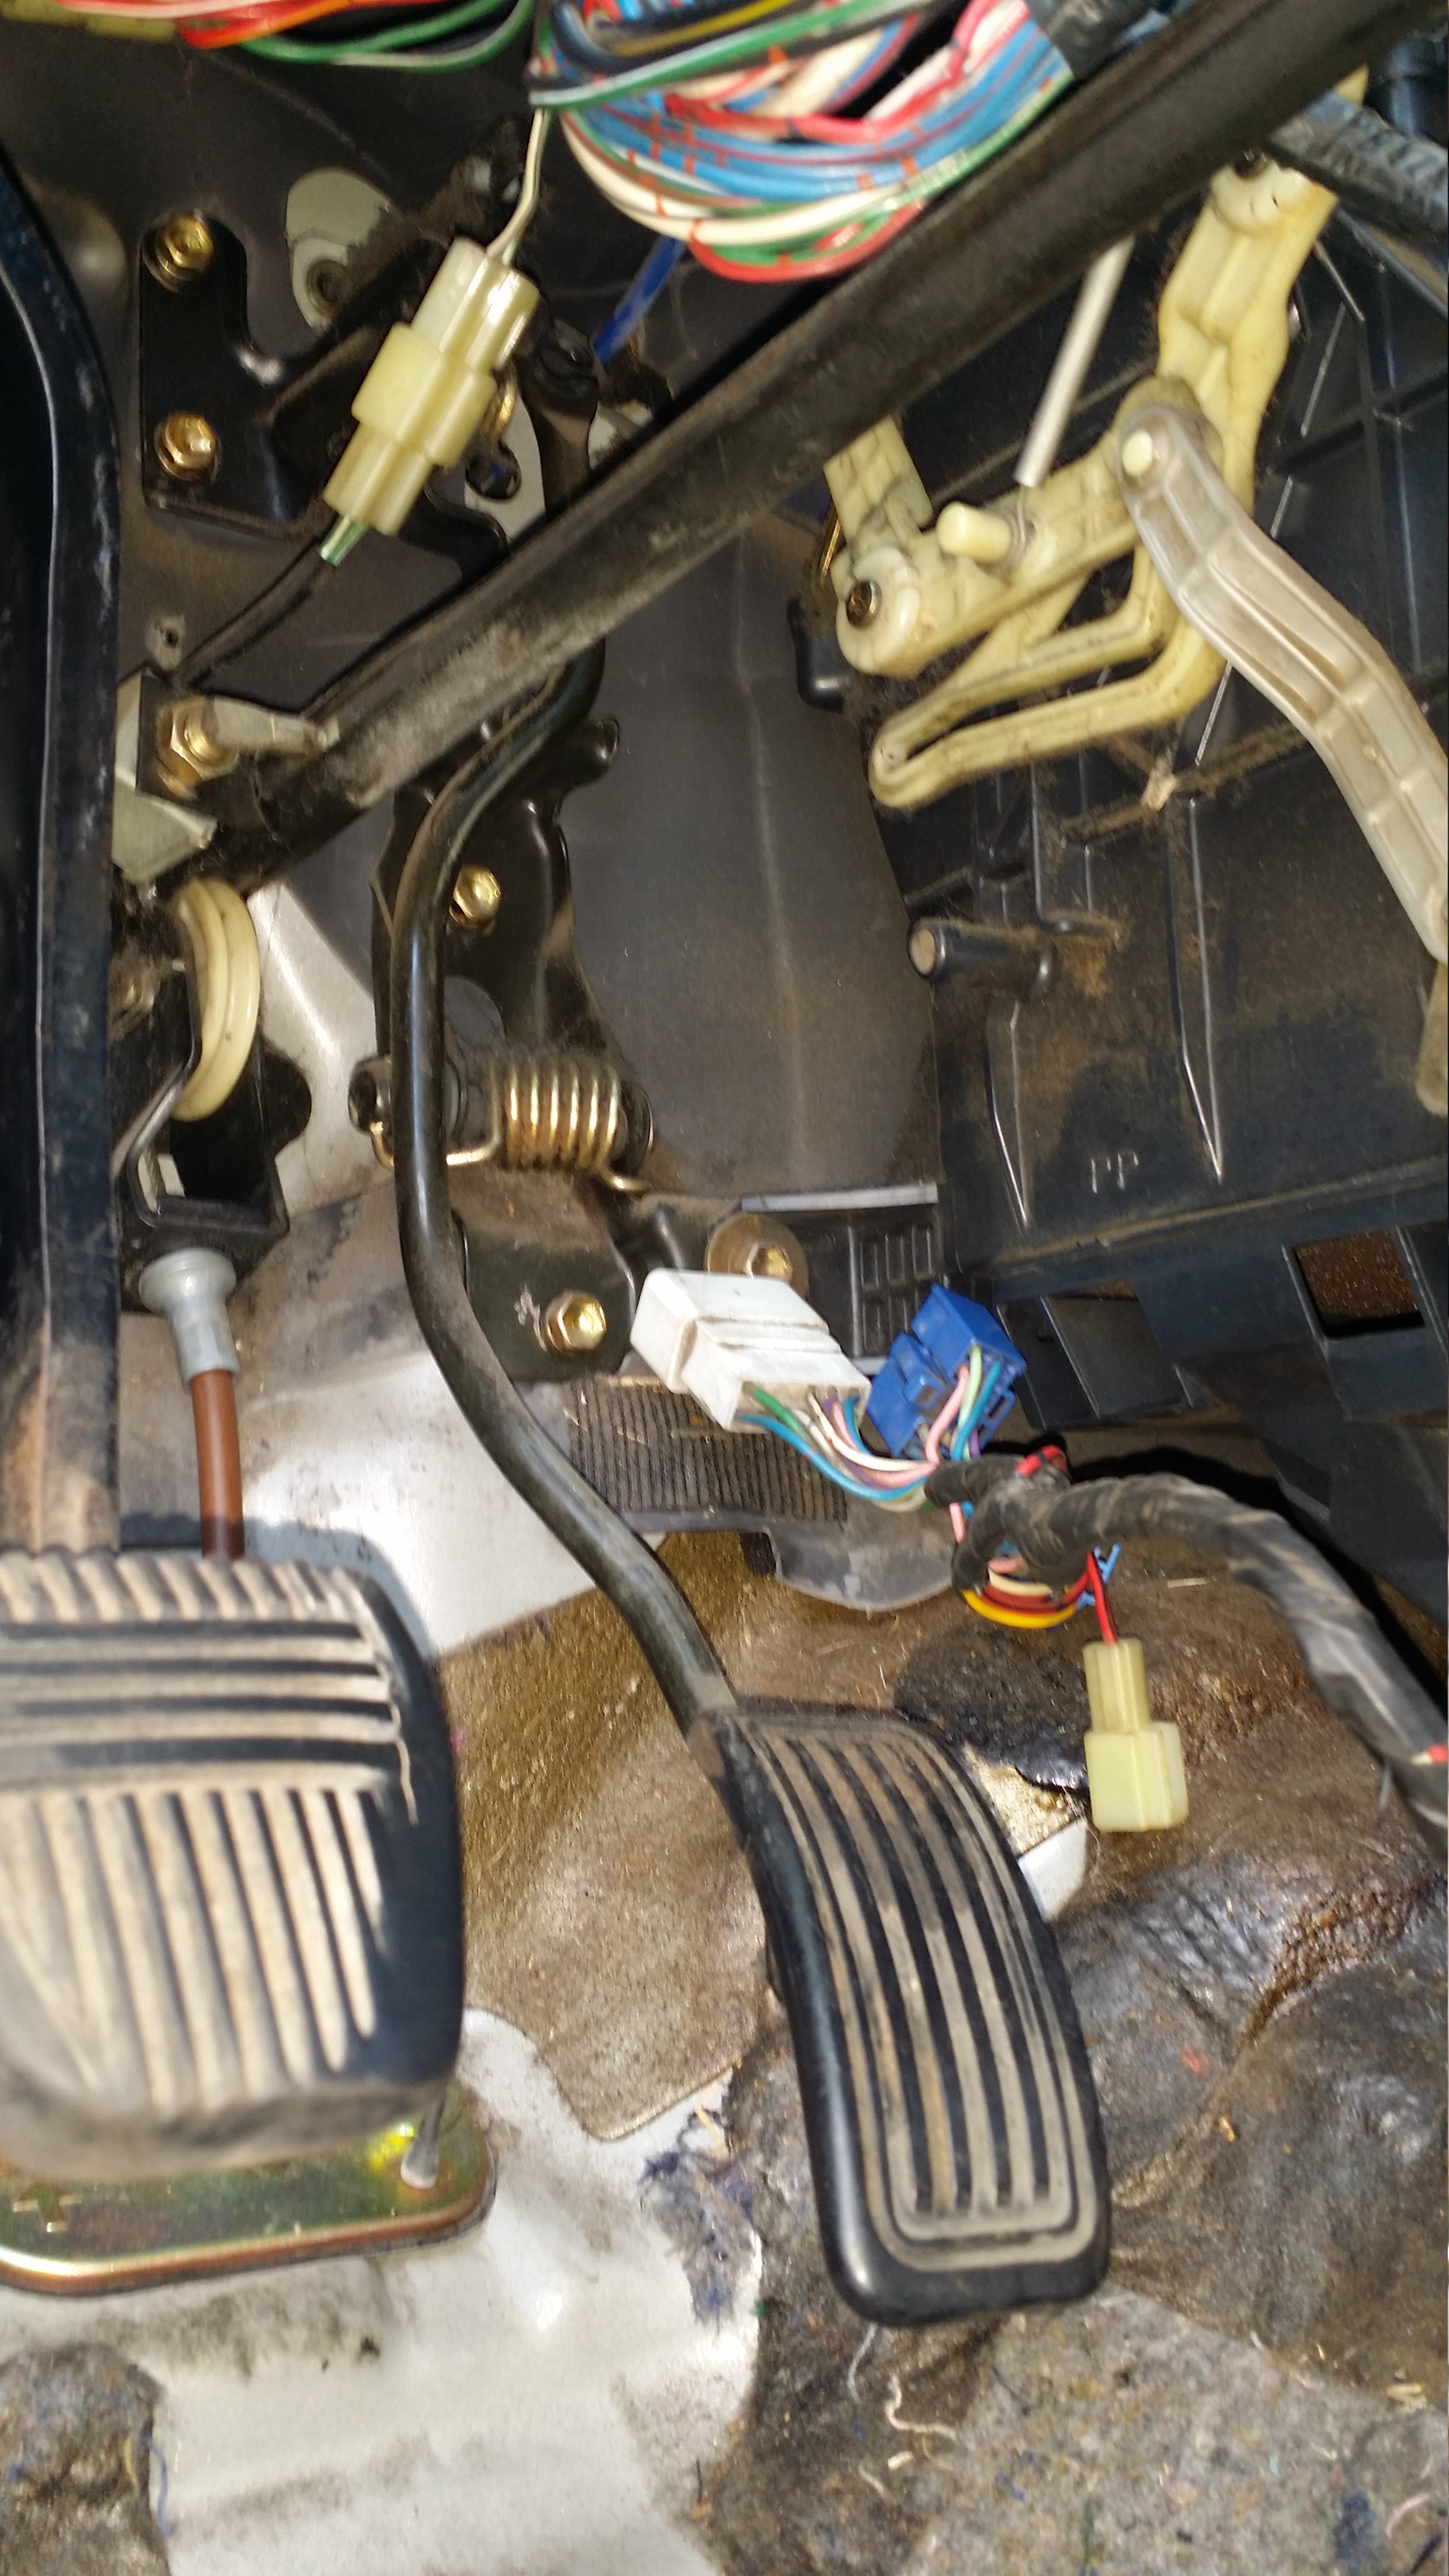
Have to keep the gas pedal from the 89. Floor is quite a bit different in that area and the mounting bolts are staggered...
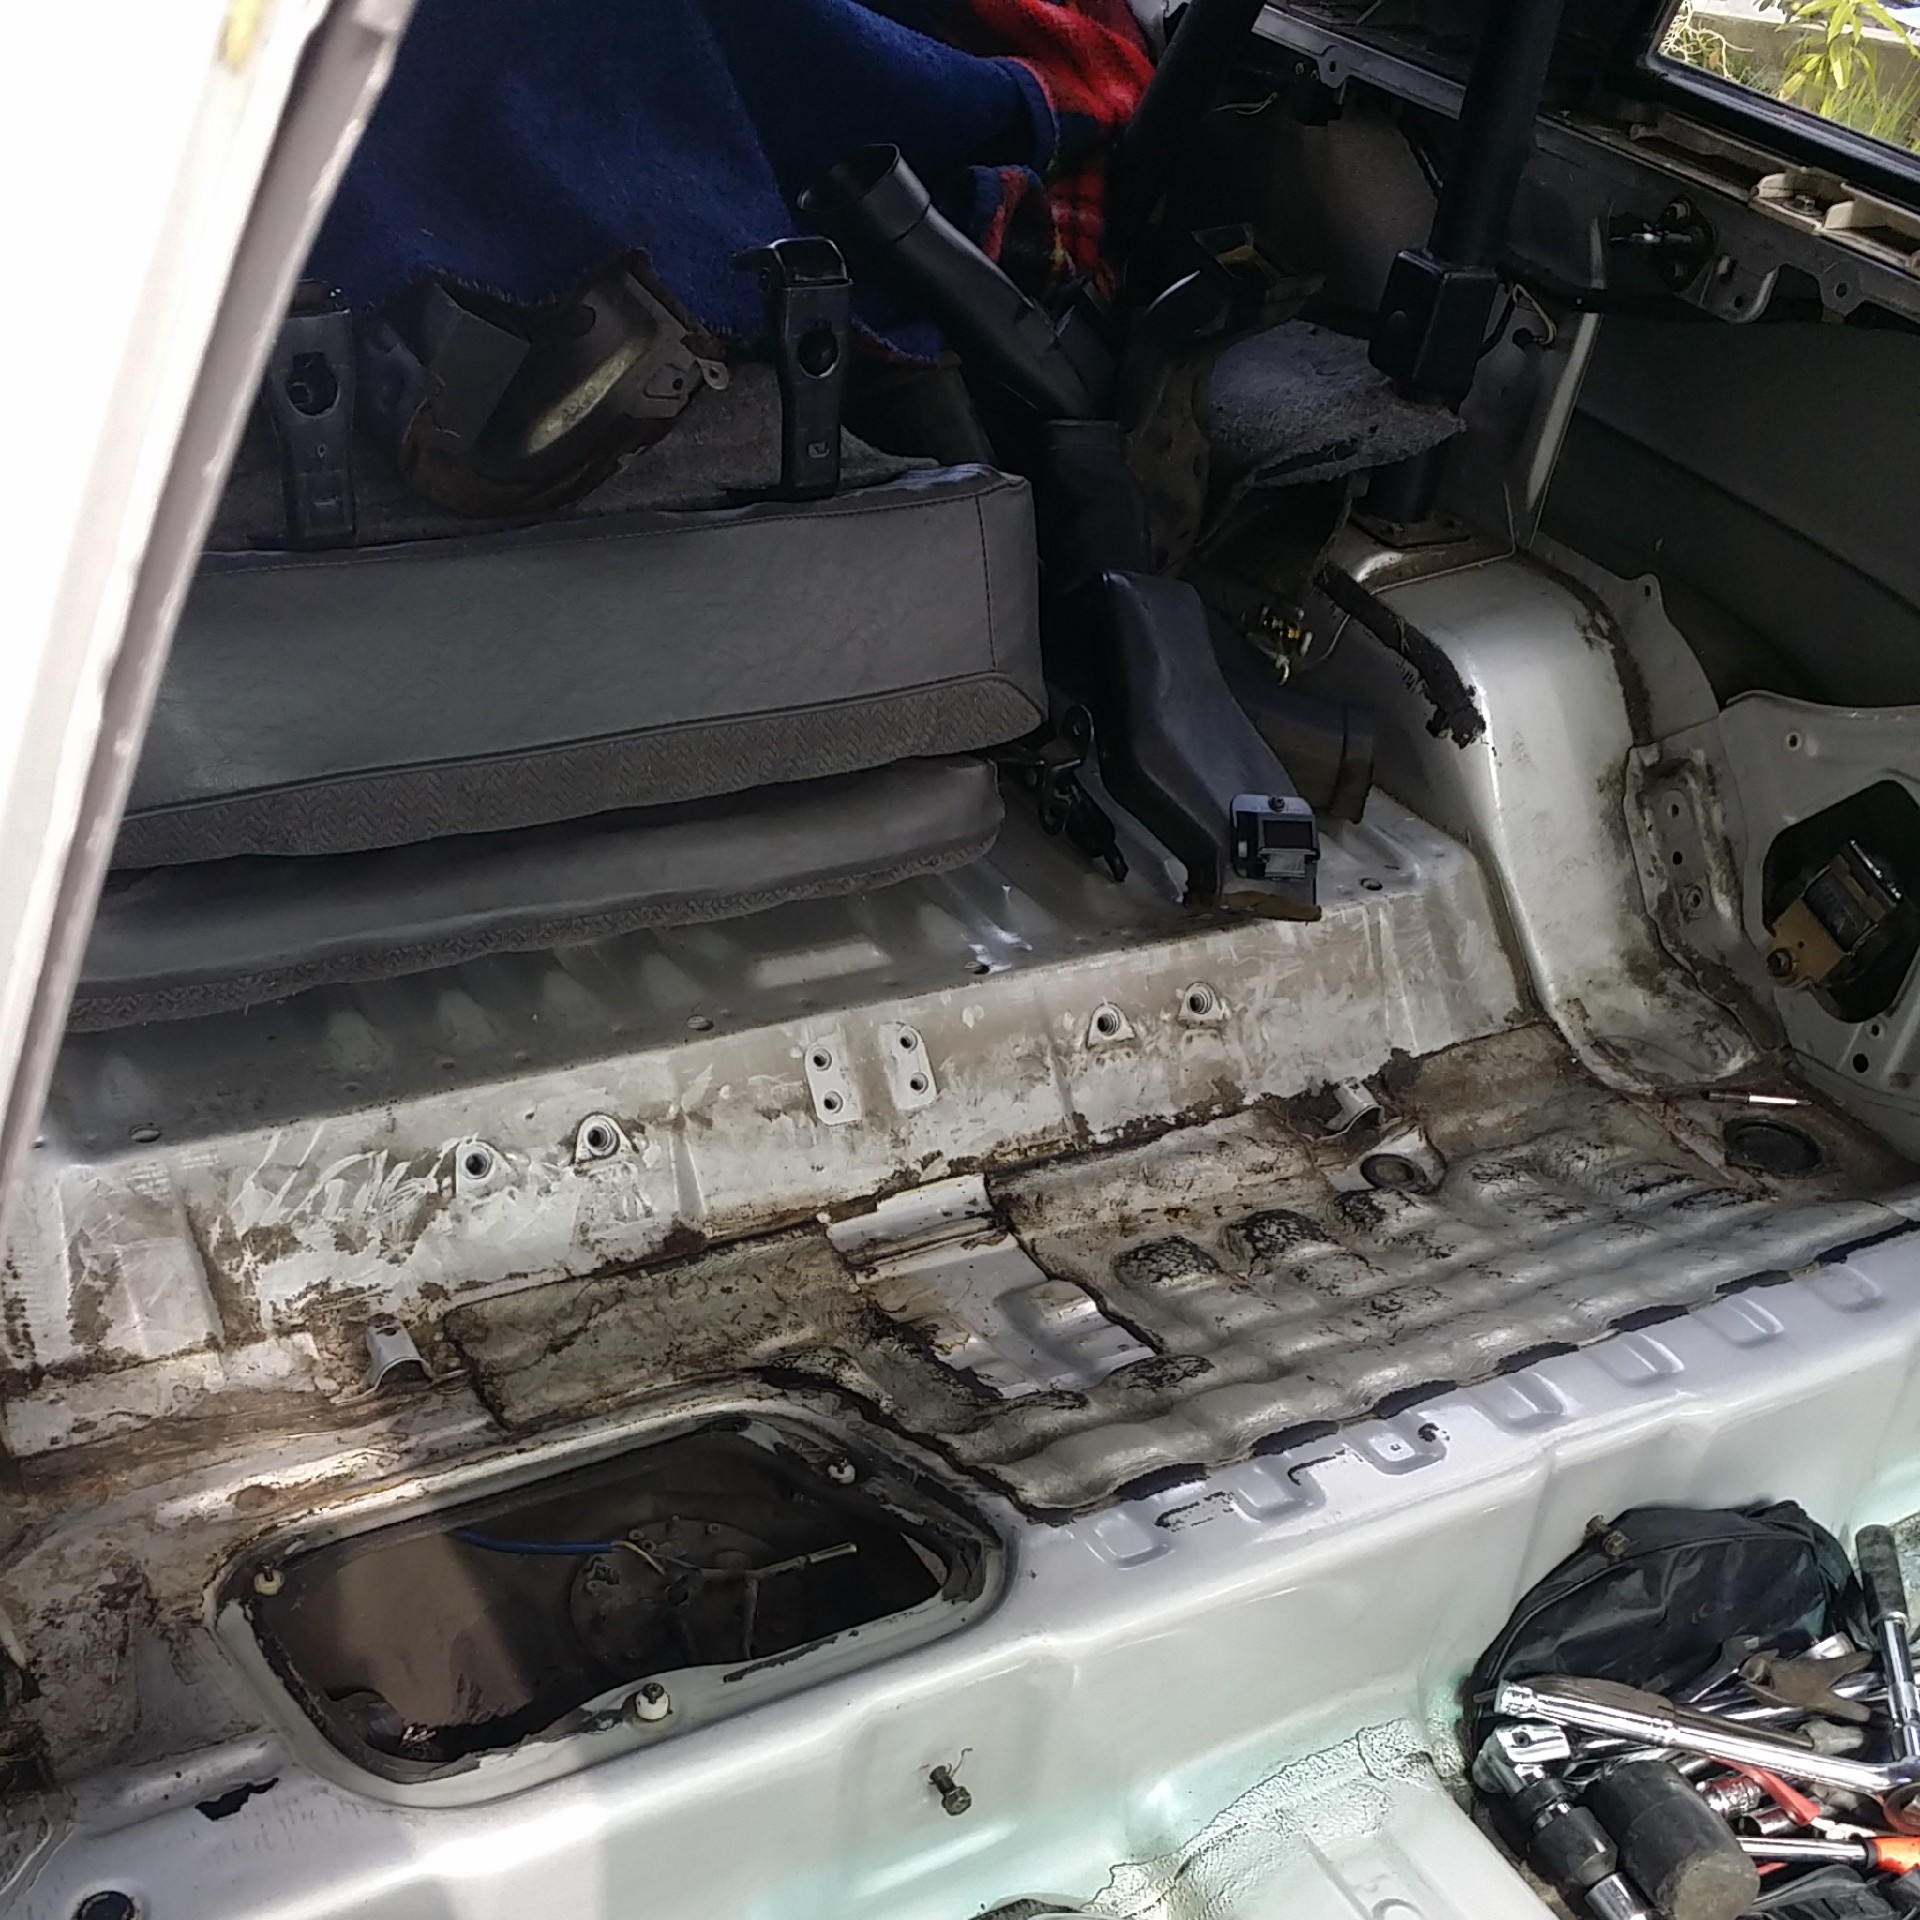
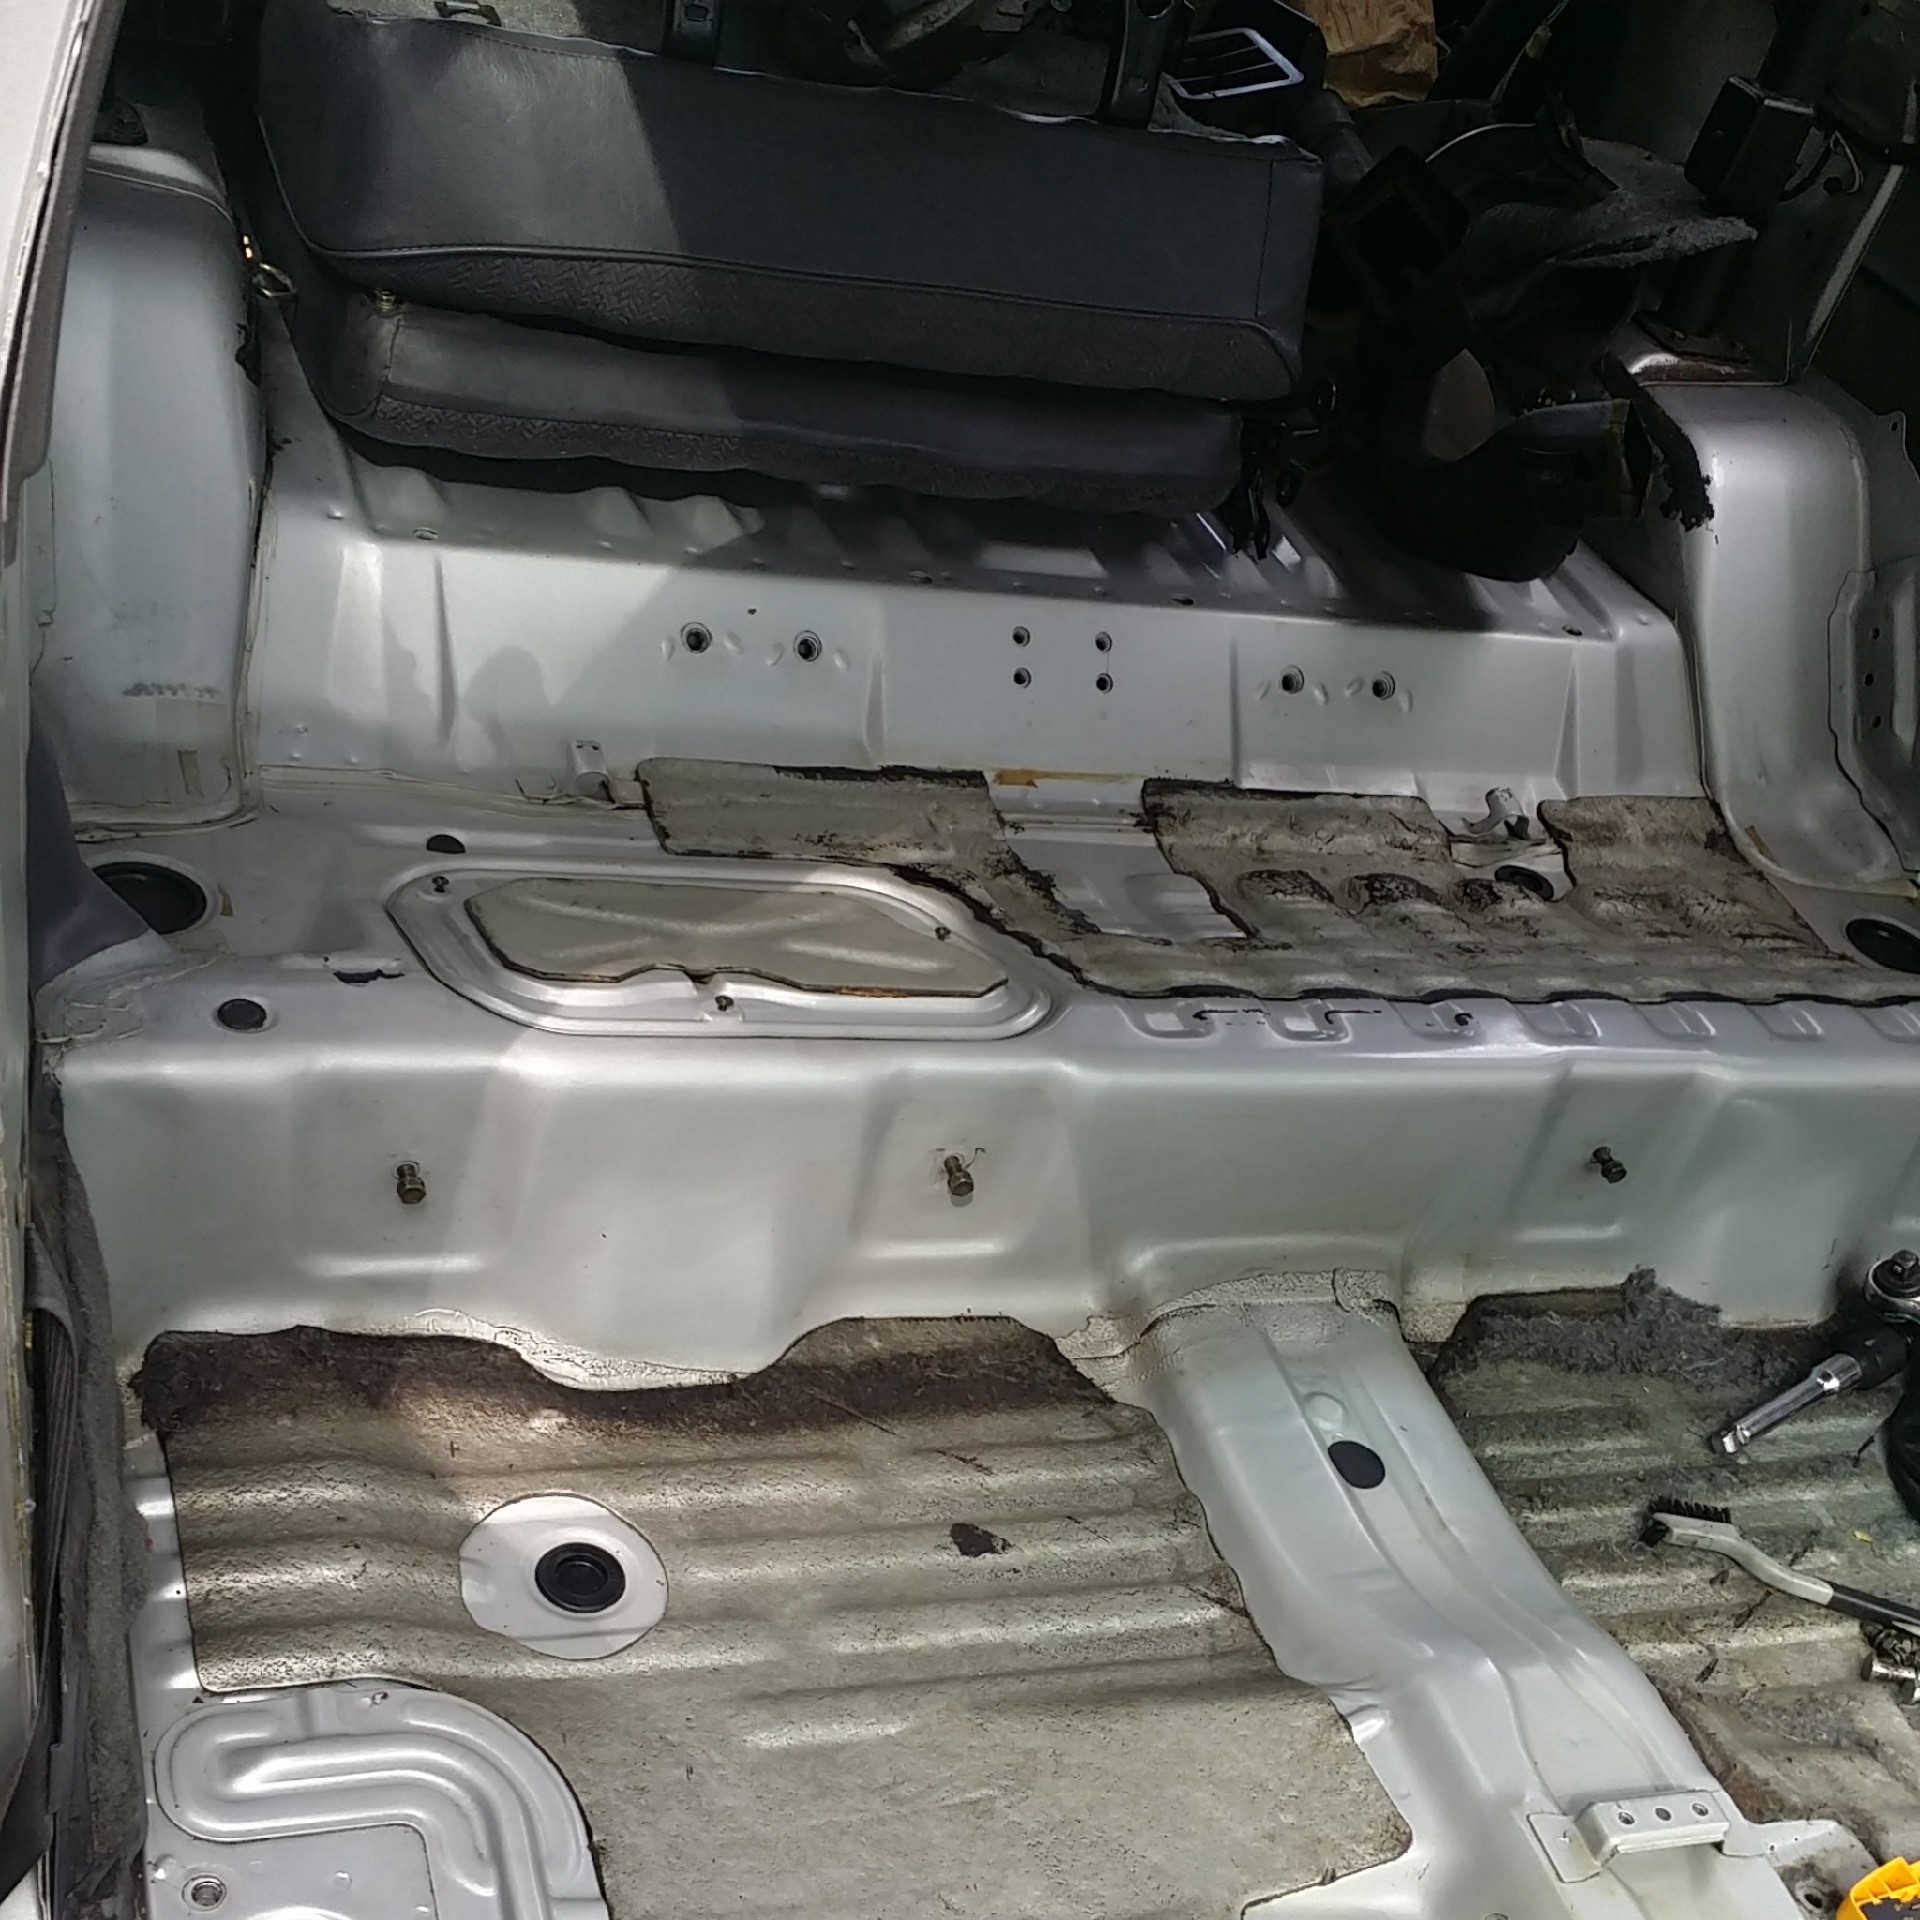
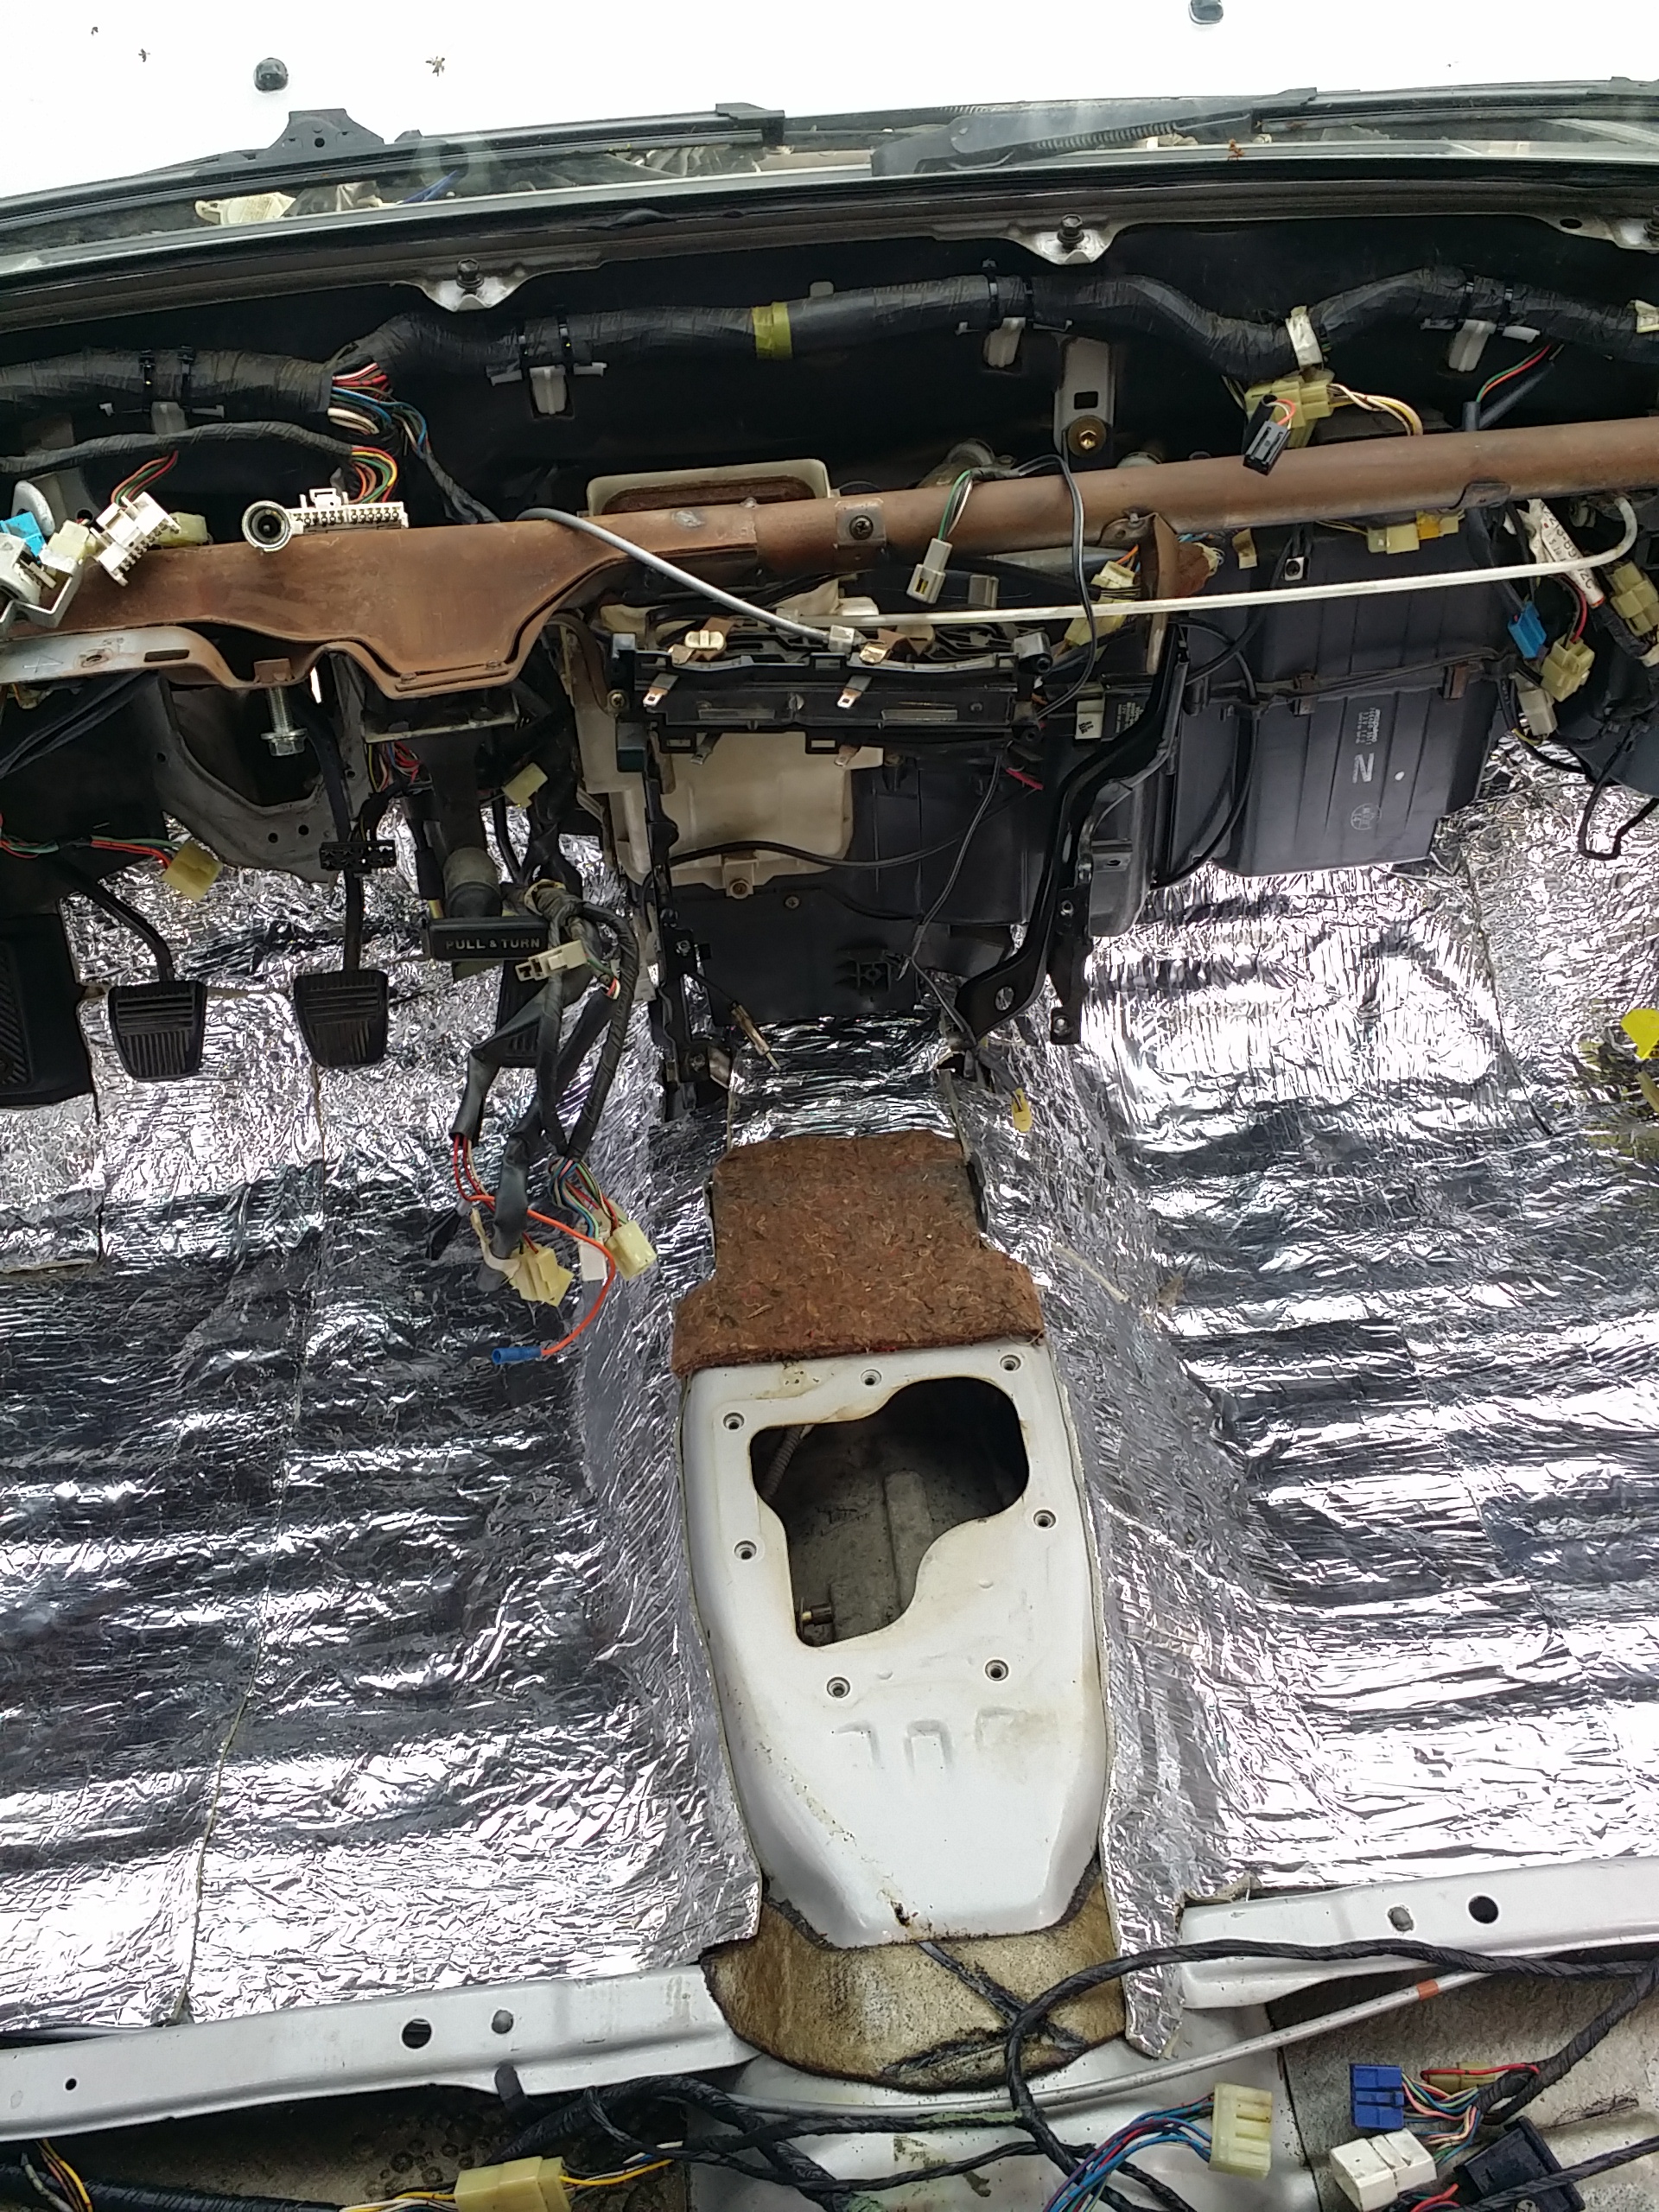
Cleaned the cabin floor to spotless, and began the insulation...
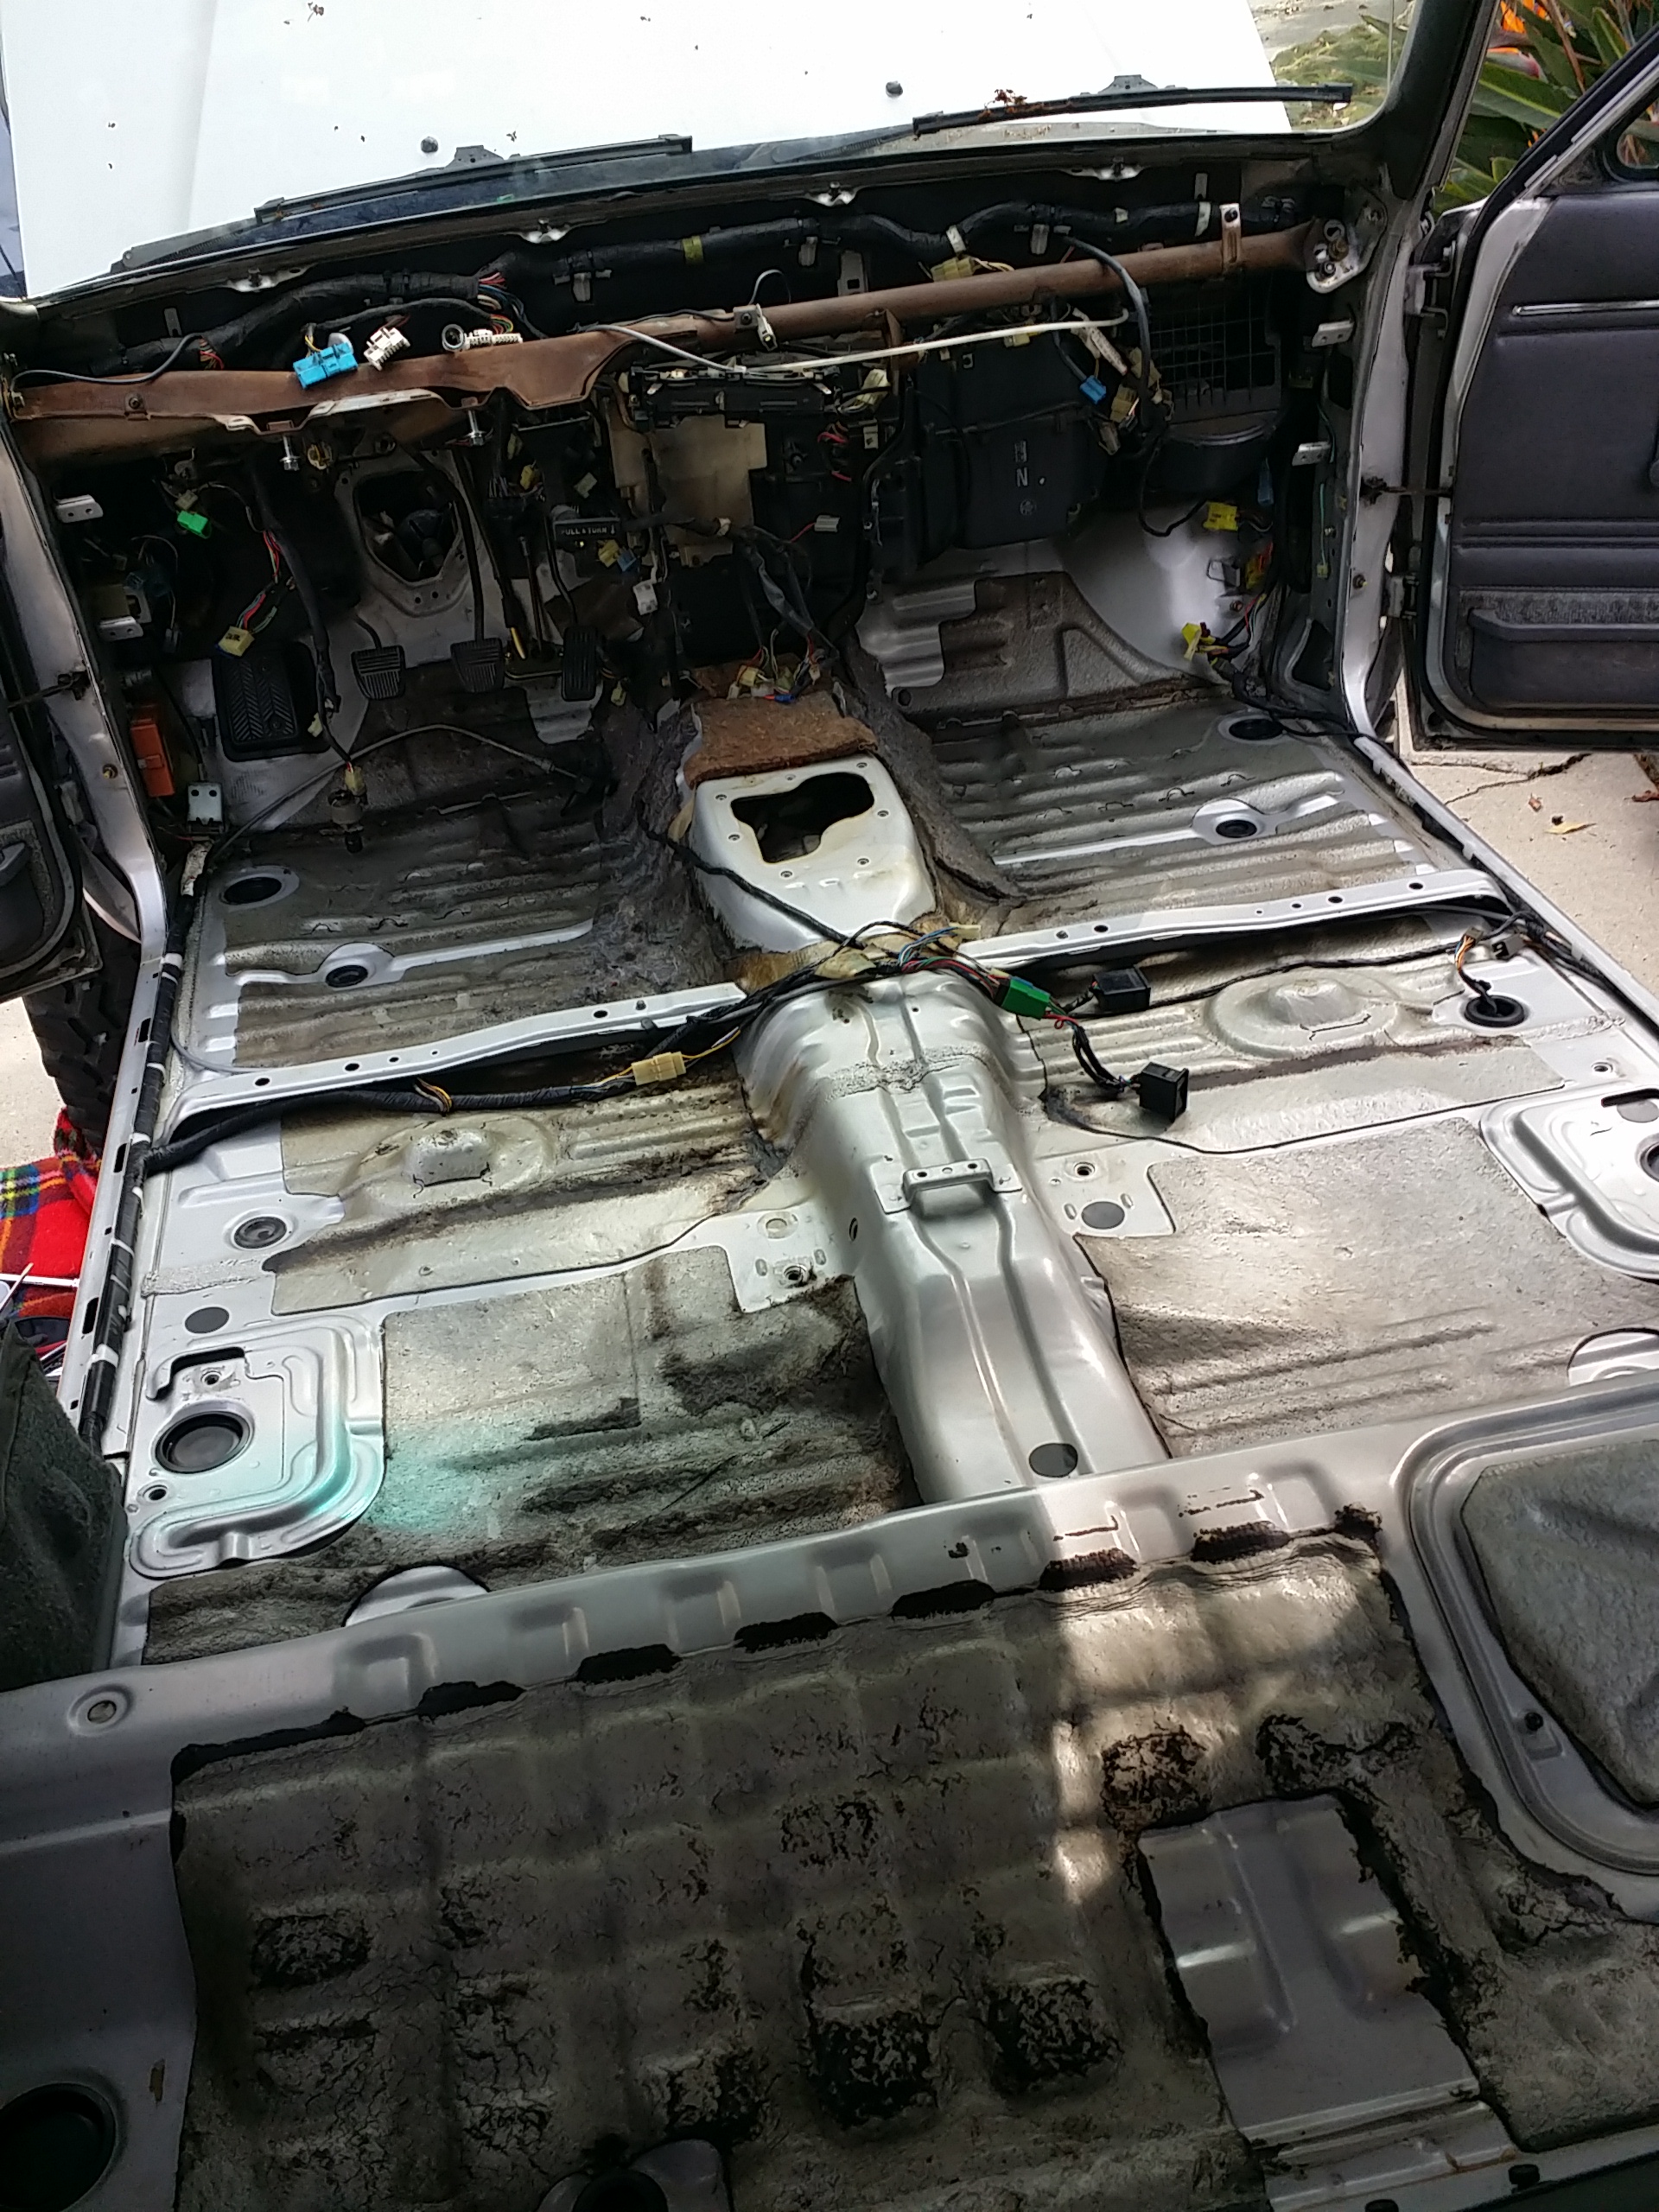
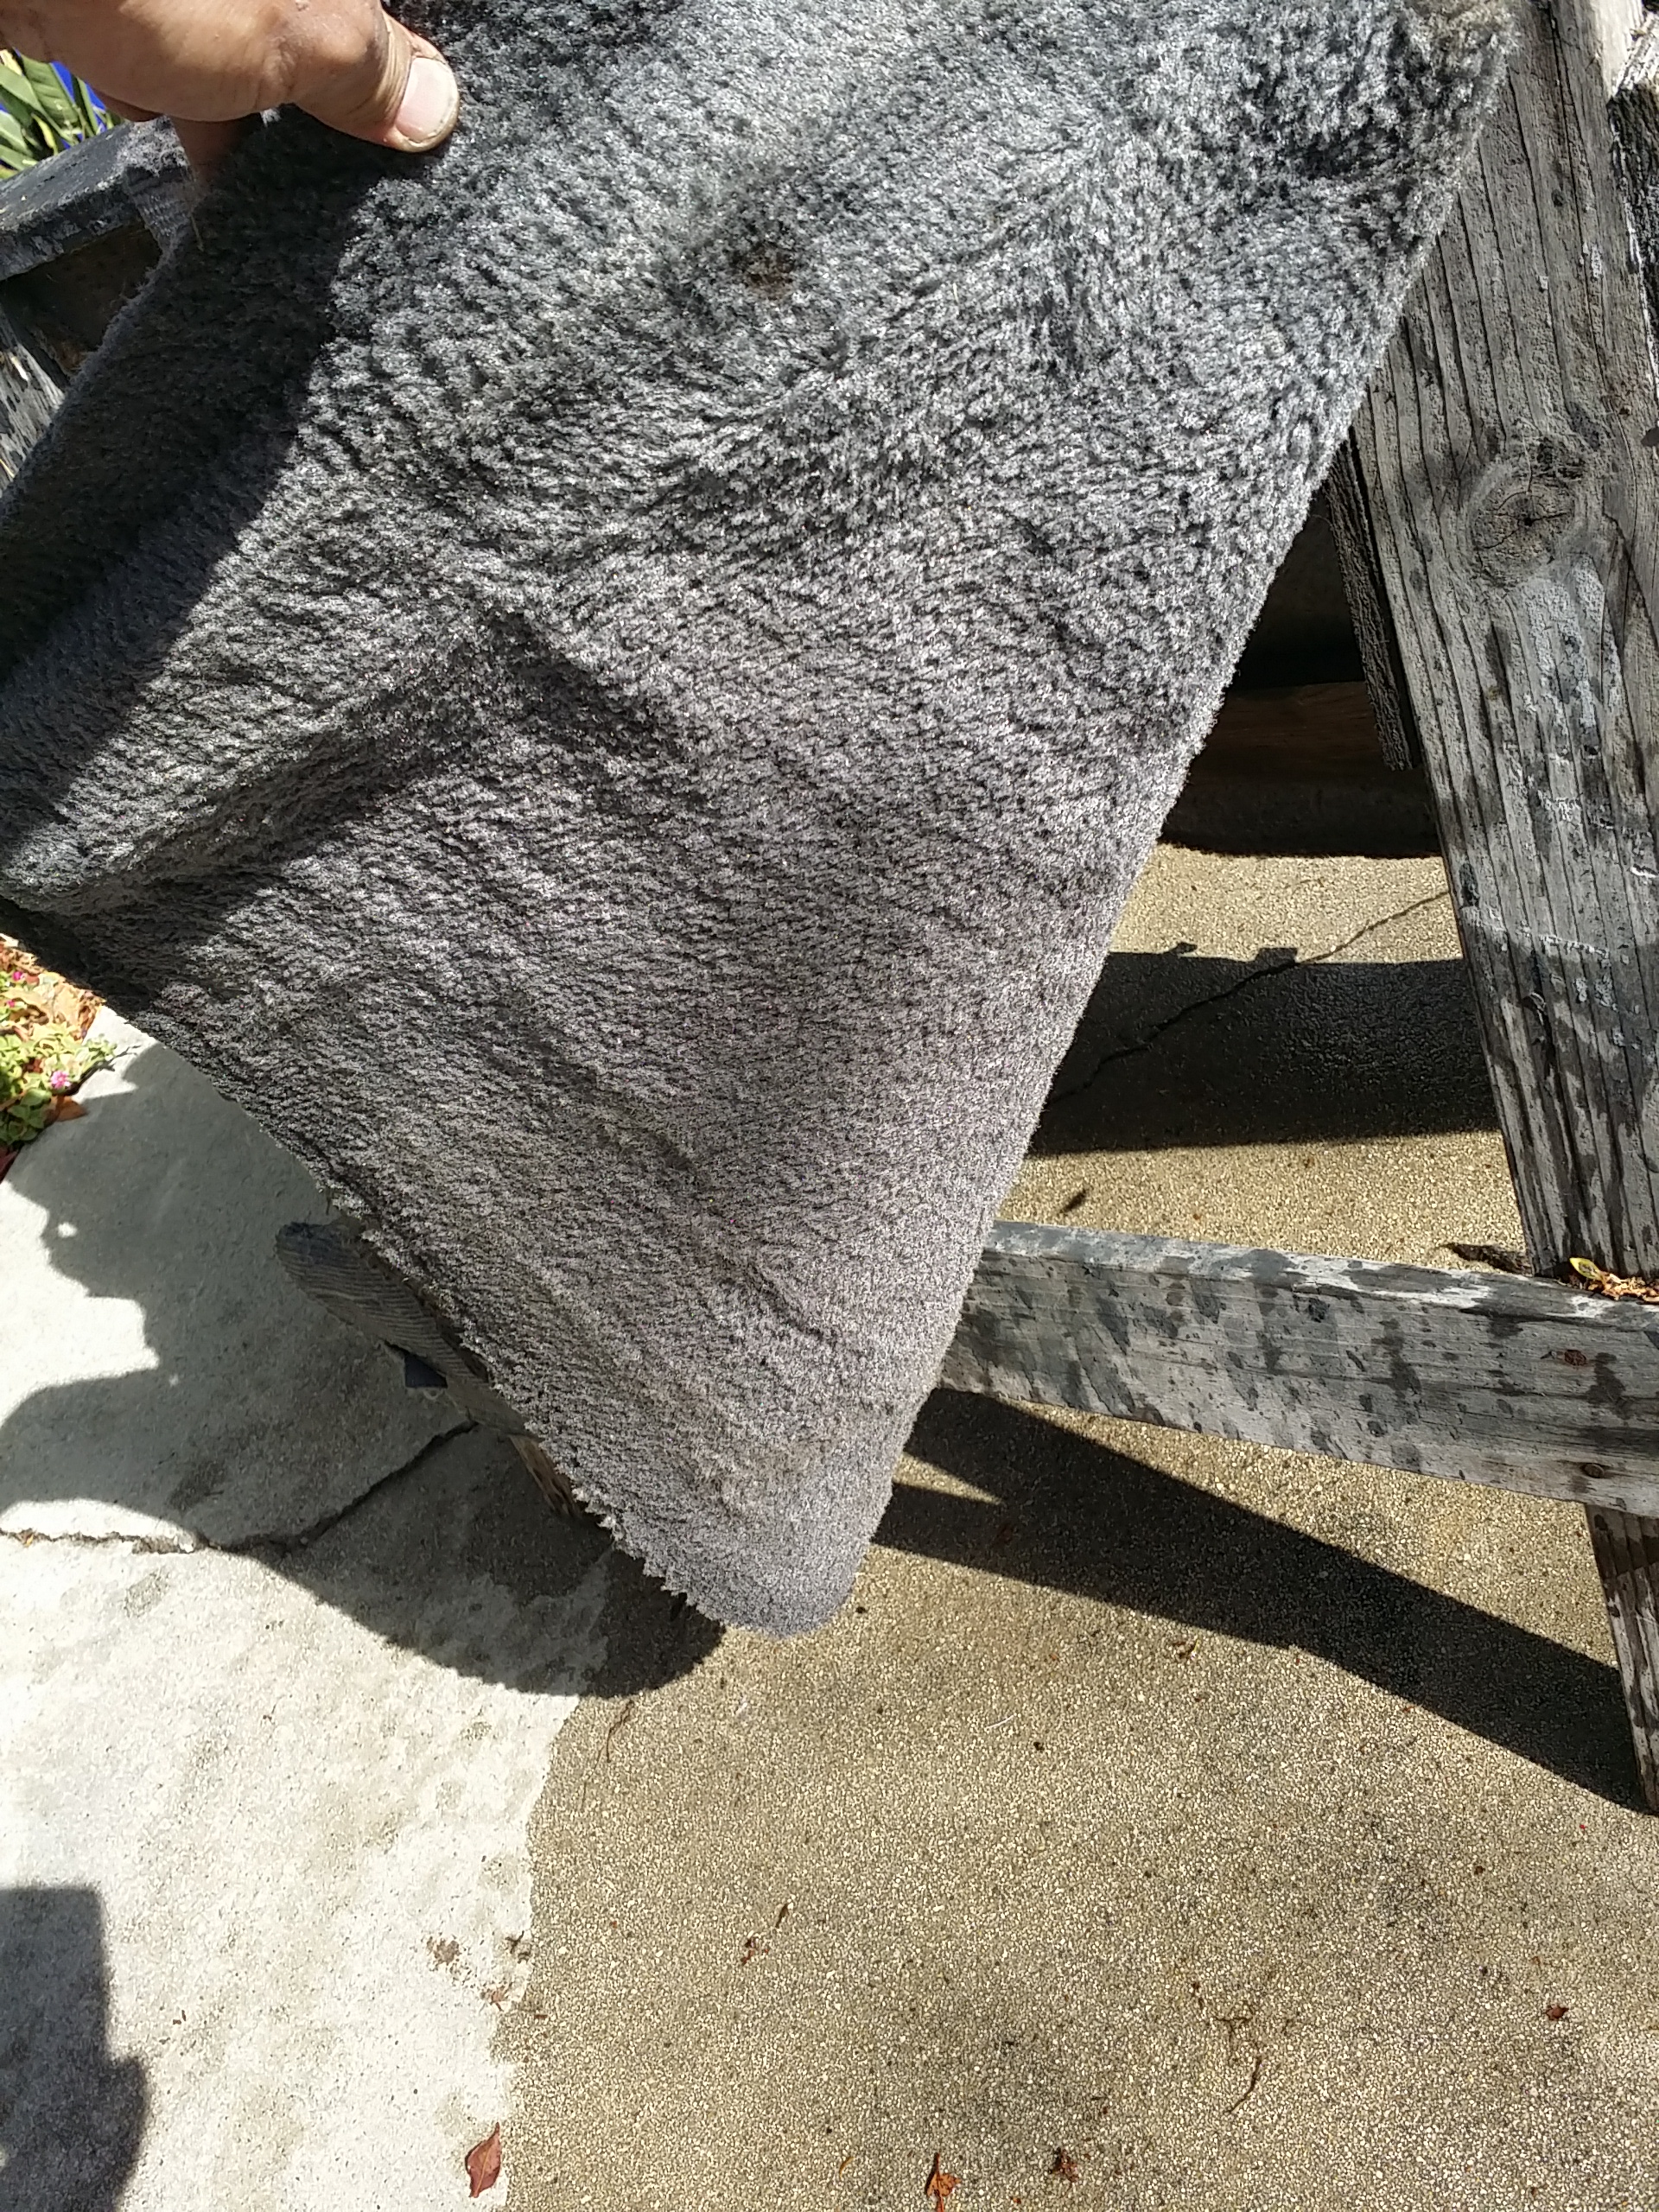
Super deep cleaned the front most carpet. ...
Insulating.......again. lol...

My other thread is by no means going away. Doesn't make sense since its only a body swap... While it sounded funny saying that last part lol. Hardly an only type of thing, but you know what I meant.
I'm really excited, and if everything goes according to plan, and if I can get a gantry over here, and if its not absolutely pouring rain, I should be able to swap the bodies Saturday!
Here's a few more videos to update this thread...
Have to keep the gas pedal from the 89. Floor is quite a bit different in that area and the mounting bolts are staggered...


Cleaned the cabin floor to spotless, and began the insulation...


Super deep cleaned the front most carpet. ...

Insulating.......again. lol...
 Feb 28, 2014 | 04:32 AM
#47
Registered User

Joined: Oct 2011
Posts: 2,731
Likes: 344
From: Denver CO
Nice!!!!! I hate to say it but the silver with black anything is going to look better than it did on ruby, don't hate me for saying it though I think it's time I moved on and got over the roll
Gray with black is the best combo possible, this is really going to be wonderful I'm pretty excited for you mark
Gray with black is the best combo possible, this is really going to be wonderful I'm pretty excited for you mark
Last edited by Discombobulated; Feb 28, 2014 at 04:33 AM.
Feb 28, 2014 | 04:57 AM
#48
How you have your harness zip tied to the mounts is exactly the way I do mine. 2 per mount.
Incase you ever need to work on your heater controls in the future, I do a splash of paint on the cables and where they lay for future reference. It is out of site and saves alot of future headaches.
Looks like you took your carpet to the carwash. Even as well cared for that Silverback was, you suprisied at the amount of junk that was in it? It will have a fresh smell to it now.
Copied...
I left the Heater Control Assembly in when I took out the Main Dash. Here I spray some paint on the cables and where they route when I put it back to gether. This is top passenger side. I got black on top and orange for the bottom ones. This will help when putting Heater Controls back in and is probably the most difficult part.
Drivers Top.
Incase you ever need to work on your heater controls in the future, I do a splash of paint on the cables and where they lay for future reference. It is out of site and saves alot of future headaches.
Looks like you took your carpet to the carwash. Even as well cared for that Silverback was, you suprisied at the amount of junk that was in it? It will have a fresh smell to it now.
Copied...
I left the Heater Control Assembly in when I took out the Main Dash. Here I spray some paint on the cables and where they route when I put it back to gether. This is top passenger side. I got black on top and orange for the bottom ones. This will help when putting Heater Controls back in and is probably the most difficult part.

Drivers Top.

Last edited by Terrys87; Feb 28, 2014 at 05:00 AM.
Feb 28, 2014 | 10:23 AM
#49
On Youtube 24, the oval cutouts in the rocker panel you show at the first of the video, that is where dirt and moisture gets trapped. On the bottom side is some "V" notches that are drain holes. While you have your door seal/trim off is a good time to blow the dirt out of there and make sure the drain holes are cleared. I sometimes have taken a piece of wire to clear the holes.
If the drain holes are clear, you can see thru the ovals to the drain holes on a few of them. I found a dead mouse in my 85s rocker panel. I dont think he was supposed to be in there. He must of gotten down in there and got trapped. Luckily he was petrified and I was able to get him out in dried out pieces.
If the drain holes are clear, you can see thru the ovals to the drain holes on a few of them. I found a dead mouse in my 85s rocker panel. I dont think he was supposed to be in there. He must of gotten down in there and got trapped. Luckily he was petrified and I was able to get him out in dried out pieces.
Last edited by Terrys87; Feb 28, 2014 at 10:29 AM.
 Feb 28, 2014 | 08:07 PM
#52
Thread Starter
Registered User
iTrader: (5)
Joined: Jun 2009
Posts: 19,281
Likes: 20
From: Lake Havasu, AZ
First and foremost, I would like to thank Greg o for stopping by and lending a hand for a few hours! Very helpful, & I think we got quite a bit done for just a couple-few hours! Thanks brother!
Well, .... I had to call everyone off tomorrow, because due to torrential rains a1 rentals sent all of the drivers home early as they had no Construction rental. However, I think this is a good thing in a way... Here's my reasons:
1.) It's freaking pouring rain and will be probably through Monday! Lol...
A. Rain makes for dangers that are just in time for scene and even if no one's hurt which is obviously of paramount importance, something could slip and fall back down and damage the body... Etcetera etcetera
B. It makes for an uncomfortable job for everyone.....
C. In order to move this body, unless I have at least 6 decent strength guys, I have to have the shell off(obviously, even if I had 8 strong hands, the show would need to come off because it's freaking heavy! Lol).... , and in pulling in the shell off, this creates the window of opportunity for torrential rains to fill up the interior if we have any hiccups at all, including, let's face it, forklift breakdown? Exactly, so I think that alone is a good enough reason to be grateful instead of bitter( and honestly? Very grateful that I even found this thing and that its clean for so cheap... More than that, I'm grateful that I wasn't hurt in the accident, not even a scratch! )....
2.) WIRING DETAILS!.....
A. This will really allow me to get a few things free wired and make it that much quicker to have her on the road. Realistically, once I put the body on, within a couple hours I could drive it and moving around, because the harness is ready to go. I just have to run my headlight wiring harness upgrade and so forth.
B. On board air will remain completely mounted to the frame of rubies under goodies. Lol. I just have to run the wiring to the switch digital gauge again. However, the digital gauge IS still fully wired to all of its connections and will easily be but plugged back in to the side of the stereo Bezel, unless I come up with a better place to mount it. (I like it down there because its not in my face.)
C. I need to wire the tunes, properly this time( I did a good job, and Richard came over to help with the amp and could tell you that I did it cleanly... , but it could always be done clear, am i right? )
D. 18 pod rock light kit is completely still installed as is the wireless remote. All I have to do is re wire it to the auxiliary fuse block and ground it to the firewall and I am good to go. Just have to pull it up in a couple spots, actually a total of 4, to remount it to the body. The lights are even still attached but I had to cut one to avoid cutting through the core support, in case someone might need it...
3.) ASTHETICS DETAILS:
A. Haven't decided yet whether to mount the James Deans creation smoke colored 87 88 decals or not. Luckily this one had no decals which leaves me a choice. Lol. I'm not a big fan of the 89 decal... It looks basically like a check mark to me. Its not ugly, I just think this one is so much more cool and 80's looking! Lol... The smoke or charcoal colored stripes like Toyotech has,... well, they will basically match pretty much exactly with all of my hammered black armor. I'm obviously not going to do gold and silver is out of the question, lol. And I don't see black as an offer . I don't think it would look as good as the metallic stripes do... However the flat paint and gold stripes combo of red and gold looks pretty good. Nonetheless, as I said, I don't see where he offers in black anyway. I just wonder if I should wait until I eventually painted again with a really nice paintjob, then doing the stripes... I gotta be honest, I miss them! Lol. Again, this is totally irrelevant... Just talking out loud.
**************************************
TRANS TUNNEL CUTTING AND HAMMERING TO COMMENCE very soon...
I need to be ready when the body heads over to its new home. The problem with triple sticks and dual cases in general is that they bring things up. Especially up considering I have a low profile heavy duty cross member... So if i even just cut out the proper cut out, I'm pretty sure the trans would make contact with at least the outer arms above the Heims. And why would I want to be cutting any more than I have to after I'm right there and dropping it down? I will take some measurements tomorrow from the lowest point on the floor portion of the chassis to the top of the tunnel and from front to back. But I can already tell you, the automatic transmission cutout begins at 10 inches and does not include a separate cut out for the transfer case let alone a larger one.... The manual transmission cutout begins at 8 inches, and that was never cut any further... So, I will do my best to get it just right so that I don't cut away too much and so forth. Other than that, the tunnels look fairly close to identical identical.
PS: I haven't decided on what to do yet with the tailgate.
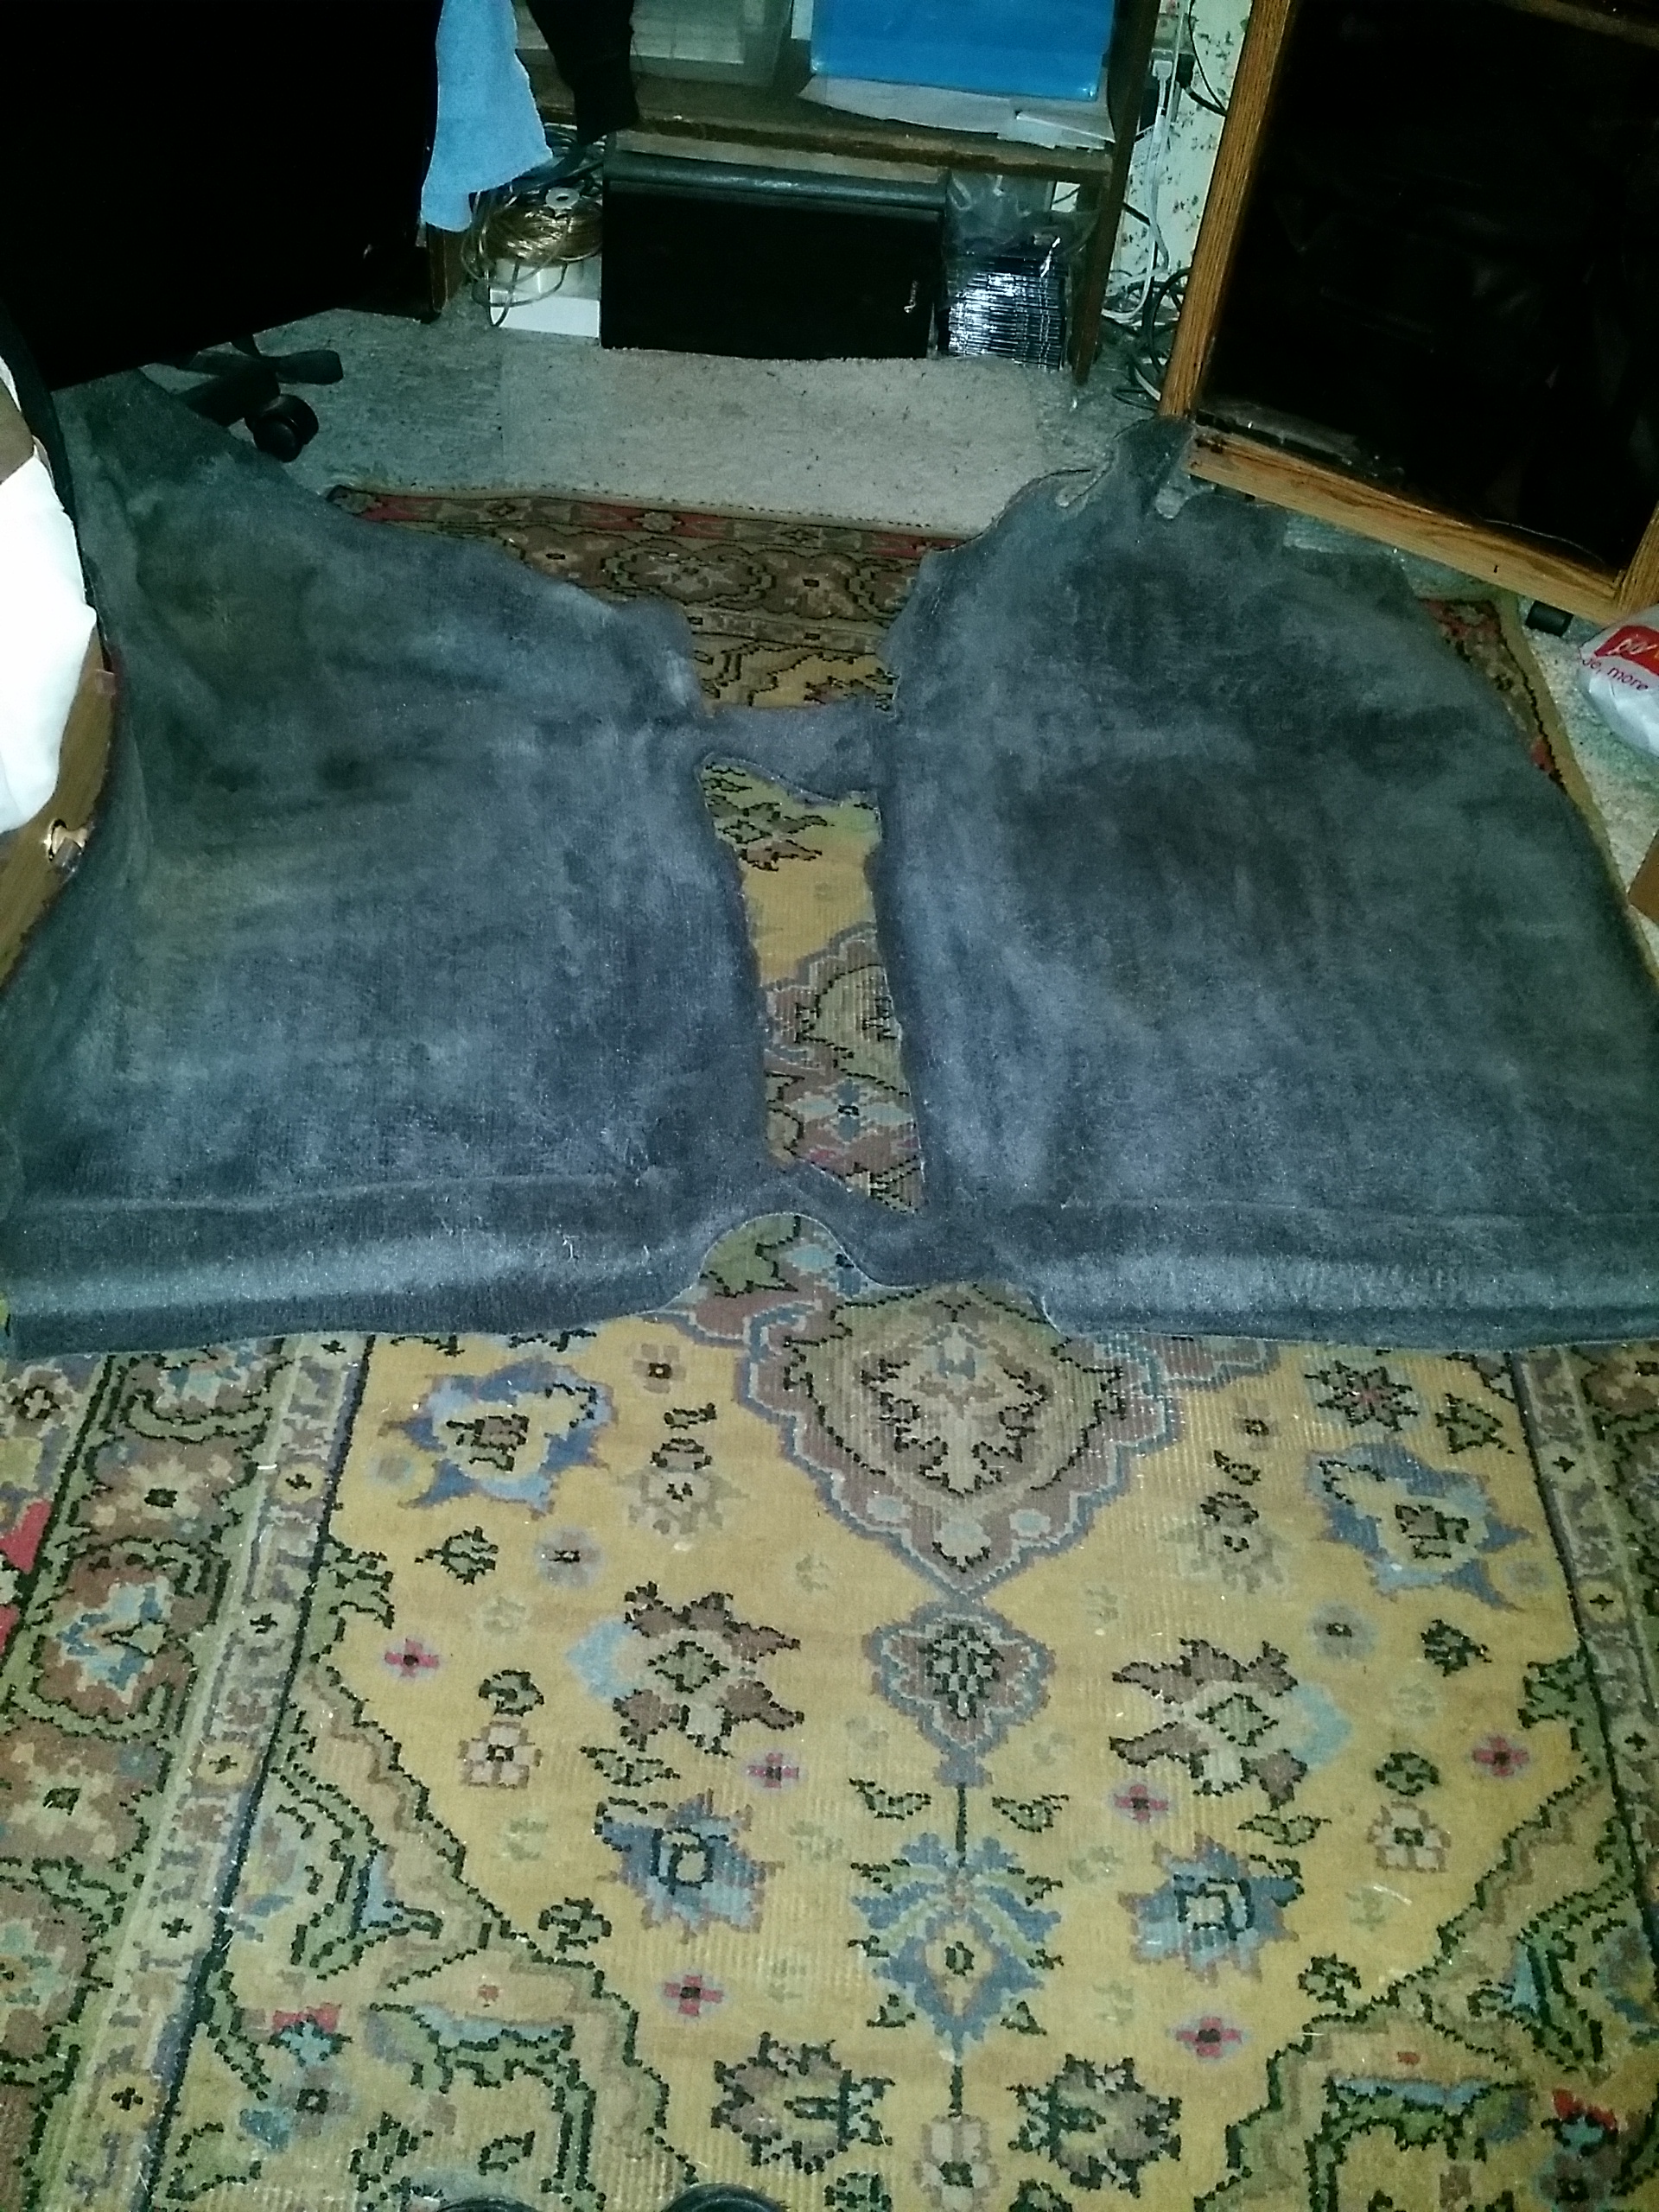
PSS: first carpet I cleaned, upfront, from my truck,... Came out so clean I'm really happy! I will share later how I did it but I basically threw it on the concrete out front and scrub the crap out of it using the carpet cleaning shampoo that I have, and a hand brush that is really use usually for floors..... Then, I spent about 30 minutes rinsing it and washing it out with a high pressure hose. Not that stuff from the car wash, more like it just stream. It really works better to force all of the dirt out. It doesn't have a single cent at all, which is what I was going for. I don't want to smell shampoo fragrance, because then I can't know if its musty. Even the padding smells.. Well, it smells like nothing! Lol.
And here's a shot of that transmission tunnel on the automatic. So basically I have to cut another to inches further towards the dash, and then around 6 inches to the back and outward a bit towards the back. I'm going to do a bit cleaners this time though. Its not that they didn't do a good job, but I think on my own truck, using my attention to detail, I can do a better job.
Well, .... I had to call everyone off tomorrow, because due to torrential rains a1 rentals sent all of the drivers home early as they had no Construction rental. However, I think this is a good thing in a way... Here's my reasons:
1.) It's freaking pouring rain and will be probably through Monday! Lol...
A. Rain makes for dangers that are just in time for scene and even if no one's hurt which is obviously of paramount importance, something could slip and fall back down and damage the body... Etcetera etcetera
B. It makes for an uncomfortable job for everyone.....
C. In order to move this body, unless I have at least 6 decent strength guys, I have to have the shell off(obviously, even if I had 8 strong hands, the show would need to come off because it's freaking heavy! Lol).... , and in pulling in the shell off, this creates the window of opportunity for torrential rains to fill up the interior if we have any hiccups at all, including, let's face it, forklift breakdown? Exactly, so I think that alone is a good enough reason to be grateful instead of bitter( and honestly? Very grateful that I even found this thing and that its clean for so cheap... More than that, I'm grateful that I wasn't hurt in the accident, not even a scratch! )....
2.) WIRING DETAILS!.....
A. This will really allow me to get a few things free wired and make it that much quicker to have her on the road. Realistically, once I put the body on, within a couple hours I could drive it and moving around, because the harness is ready to go. I just have to run my headlight wiring harness upgrade and so forth.
B. On board air will remain completely mounted to the frame of rubies under goodies. Lol. I just have to run the wiring to the switch digital gauge again. However, the digital gauge IS still fully wired to all of its connections and will easily be but plugged back in to the side of the stereo Bezel, unless I come up with a better place to mount it. (I like it down there because its not in my face.)
C. I need to wire the tunes, properly this time( I did a good job, and Richard came over to help with the amp and could tell you that I did it cleanly... , but it could always be done clear, am i right? )
D. 18 pod rock light kit is completely still installed as is the wireless remote. All I have to do is re wire it to the auxiliary fuse block and ground it to the firewall and I am good to go. Just have to pull it up in a couple spots, actually a total of 4, to remount it to the body. The lights are even still attached but I had to cut one to avoid cutting through the core support, in case someone might need it...
3.) ASTHETICS DETAILS:
A. Haven't decided yet whether to mount the James Deans creation smoke colored 87 88 decals or not. Luckily this one had no decals which leaves me a choice. Lol. I'm not a big fan of the 89 decal... It looks basically like a check mark to me. Its not ugly, I just think this one is so much more cool and 80's looking! Lol... The smoke or charcoal colored stripes like Toyotech has,... well, they will basically match pretty much exactly with all of my hammered black armor. I'm obviously not going to do gold and silver is out of the question, lol. And I don't see black as an offer . I don't think it would look as good as the metallic stripes do... However the flat paint and gold stripes combo of red and gold looks pretty good. Nonetheless, as I said, I don't see where he offers in black anyway. I just wonder if I should wait until I eventually painted again with a really nice paintjob, then doing the stripes... I gotta be honest, I miss them! Lol. Again, this is totally irrelevant... Just talking out loud.
**************************************
TRANS TUNNEL CUTTING AND HAMMERING TO COMMENCE very soon...
I need to be ready when the body heads over to its new home. The problem with triple sticks and dual cases in general is that they bring things up. Especially up considering I have a low profile heavy duty cross member... So if i even just cut out the proper cut out, I'm pretty sure the trans would make contact with at least the outer arms above the Heims. And why would I want to be cutting any more than I have to after I'm right there and dropping it down? I will take some measurements tomorrow from the lowest point on the floor portion of the chassis to the top of the tunnel and from front to back. But I can already tell you, the automatic transmission cutout begins at 10 inches and does not include a separate cut out for the transfer case let alone a larger one.... The manual transmission cutout begins at 8 inches, and that was never cut any further... So, I will do my best to get it just right so that I don't cut away too much and so forth. Other than that, the tunnels look fairly close to identical identical.
PS: I haven't decided on what to do yet with the tailgate.
PSS: first carpet I cleaned, upfront, from my truck,... Came out so clean I'm really happy! I will share later how I did it but I basically threw it on the concrete out front and scrub the crap out of it using the carpet cleaning shampoo that I have, and a hand brush that is really use usually for floors..... Then, I spent about 30 minutes rinsing it and washing it out with a high pressure hose. Not that stuff from the car wash, more like it just stream. It really works better to force all of the dirt out. It doesn't have a single cent at all, which is what I was going for. I don't want to smell shampoo fragrance, because then I can't know if its musty. Even the padding smells.. Well, it smells like nothing! Lol.

And here's a shot of that transmission tunnel on the automatic. So basically I have to cut another to inches further towards the dash, and then around 6 inches to the back and outward a bit towards the back. I'm going to do a bit cleaners this time though. Its not that they didn't do a good job, but I think on my own truck, using my attention to detail, I can do a better job.
Last edited by ChefYota4x4; Feb 28, 2014 at 08:18 PM.
Mar 1, 2014 | 08:15 AM
#53
Copied https://www.yotatech.com/forums/f199...l#post52002149 This truck didnt have the ac Condenser is why it got the core dirty. I will be up tonite and should be online about 10:30 your time.
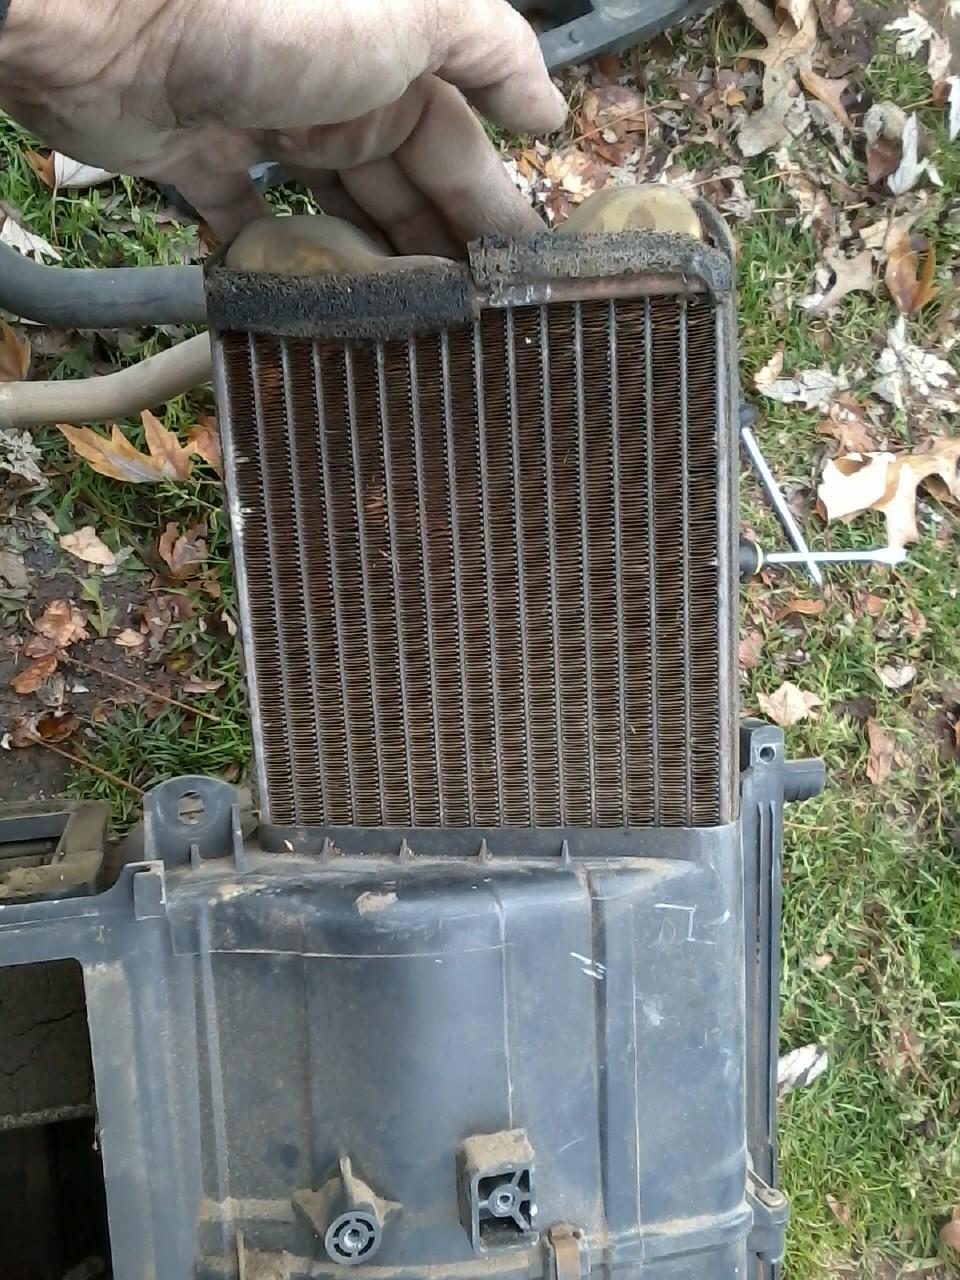
The temperture has been dropping around here and Steve was saying that his heater wasnt working. He doesnt know much about mechanicing so I looked at it and said it must be a clogged heater core so we tried flushing it several times and got very little junk out of it. So then I tried to soak it with CLR. Trying everything to avoid from swapping heater cores. Nothing worked, so today he went and bought a core from Oriellys for $62 if I recall right.
Flushing wasnt going to fix this one and is the first time that I have ran into something like this. His truck doesnt have AC, and instead of having the condenser, it has a square tube in its place. The heater core was full of dust,dirt and debri. My guess is with an AC unit under the dash it would of blocked the debri from getting to the heater core, but with a square tube, the debri goes from the blower straight to the core. Flushing cant fix the outside of the core.
I have listed on one of my threads about how debri gets thru the cowl and on the passenger side it can get down to the blower and that is how you can get fan noise from debri getting in from the out side. I am going to do the following write up so as I can just copy and paste it to my 88 Runner build as I am trying to make it where someone that has questions, that maybe the 88 Runner build can help solve their problems. I refer to it alot myself.
Remove Speedometer Bezel
Remove Speedometer Assembly
Remove Lower Panel
Remove Glove Box
Remove Dashpad
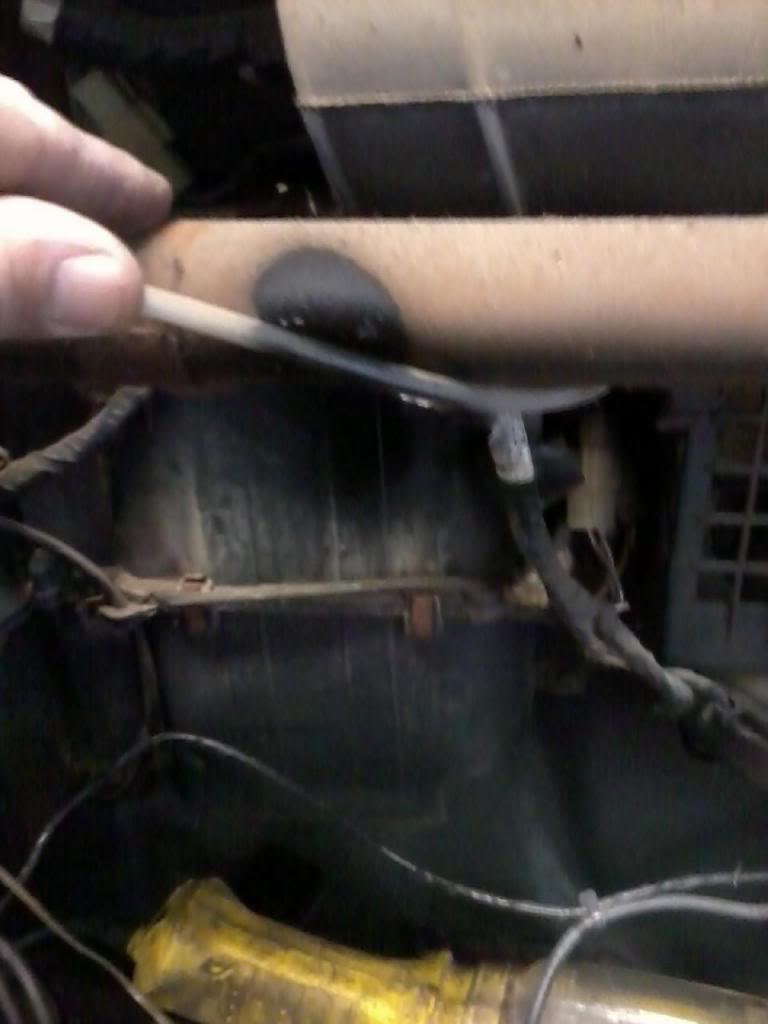
Remove the hoses clamps under the hood. I find it easier to leave the hoses attached to the core and push the hose thru the firewall with firewall seals attached.
Unhook the 4 cables attached to the heater controls.
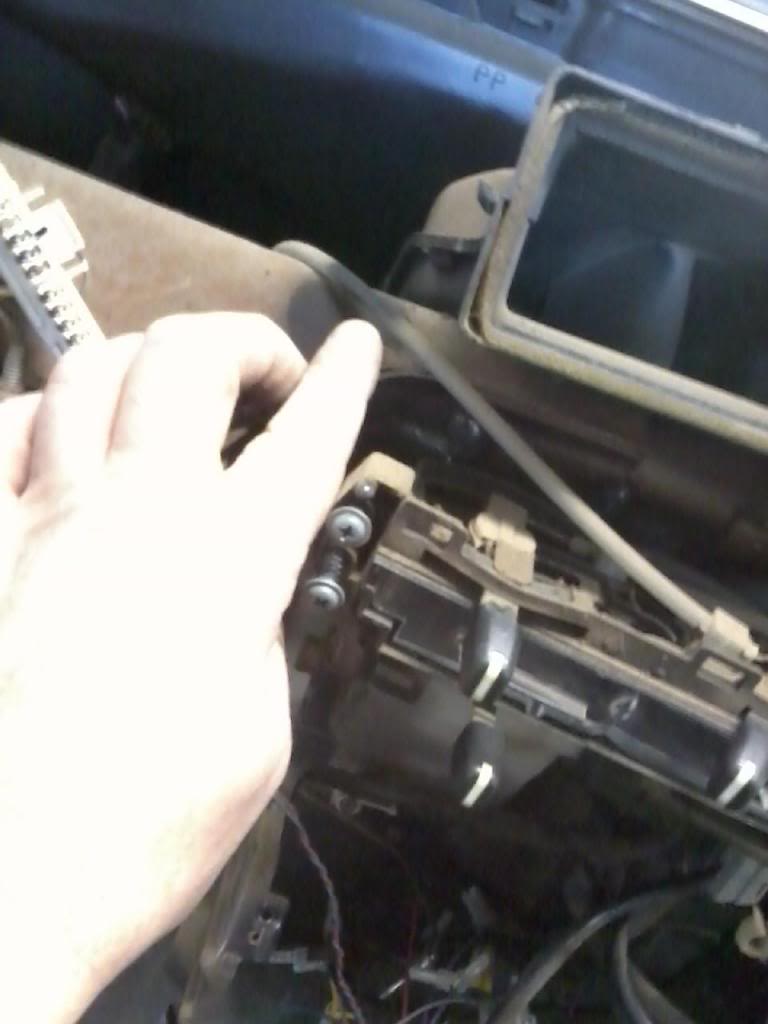
Here you can see I removed the White plastic cover and the side arms that support the dash and where your stereo will mount to.
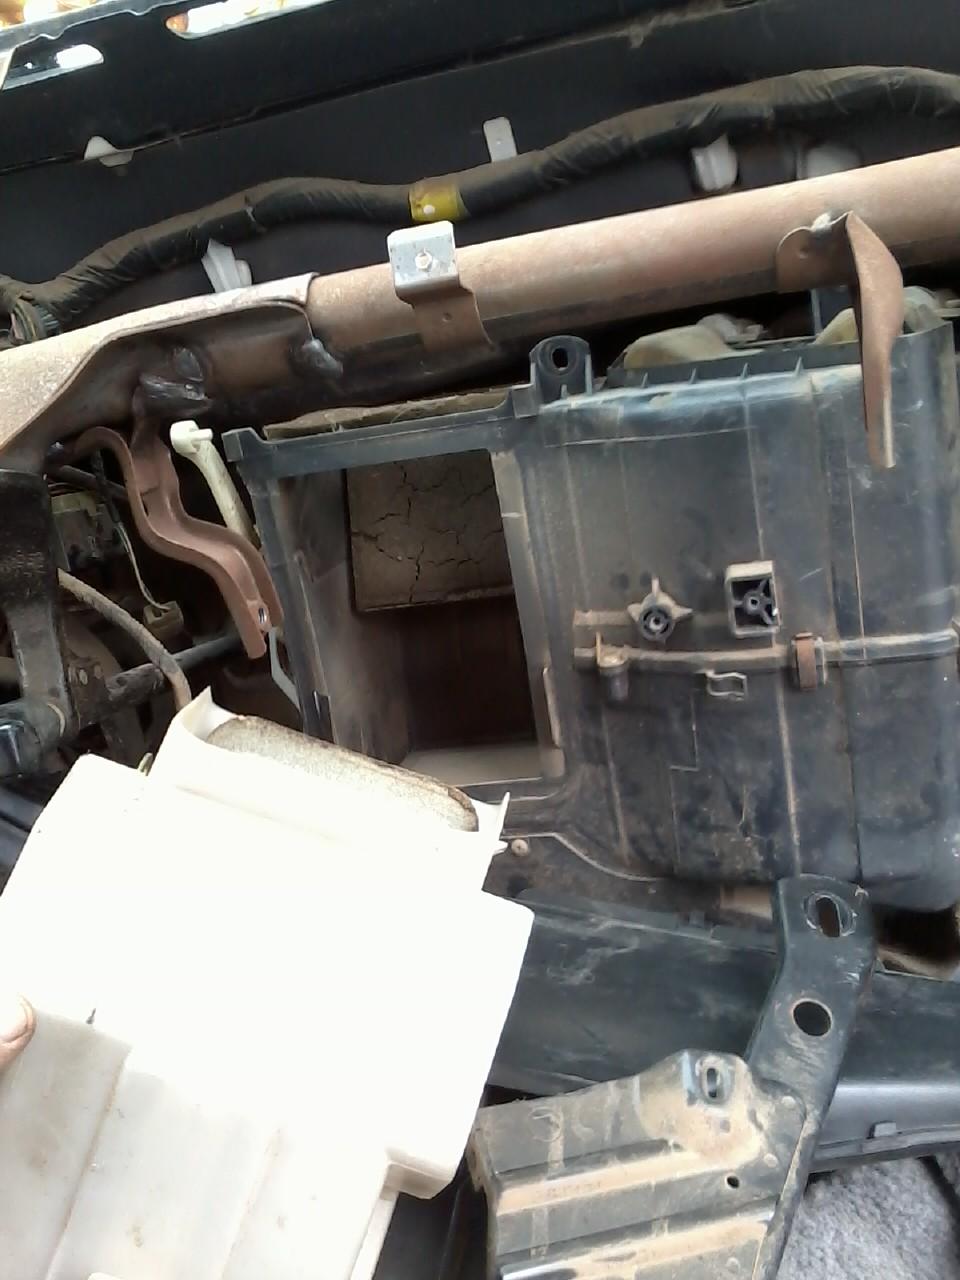
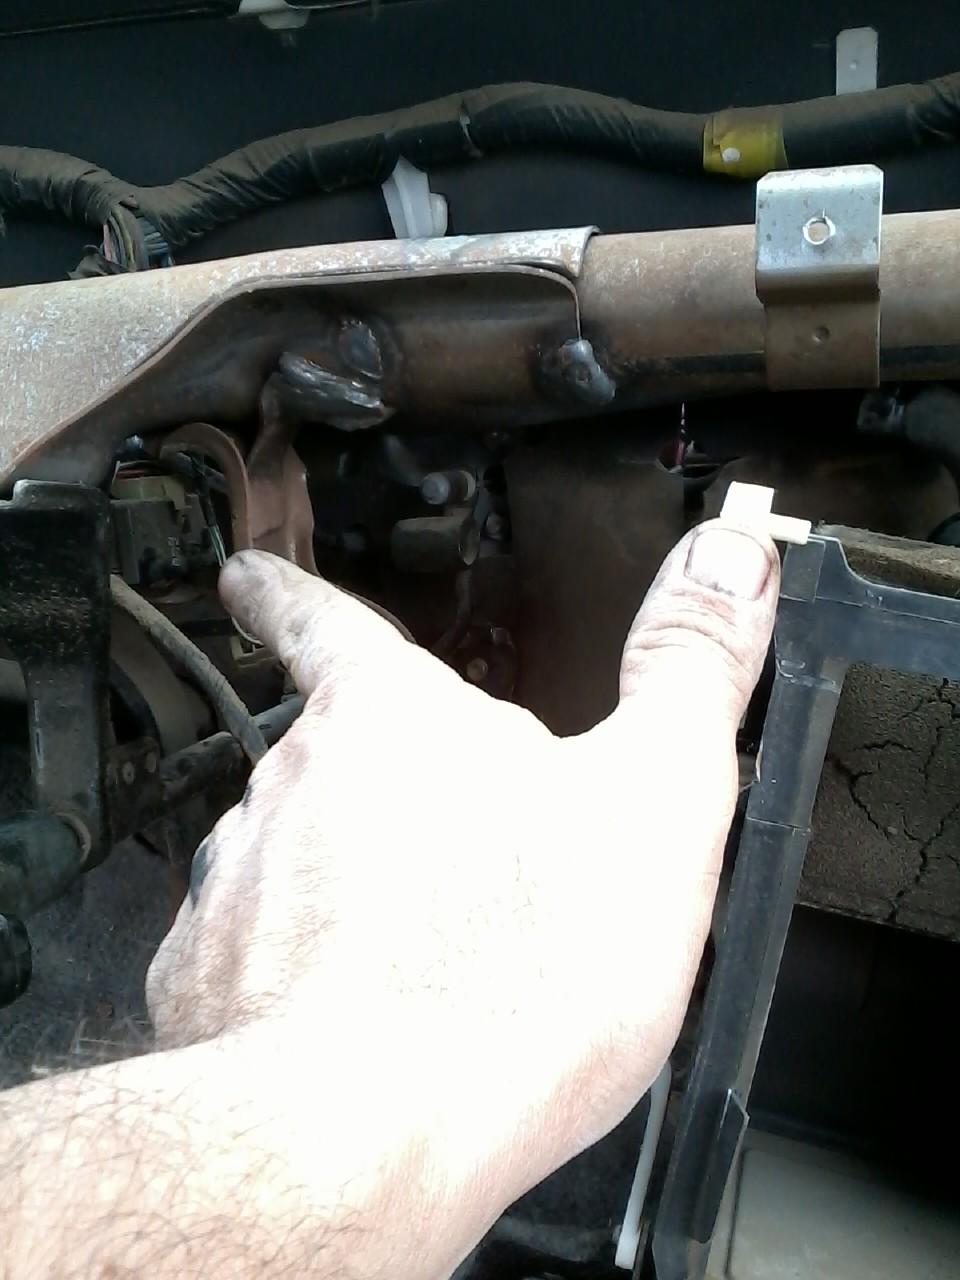
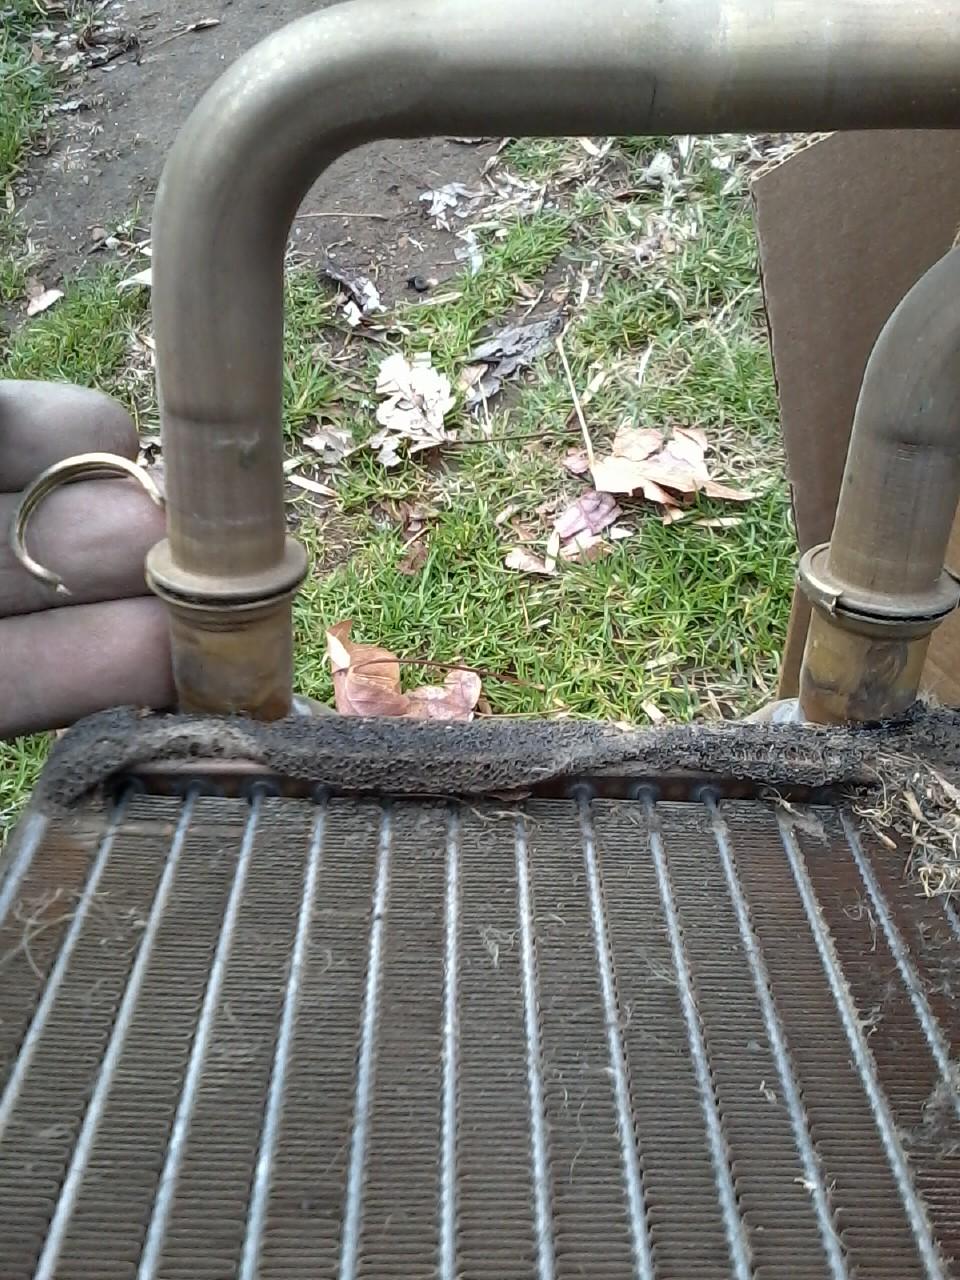
When pulling the heater core assembly thru, pull it til the metal hose portion clears the firewall and slide to the right to clear the bracket and core where my fingers are pointing to.
Here is the Core Assembly. You will have 4 clamps on top that are held by phillips screws. Remove and slide the core up and out.
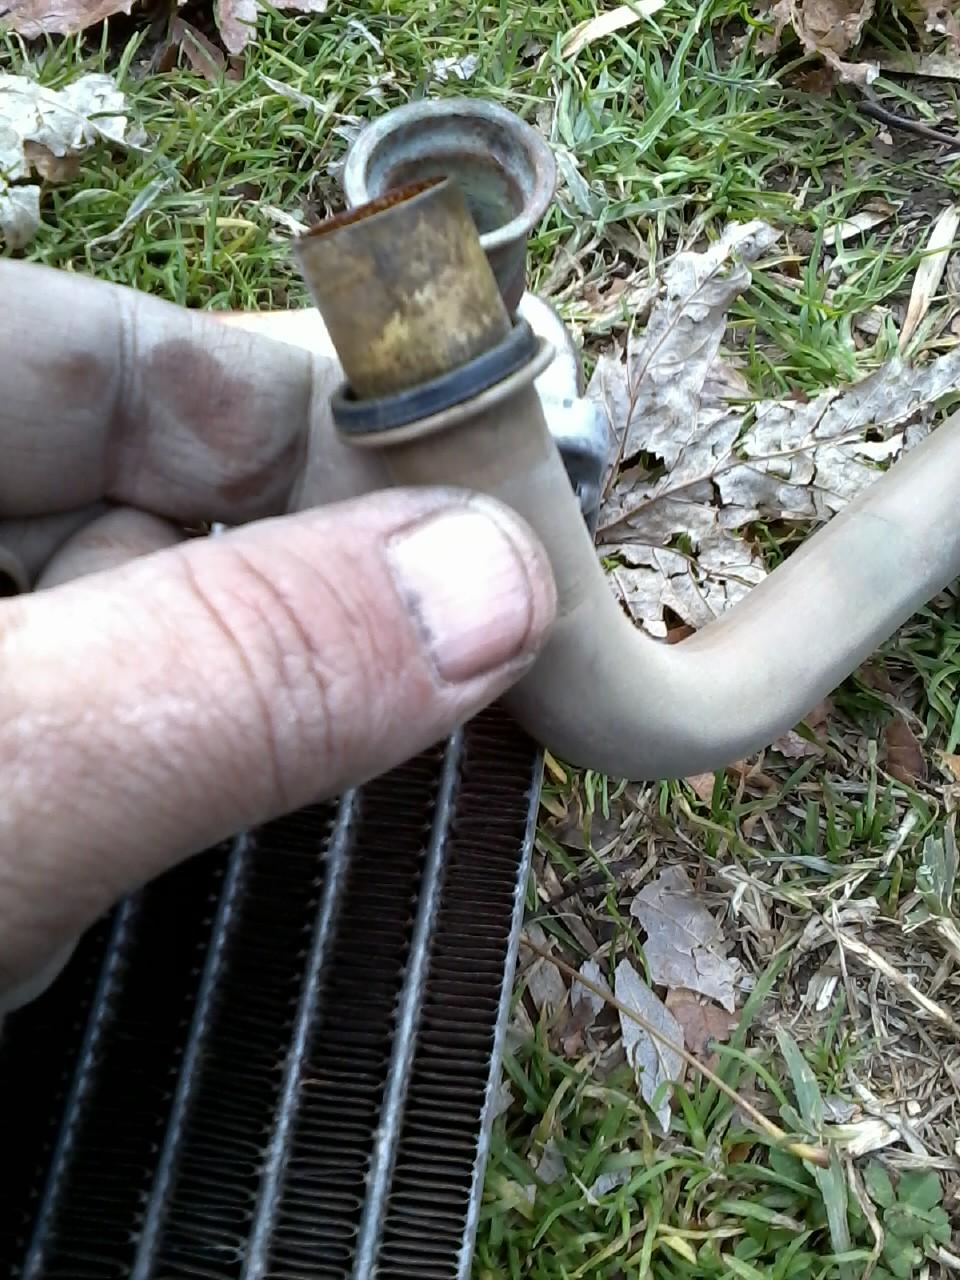
Seperate the pipes from the core. My replacement core didnt come with new seals or the c clips. Be gentle with these as you will need to reuse them. When you stick the old pipes into the new core (you use your old pipes) do NOT try to squeeze them with pliers to try and close the gap. The edge will bend and then you have to straighten it out. I found it easier to have someone to push the two pieces together while I put on the clip.
The oring you will need to reuse. I should of went to the store and got a new one, but we didnt have any leaks when done.
Here is the problem with this core. Steve wanted a new one in it. The old one was actually in great shape, so I will clean the outside and keep it for a spare. I am a cheapscape and can have a core out in 45 minutes, just because I have done this several times.
The first time I changed heater controls, it took me 3 hours. This is not an easy job for your first time but will add this post to my 88 build to try and make it easier for someone who might have to do this. I have some videos of other steps.
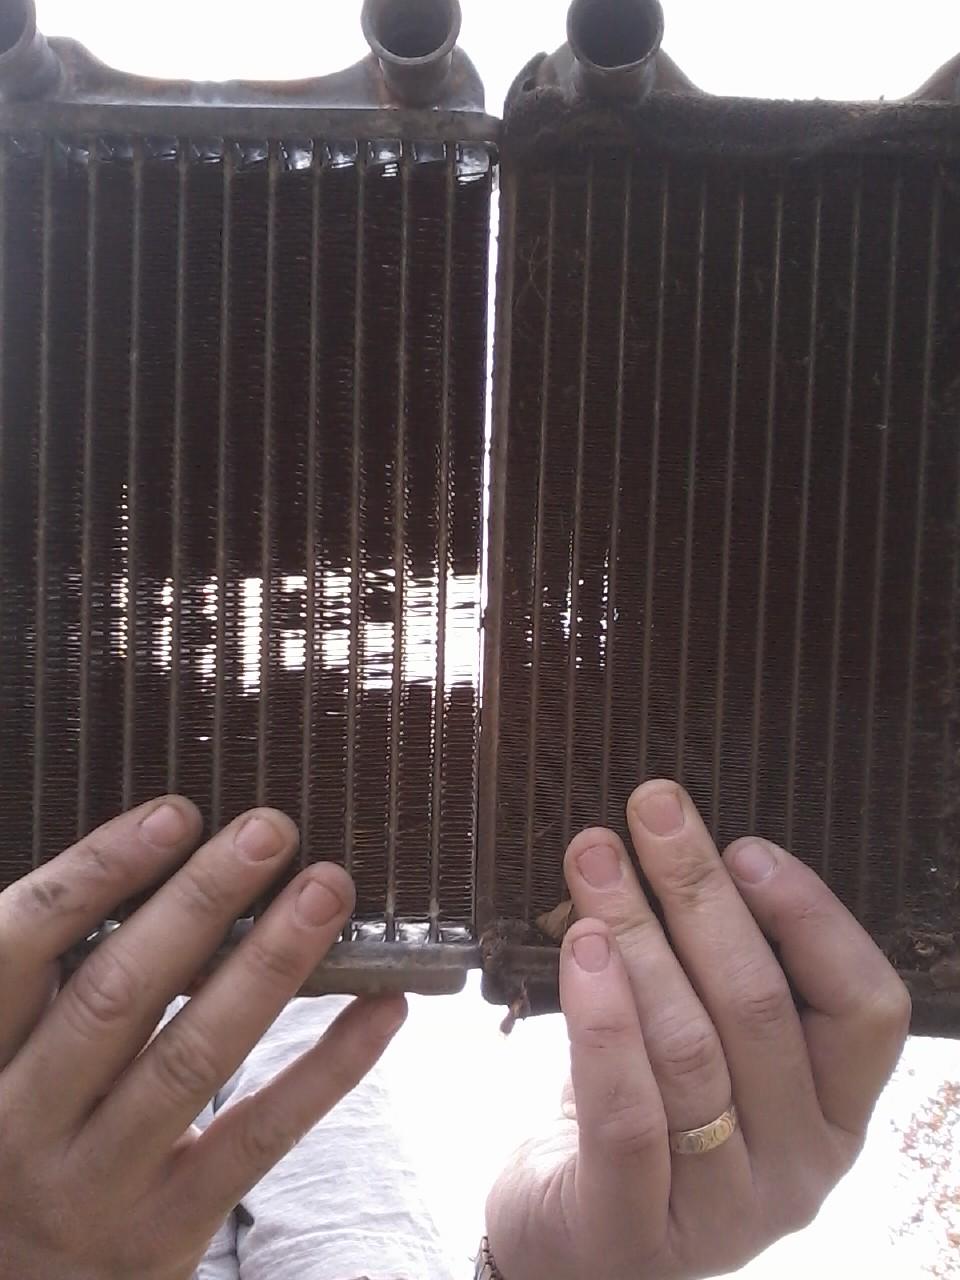
New one on left and clogged one on the right. First time I ever ran into a core like this.
The temperture has been dropping around here and Steve was saying that his heater wasnt working. He doesnt know much about mechanicing so I looked at it and said it must be a clogged heater core so we tried flushing it several times and got very little junk out of it. So then I tried to soak it with CLR. Trying everything to avoid from swapping heater cores. Nothing worked, so today he went and bought a core from Oriellys for $62 if I recall right.
Flushing wasnt going to fix this one and is the first time that I have ran into something like this. His truck doesnt have AC, and instead of having the condenser, it has a square tube in its place. The heater core was full of dust,dirt and debri. My guess is with an AC unit under the dash it would of blocked the debri from getting to the heater core, but with a square tube, the debri goes from the blower straight to the core. Flushing cant fix the outside of the core.
I have listed on one of my threads about how debri gets thru the cowl and on the passenger side it can get down to the blower and that is how you can get fan noise from debri getting in from the out side. I am going to do the following write up so as I can just copy and paste it to my 88 Runner build as I am trying to make it where someone that has questions, that maybe the 88 Runner build can help solve their problems. I refer to it alot myself.
Remove Speedometer Bezel
Remove Speedometer Assembly
Remove Lower Panel
Remove Glove Box
Remove Dashpad
Remove the hoses clamps under the hood. I find it easier to leave the hoses attached to the core and push the hose thru the firewall with firewall seals attached.
Unhook the 4 cables attached to the heater controls.
Here you can see I removed the White plastic cover and the side arms that support the dash and where your stereo will mount to.
When pulling the heater core assembly thru, pull it til the metal hose portion clears the firewall and slide to the right to clear the bracket and core where my fingers are pointing to.
Here is the Core Assembly. You will have 4 clamps on top that are held by phillips screws. Remove and slide the core up and out.
Seperate the pipes from the core. My replacement core didnt come with new seals or the c clips. Be gentle with these as you will need to reuse them. When you stick the old pipes into the new core (you use your old pipes) do NOT try to squeeze them with pliers to try and close the gap. The edge will bend and then you have to straighten it out. I found it easier to have someone to push the two pieces together while I put on the clip.
The oring you will need to reuse. I should of went to the store and got a new one, but we didnt have any leaks when done.
Here is the problem with this core. Steve wanted a new one in it. The old one was actually in great shape, so I will clean the outside and keep it for a spare. I am a cheapscape and can have a core out in 45 minutes, just because I have done this several times.
The first time I changed heater controls, it took me 3 hours. This is not an easy job for your first time but will add this post to my 88 build to try and make it easier for someone who might have to do this. I have some videos of other steps.
New one on left and clogged one on the right. First time I ever ran into a core like this.
Last edited by Terrys87; Mar 1, 2014 at 08:27 AM.
Mar 1, 2014 | 11:30 AM
#54
Pressure washer works good for cleaning those out.. I use a hot pressure washer to clean out condensors and intercoolers on the semitrucks.. works everytime and at the right angles it wont bend the cooling fins
Mar 1, 2014 | 07:04 PM
#55
Thread Starter
Registered User
iTrader: (5)
Joined: Jun 2009
Posts: 19,281
Likes: 20
From: Lake Havasu, AZ
Well, I got quite a bit done today since I am pretty much done and ready to pull the bodies next Saturday.
I did have to finish up a couple things today, and luckily a really cool guy nearby me that's on me on instagram offered to help and came over here and spend at least 4 hours just helping me out! He will be back anytime I need him on the weekend until this is done. Very grateful!
We pulled the remaining power steering hose tidbit that goes in front of the condenser and capped the lines and hopefully, the steering system will now remain sealed until it's time to do the body swap next weekend.
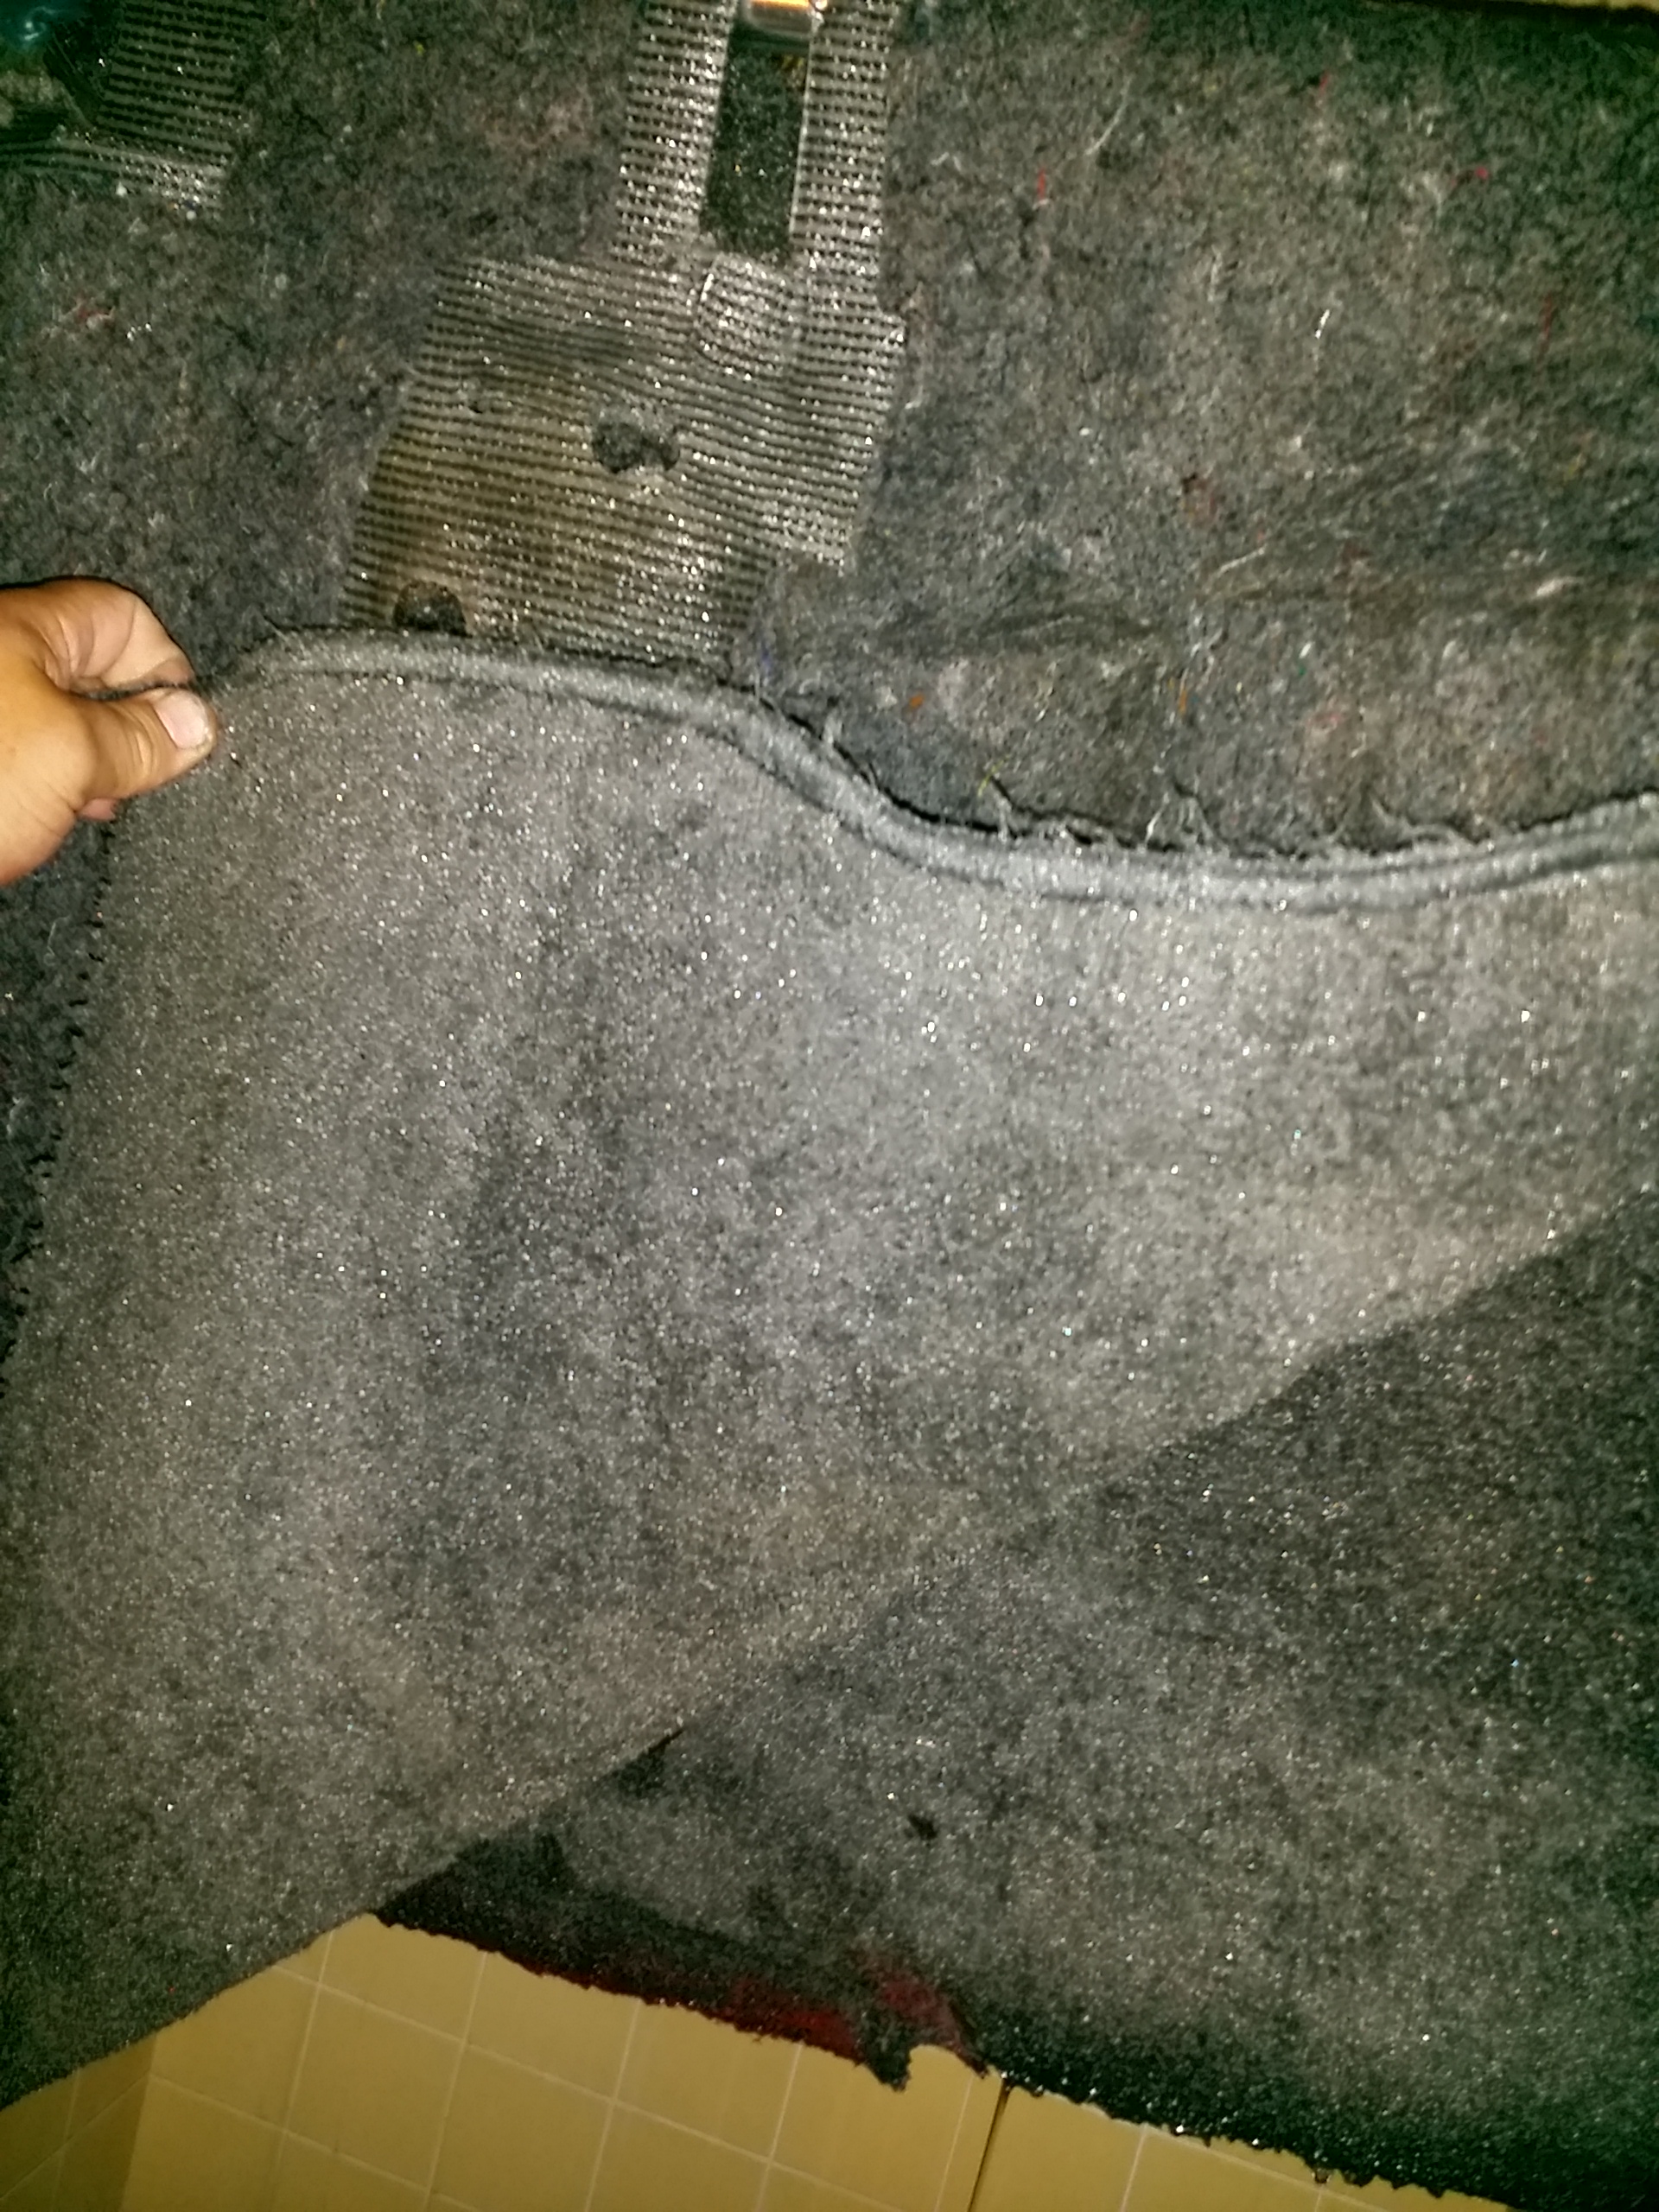
We also finished pulling the remaining carpet from Ruby and I spent a little time using the industrial cleaners for carpet and upholstery and cleaned the midsection up now, pristine! ....
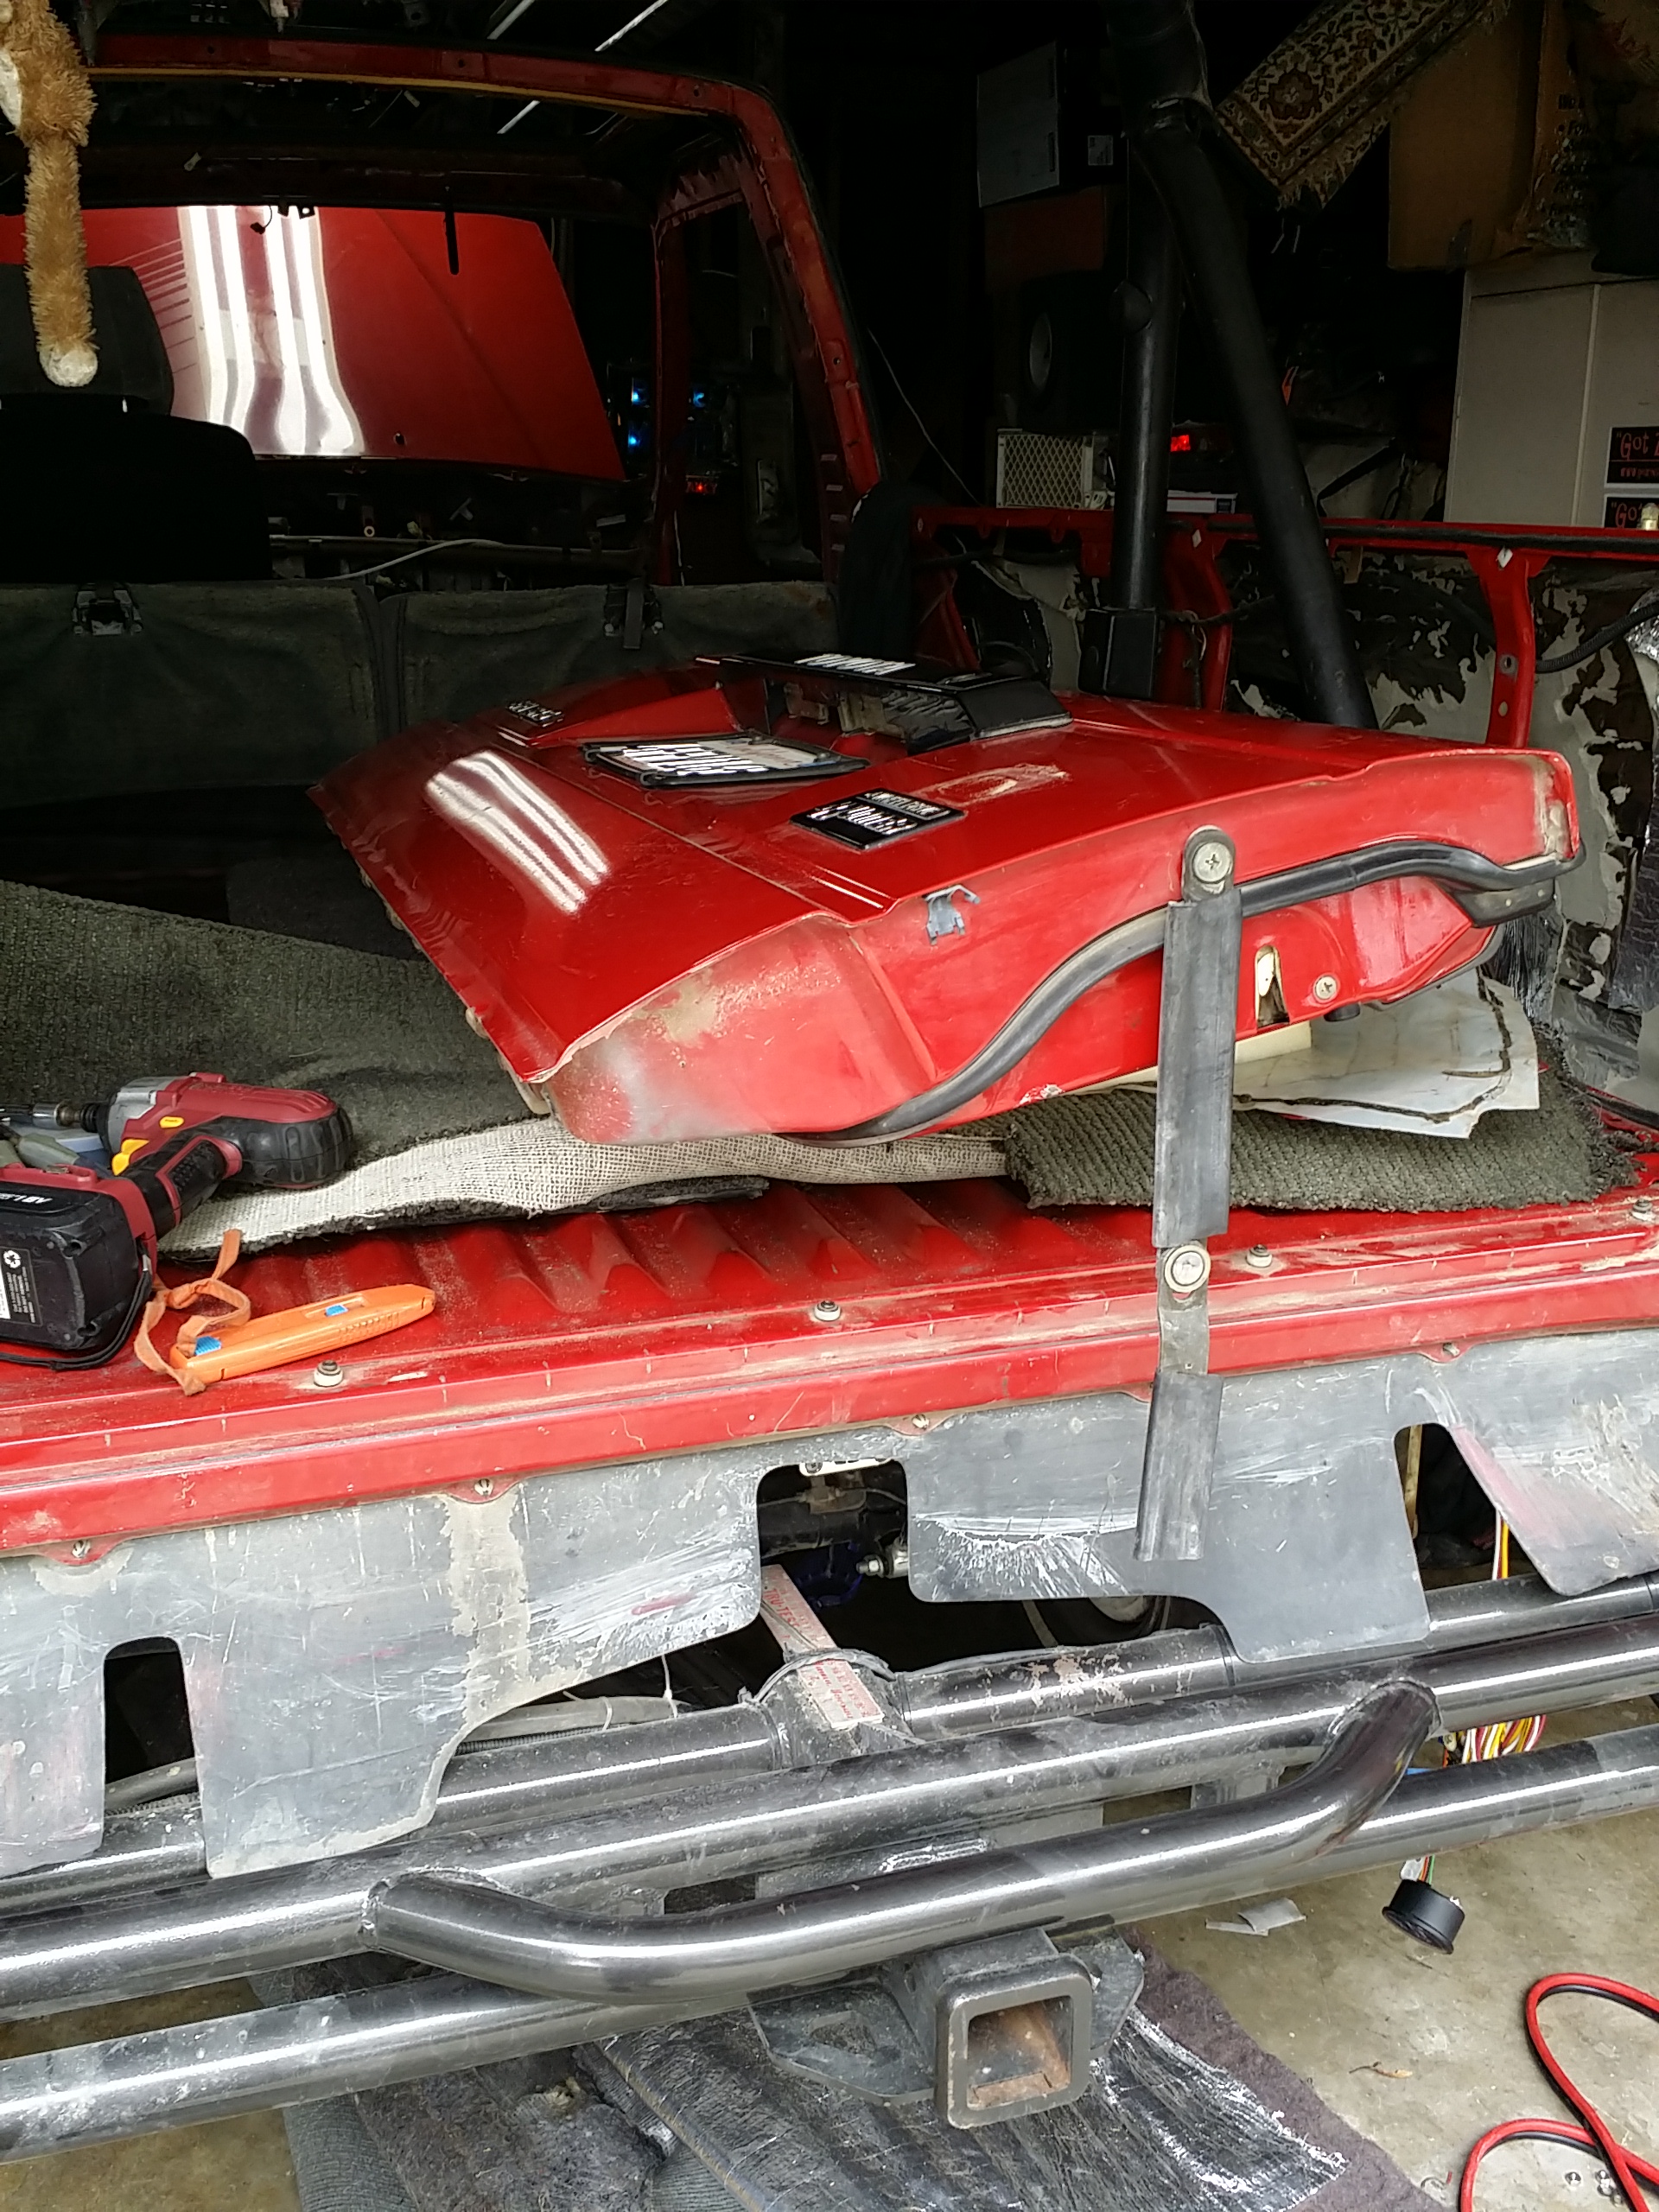
We went through pretty much everything and make sure that the bodies will be now be free to pull from the frames. We then came back and pulled the tailgate of of Ruby...
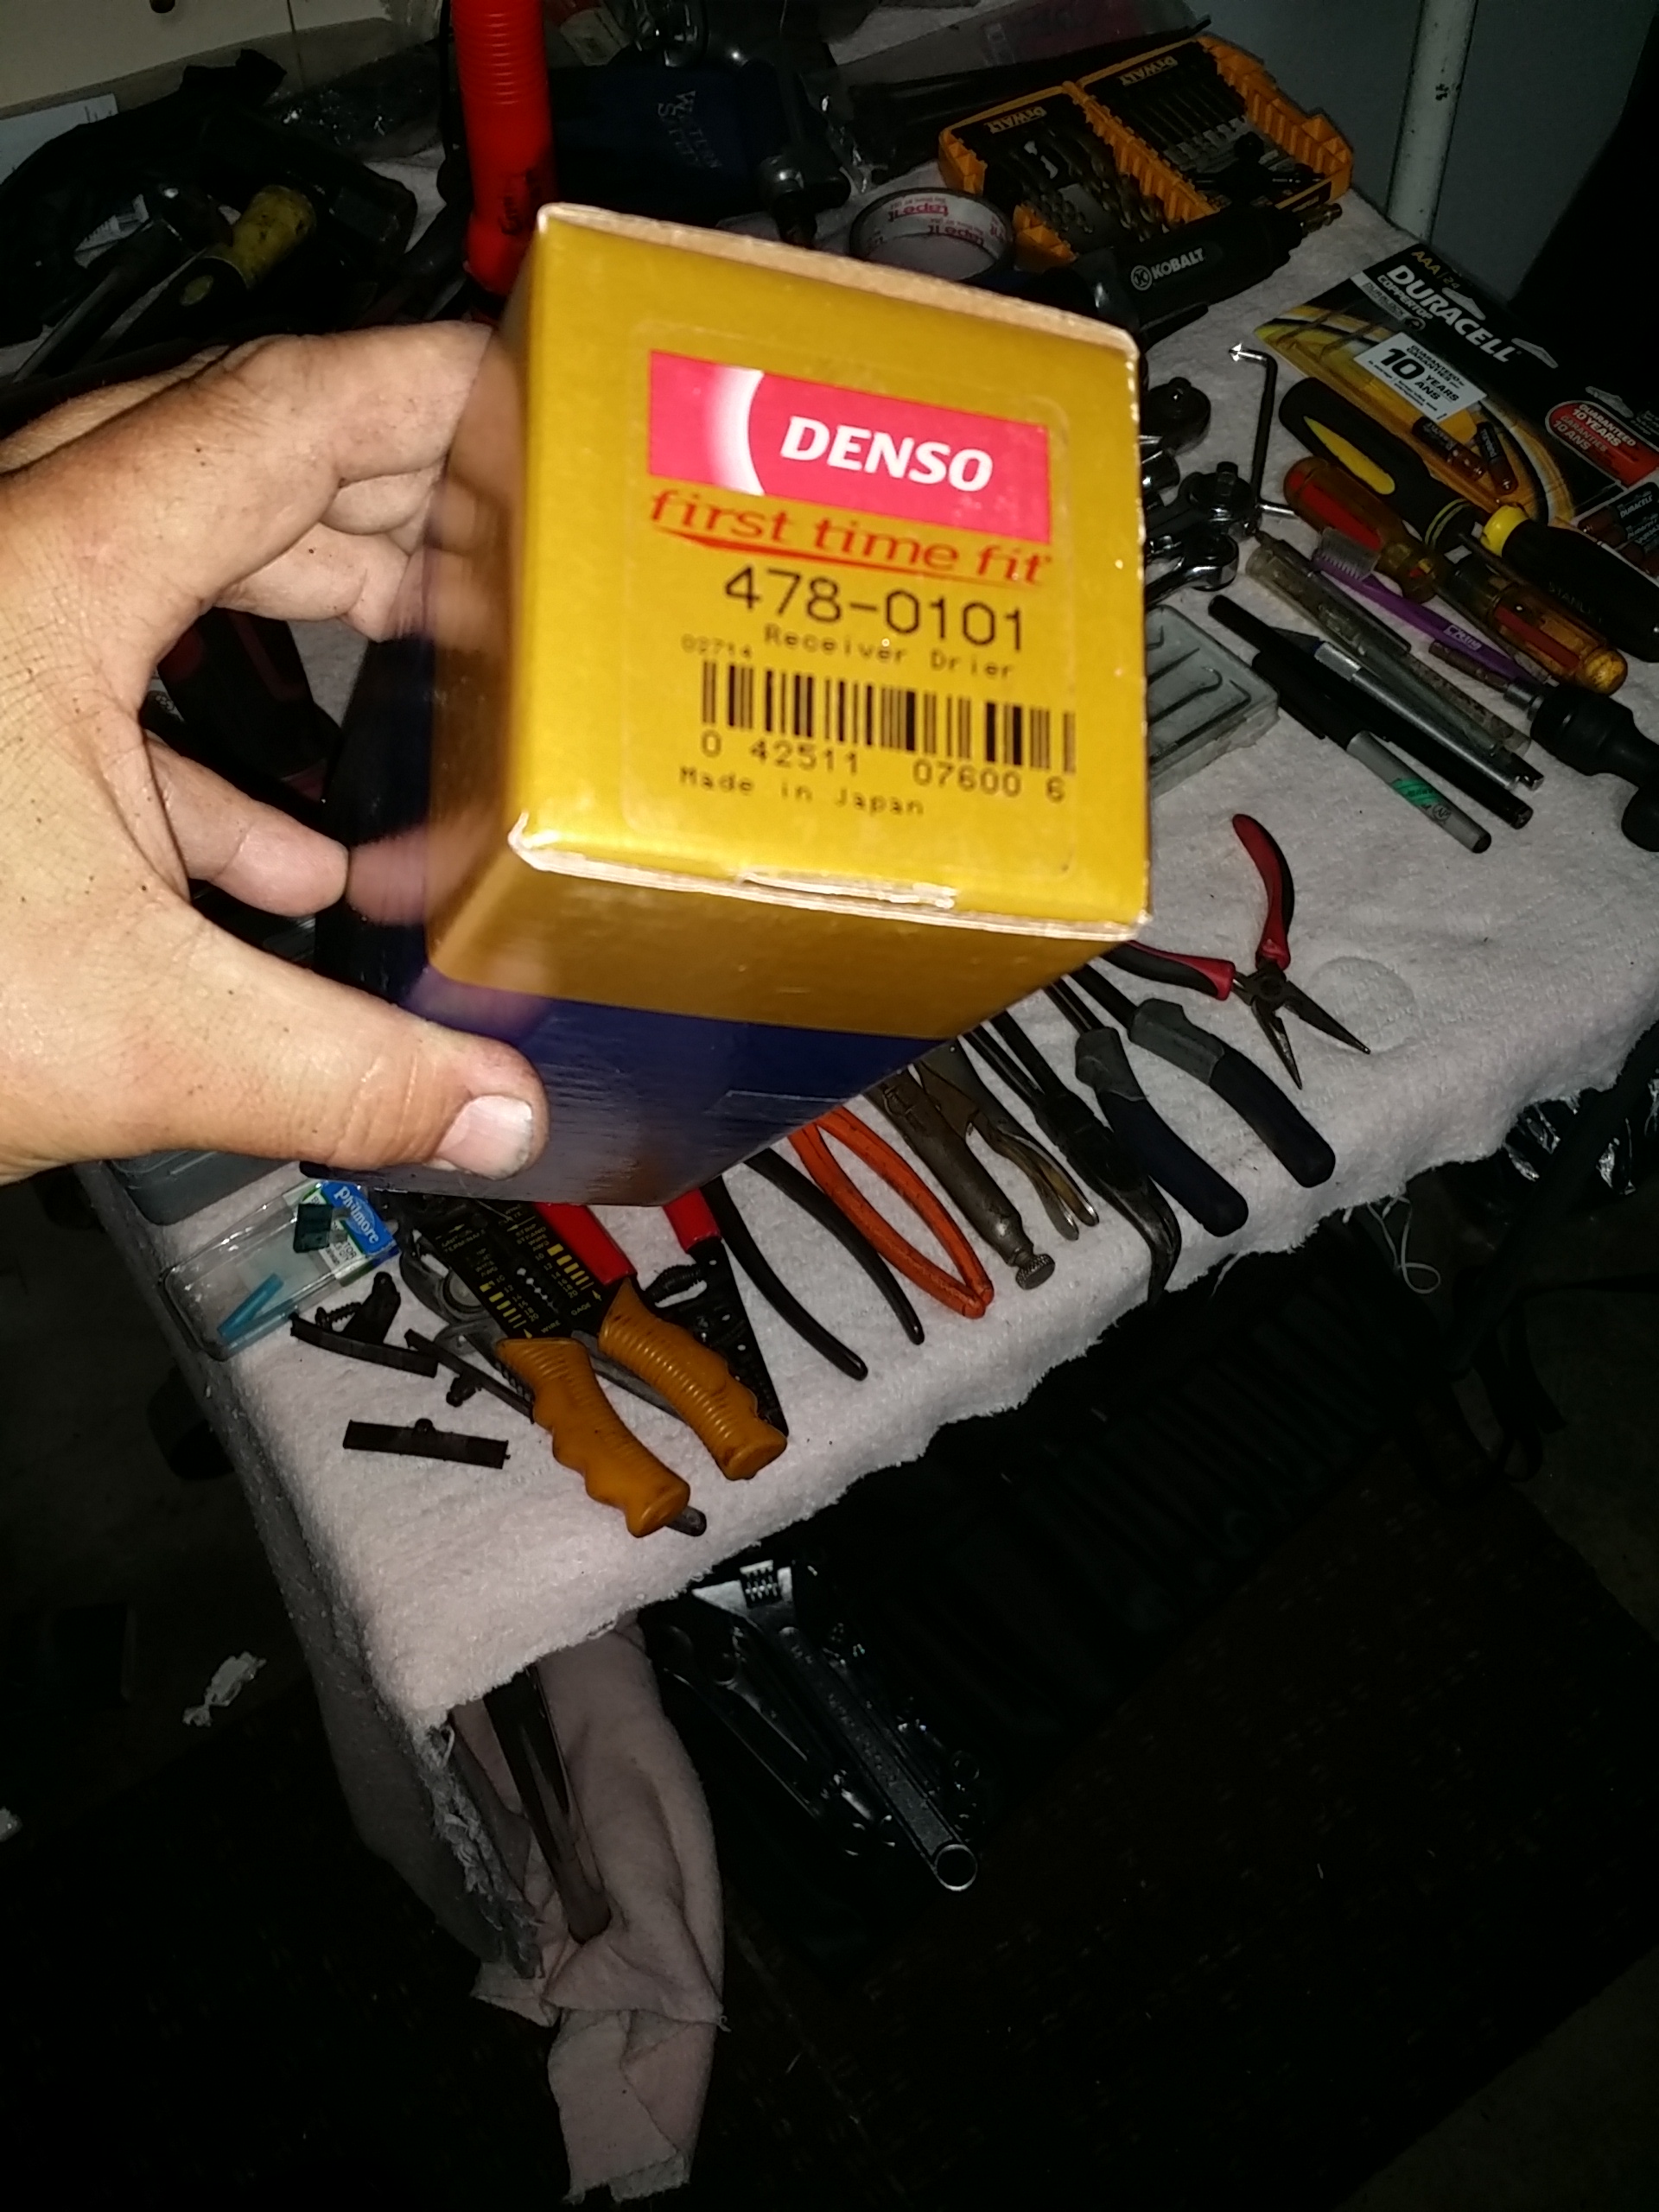
As we were chilling out, the postal driver showed up and drop me this off so that I can redo my r12 as soon as I get this done... ( I absolutely have to lose it in order to pull the lines from the evap... .... What can I do? Lol.) ... ....
We got quite a bit done so far from that, but just knick-knacks. I will update as I go, but I am pretty much only able at this point to run my wiring and finish laying down and then lay down the insulation, all in the silver one,... and then lay the carpet down over the insulation. It will be so nice to start fresh with a perfectly clean deck and super clean carpet.
I did have to finish up a couple things today, and luckily a really cool guy nearby me that's on me on instagram offered to help and came over here and spend at least 4 hours just helping me out! He will be back anytime I need him on the weekend until this is done. Very grateful!
We pulled the remaining power steering hose tidbit that goes in front of the condenser and capped the lines and hopefully, the steering system will now remain sealed until it's time to do the body swap next weekend.
We also finished pulling the remaining carpet from Ruby and I spent a little time using the industrial cleaners for carpet and upholstery and cleaned the midsection up now, pristine! ....

We went through pretty much everything and make sure that the bodies will be now be free to pull from the frames. We then came back and pulled the tailgate of of Ruby...

As we were chilling out, the postal driver showed up and drop me this off so that I can redo my r12 as soon as I get this done... ( I absolutely have to lose it in order to pull the lines from the evap...
.... What can I do? Lol.) ... ....
We got quite a bit done so far from that, but just knick-knacks. I will update as I go, but I am pretty much only able at this point to run my wiring and finish laying down and then lay down the insulation, all in the silver one,... and then lay the carpet down over the insulation. It will be so nice to start fresh with a perfectly clean deck and super clean carpet.
Mar 1, 2014 | 07:13 PM
#56
Thread Starter
Registered User
iTrader: (5)
Joined: Jun 2009
Posts: 19,281
Likes: 20
From: Lake Havasu, AZ
Thanks Terry! U2, Steven. ..
I will do my best to find the best heater core I can get. Within reason of course. I was speaking with Terry about this, guys, & I wonder if anyone had any luck finding a done though heater core @ a reasonable price.... I found one from spectrum premium which is all brass. It's a bit pricier but it comes with the full length of brass pipes. Terry was explaining to me that most often, when he sees a truck with the really clogged heater core, it's usually because that truck doesn't have air conditioning. Clogged in reference to the fins, like in the picture above..... I have a conditioning this one, and I would be willing to bet that it is probably not that bad in regards to being clogged, at least in comparison to everything else I've seen on this truck in the dash and so forth... I just feel like it would be something I would really regret if I didn't change it and was in a couple years it blew or just got less and less effective. If I only find it to be clogged within the fins, and water flows easily through it, then I may just do what Steven said and blast all the crap out of the fins! Lol...
I'm curious if anyone who resist could tell me, does their heater blow hot as hell? Mine really take some work to get warm that I have to have all the windows up, and then it never really gets fully hot. when I first started this truck in the driveway and let it run and run, I came back and found it to be warm inside with the heater left on... But definitely not super toasty, and that was on full blast at an idle.
Mar 1, 2014 | 08:00 PM
#57
Registered User
Joined: May 2008
Posts: 3,277
Likes: 23
From: way way nor cal
Yes, every toyota I have owned had/has a very hot hot heater. And the heaters heat up fast. At least in the 22r and 22re series.
Nice work on the rig BTW.
I wish you lived a little closer I would come help out.
Nice work on the rig BTW.
I wish you lived a little closer I would come help out.
Last edited by toyospearo; Mar 1, 2014 at 08:02 PM.
Mar 1, 2014 | 09:40 PM
#60
Thread Starter
Registered User
iTrader: (5)
Joined: Jun 2009
Posts: 19,281
Likes: 20
From: Lake Havasu, AZ
Yeah, and this is two in a row, mine and this 3.0, where it gets warm, especially if you focus out of one hole... , but it doesn't get so hot but you have to turn it off. And it doesn't get even acceptably hot enough without waiting at least several minutes... And even then its not screaming hot
Thank ya bud


