When you click on links to various merchants on this site and make a purchase, this can result in this site earning a commission. Affiliate programs and affiliations include, but are not limited to, the eBay Partner Network.
What's the part/model number for the OME springs? I know they have a few different ones. How do you like them so far?
CS009R are the ones I used. They are 2 1/4 in lift medium duty springs. I like them so far but I think they're really limited on my 4runner because I haven't put longer shocks on yet, mine are maxed out!
The next big purchase was trail-gear front and rear bumpers, rock sliders. and at the same time a Harbor freight winch. I was actually very Happywith my last harbor freight winch. Take care of them and they are good machines!
Once I got the front bumper off, the new one bolted up with no problems. I hated seeing this go, but I loved my new one too! Painted the bumper satin black. I actually contemplated matching the paint to the 4runner. But I like to be able to keep a rattle can in the truck to touch up paint at anytime. The hardest part about the rear bumper was cutting off the old hitch that was welded to the frame. After that it bolted right up! However I have recently noticed the bolts may have loosened up a bit as I can move in about a half inch up and down now. Anyone have a solution for that? Other than welding? Here's a shot with the front and sliders, sorry I don't have any of the rear yet. I also had a couple Hella lights mounted on it. Those are gone now though
If you dont want to weld it to the body maybe you could but metal spacers into the haps so ot doesnt move. I welded my trail gear bumper on and it is great.
Looking good man. Just finished up a harness for the E-locker you sold me. Let me know if you want some help making a harness. A few companies sell them but they are pricey and they aren't exactly what I would call factory quality.
Looking good man. Just finished up a harness for the E-locker you sold me. Let me know if you want some help making a harness. A few companies sell them but they are pricey and they aren't exactly what I would call factory quality.
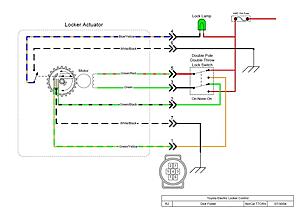
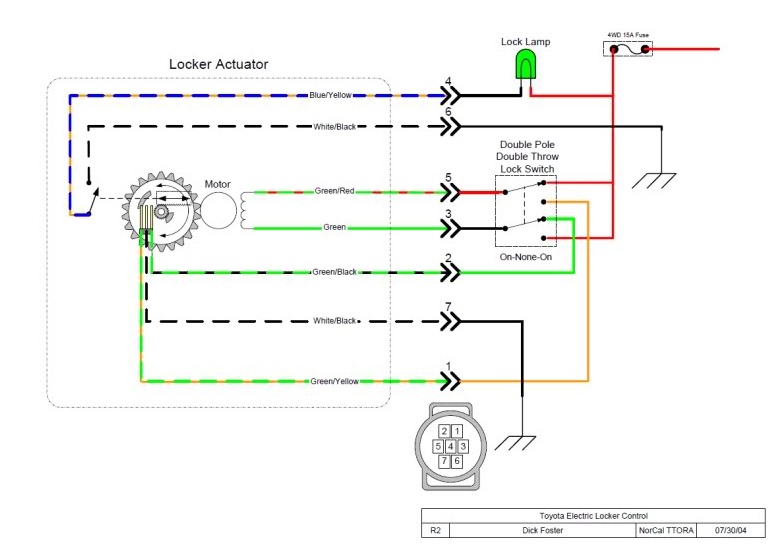
yea I'm definitely curious to see how you did it. I've been looking at several different setups. Most with a DPDT momentary rocker switch, but I do have a diagram for a factory switch setup that uses a DPDT relay instead. I like that setup most because it has an LED for when the locker is engaged.
So I picked these up today for a case of beer. They're pretty ruff but this is the first rear heat center console I've ever seen in person. Do you guys think any of this is salvageable? Also the inclinometer will be going on the classifieds, hopefully for a good trade!
if you dont mind shipping international, theres an awesome dude named somedayj on here thats been looking for one. i think hed be willing to pick it up.
Also the inclinometer will be going on the classifieds, hopefully for a good trade!
Hi jaysson, pm sent.
Originally Posted by space-junk
if you dont mind shipping international, theres an awesome dude named somedayj on here thats been looking for one. i think hed be willing to pick it up.
So I picked up that junk SR5 gauge cluster yesterday and after thinking on it over night I thought I might be able to use parts from it to convert my auto gauge cluster to a manual ( with volt meter). So here's how I did it!
First So here's the junk manual cluster and my good Auto cluster. You can see the junk one has a broken fuel gauge need
So you can see the pin out are DIFFERENT! A manual gauge cluster will NOT directly swap into an automatic.
You can see I mashed these 2 together and got my good fuel gauge on. And then I cleaned it up and put it in my cluster
Now because the pin outs are different it wasn't as easy as just bolting in the new volt/fuel gauge and it being good. I had to make a jumper from the screw for the volt meter to the constant 12v from the turn signal. This is actually the same place the manual pulls voltage from
yea I'm definitely curious to see how you did it. I've been looking at several different setups. Most with a DPDT momentary rocker switch, but I do have a diagram for a factory switch setup that uses a DPDT relay instead. I like that setup most because it has an LED for when the locker is engaged.
I used a Carling switch with two lights. One comes on with the dash lights and the other comes on when the locker is engaged. You could use an OEM switch too, just a bit expensive new and hard to find used. I built my harness with the factory plug at the differential, weatherpack connectors for the exterior and waterproof grommets to pass through the body.
I used a Carling switch with two lights. One comes on with the dash lights and the other comes on when the locker is engaged. You could use an OEM switch too, just a bit expensive new and hard to find used. I built my harness with the factory plug at the differential, weatherpack connectors for the exterior and waterproof grommets to pass through the body.
so for the switch you need a DPDT momentary ON/OFF/ON correct? I think I am going to go your route just for the fact that there are less components (no relay)
For the plug I do have the factory plug
For what connections did you use the weatherpack connectors? I was going to wire the harness I make into the factory pigtail pictured above, and run that straight to the switch. Where does the other connection come in?
Also are the wires that run over behind the drums for ABS? That was my guess, I was planning on just cutting them down as short as possible. That would cause no harm right?
Correct, you need a DPDT switch to not use relays. This is the switch I used. It is momentary up or down and defaults back to center. I actually used two relays just to make sure that the switch isn't overloaded. The switch is rated for 20A and I have the system fused at 10A but I figured I'd play it safe. If you use relays then you can use a SPDT switch.
I later discovered otrattw.net where you might be able to save a couple bucks over what I paid for an equivalent switch.
Here's how I wired mine with relays.
Here's how I was considering doing it without relays.
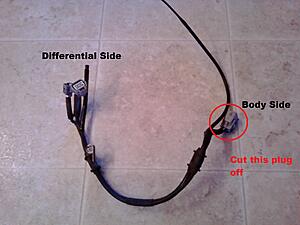
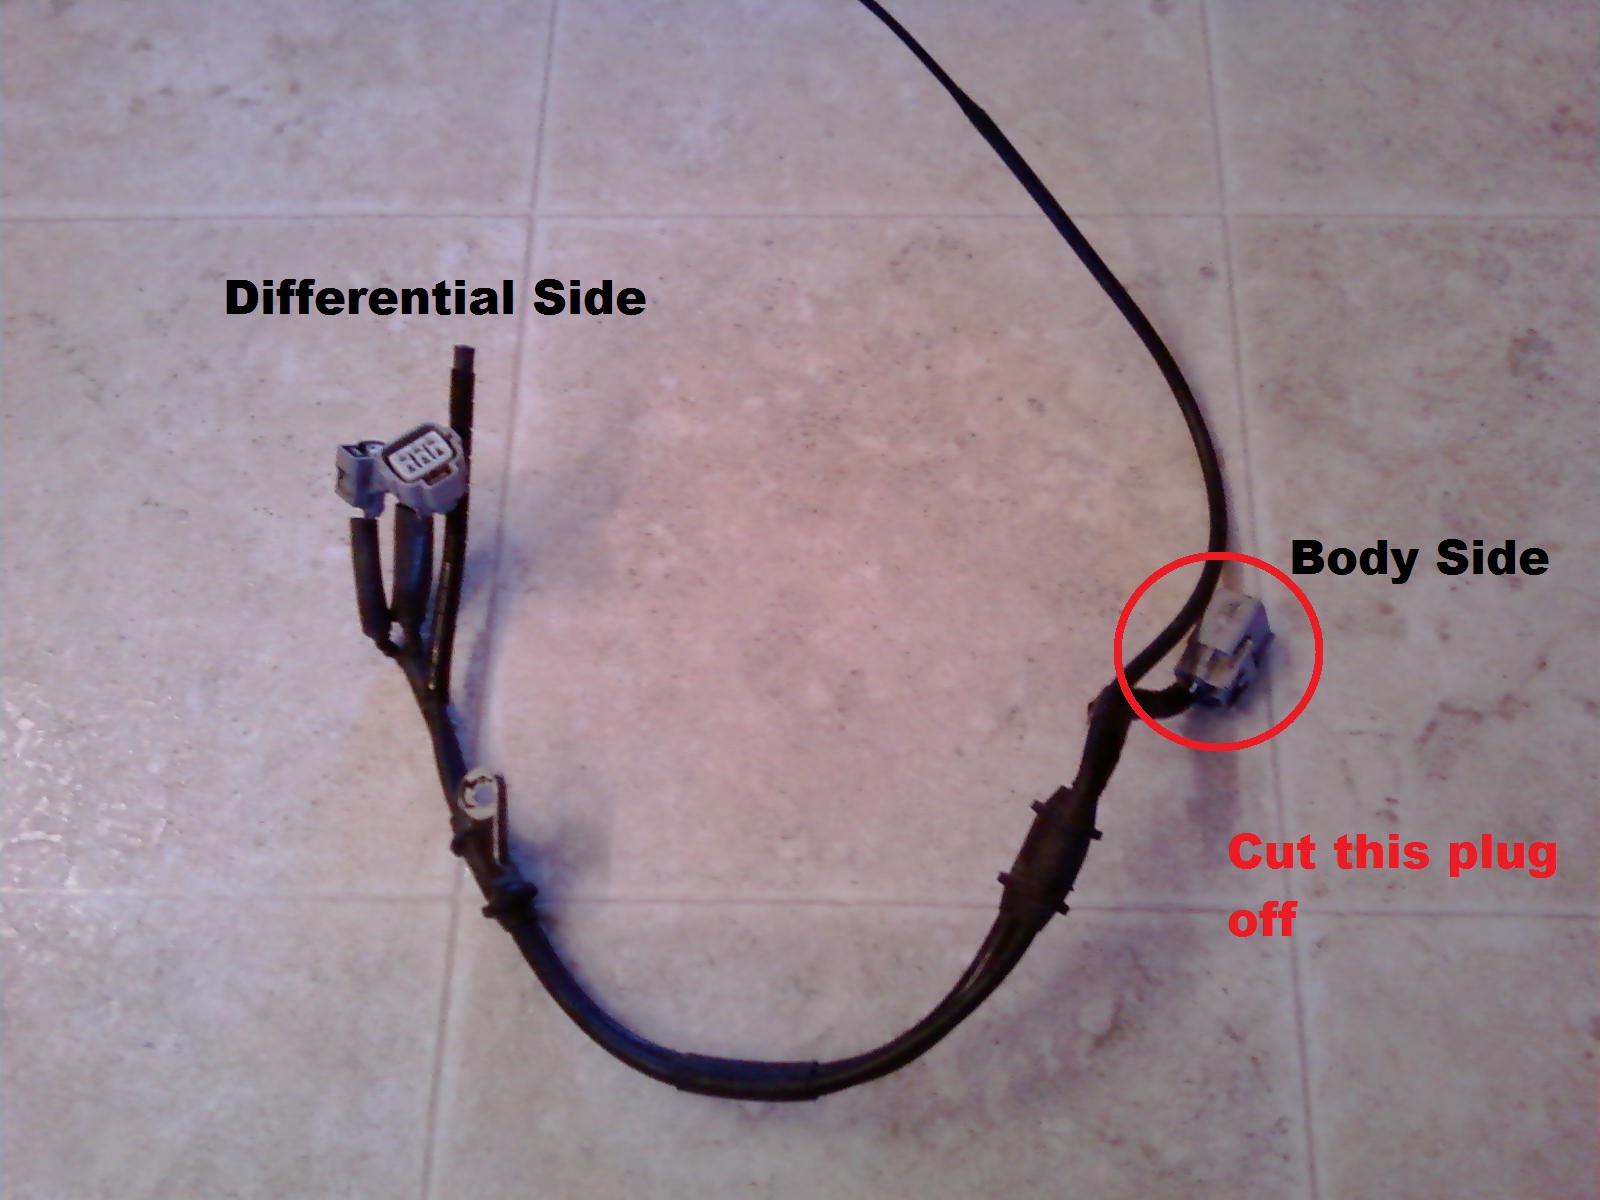
That's the wrong end of the factory E-locker harness or the wrong plug all together. The diff has two plugs, a 5 pin on the actuator and a 2 pin for the indicator switch. The factory E-locker harness has two plugs on one end and one on the other. You need the two plugs. You can buy the harness from Toyota. It's P/N: 82127-35100 and should run about $35 online. You will need to cut off the larger plug (the one you already have), throw it away, and extend the wires up to whatever you use for a switch.
I used WeatherPack connectors right where the wires come through the body so that I could take it apart at some point without having to pull wires all the way back to the dash and leave a hole.
If you're using the factory Taco E-locker axle housing then it will have provisions for ABS. You don't need that so you can just snip the wires or remove the sensor and cap/plug the hole.
ok perfect, the above diagram is the same one I have printed off and notes drawn all over.
For the wiring, my axle has that harness on it already, the plug I have is the male end of the plug labeled "cut this plug off" so I think I'm going to keep that, and have my harness start at that pig tail. Here is pictures of both ends of the harness I have.
This harness has no wires going to abs. HOWEVER, after looking closer and actually knowing what I'm looking at, there is a second harness on my axle, I believe this one is for a truck with Elocker and abs. Here's a picture. Also I'm really sorry I didn't notice this earlier! I would have gave you one of the harnesses with your Elocker
The side that plugs into the Elocker is the same, except the ABS is routed into the harness, and the other end has different plugs.
For the wiring, my axle has that harness on it already, the plug I have is the male end of the plug labeled "cut this plug off" so I think I'm going to keep that, and have my harness start at that pig tail.
I see now. That's actually really good. Saves you from buying waterproof connectors and looks factory.
...
Originally Posted by jaysson_2012
Also I'm really sorry I didn't notice this earlier! I would have gave you one of the harnesses with your Elocker.
It's not a big deal. $35 isn't something to cry over.
I hammered pinch welds and gained plenty of clearance. My IFS doesn't flex so I don't have to worry about that hahahaha These are the new cut fenders, and flares. I will not be putting the rear flares on because I don't want to drill into the body. $60 for fenders and flares.
Do you have the rear ones and would you sell them to me
Last edited by 86toyotaprerunner14; Mar 25, 2017 at 08:09 PM.
Do you have the rear ones and would you sell them to me
I do have the rears, but I have a plan for them in the future. I wand to run tube from the slider to the rear bumper and plan on putting the flares just over top. I don't like the looks of the visible tube everywhere. However, I am going to try to attach them with 3M because I don't want to drill into the body. So if that doesn't work I'll be looking to get rid of them!


 Mar 15, 2017 | 05:00 PM