
jalopytech 1980 4x4
 Sep 3, 2013 | 12:02 PM
#1
Thread Starter
Registered User
Joined: Mar 2012
Posts: 67
Likes: 0
From: Wandering Arizona
jalopytech 1980 "Build Up Thread" 2013
Labor Day 2013.
Wife tells me not to bother her, Perry Mason marathon all day.
Oz the dog and I go outside.
Daughters Toyota 4x4 parked near garage.
Keys in ignition.
Oz looks at me with a cocked head and one ear up, I do the same, we understand one another.
Pull Truck into garage.
Chilton Manual say�s to disconnect battery before servicing.
Removed hood, cut unwanted metal from hood, then re-formed to fit hood braces more better.

Attachment 94189
Attachment 94190
Re-installed hood.
Note to self: Why would anyone do a custom flame paint job on only one side of hood?
Battery cables already removed, decided to place battery somewhere else.
Removed outer fender�s and all other assorted gizmo�s attached to said inner fender�s. No picture necessary.
Cut and removed inner fender wells and core support from unitized body, "not a pretty picture."
Oz and I Ate lunch, wife asked if I was servicing daughters truck, I said �Yes.� And that Perry Mason was queer, she ran me off again and told me to take my damn dog with me.
Fabricated new battery holder in much better location and other assorted gizmos out of sight. Utilized american type battery clamp at base of battery, instead of top clamp, wire and bungee cord arrangement.

Wife asked if I found any problems with truck, told her I found a better way to get the oil filter off.
Fabricated new core support, fortunately neighbor is selling there house and the realtor uses real 1� angle iron for sign post's. Neighbor�s complains that someone keeps stealing their signs & posts and thinks other neighbor that is trying to sell his house is stealing them.
Decided that plate style bumper to be built with headlights installed within bumper.
Mill table cranky goes in but not out, removed table and began cleaning and inspecting for problem, day wasted.
Wife extremely unhappy with my handy work, threatens to tell daughter, whom is in Oregon. I change subject and seriously comment on issue that Americas got talent is missing a subject (fabrication) and that instead of 2 hours of that crap they should eliminate 1 (or more) talent at the end of each of these reality shows. I guess that spells MISTAKE, now she's really pissed. Dog wants out on his own.
Dis-allusion setting in, probably do to hood prop thingy no longer in proper position and I keep knocking it off were it is precariously balanced on motor. Head hurts, so I flung it into junk pile and installed a gas prop, now hood opens and stays open like normal hoods do, closes like one should too.
Note to self: Why haven't you done this a very long time ago, what else have I been missing? Probably should consult professional help.
Executive decision: All wiring to be run inside boxed frame rails were it should of been put to begin with.
Fixed milling table but forgot what I needed it for. Told wife my head hurt, she made comment "now you know how you make me feel." She offered little green pills but I noticed box was labeled D-Con. I remembered that milling machine was needed to notch tubing and told her "thanks but got to go."
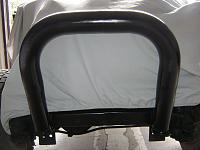
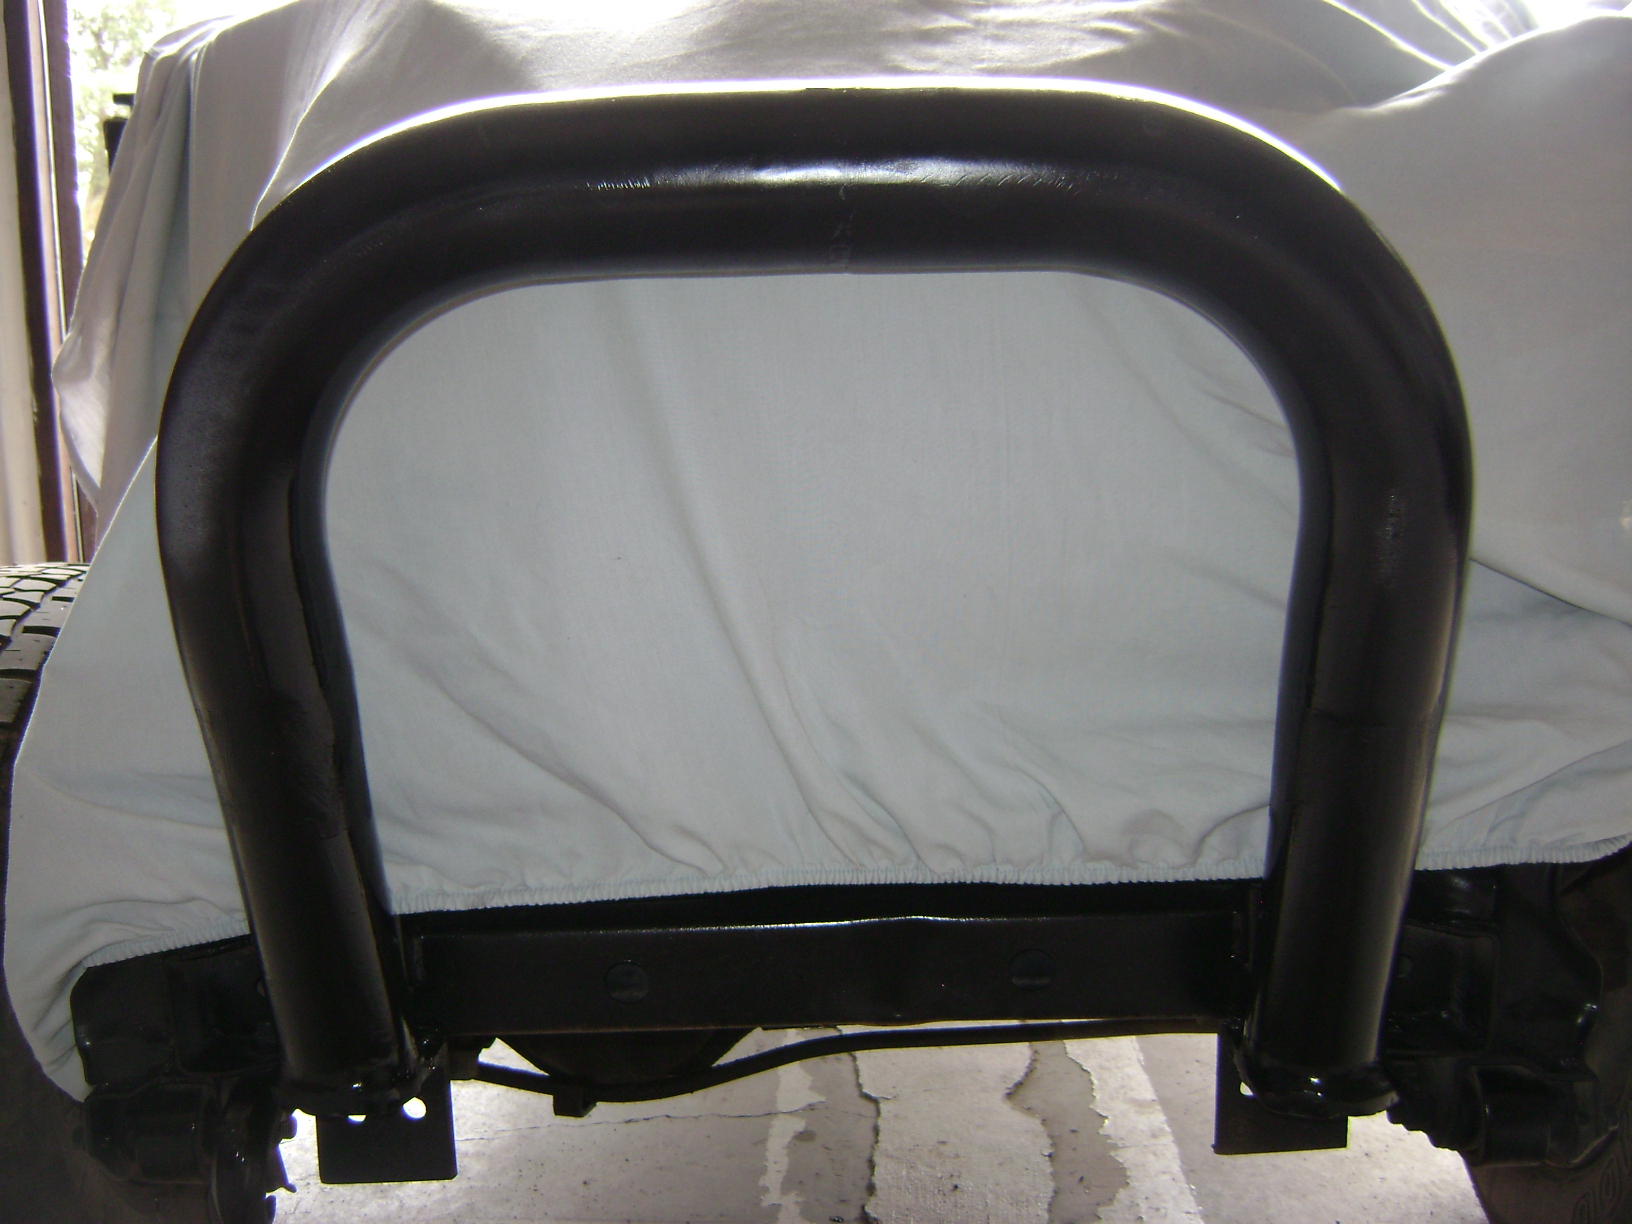
Changed mind; Going to build 3" bull bar, bull bar to have back to back bends at top to fit new hood configuration better, rather than usual u or v bend, then build bumper to complement bull bar.
Wife asked what is that? I told her "Bull Bar!" She exclaimed "former husbands was bigger", I said he "probably bought his". She said "next husband to have competency exam." I told her "next wife to have credit check and must pass welding skills test."
Now to start bumper and attach kickers from B/B to bumper.
Then onto Baja style front fenders.
Wife tells me not to bother her, Perry Mason marathon all day.
Oz the dog and I go outside.
Daughters Toyota 4x4 parked near garage.
Keys in ignition.
Oz looks at me with a cocked head and one ear up, I do the same, we understand one another.
Pull Truck into garage.
Chilton Manual say�s to disconnect battery before servicing.
Removed hood, cut unwanted metal from hood, then re-formed to fit hood braces more better.

Attachment 94189
Attachment 94190
Re-installed hood.
Note to self: Why would anyone do a custom flame paint job on only one side of hood?
Battery cables already removed, decided to place battery somewhere else.
Removed outer fender�s and all other assorted gizmo�s attached to said inner fender�s. No picture necessary.
Cut and removed inner fender wells and core support from unitized body, "not a pretty picture."
Oz and I Ate lunch, wife asked if I was servicing daughters truck, I said �Yes.� And that Perry Mason was queer, she ran me off again and told me to take my damn dog with me.
Fabricated new battery holder in much better location and other assorted gizmos out of sight. Utilized american type battery clamp at base of battery, instead of top clamp, wire and bungee cord arrangement.

Wife asked if I found any problems with truck, told her I found a better way to get the oil filter off.
Fabricated new core support, fortunately neighbor is selling there house and the realtor uses real 1� angle iron for sign post's. Neighbor�s complains that someone keeps stealing their signs & posts and thinks other neighbor that is trying to sell his house is stealing them.
Decided that plate style bumper to be built with headlights installed within bumper.
Mill table cranky goes in but not out, removed table and began cleaning and inspecting for problem, day wasted.
Wife extremely unhappy with my handy work, threatens to tell daughter, whom is in Oregon. I change subject and seriously comment on issue that Americas got talent is missing a subject (fabrication) and that instead of 2 hours of that crap they should eliminate 1 (or more) talent at the end of each of these reality shows. I guess that spells MISTAKE, now she's really pissed. Dog wants out on his own.
Dis-allusion setting in, probably do to hood prop thingy no longer in proper position and I keep knocking it off were it is precariously balanced on motor. Head hurts, so I flung it into junk pile and installed a gas prop, now hood opens and stays open like normal hoods do, closes like one should too.
Note to self: Why haven't you done this a very long time ago, what else have I been missing? Probably should consult professional help.
Executive decision: All wiring to be run inside boxed frame rails were it should of been put to begin with.
Fixed milling table but forgot what I needed it for. Told wife my head hurt, she made comment "now you know how you make me feel." She offered little green pills but I noticed box was labeled D-Con. I remembered that milling machine was needed to notch tubing and told her "thanks but got to go."
Changed mind; Going to build 3" bull bar, bull bar to have back to back bends at top to fit new hood configuration better, rather than usual u or v bend, then build bumper to complement bull bar.
Wife asked what is that? I told her "Bull Bar!" She exclaimed "former husbands was bigger", I said he "probably bought his". She said "next husband to have competency exam." I told her "next wife to have credit check and must pass welding skills test."
Now to start bumper and attach kickers from B/B to bumper.
Then onto Baja style front fenders.
Last edited by jalopytech; Sep 7, 2013 at 10:30 AM.


 Sep 4, 2013 | 06:18 AM
#3
Thread Starter
Registered User
Joined: Mar 2012
Posts: 67
Likes: 0
From: Wandering Arizona
Thanks slacker for the input, my battery relocation will be the next photo, I would rather show the completed version of what my feeble mind creates rather than to bore one with details. I'm holding back with before and after pictures of this project until I'm through the creating process. I will add a closer Pic of the hood details though.

Thread
Thread Starter
Forum
Replies
Last Post
DrZero
General Vehicle Related Topics (Non Year Related)
18
Jul 24, 2015 11:31 PM


