
dirtdobberoffroad's 1982 Pickup Build-Up Thread
 Sep 24, 2012 | 02:30 PM
#162
Thread Starter
Registered User
Joined: Aug 2011
Posts: 654
Likes: 2
From: Swamp east MO
kind of an update I replaced the master on the brakes..man I about threw my self threw the window the first time after bleeding every thing....I couldn't belive it when I opened the box from Orielly's and it was a Aisin master..wow! and 21 bucks at that...I should have replaced it sooner!
Oct 9, 2012 | 08:42 AM
#164
Thread Starter
Registered User
Joined: Aug 2011
Posts: 654
Likes: 2
From: Swamp east MO
yeah I know Im probably the luckiest guy on here...I got all that stuff from you, now your offering more stuff, I lucked into the truck from the begining, and I picked up a couple of great friends along the way....LOL....which reminds me I looking to luck into a 4x4 transmission, I think I found one in the pick and pull with the transfer case for 75 bucks...If I get that I might try to put the two 2.28 boxes infront of the stock case I picked up from you...lol three low range boxes...... :lau gh:
 why not.
:lau gh: why not.
Oct 15, 2012 | 06:42 AM
#165
Thread Starter
Registered User
Joined: Aug 2011
Posts: 654
Likes: 2
From: Swamp east MO
did a little bit of work on the truck this weekend I got tired of the truck running out of gas at 1/4 of a tank. So I dropped the tank only broke one bolt the rest came right out like I was working on a new car...LOL I found a little frame rot behind the tank. What I did on the fuel level sending unit (?)....I pulled it and hooked it up to the wires under the truck grounded the unit with a jumper wire and two alligator clips so it would work let the float fall all the way down and rest on the bottom stop. And the gauge would not drop to E I tried to bend the rod to get it to read correct and that did not work so the next step was to bend the stop on the unit. I bent it so it would let the float sink a little more. this worked the needle with now drop to E. My worry was that the pickup tube would run dry before the float would sink far enought to read E. I got installed and I had about 1.5" of gas in the tank and the needle sat right above the E mark so that is close enough for me.
frame rot
the unit after its removed and the stop, stopping the float rod
tab that I bent on the unit
the angle of the stop after bedning it. tha stop was at 90* from the housing
Inside of tank is really clean just some bugs... no rust tho.
fuel pickup tube really clean...
Tank put back together and ready to install oh year sanded and painted it too...
Oct 15, 2012 | 06:51 AM
#166
Thread Starter
Registered User
Joined: Aug 2011
Posts: 654
Likes: 2
From: Swamp east MO
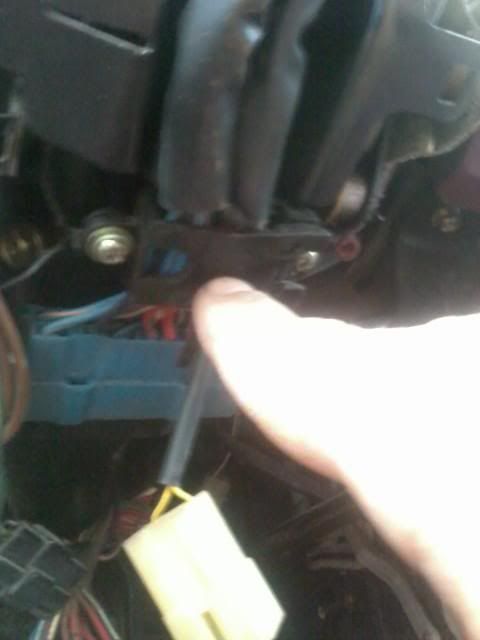
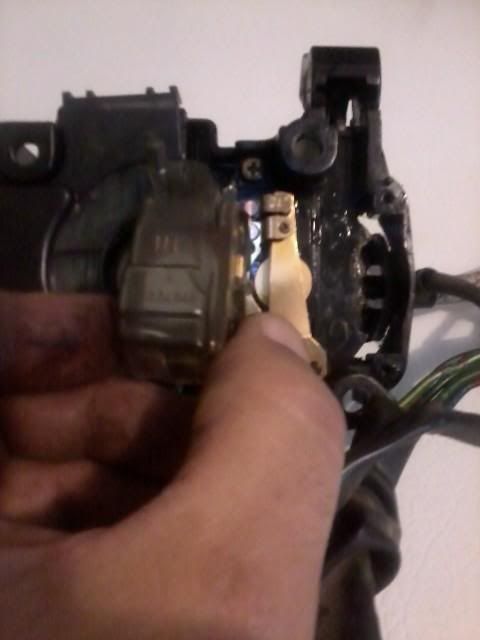
also fixed my bright light problem I found a disconected solder joint and fastend it back.. First mark steering wheel and column, remove the steering wheel and steering column cover. Then remove the four screws holding the wiper, light and blinker controls, disconnect the wire connections under the steering column. and pull the controls toward you. I flipped it over to see the wire that needed to be resoldered.
 the orange with yellow stripe.
then soldered it back in place.

reinstall the components...and you are done. Now if you did not mark the steering wheel with the column you got to take the time to get those back inline...
the orange with yellow stripe.then soldered it back in place.
reinstall the components...and you are done. Now if you did not mark the steering wheel with the column you got to take the time to get those back inline...
Oct 18, 2012 | 07:02 AM
#167
What was your highbeam problem?? My highbeams work when I hold the switch back, but they don't stay on (no lights at all) when I flip the switch forward. Basically, I can flash, manually, but they won't stay on unless I'm holding the switch. Is this the same problem you had?
Oct 18, 2012 | 11:24 AM
#168
Thread Starter
Registered User
Joined: Aug 2011
Posts: 654
Likes: 2
From: Swamp east MO
no mine didn't do that.. if I flashed or switched on the brights I would lose lights and if I grounded the wire the lights would come on even if the dims where on..it was a lose solder joint that you can see in post #166 if you cannot see the wire there you can look on my profile I have pictures in my photo album there also. I don't really know what your problem is it would be something I would have to mess with to figure it out...LOL good luck
Oct 22, 2012 | 12:14 PM
#171
Thread Starter
Registered User
Joined: Aug 2011
Posts: 654
Likes: 2
From: Swamp east MO
I think I finally figured out how to go about my chevy spring swap when I make it 4x4 I will use chevy width spring hangers front and back and thin use an extended chevy drop shackle on the rear.

use those^^^ front and rear then use these out back vvv

do y'all see any thing wrong with that set up??? I think that would be about the cheapest way to go.
use those^^^ front and rear then use these out back vvv
do y'all see any thing wrong with that set up??? I think that would be about the cheapest way to go.


 Oct 29, 2012 | 02:05 PM
#173
Thread Starter
Registered User
Joined: Aug 2011
Posts: 654
Likes: 2
From: Swamp east MO
Made the second cut 12.25"s from the first
had to trim the frame... ....after this photo
took this section out
Had to trim a bed support to clear the crossmember that held the spare tire.......
added some new bed mounts 3/16 angle....
Tacked it on the inside of the bed....
fit the shell


I will start the body work this week!!!
had to trim the frame...
....after this phototook this section out
Had to trim a bed support to clear the crossmember that held the spare tire.......
added some new bed mounts 3/16 angle....
Tacked it on the inside of the bed....
fit the shell
I will start the body work this week!!!
Last edited by dirtdobberoffroad; Nov 19, 2012 at 06:13 PM.
Oct 30, 2012 | 06:59 AM
#174
You been getting after it. Looks like you got alot done. I will be glad when I get the capabity to start doing cutting and welding. I am going to try and talk the wifey into getting me a welder for Christmas. When is kiddo due?
Kawazx636...Here is a link to how I fixed my headlight switch. It is on a 2nd gen but probably about the same as yours.
I went to work on my Light Switch and Wiper delay. I plugged my old one in and the wiper delay worked. But not bright lights. I then tried to combine the 2 and was going to have cut wire and splice and didnt want to go that route.
The Light Assembly I had before was from an 86 and it has another plug my 88 didnt have. I figured it was for some option mine didnt have so didnt think much about it. The white plug is what I am talking about on an 86 in this picture.

Today I got to looking at it (the white plug) and it runs to the wiper handle and I am guessing it is to the delay in the handle. So I then decided to see what I could do about my original Light assembly.
I took the Steering Wheel off. I have had mine off before and have it snug but not so tight I need a Steering Wheel Puller. If you havent had it off, dont bang on it as it will bulge the Steering shaft. Go rent a puller from the parts store. It is free.
You will need to drop the lower plastic panel and I diconnect the dimmer switch and just let it lay on the floor. Remove the Steering Wheel and the covers to the steering column.
There are 4 screws that hold the Light Switch Assembly on. They are recessed. Then disconnect the black clip that keeps all of the wire bundeled to the column and 2 screws that hold the blue connectors to the black tabs /clip.
Once I had it off, I had to take 2 screw out that hold the hazard light switch to the assembly, and set it out of the way. I then had to remove the clear plastic cover so as I could use my wife finger nail file (yeah.. she liked that idea) and went over the little copper tips on the copper layers. Just a couple of times to help make a good clean contact. Then I hit with some WD-40.
Here is a good picture of the contacts that need cleaned and more info if someone needs it.
https://www.yotatech.com/forums/f116...t-work-100088/
Put it back togther and everything works great. The 86 and 88 Light assemblys do have different part numbers on them and they interchanged and it got me thru. But it is nice having everything working as it should.
I did take my passenger kick panel off and didnt see a relay box there. Not saying it isnt, I just didnt want to pull the ECM and since I was able to test with a good wiper delay switch, I didnt need to go that far into it.
Found another link to a headlight problem I just wanted to add.
https://www.yotatech.com/forums/f116...icator-229946/
Kawazx636...Here is a link to how I fixed my headlight switch. It is on a 2nd gen but probably about the same as yours.
I went to work on my Light Switch and Wiper delay. I plugged my old one in and the wiper delay worked. But not bright lights. I then tried to combine the 2 and was going to have cut wire and splice and didnt want to go that route.
The Light Assembly I had before was from an 86 and it has another plug my 88 didnt have. I figured it was for some option mine didnt have so didnt think much about it. The white plug is what I am talking about on an 86 in this picture.
Today I got to looking at it (the white plug) and it runs to the wiper handle and I am guessing it is to the delay in the handle. So I then decided to see what I could do about my original Light assembly.
I took the Steering Wheel off. I have had mine off before and have it snug but not so tight I need a Steering Wheel Puller. If you havent had it off, dont bang on it as it will bulge the Steering shaft. Go rent a puller from the parts store. It is free.
You will need to drop the lower plastic panel and I diconnect the dimmer switch and just let it lay on the floor. Remove the Steering Wheel and the covers to the steering column.
There are 4 screws that hold the Light Switch Assembly on. They are recessed. Then disconnect the black clip that keeps all of the wire bundeled to the column and 2 screws that hold the blue connectors to the black tabs /clip.
Once I had it off, I had to take 2 screw out that hold the hazard light switch to the assembly, and set it out of the way. I then had to remove the clear plastic cover so as I could use my wife finger nail file (yeah.. she liked that idea) and went over the little copper tips on the copper layers. Just a couple of times to help make a good clean contact. Then I hit with some WD-40.
Here is a good picture of the contacts that need cleaned and more info if someone needs it.
https://www.yotatech.com/forums/f116...t-work-100088/
Put it back togther and everything works great. The 86 and 88 Light assemblys do have different part numbers on them and they interchanged and it got me thru. But it is nice having everything working as it should.
I did take my passenger kick panel off and didnt see a relay box there. Not saying it isnt, I just didnt want to pull the ECM and since I was able to test with a good wiper delay switch, I didnt need to go that far into it.
Found another link to a headlight problem I just wanted to add.
https://www.yotatech.com/forums/f116...icator-229946/
Oct 30, 2012 | 01:51 PM
#175
Thread Starter
Registered User
Joined: Aug 2011
Posts: 654
Likes: 2
From: Swamp east MO
hey Terry yeah I wish I had a welder too....do you think jb weld will hold that very long?????
No I had to borrow a buddys shop and welder to do this..
The BOY is due early Jan. boy is in all caps b/c they first told us he was a she. ..LOL
..LOL
No I had to borrow a buddys shop and welder to do this..
The BOY is due early Jan. boy is in all caps b/c they first told us he was a she.
..LOL
Oct 30, 2012 | 02:27 PM
#176
I not really impressed with JB weld for really demanding strength issues. Docs dont aways get it right. We were to have twins at one time. That changed. January isnt far off. Enjoy the sleep now while you can. Both of ours had the 2 hour thing down pat. Dont think thye ever missed a beat.
Oct 31, 2012 | 02:07 PM
#177
Thread Starter
Registered User
Joined: Aug 2011
Posts: 654
Likes: 2
From: Swamp east MO
LOL the jb weld thing was a joke I hope you took it that way....LOL
As far a sleep my wife is really good about that she told me she see's no reason for me to get up with the baby if I have to go to work the next day, last time I only got up a couple of times with our daughter maybe it will be the same way this time!!!!!
As far a sleep my wife is really good about that she told me she see's no reason for me to get up with the baby if I have to go to work the next day, last time I only got up a couple of times with our daughter maybe it will be the same way this time!!!!!
Nov 15, 2012 | 02:31 PM
#178
Thread Starter
Registered User
Joined: Aug 2011
Posts: 654
Likes: 2
From: Swamp east MO

Got a little body work done I got it all but finished in primer and back on the truck but I dont have a picture yet!
Another thing is see below
https://www.yotatech.com/forums/f123...ucking-260942/
Last edited by dirtdobberoffroad; Nov 19, 2012 at 06:04 PM.
Nov 18, 2012 | 01:45 PM
#179
Looks like you been getting some work done. I looked at your other thread and am not much help there. I have heard it does have something to do with the valves when it does suck your hand back in. Seems like I heard it was one sticking, bt would think it would have a set pattern if it was the same one. Not much help on it I know, but have heard of that exhaust check. Hope things are going well for you.
Nov 18, 2012 | 02:20 PM
#180
Thread Starter
Registered User
Joined: Aug 2011
Posts: 654
Likes: 2
From: Swamp east MO
I don't have a valve stuck the compression is to uniform and to high on all cylinders to have a stuck valve I dont know Im starting to think its just he over lap in the cam when its idling below 800 rpm. it runs great so I'm just gonna drive it!


