
Strykersd's Turbo 4runner build

 Mar 21, 2012 | 05:41 PM
#23
Thread Starter
Registered User

Joined: May 2007
Posts: 569
Likes: 1
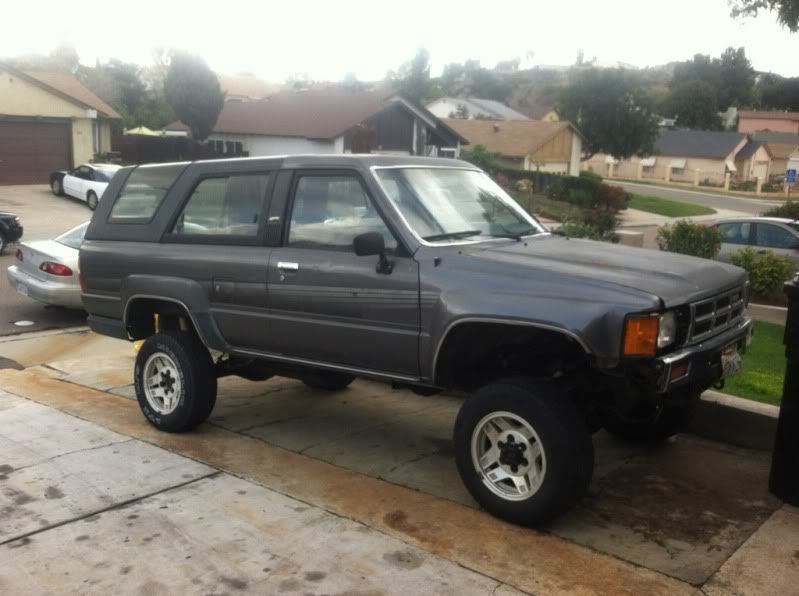
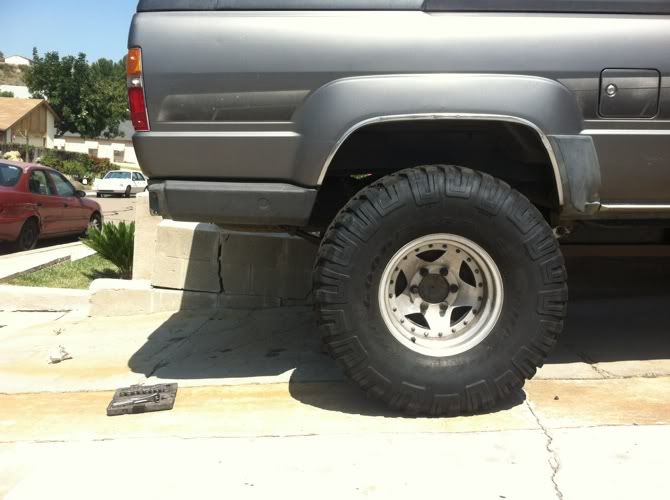
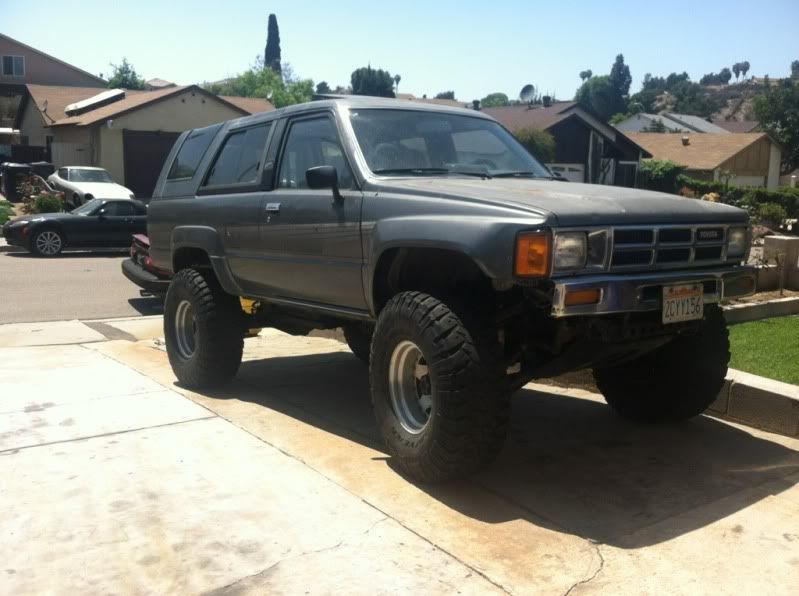
Alright, so it's been a few more weeks and I haven't got much done on my 4runner. Here's a picture of my 4runner after installing the lift.
I need some new tires soon! I've just been stuck on a few decisions. New or used, 33X12.5 or 35X12.5
I also haven't been able to drive it since I don't have shocks for the rear. My long term goal is to install a long travel kit on this 4runner and have rebuildable and revalvable shocks on each corner with the spring under the axle in the rear.. Although I bought my old OME leaf springs back from the guy I sold my 4runner too so that I can fit larger tires for now, I'm trying to do everything right the first time. So although I'll hate spending this much money on my limited travel rear end at the moment, I'll probably just buy a set of Bilstein short body 7100 for the rear and mount them in the stock location.
My other delimma is my driver door. I've seen doors that will fit at the junkyard, but in the month that I've been looking I haven't found any grey doors. I'm debating on waiting longer or just buying a different door and either trying to paint match it or just repainting the whole 4runner myself.
But other than those dilemmas I've just been replacing all the fluids on the 4runner. Once I get some shocks in the rear I can finally take it out!
As far as cost, I've sold my rear bumper for $80. Bringing my total project cost to: $1903
Last edited by strykersd; May 10, 2014 at 07:20 AM.
Mar 26, 2012 | 03:15 PM
#24
Thread Starter
Registered User
Joined: May 2007
Posts: 569
Likes: 1
The last few days I've been going back and forth on what to do as far as wheels and tires. I knew that I wanted either 33X12.5 or 33X12.5 Goodyear MTRs or KM2s. I knew I would need larger wheels since you can't mount 12.5" wide tires on our stock 7" wheels without the tire ballooning up.
After a ton of debate, knowing myself I decided that after running 35" tires on my last 4runner, I would just get bored of 33" tires. I hope I don't regret this decision! I've been keeping my eye out on my local Craigslist looking for a set of wheels and tires when I found a set of five old school MTRs on some aluminum wheels with my same bolt pattern for $400. Two of which were at 70% and three at 35%. I called the guy up and picked them up later that afternoon.
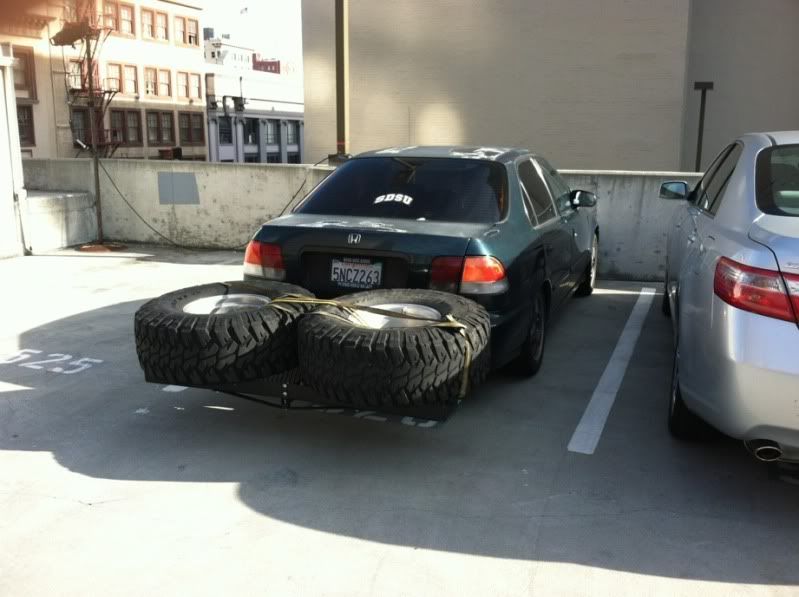
Funny story about when I picked them up, I was too impatient to borrow my mom's truck that I just decided to pick them up in my four door Honda Civic haha. Turns out a Civic with a cargo rack can carry five 35" tires! Here's a picture I figured some of you would appreciate
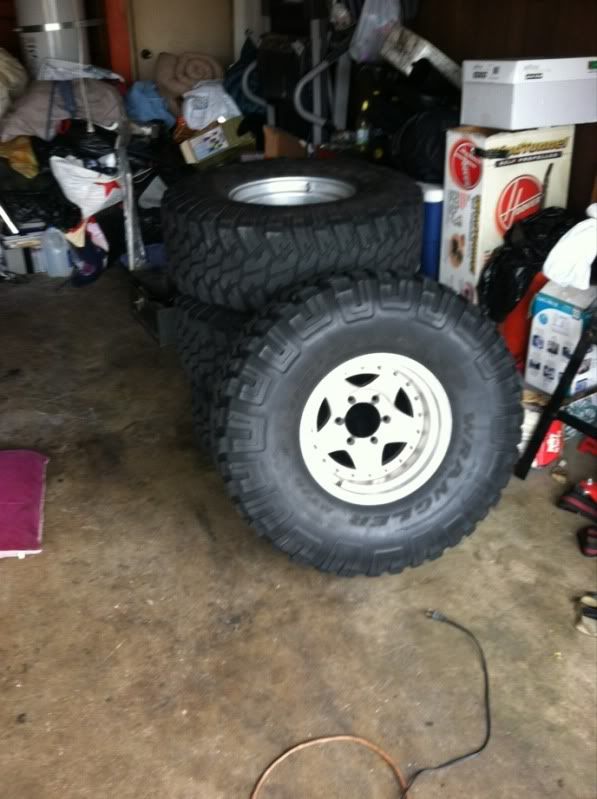
A better shot of the wheels in my garage
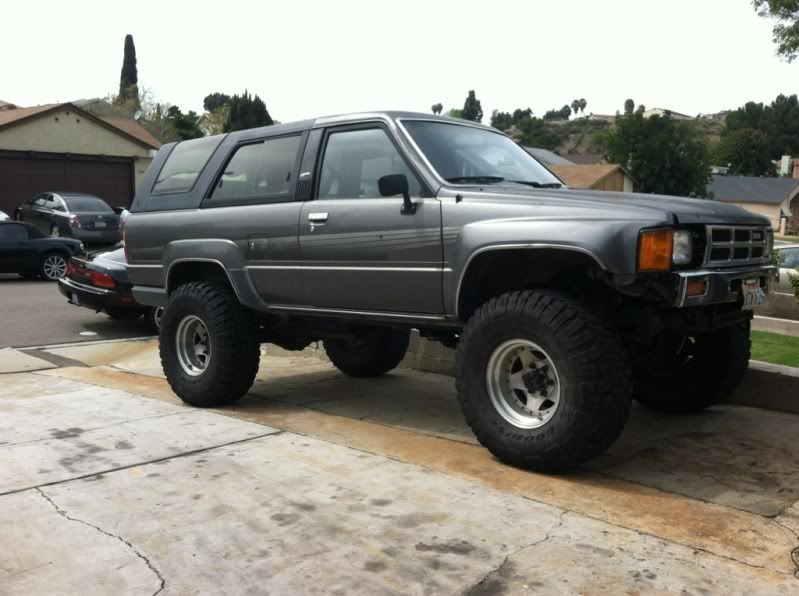
And finally a shot of them on my 4runner! Now I just need to do a ton of trimming to get them to fit!
Now I'm just looking for a deal on a set of rear shocks so that I can drive the 4runner to get smogged and finally start hitting some trails!
Although these set me back $400, I managed to sell my stock wheels and tires for $100 bringing my total project cost to $2203
After a ton of debate, knowing myself I decided that after running 35" tires on my last 4runner, I would just get bored of 33" tires. I hope I don't regret this decision! I've been keeping my eye out on my local Craigslist looking for a set of wheels and tires when I found a set of five old school MTRs on some aluminum wheels with my same bolt pattern for $400. Two of which were at 70% and three at 35%. I called the guy up and picked them up later that afternoon.
Funny story about when I picked them up, I was too impatient to borrow my mom's truck that I just decided to pick them up in my four door Honda Civic haha. Turns out a Civic with a cargo rack can carry five 35" tires! Here's a picture I figured some of you would appreciate
A better shot of the wheels in my garage
And finally a shot of them on my 4runner! Now I just need to do a ton of trimming to get them to fit!
Now I'm just looking for a deal on a set of rear shocks so that I can drive the 4runner to get smogged and finally start hitting some trails!
Although these set me back $400, I managed to sell my stock wheels and tires for $100 bringing my total project cost to $2203
Last edited by strykersd; May 10, 2014 at 07:21 AM.
Mar 26, 2012 | 11:02 PM
#26
Registered User
Joined: Mar 2007
Posts: 642
Likes: 3
From: Renton, WA
nice rig! nice tires!!
i wish my turbo runner had the badge, mine doesnt. the only thing that says turbo was the steering wheel (which i removed and replaced with grant racing wheel) and the intake manifold. i cant find a turbo badge, anywhere.
although, if you plan on keeping the auto tranny and just swapping out the transfer case that will be very costly and not worth it in my opinion (the tcase and trans are one piece, you need a special adapter), but to each there own.
i wish my turbo runner had the badge, mine doesnt.
the only thing that says turbo was the steering wheel (which i removed and replaced with grant racing wheel) and the intake manifold. i cant find a turbo badge, anywhere.although, if you plan on keeping the auto tranny and just swapping out the transfer case that will be very costly and not worth it in my opinion (the tcase and trans are one piece, you need a special adapter), but to each there own.
Apr 11, 2012 | 08:45 PM
#29
Thread Starter
Registered User
Joined: May 2007
Posts: 569
Likes: 1
Work on the 4runner has slowed recently for a few different reasons. Firstly, I realized that including the $300 it cost me to pick up the 4runner, I've spent $2500 in the last two months while I've been trying to finish paying off my credit cards, on the bright side they're almost paid off! Secondly, I went into the DMV the other day to change the 4runner from non-operation registration to operational, only to be informed that if I want to register it, I would need to pay for two years registration on the spot. It's registration date is June 8th, and they don't give me the option of paying $75 for this years registration and $75 again in June. Considering that I'm less than two months out and I'm trying to save money, I figured I'd just keep building it up and have it ready to go come June!
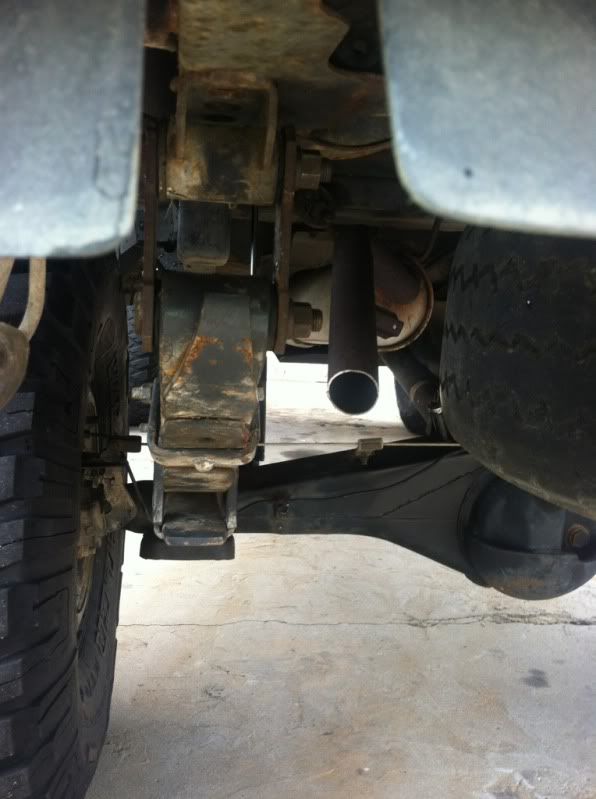
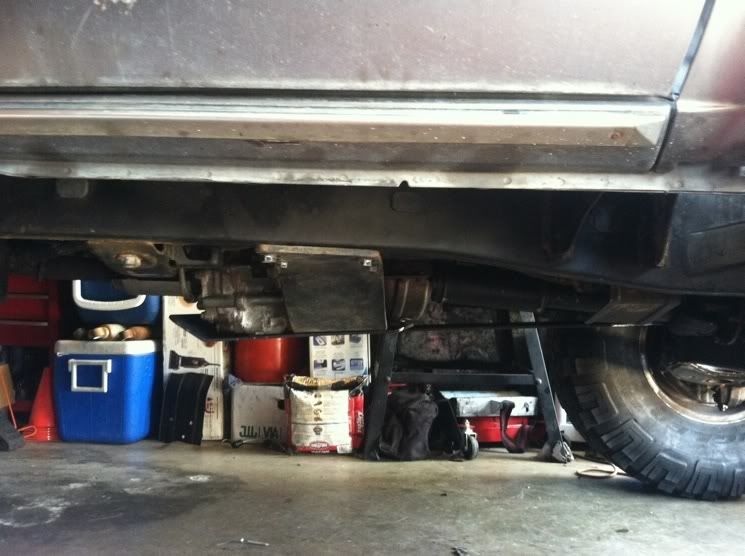
But enough of the boring stuff, onto the work I've been doing on it. After adding the 35" tires I knew I would need to do a ton of modifications. Knowing that I'll also buy a tube bumper in the near future, I figured I'd start on some of those mods now. The first of which is removing the stock rear side bumpers.
After unbolting those, you're left with these two brackets.
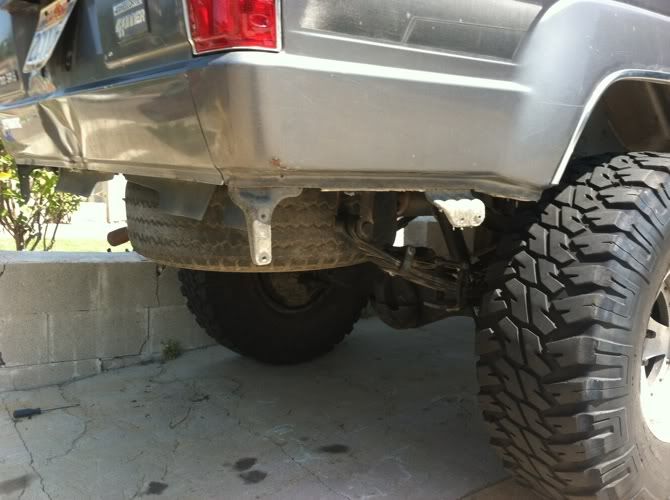
I broke out the sawzall and made quick work of removing those brackets. This shot also shows the Bilstein shocks a buddy of mine gave me off some late 90s Ford F-250. Nothing special, but they'll do for now.
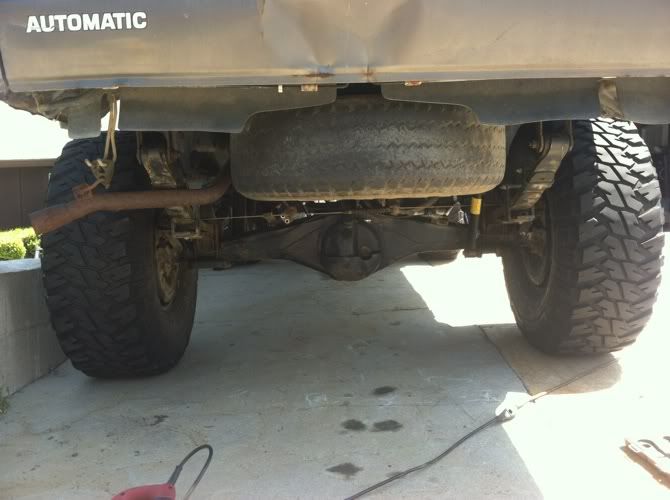
While under the truck I noticed that the stock exhaust would interfere with my droop travel. So since I had the sawzall out, I took care of that!
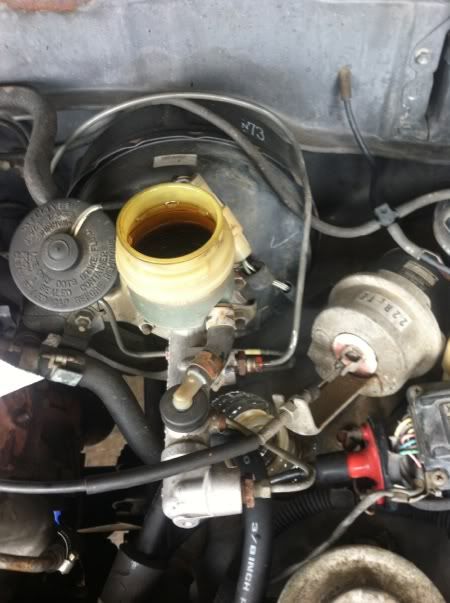
After installing my rear elocker axle, I had to do something about my load sensor proportioning valve. I could have easily adapted it to work, but considering that I'm planning on going long travel with this truck eventually, the LSPV might have some issues with 12-14" of travel. With that in mind, I decided to go with a LSVP delete and run a Wilwood manual proportioning valve up by my master cylinder. Here's a shot of my stock master cylinder setup.
I broke out a cool pipe cutter that came with my propane torch, cut the brake line and reflaired them. After cutting brake lines with hack saws and cut off wheels in the past, it's always been a pain having to file it down afterwards. This tool makes nice square cuts!
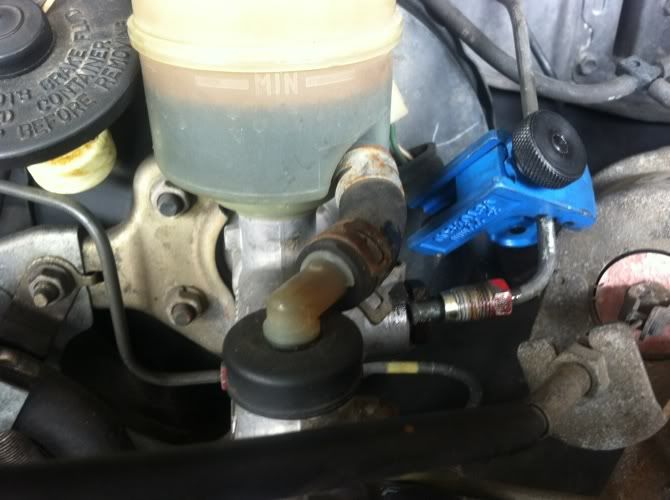
The finished product
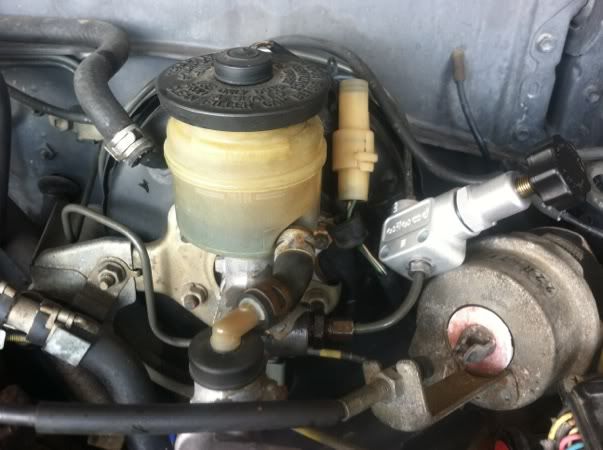
I still need to change up a bit of the plumbing in the back of the truck.
The proportioning valve cost me $40, bringing my total project cost up to $2245
But enough of the boring stuff, onto the work I've been doing on it. After adding the 35" tires I knew I would need to do a ton of modifications. Knowing that I'll also buy a tube bumper in the near future, I figured I'd start on some of those mods now. The first of which is removing the stock rear side bumpers.
After unbolting those, you're left with these two brackets.
I broke out the sawzall and made quick work of removing those brackets. This shot also shows the Bilstein shocks a buddy of mine gave me off some late 90s Ford F-250. Nothing special, but they'll do for now.
While under the truck I noticed that the stock exhaust would interfere with my droop travel. So since I had the sawzall out, I took care of that!
After installing my rear elocker axle, I had to do something about my load sensor proportioning valve. I could have easily adapted it to work, but considering that I'm planning on going long travel with this truck eventually, the LSPV might have some issues with 12-14" of travel. With that in mind, I decided to go with a LSVP delete and run a Wilwood manual proportioning valve up by my master cylinder. Here's a shot of my stock master cylinder setup.
I broke out a cool pipe cutter that came with my propane torch, cut the brake line and reflaired them. After cutting brake lines with hack saws and cut off wheels in the past, it's always been a pain having to file it down afterwards. This tool makes nice square cuts!
The finished product
I still need to change up a bit of the plumbing in the back of the truck.
The proportioning valve cost me $40, bringing my total project cost up to $2245
Last edited by strykersd; May 10, 2014 at 07:22 AM.
Apr 22, 2012 | 12:12 PM
#30
Thread Starter
Registered User
Joined: May 2007
Posts: 569
Likes: 1
A few weeks back, while buying the IFS stuff off the guy I sold my last 4runner to, he tried to convince me to buy my old Budbuilt single case crossmember too since he upgraded to dual cases and no longer used it. I deferred at first and decided to call Budbuilt and see if the manual crossmember would work on an automatic too. Bud informed that they are indeed the same, just that the automatics needed another small mount to make it work. So I picked up the complete crossmember from the guy I sold me last 4runner to for $100.
I bought both pieces because I'm still not sold on whether or not I'll keep the automatic. I want to try crawling with an auto, but if I hate it I'll just switch it over to a manual transmission.
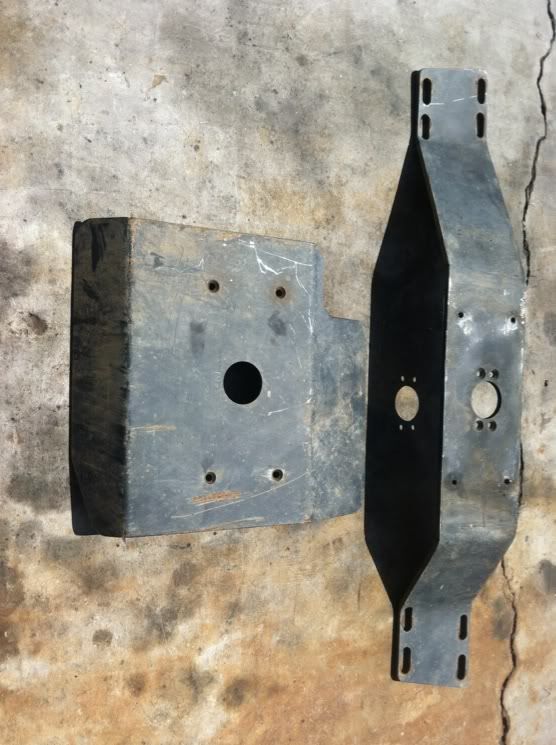
After making a call out to Budbuilt, he sent me the automatic skid plate and mounts for another $100. Here's a shot after I painted them
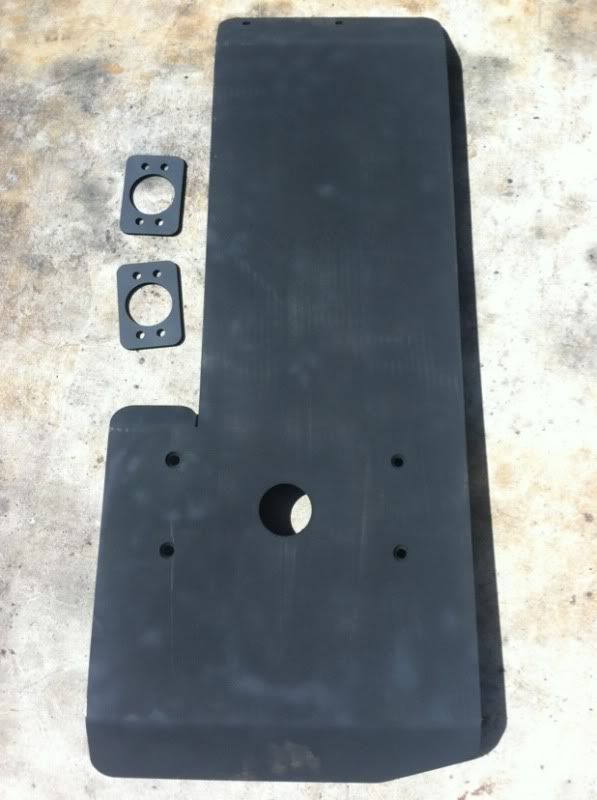
When I attempted to bolt it up, I was rudely surprised to find that it not only hit my transfer case but also my driveshaft. I contacted Bud and he ensured me it was the right part. After it took over three weeks to get this first skid plate, I didn't feel like going through the hassle and waiting that long again so I just modified it to work.
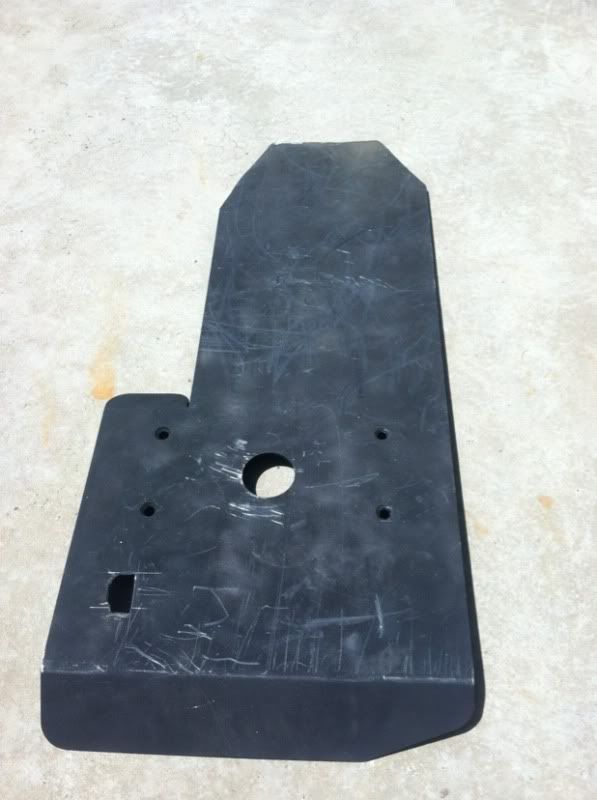
All in all, I needed to cut one corner off the front of the skid plate and make a whole for part of the transfer case to sit in. You might be wondering why both front corners are cut and that's because I ˟˟˟˟ed up and cut the wrong front corner at first, oh well.
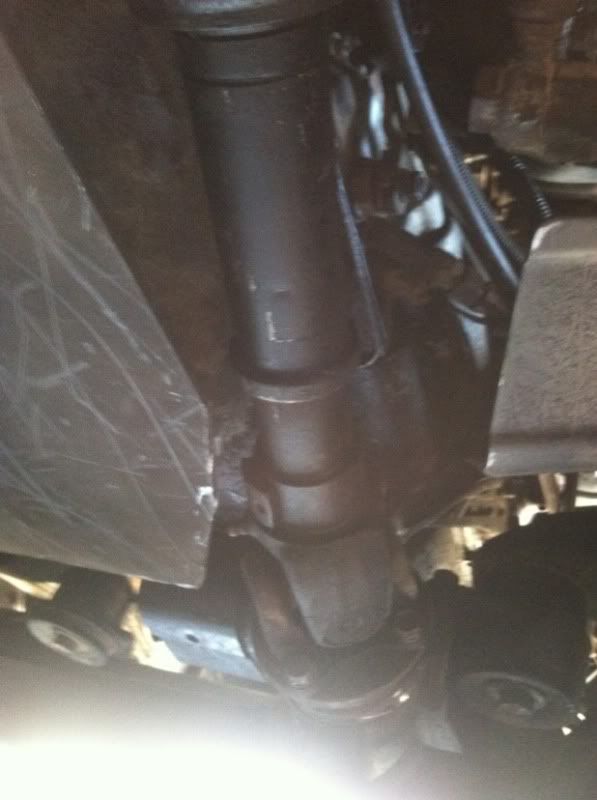
Driveshaft clearance after I cut the skid plate.
The hole I had to cut to make the skid plate fit
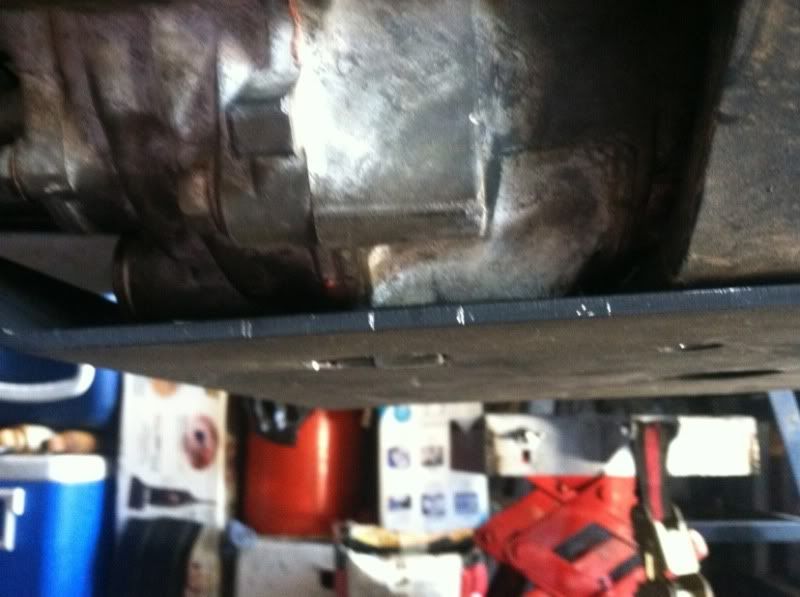
The finished product
All in all, I picked up half an inch of ground clearance and now have the piece of mind that my crossmember won't bend and screw up all my rubber motor/transfer case mounts. After installing the skid plate I have decided that I really didn't like how long the skid plate was because of the leverage on the crossmember of how long the automatic skid plate was. My plan is to eventually tie it into my Sonoran Steel IFS brace.
Total project cost = $2443
I bought both pieces because I'm still not sold on whether or not I'll keep the automatic. I want to try crawling with an auto, but if I hate it I'll just switch it over to a manual transmission.
After making a call out to Budbuilt, he sent me the automatic skid plate and mounts for another $100. Here's a shot after I painted them
When I attempted to bolt it up, I was rudely surprised to find that it not only hit my transfer case but also my driveshaft. I contacted Bud and he ensured me it was the right part. After it took over three weeks to get this first skid plate, I didn't feel like going through the hassle and waiting that long again so I just modified it to work.
All in all, I needed to cut one corner off the front of the skid plate and make a whole for part of the transfer case to sit in. You might be wondering why both front corners are cut and that's because I ˟˟˟˟ed up and cut the wrong front corner at first, oh well.
Driveshaft clearance after I cut the skid plate.
The hole I had to cut to make the skid plate fit
The finished product
All in all, I picked up half an inch of ground clearance and now have the piece of mind that my crossmember won't bend and screw up all my rubber motor/transfer case mounts. After installing the skid plate I have decided that I really didn't like how long the skid plate was because of the leverage on the crossmember of how long the automatic skid plate was. My plan is to eventually tie it into my Sonoran Steel IFS brace.
Total project cost = $2443
Last edited by strykersd; May 10, 2014 at 07:23 AM.

 May 17, 2012 | 11:36 AM
#33
Thread Starter
Registered User
Joined: May 2007
Posts: 569
Likes: 1
Sadly I'm still haven't really drove the 4runner yet. I'm waiting until June 8th to register the thing. Although I have driven it around my block, I can't wait to get it on the open road and wheel the thing!
So for now I started working on completing the interior. When I bought the 4runner, it's interior was rough to say the least. Stains everywhere, the rear cargo area carpet was just thrown in teh back, no carpet up front, a bunch of broken pieces, but I finally have it coming around. When I bought my last 4runner in 2007 it was much easier to find parts for it, now five years later I can't seem to find first generation 4runner's anywhere! After searching Craigslist for a few weeks I found a wrecking yard 90 miles away from my house that had two first generation 4runners and one of them was a turbo model! So I made the 180 mile round trip to Ferman's Mini Truck in Santa Ana, California.
For $180 I picked up
-grey carpet for the front of my 4runner. I was told it was from a first generation 4runner, turns out it was from a second or third gen with four doors. I wasn't too happy about that
-a plastic piece of the driver side door panel. Mine was broken, which caused the switch panel to fall into the door. Plus it's hard to find since it's specific to the turbo model and the dealership only sells the whole door panel.
-stock bottle jack
-a 4crawler hi-lift mount that bolts to the factory roll bar
-windshield wiper fluid bag/pump for the rear sprayer
-a grey cubby door for the rear cargo area (I had one, only needed one more)
-factory Quartz clock
-turn signal switch
-some small plastic pieces for around the 4runner
All in all, a pretty good haul and definitely worth the drive. Now onto the pics!
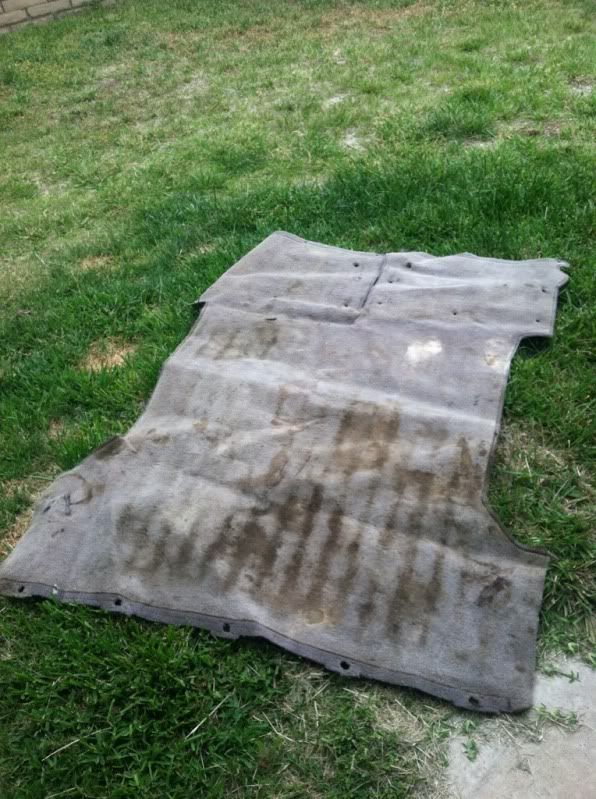
Here's the carpet for the rear cargo area that came with the 4runner. Needless to say it needed a good shampooing
When I got the 4runner home I discovered that the tailgate handle wouldn't open the tailgate. Thankfully after a $2 part from the dealership, I have a fully operational tailgate! Here's a shot while I was fixing it, that also shows the cleaned carpet.
Since my last 4runner had the factory clock, it really bugged me that this one didn't. After hearing that every 4runner had the wiring for the clock I knew I had to get one. Here it is installed!
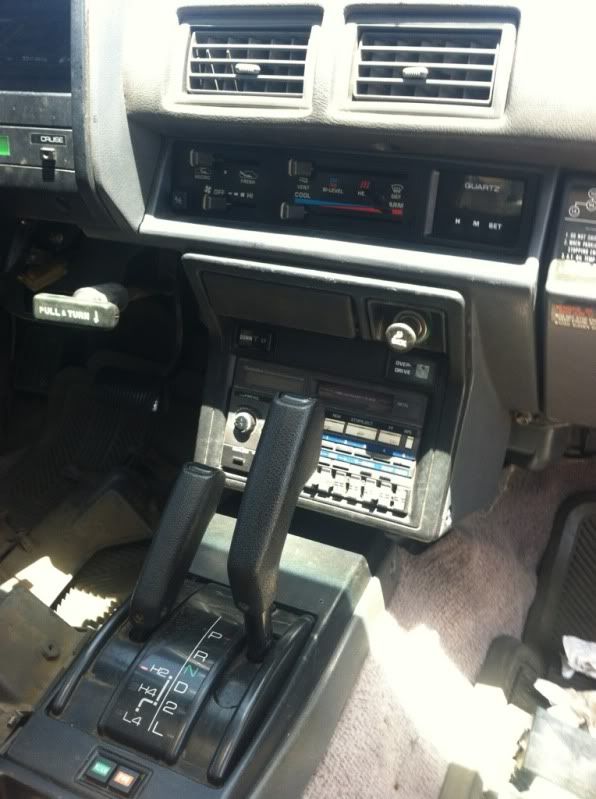
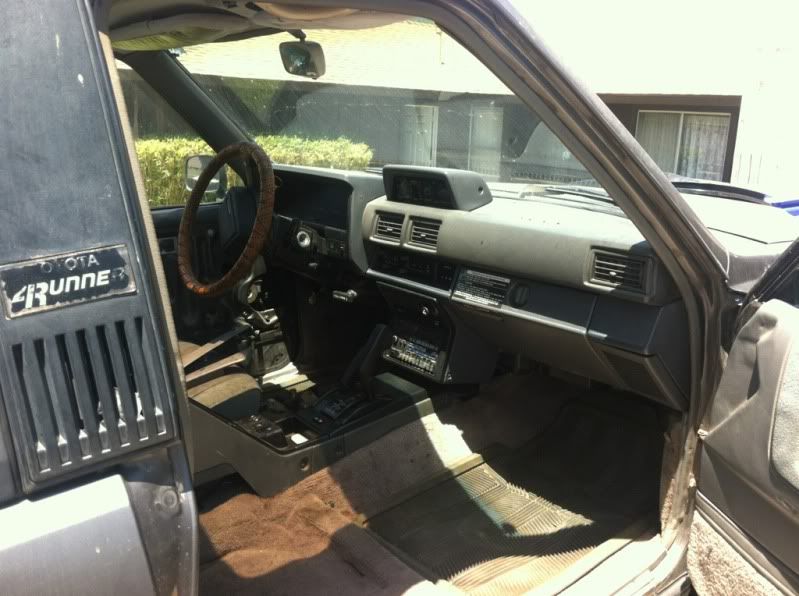
My almost complete front interior! I pulled the passenger seat because like on almost every other first gen 4runner, the cable that allows the passenger seat to slide forwards so people could get in the back broke. I do like that the 4runner came with some all weather floor mats, so I don't have to buy my own.
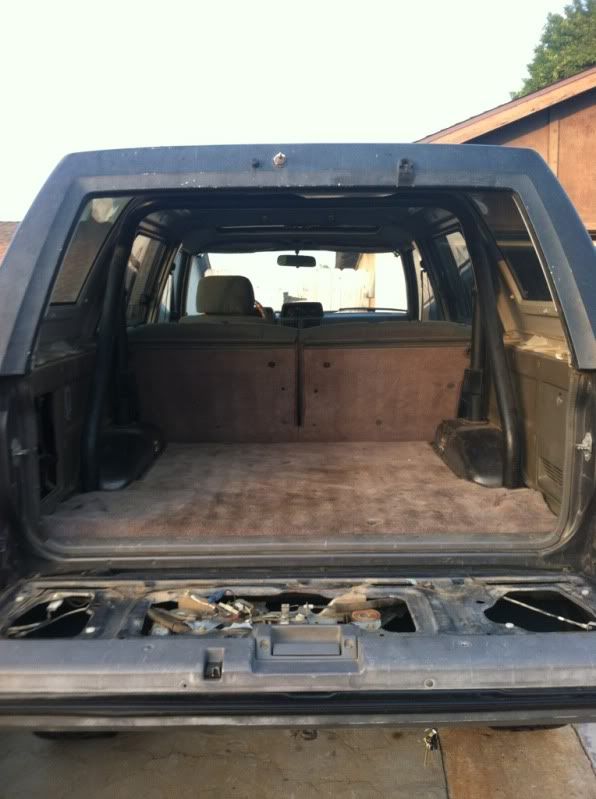
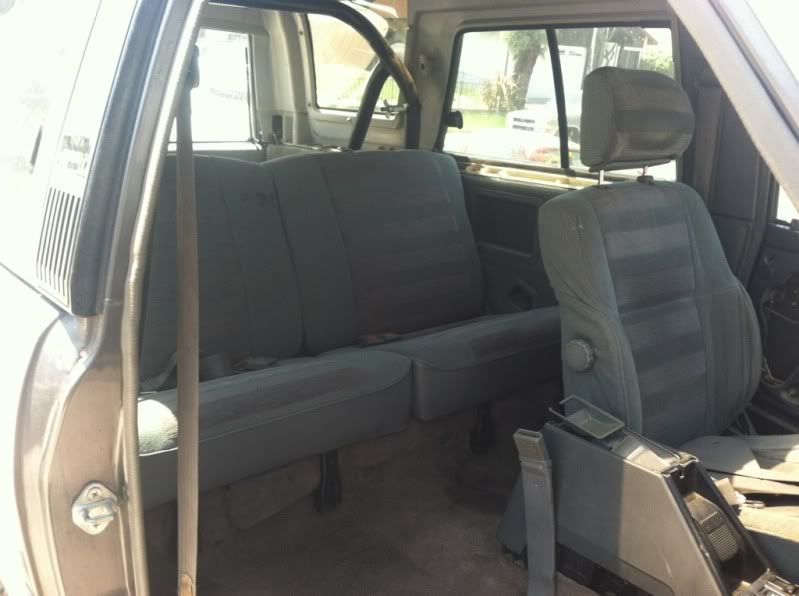
The back interior. If you look closely you can tell that the carpet isn't factory, but it works for me! If you look really closely you can see the 4crawler hi-lift mount. Now I just need to buy a hi-lift jack!
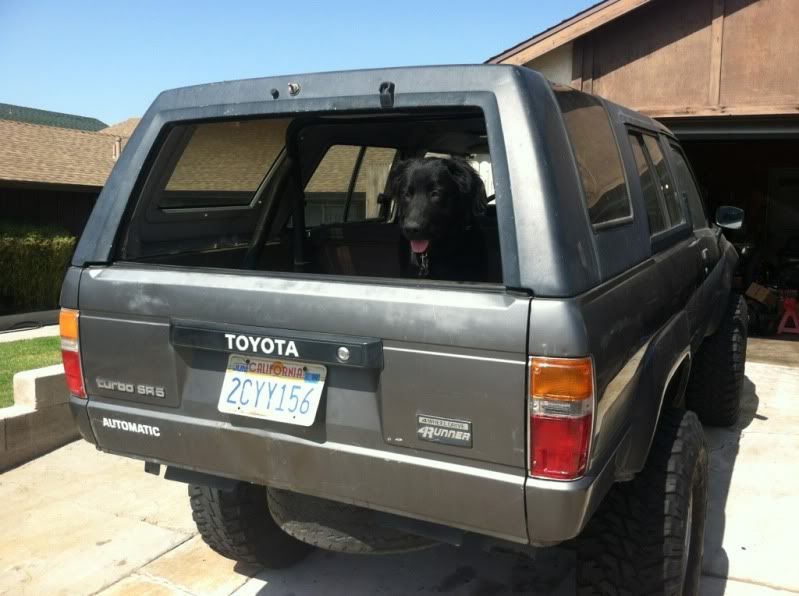
And last but not least, I took my dog for a quick spin around the block in the 4runner!
Total project cost = $2625
It's starting to get up there, but I'm thrilled with how well it's came out for how much I put into it!
So for now I started working on completing the interior. When I bought the 4runner, it's interior was rough to say the least. Stains everywhere, the rear cargo area carpet was just thrown in teh back, no carpet up front, a bunch of broken pieces, but I finally have it coming around. When I bought my last 4runner in 2007 it was much easier to find parts for it, now five years later I can't seem to find first generation 4runner's anywhere! After searching Craigslist for a few weeks I found a wrecking yard 90 miles away from my house that had two first generation 4runners and one of them was a turbo model! So I made the 180 mile round trip to Ferman's Mini Truck in Santa Ana, California.
For $180 I picked up
-grey carpet for the front of my 4runner. I was told it was from a first generation 4runner, turns out it was from a second or third gen with four doors. I wasn't too happy about that
-a plastic piece of the driver side door panel. Mine was broken, which caused the switch panel to fall into the door. Plus it's hard to find since it's specific to the turbo model and the dealership only sells the whole door panel.
-stock bottle jack
-a 4crawler hi-lift mount that bolts to the factory roll bar
-windshield wiper fluid bag/pump for the rear sprayer
-a grey cubby door for the rear cargo area (I had one, only needed one more)
-factory Quartz clock
-turn signal switch
-some small plastic pieces for around the 4runner
All in all, a pretty good haul and definitely worth the drive. Now onto the pics!
Here's the carpet for the rear cargo area that came with the 4runner. Needless to say it needed a good shampooing
When I got the 4runner home I discovered that the tailgate handle wouldn't open the tailgate. Thankfully after a $2 part from the dealership, I have a fully operational tailgate! Here's a shot while I was fixing it, that also shows the cleaned carpet.
Since my last 4runner had the factory clock, it really bugged me that this one didn't. After hearing that every 4runner had the wiring for the clock I knew I had to get one. Here it is installed!
My almost complete front interior! I pulled the passenger seat because like on almost every other first gen 4runner, the cable that allows the passenger seat to slide forwards so people could get in the back broke. I do like that the 4runner came with some all weather floor mats, so I don't have to buy my own.
The back interior. If you look closely you can tell that the carpet isn't factory, but it works for me! If you look really closely you can see the 4crawler hi-lift mount. Now I just need to buy a hi-lift jack!
And last but not least, I took my dog for a quick spin around the block in the 4runner!
Total project cost = $2625
It's starting to get up there, but I'm thrilled with how well it's came out for how much I put into it!
Last edited by strykersd; May 10, 2014 at 07:24 AM.
 May 21, 2012 | 12:43 PM
#37
Thread Starter
Registered User
Joined: May 2007
Posts: 569
Likes: 1
Thanks! Good luck on your build!
May 21, 2012 | 12:55 PM
#38
Thread Starter
Registered User
Joined: May 2007
Posts: 569
Likes: 1
When I bought my 4runner, my turn signals worked just fine. In the two or three miles I've test drove it, my turn signal switch broke somehow. Luckily while I was at the junkyard I found a 4runner with a working turn signal switch and a broke cruise control/wiper arm, so I was able to pick it up dirt cheap. I combined my good cruise control/wiper arm with the turn signal switch and everything is up and running well!
My last 4runner's 20+ year fuel pump strainer disintegrated and clogged my last fuel pump, so on this one I took the liberty of pulling my fuel pump and checking the strainer. Although the strainer was in one piece, it was an awful brown color so I replaced it with an Autozone unit. While I was in there I found this hack job wiring job.
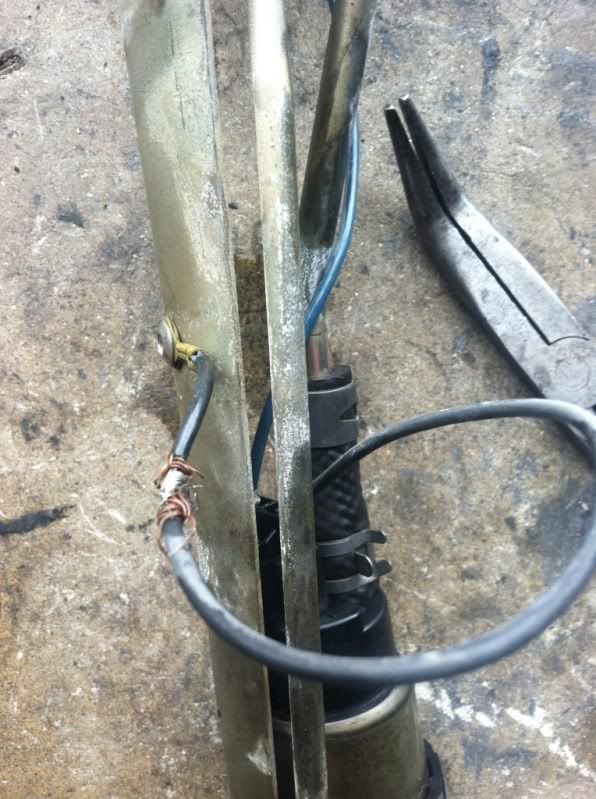
I'm glad I found this before I went off roaring, hit a bump and my truck just turned off. I soldered the joint and it should be good to go! I'm just a bit worried that this isn't the stock fuel pump...
I also repaired my passenger seat's sliding mechanism by replacing the seat cable. A simple $50 part from the dealership and my interior is ready to go! Well I would like a new head unit and CB radio, but that'll come when I get more money. For now I can just use my hand held radios and a cassette adapter to listen to my ipod/iphone.
Although I haven't changed much, I haven't taken a picture of the 4runner in a while. Here it is with the chrome fender well guards removed and with the new head light bezel.
Not many pictures, but I'm making progress!
Total project cost = $2695
17 more days until I can register it!
My last 4runner's 20+ year fuel pump strainer disintegrated and clogged my last fuel pump, so on this one I took the liberty of pulling my fuel pump and checking the strainer. Although the strainer was in one piece, it was an awful brown color so I replaced it with an Autozone unit. While I was in there I found this hack job wiring job.
I'm glad I found this before I went off roaring, hit a bump and my truck just turned off. I soldered the joint and it should be good to go! I'm just a bit worried that this isn't the stock fuel pump...
I also repaired my passenger seat's sliding mechanism by replacing the seat cable. A simple $50 part from the dealership and my interior is ready to go! Well I would like a new head unit and CB radio, but that'll come when I get more money. For now I can just use my hand held radios and a cassette adapter to listen to my ipod/iphone.
Although I haven't changed much, I haven't taken a picture of the 4runner in a while. Here it is with the chrome fender well guards removed and with the new head light bezel.
Not many pictures, but I'm making progress!
Total project cost = $2695
17 more days until I can register it!
Last edited by strykersd; May 10, 2014 at 07:24 AM.
May 26, 2012 | 12:42 AM
#39
Thread Starter
Registered User
Joined: May 2007
Posts: 569
Likes: 1
More progress! After an a few minutes poking and prodding around with my multimeter I discovered that my passenger side power window problem was caused by the passenger side window switch. I believe the contacts were too worn down. I headed down to the dealership and was quoted $71 for a switch! Luckily the guy at the dealership is a friend of mine and he informed me that the same switch came in 80's model Supras, Corollas, Camrys and Cressidas. After a short ebay search I found the switch for just $22. I just got it in today and now the window works great! Moral of the story, if your passenger window doesn't work on both the passenger controls and driver controls, it's probably your passenger switch!
Other than that I've just been fixing some minor details, changed two light bulbs in turn signals.
The date I can register the 4runner on is coming up soon!
Total project cost = $2721
13 more days until I can register it!
Other than that I've just been fixing some minor details, changed two light bulbs in turn signals.
The date I can register the 4runner on is coming up soon!
Total project cost = $2721
13 more days until I can register it!
Last edited by strykersd; May 10, 2014 at 07:25 AM.


