Overheating in 22RE 3,000 miles after ENGBLDR FEK install
 07-06-2010, 10:11 AM
#121
Registered User
Join Date: Mar 2010
Location: Fresno, California
Posts: 594
Likes: 0
Received 0 Likes
on
0 Posts
to get those off just put the castle nut back on part way and hammer them loose. you shouldnt need an alignment if you dont turn any of the rod ends and just put it back on the way it came off. also i dont think it will hurt them to just leave it hanging, they are swivel joints. looks like fun!!!
 07-06-2010, 01:24 PM
#122
i dropped my idler arm like ZUK mentioned when i took off/installed my oil pan, left everything connected except for the steering stabilizer and the 3 bolts that mount the idler. it was the only way i could get in there and it give enough room to even leave the oil pickup tube in place and still be able to install. i believe it mentions it in the chilton's manual to take off the steering link bar, so i just decided to take off the idler and let it hang.
07-06-2010, 01:37 PM
#123
Registered User
Thread Starter
iTrader: (2)
Join Date: Dec 2009
Location: Pleasanton, CA - SF Bay Area
Posts: 2,159
Likes: 0
Received 7 Likes
on
5 Posts
Thanks! Can't wait to get home and check out the idler arm and see how easy it is to just drop it.
That's also good news that the oil pickup can be mounted when putting the pan in...one less thing to worry about!
That's also good news that the oil pickup can be mounted when putting the pan in...one less thing to worry about!
07-07-2010, 06:15 AM
#125
Registered User
Thread Starter
iTrader: (2)
Join Date: Dec 2009
Location: Pleasanton, CA - SF Bay Area
Posts: 2,159
Likes: 0
Received 7 Likes
on
5 Posts
Thanks guys for the tips - I got home last night and took a 17mm socket to the 3 bolts holding on the passenger side idler arm (to the frame) and presto! they broke pretty easily. the drivers side also attached with 3 bolts to the frame, but it's integrated with the power steering apparatus, which I'm likely NOT going to try to move. When I get more time this week, I'm going to drop the passenger side idler arm, and bang out some of the connections in the photos using "reversed" castle nuts. I'll keep you posted.
One more question for when I fill this guy back up....I kept the oil pump on the timing cover for this job...is there anything I need to do when refilling the engine with oil before starting? I primed it with vasoline last time I took everything apart and put back together again, but not this time, since the pump stayed on the cover.....
One more question for when I fill this guy back up....I kept the oil pump on the timing cover for this job...is there anything I need to do when refilling the engine with oil before starting? I primed it with vasoline last time I took everything apart and put back together again, but not this time, since the pump stayed on the cover.....
07-08-2010, 09:13 AM
#126
Registered User
Thread Starter
iTrader: (2)
Join Date: Dec 2009
Location: Pleasanton, CA - SF Bay Area
Posts: 2,159
Likes: 0
Received 7 Likes
on
5 Posts
Oil pan on!
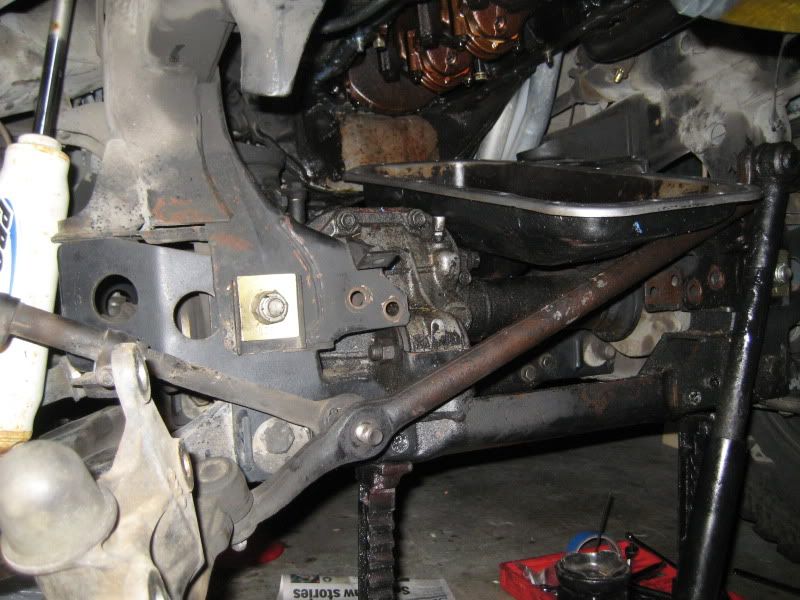
Thanks guys for the suggestions with the idler arm bolts. Turns out, I didn't even need to remove those 6 castle nuts (and &*()&*()$&#& cotter pins) in the first place. All I had to do was remove the 3 (18mm?) bolts that attach the idler arm to the frame (while truck was suspended!), and swing the crossbar down and out of the way -that made enough room to easily snake the oil pan and pickup tub in there. I tried to see if I had room to attach the pickup tube, and THEN the oil pan, but no dice. Glad I tried that before opening up the tube of FIPG!
The caveat here is that I have a 4" lift on this truck, so if you're running stock IFS, you'll still need to drop the diff, like 92Toy shows in his writeup here.
Here are some pics from last night's oil pan installation:
The 3 bolts come off pretty easily:

Just grab the arm and swing it out of the way:


Plenty of room for the oil pan to get in there (but you'll need to have the pickup tube laying in it and bolt that up with the pan sitting where it is in this photo - work fast with the drying FIPG!):
It's ON:


I torqued it to 9 ft/lbs in an alternating star pattern and had the whole FIPG part done in about 20 minutes Getting it on with all the bolts wasn't hard - it was the getting an angle for the torque wrench to do this that took the longest.
SO.....the one question I have that remains unanswered is in regards to the oil pump:
Since I didn't remove the oil pump from the timing cover on this job, need I worry about it being primed or not when I fill up with new oil and fire this guy up? Do I need to fill up, give the crank a few hand turns in neutral to cycle the oil before starting? What's the best thing to do here?
Hope to get it running this weekend
Thanks all again!
Phil
The caveat here is that I have a 4" lift on this truck, so if you're running stock IFS, you'll still need to drop the diff, like 92Toy shows in his writeup here.
Here are some pics from last night's oil pan installation:
The 3 bolts come off pretty easily:
Just grab the arm and swing it out of the way:
Plenty of room for the oil pan to get in there (but you'll need to have the pickup tube laying in it and bolt that up with the pan sitting where it is in this photo - work fast with the drying FIPG!):
It's ON:
I torqued it to 9 ft/lbs in an alternating star pattern and had the whole FIPG part done in about 20 minutes Getting it on with all the bolts wasn't hard - it was the getting an angle for the torque wrench to do this that took the longest.
SO.....the one question I have that remains unanswered is in regards to the oil pump:
Since I didn't remove the oil pump from the timing cover on this job, need I worry about it being primed or not when I fill up with new oil and fire this guy up? Do I need to fill up, give the crank a few hand turns in neutral to cycle the oil before starting? What's the best thing to do here?
Hope to get it running this weekend
Thanks all again!
Phil
07-08-2010, 10:58 AM
#127
RIGHT ON, PHIL! Awesome job! On the oil pump? Not sure, ...... I would think that every time the engine is turned off, oil draining back to pan, you still have oil primed in the pump for the next start, no? Just guessing, ...someone will give ya the what's what that you need, lol.
Glad you're almost there!
Mark
Glad you're almost there!
Mark
07-09-2010, 10:24 PM
#128
Any news, Phil? Just checking in. I took your advice and installed the Zuk's. My neighbor had time and said, "LET'S DO IT, RIGHT NOW, OK? REallyyyy busy, now or never"......Uh, YEAH, lol. I was torn whether to do them or not....GLAD I did, and after all, I can always weld the stop bottoms back on, as we used Torch(TM) and diablo blades and did it in 10 minutes(removing them)..... Sorry, not meaning to highjack or anything, ...Just wanted to share because, honestly? YOU were the deciding factor, hahaha.
Have a good one, Phil. are you going to post any 'RUNNING' video? lol.
Have a good one, Phil. are you going to post any 'RUNNING' video? lol.
07-10-2010, 03:34 PM
#129
Registered User
Thread Starter
iTrader: (2)
Join Date: Dec 2009
Location: Pleasanton, CA - SF Bay Area
Posts: 2,159
Likes: 0
Received 7 Likes
on
5 Posts
It's alive!!
Chef - glad you got the ZUK mod done and done so easily - world of difference, I'm sure you now agree
I finally got it filled with fluids, started, timed, and cooling system burped. I also took advantage of the truck being on stands and cranked the T bars ALL the way down, and added the passenger side lock nut I got from the dealer a few weeks back with my FIPG (nut was $5!!). That actually evened out the front with the back even more - I like it!
So far, no leaks I need to take it around town a bit and really put it through its paces before I rest easy, but it's looking good.
The only fluid I saw on the ground after driving it around in front of my garage was right under the steering damper, which leaked a bit when I dropped it for the oil pan job...I think it's just old and leaks??
Also, one of my power steering vacuum tubes broke right near where it mounts to the intake manifold...so I had to cram it on there again. I removed the threaded fitting for it from the manifold to more easily cram the tube on there, and >>>>wow - it was FULL OF BLACK CRAP. I took some carb cleaner and an awl to it and it's good as new, but I think that's an indicator of just how gummed up my intake manifold is (next big job is that, plus injectors I think...).
Here's some video and photos of today.
[YOUTUBE]http://www.youtube.com/watch?v=v8eW94hHEos[/YOUTUBE]
[YOUTUBE]http://www.youtube.com/watch?v=nfVbp8AhwWg[/YOUTUBE]
Clogged vacuum hose thing:

This is a flathead after I stuck it into the manifold and gave it a short twist...CAKED with BLACK CRAP:

Back in action:


The only leaking so far...think it's the steering damper:


I finally got it filled with fluids, started, timed, and cooling system burped. I also took advantage of the truck being on stands and cranked the T bars ALL the way down, and added the passenger side lock nut I got from the dealer a few weeks back with my FIPG (nut was $5!!). That actually evened out the front with the back even more - I like it!
So far, no leaks
I need to take it around town a bit and really put it through its paces before I rest easy, but it's looking good.The only fluid I saw on the ground after driving it around in front of my garage was right under the steering damper, which leaked a bit when I dropped it for the oil pan job...I think it's just old and leaks??
Also, one of my power steering vacuum tubes broke right near where it mounts to the intake manifold...so I had to cram it on there again. I removed the threaded fitting for it from the manifold to more easily cram the tube on there, and >>>>wow - it was FULL OF BLACK CRAP. I took some carb cleaner and an awl to it and it's good as new, but I think that's an indicator of just how gummed up my intake manifold is (next big job is that, plus injectors I think...).
Here's some video and photos of today.
[YOUTUBE]http://www.youtube.com/watch?v=v8eW94hHEos[/YOUTUBE]
[YOUTUBE]http://www.youtube.com/watch?v=nfVbp8AhwWg[/YOUTUBE]
Clogged vacuum hose thing:
This is a flathead after I stuck it into the manifold and gave it a short twist...CAKED with BLACK CRAP:
Back in action:
The only leaking so far...think it's the steering damper:
Last edited by Philbert; 07-10-2010 at 03:45 PM. Reason: hit 'enter' too soon before pics were done loading :)
07-10-2010, 04:01 PM
#130
WOOOOOO HOOOOOOOOOO! Looks and sounds GREAT, my friend! My pump actually leaks and it was TOTALLY fooling me into thinking it was the pan or sender again, hahaha. It drips down in weird pathways to wind up on the rear/bottom of the front Diff. Used some Lucas with Stop leak, seeing as it was a lil low, and I CAN'T SEEM TO GET IT TO LEAK ANYMORE! hahaha. Yeah, that's perfectly fine with me, for now. NOT CHEAP< lol.
Yeah, love the Zuks so far, and I can EASILY change it back with a simple weld. So no worries, thanks! I did a video I'm going to add to my troubleshooting thread. I already posted some pics of it, but it's looking SO much and feeling SO much better!
Thanks for the inspiration, Phil! Glad you're happy with your rig! btw, ...DANG, it looks so much lower, and level. Those different tires than what were on there in the first pics when you did the Zuk? LOOKS GREAT! Ride better with the Torsion Bars cranked down?
07-10-2010, 04:15 PM
#131
Registered User
Thread Starter
iTrader: (2)
Join Date: Dec 2009
Location: Pleasanton, CA - SF Bay Area
Posts: 2,159
Likes: 0
Received 7 Likes
on
5 Posts
thanks Chef!
that's crazy about your leak...always fun to track things down,eh?
It's the same tires as I've had for years, since I got the lift done. I really haven't driven it much - just a couple hundred feet. Will try to take on some "around town" short trips in the coming days to break it back in. I like the look - a lot more level.
Take it easy!
07-10-2010, 04:38 PM
#132
Registered User
Looks good Phil. The stance looks nice and level too!!
07-11-2010, 08:51 AM
#135
thanks Chef!
that's crazy about your leak...always fun to track things down,eh?
It's the same tires as I've had for years, since I got the lift done. I really haven't driven it much - just a couple hundred feet. Will try to take on some "around town" short trips in the coming days to break it back in. I like the look - a lot more level.
Take it easy!
that's crazy about your leak...always fun to track things down,eh?
It's the same tires as I've had for years, since I got the lift done. I really haven't driven it much - just a couple hundred feet. Will try to take on some "around town" short trips in the coming days to break it back in. I like the look - a lot more level.
Take it easy!
HOPE YOU'RE HAVING FUN, Phil, ....and most important; NO LEAKS! ???
12-30-2010, 09:26 AM
#136
Registered User
Thread Starter
iTrader: (2)
Join Date: Dec 2009
Location: Pleasanton, CA - SF Bay Area
Posts: 2,159
Likes: 0
Received 7 Likes
on
5 Posts
OMG, so I had to look up this thread to remind myself how to get the oil pan back in, since I'm having trouble finding room....I removed the bolts, but while the truck was sitting and not jacked up, so the arm doesn't pull down as much....now I know what to do.
Funny, because the leak I thought was my steering damper (above photo) is actually the head gasket leak I'm trying to fix this week And, ironically, I snapped my OEM steering damper off while wrestling with the hardware to make room for the pan today.....and I'd bought a new Monroe one last month. I just need to figure out how to get the damn (broken off) piece off, to make room for my new unit....I've tried hammer and chisel/prying/etc - nothing is moving. Any tips?
Funny, because the leak I thought was my steering damper (above photo) is actually the head gasket leak I'm trying to fix this week
And, ironically, I snapped my OEM steering damper off while wrestling with the hardware to make room for the pan today.....and I'd bought a new Monroe one last month. I just need to figure out how to get the damn (broken off) piece off, to make room for my new unit....I've tried hammer and chisel/prying/etc - nothing is moving. Any tips?
12-30-2010, 07:20 PM
#137
Registered User
did u ever check the thermostat??? it sounds like it closed up and caused it to pressure up mixed with a bad radiator cap causing it to leak out the water pump area,when u first pulled over where the hoses stiff or mushy? have u used a strait edge on the water pump or cover to make sure u flat or level?? might have space some where and when it over heated it blew out the gasket to let it leak....
just some thoughts...
just some thoughts...
12-31-2010, 08:14 AM
#138
Registered User
Thread Starter
iTrader: (2)
Join Date: Dec 2009
Location: Pleasanton, CA - SF Bay Area
Posts: 2,159
Likes: 0
Received 7 Likes
on
5 Posts
Thanks Justin - when I did the timing cover earlier this year, I replaced the T stat as a precaution since it was cheap. Just to catch everyone up, I got the water pump issue fixed...this week I was addressing an oil leak where my head meets the top of the timing cover - I had cut out the old part of the Head Gasket last time i did this, since it was mangled. Now, the oil leak is slowed, but I'm leaking from the drivers side back water pipe (same place I had the coolant leak earlier this year....ARGH!!!! At least it won't require the timing cover to come off again when I go to put in a beefier gasket. Any recommendations on how best to get that pipe free from the block to elicit some "play" where the pipe flange meeets the back of the timing cover?
And, I got the steering damper eye off finally - got a pickle fork kit and went to town. Almost took out my teeth when it popped out!! Install of new Monroe damper took about 5 minutes Sigh.....
And, I got the steering damper eye off finally - got a pickle fork kit and went to town. Almost took out my teeth when it popped out!! Install of new Monroe damper took about 5 minutes
Sigh.....


