
No more Yota
 12-26-2008, 04:16 PM
#101
Registered User
Thread Starter
Join Date: May 2007
Location: Tabernacle, NJ
Posts: 538
Likes: 0
Received 0 Likes
on
0 Posts
I'll be pulling the ifs parts apart soon, send me pm's with what you're interested in and I'll get back to you. Yeah I just sort of eye balled the pinion angle, I got it to where it looked perfectly lined up with the tcase with the weight of the truck on the springs then tapped it back down a few degrees to where I guessed the springs would eventually settle at.
Brian you mentioned clamps that you used for the brake lines to keep them from vibrating, where'd you get them and what're they called
Brian you mentioned clamps that you used for the brake lines to keep them from vibrating, where'd you get them and what're they called
 12-26-2008, 04:31 PM
#102
I'll be pulling the ifs parts apart soon, send me pm's with what you're interested in and I'll get back to you. Yeah I just sort of eye balled the pinion angle, I got it to where it looked perfectly lined up with the tcase with the weight of the truck on the springs then tapped it back down a few degrees to where I guessed the springs would eventually settle at.
Brian you mentioned clamps that you used for the brake lines to keep them from vibrating, where'd you get them and what're they called
Brian you mentioned clamps that you used for the brake lines to keep them from vibrating, where'd you get them and what're they called
http://www.pirate4x4.com/forum/showt...082&highlight=
 12-26-2008, 09:46 PM
#103
Registered User
Thread Starter
Join Date: May 2007
Location: Tabernacle, NJ
Posts: 538
Likes: 0
Received 0 Likes
on
0 Posts
cool, I have enough backing plates laying around with the tabs on them, I'll just cut them off and weld one to the frame and one to the steering arm.
Tonight's progress
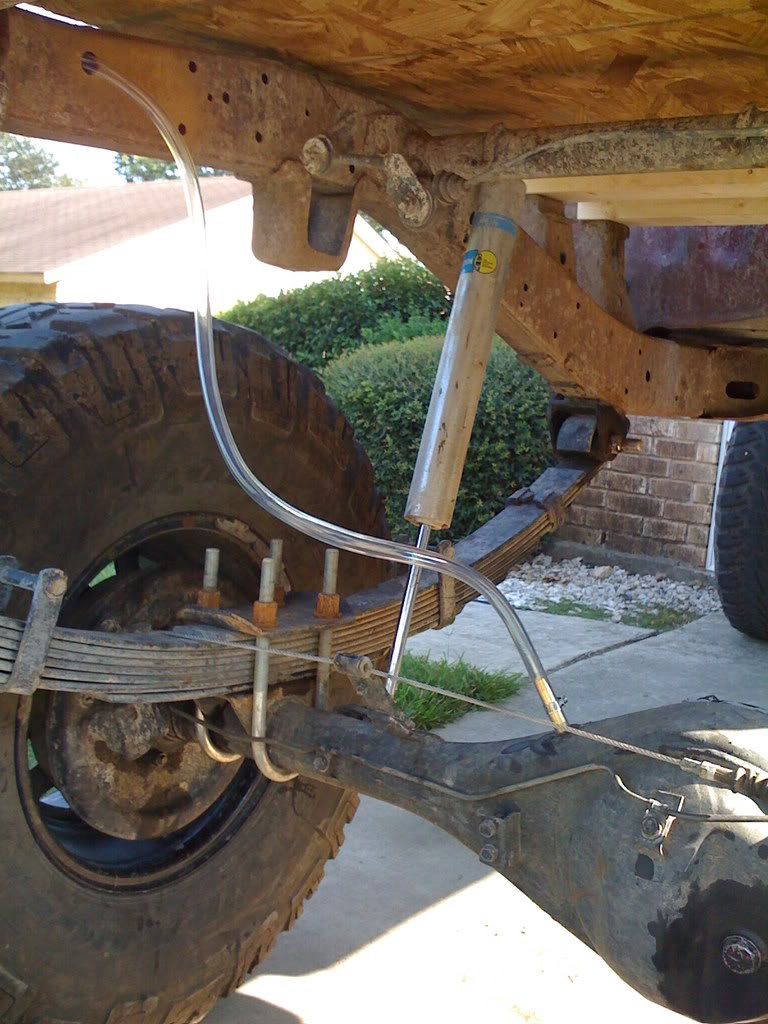
Rear end done. I'm thinking I should have gone with 10" shocks instead of 12 since I'm running them in the stock location... won't know until I start flexing I guess but they look too long.

Adjusting the tie rod.

Checking tie rod/draglink clearance. They look REALLY close. It's hard to tell if they're overlapping enough to touch. Again, won't know until I start flexing the suspension. Definitely close enough that a 3/4 pittman arm would probably do the job.


Stabilizer on

This leaves shock hoops, front brakes, and the driveshaft.
Tonight's progress
Rear end done. I'm thinking I should have gone with 10" shocks instead of 12 since I'm running them in the stock location... won't know until I start flexing I guess but they look too long.
Adjusting the tie rod.
Checking tie rod/draglink clearance. They look REALLY close. It's hard to tell if they're overlapping enough to touch. Again, won't know until I start flexing the suspension. Definitely close enough that a 3/4 pittman arm would probably do the job.
Stabilizer on
This leaves shock hoops, front brakes, and the driveshaft.
12-27-2008, 06:30 AM
#105
You need to clean the inside of the frame and cut off the excess on the u-bolts. 
I have 10" shocks on the rear of my 85 4Runner, but 12"s on the rear of my 85 ext cab...just kinda depends. I usually mount the rear lower shock mounts at about 10 and 2 o'clock respectively.
Glad you are almost through?
I have 10" shocks on the rear of my 85 4Runner, but 12"s on the rear of my 85 ext cab...just kinda depends. I usually mount the rear lower shock mounts at about 10 and 2 o'clock respectively.
Glad you are almost through?
12-27-2008, 05:07 PM
#106
Registered User
Thread Starter
Join Date: May 2007
Location: Tabernacle, NJ
Posts: 538
Likes: 0
Received 0 Likes
on
0 Posts
Yeah the front u-bolts hit the bump stops before the pad does, I'm still working on torquing them down. I'll cut them all off when I get the front shocks mounted. The hardware store was closed today and I don't have any nuts and bolts for them lol.
Cut off the part of the bumper brackets that interfered with the front hanger. I'll make a couple triangle gussets to run between the bottom of the bumper and the front crossmember/spring hanger to strengthen it.
My 33's look so pathetic.


What a mess.
Cut off the part of the bumper brackets that interfered with the front hanger. I'll make a couple triangle gussets to run between the bottom of the bumper and the front crossmember/spring hanger to strengthen it.
My 33's look so pathetic.
What a mess.
Last edited by Beaniam; 12-27-2008 at 05:10 PM.
 12-27-2008, 06:12 PM
#110
Registered User
Lolz, I like how the beginning of this thread is a wreck and it says no more...
Then, and I know this isnt the ending..but here, You fixed the damage from the wreck, made it look even better then before..and now you SASed it...WOW...
Lookin good man

Then, and I know this isnt the ending..but here, You fixed the damage from the wreck, made it look even better then before..and now you SASed it...WOW...
Lookin good man
12-27-2008, 06:58 PM
#112
Registered User
Join Date: Jul 2008
Location: Vancouver
Posts: 73
Likes: 0
Received 0 Likes
on
0 Posts
WOW nice looking SAS.
i got a similar set up on my double cab. although it was not SASed it was factory solid axle. but i got the 5" Trail Gear springs with 35" Goodyear MTR's and i get some pretty good rub. i've cracked all my flares and pushed up my fenders from the rubbing. don't exactly wanna get out the sledge hammer cuz i know someone that did that and it made his runner leak water into the cab cuz he broke all the seams.
A question for you though. since you did all the fab work and used the trail gear kit how come you didn't triangulate your rear shocks?

overdrive
i got a similar set up on my double cab. although it was not SASed it was factory solid axle. but i got the 5" Trail Gear springs with 35" Goodyear MTR's and i get some pretty good rub. i've cracked all my flares and pushed up my fenders from the rubbing. don't exactly wanna get out the sledge hammer cuz i know someone that did that and it made his runner leak water into the cab cuz he broke all the seams.
A question for you though. since you did all the fab work and used the trail gear kit how come you didn't triangulate your rear shocks?
overdrive
12-27-2008, 07:12 PM
#113
Registered User
Thread Starter
Join Date: May 2007
Location: Tabernacle, NJ
Posts: 538
Likes: 0
Received 0 Likes
on
0 Posts
Do you get more rear articulation like that? Right now my springs are still stiff so my shocks don't seem to be limiting my travel yet. I guess after they break in I may do that if they are causing problems.
 12-28-2008, 06:34 PM
#116
Registered User

Join Date: Sep 2006
Location: South
Posts: 2,094
Likes: 0
Received 0 Likes
on
0 Posts
Yeah you get more shock travel when you do em like that. I need to do that also...
You'll also need to get yourself a piece of square or round tube to "triangulate" it, unless you plan on jerry-riggin it to that spare tire tube thingamajigger.
You'll also need to get yourself a piece of square or round tube to "triangulate" it, unless you plan on jerry-riggin it to that spare tire tube thingamajigger.
12-29-2008, 01:34 PM
#117
Registered User
Thread Starter
Join Date: May 2007
Location: Tabernacle, NJ
Posts: 538
Likes: 0
Received 0 Likes
on
0 Posts
Thanks to all the other people that posted sas threads that I stole ideas from, thanks to clint and brian for answering my string of never ending questions. You guys were a big help. I did this entire job myself so I wanted to make sure I only had to do the work once.

On to more pics.
Heard some awful racket when I started climbing hills. U-joint ears on the cv section of the front driveshaft was hitting my skid plate.

Cut off wheel took care of that. I also trimmed the cab body mounts so the front shackles didn't hit them while I was at it.

I'm really amazed at how easy the front driveshaft was to make. Literally took me all of 15 minutes to make it with a chop saw and the trailgear 12" long spline kit. Measure, chop old driveshaft, tap flange into cut section of driveshaft, weld. Done. I'm kind of impressed with my welding on the driveshaft too. I only started welding 6 months ago

Definitely have to triangulate the rear shocks. No question about that.


In the next couple weeks I'll be adding a cross bar to triangulate the rear shocks, either an all pro or sky transfer case e-brake, washing it and adding some wabfab stickers. lol
On to more pics.
Heard some awful racket when I started climbing hills. U-joint ears on the cv section of the front driveshaft was hitting my skid plate.
Cut off wheel took care of that. I also trimmed the cab body mounts so the front shackles didn't hit them while I was at it.
I'm really amazed at how easy the front driveshaft was to make. Literally took me all of 15 minutes to make it with a chop saw and the trailgear 12" long spline kit. Measure, chop old driveshaft, tap flange into cut section of driveshaft, weld. Done. I'm kind of impressed with my welding on the driveshaft too. I only started welding 6 months ago
Definitely have to triangulate the rear shocks. No question about that.
In the next couple weeks I'll be adding a cross bar to triangulate the rear shocks, either an all pro or sky transfer case e-brake, washing it and adding some wabfab stickers. lol
Last edited by Beaniam; 12-29-2008 at 01:43 PM.
12-29-2008, 06:14 PM
#120
Registered User
Thread Starter
Join Date: May 2007
Location: Tabernacle, NJ
Posts: 538
Likes: 0
Received 0 Likes
on
0 Posts
Thanks, yeah it's time for a non ifs avatar. Got that prefilter from an air compressor supply store for $25 lol. I think it's the same thing ARB sells for $90.


