Mysterious 22re power loss! Ooooooh!
 11-26-2011, 06:13 PM
#61
Registered User
Thread Starter
K, here's an update. Fuel pressure test- Perfect, right at around 35psi at idle, around 40 accelerating. Tried advancing timing to 8 or 9 degrees. No change. It is burning quite a bit of oil. I'm starting to think that despite the decent compression, the engine is just really tired. Any other ideas?
 11-27-2011, 12:44 PM
#64
Registered User
Thread Starter
Thanks for the input guys, i'll check out the coil tomorrow. So i had an idea today. I remembered that when i replaced the intake manifold with the newer style with integrated IAV, i also replaced the thermostat housing with one that i had cleaned up. The old thermostat housing had the sensor in it, the new one did not. I did some research here on YT and found that the consensus was that the switch was either for A/C or automatic transmission. I found it odd that my truck had that sensor, despite being a 5 speed with no A/C. I disconnected it, taped it off, and hung it down below out of the way. Today i decided to find out once and for all what that sensor was for, seeing as i'm at a loss with my problem. I looked through the wiring diagrams in the fsm and found this:
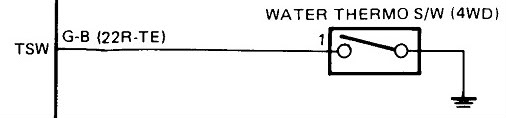
Apparently that sensor is only there for the TURBO models. Is it possible that my truck originally had a 22rte and someone swapped it out for a 22re? That would certainly explain the power loss. A turbo ECU trying to run an N/A motor is going to have incorrect fuel management and spark timing maps. Ideas, feedback? Anybody have part numbers to check which ECU i have? Or any other info on that sensor?
Apparently that sensor is only there for the TURBO models. Is it possible that my truck originally had a 22rte and someone swapped it out for a 22re? That would certainly explain the power loss. A turbo ECU trying to run an N/A motor is going to have incorrect fuel management and spark timing maps. Ideas, feedback? Anybody have part numbers to check which ECU i have? Or any other info on that sensor?
11-28-2011, 04:20 PM
#66
Registered User
Thread Starter
No such luck. Can anyone think of why in the world my truck would have that sensor from the factory if it's a non turbocharged, non A/C, Manual truck?
11-28-2011, 04:43 PM
#67

The turbo trucks have Two sensors in the t-stat housing. One for Turbo specific trucks with A/C.
The sensor you are talking about is Water Temp #2 and it is common to all 22re/22rte's...Google will probably bring up some results on that. It is a fuel pressure up switch and it is for heatsoak/hot starts if i remember correctly
The new one was probably from a 22r….
The sensor you are talking about is Water Temp #2 and it is common to all 22re/22rte's...Google will probably bring up some results on that. It is a fuel pressure up switch and it is for heatsoak/hot starts if i remember correctly
The new one was probably from a 22r….
Last edited by jeetS; 11-28-2011 at 04:45 PM.
11-28-2011, 05:18 PM
#68
Registered User
Thread Starter
Ahhhhh, so that's the one that sends the signal to the the fuel pressure vsv? That makes sense. 10 points to jeetS! That's weird, i've googled it multiple times and never come up with anything other than people's opinions on what it's for. If you search for "22re" or "22re thermostat housing" on google images, it seems about 2/3 don't have the sensor. The one that i put on came from an 89' 22re. It must be only for certain years. Any other ideas why my 22re is SOOOOOOOO SLOOOOOOOOOOOOW?!?!?
02-23-2012, 07:59 PM
#69
Registered User

About 6 years ago I bought a 87 4runner that was in great shape. It started up and ran with no problems. I thought, cool, I got a great buy for it. Only 1500 bucks. Well anyway, I had to drive it from NH to my house in NY. It had just under 190000 miles on it. The 22RE engine was week, going slow on the flats and forget about driving it up the inclines. As you said at the beginning of your post that you couldn't go over 65mph, burning oil, same here. I ended up taking it to a great mechanic and he told me that the engine was just wore out. I ended up getting a long block and put it in. All the power with the torque. Was worth the money. I hope I helped you out, even though it's not what ya wanna hear, spending that kind of cash.
 03-08-2012, 10:02 PM
#71
Registered User
Thread Starter
Finally figured it out! Well, at least the rattling noise. I was driving around 45MPH on the highway in 5th gear, and a rod decided to play peek a boo through the side of my block! I was just coasting, not even under power. Apparently my engine was made on a friday afternoon at 4:30, because one of the connecting rod cap nuts was MISSING!!!!! I don't know how long it ran like that , but i know there was no nut on there because one side snapped the bolt in half and the other was bent at a 45 degree angle, but NO NUT. I'll be sure to put a picture up, it's pretty crazy. So new short block time, i'm going to try to get out of this on a starving college student budget.
03-08-2012, 10:10 PM
#72
WOW, that's crazy!(Nope, NO WAY I'ma say "that's nuts"), hahaha....
Well, you're on it like a wet blanket, that's good.... But, I'm sorry it had to happen. Best wishes on finding a healthy shorty/good crank/etc.!
If you were out here, I'd point ya to the cheapest, yet best built rebuild place around... Hopefully you have a good machinist?
Take care
Well, you're on it like a wet blanket, that's good.... But, I'm sorry it had to happen. Best wishes on finding a healthy shorty/good crank/etc.!
If you were out here, I'd point ya to the cheapest, yet best built rebuild place around... Hopefully you have a good machinist?
Take care
03-08-2012, 10:24 PM
#73
Registered User
Thread Starter
So here's my situation as it stands right now: I picked up a "Rebuildable" short block from the salvage yard here in town for $100 bucks. When i got the head off before i took it home i got super excited because i could still see the factory cross hatching! It looked like it had already been rebuilt (New water pump, timing set, oil pump, etc). I got so excited, in fact, that i neglected to make sure the crankshaft would turn! Got it home, went to take the pistons out for a re ring and bearing replacent, and it was frozen SOLID! What the heck! The case was full of oil, what's wrong! Had to pound a hammer on my ratchet to even get the thing to turn enough to get the caps off. Number 1 bearing was TOAST. Lots of bearing material seemingly fused to the journal. Well shoot, what now? I let it sit for a day to think about it. So then i get this idea: Crankshaft journal= hard, durable steel. Bearing material= soft, sacrificial metal (I think you all know where this is going). Here's what i did: took some 220 grit sandpaper and cut a long strip of it the width of the journal. I wrapped the sandpaper around the journal, and pulled the ends back and forth, constantly changing the angle i was pulling on from left to right, trying to keep it as round as possible. I rotated the crankshaft every ten seconds of sanding or so, and only did enough to take the soft bearing material off. There were NO scratches or gouges in the crankshaft, and after wet sanding with 2000 grit sandpaper, it looks every bit as good as the other journals. I'm thinking i might just run it as is, i don't think i could have possibly taken off more than just 1 or 2 thousandths of material off (I wasn't pulling very hard on the sandpaper), does anyone have an opinion on this? I believe it's plenty smooth, my only real concerns are it being too far out of round or too small now. I got a quote from a local machine shop to machine it for $95, which i know is the right way to do it, but if i can avoid that, i'd love to  . Any suggestions from actual experience with this? I found a thread here on YT where someone had sucess with this exact thing without even the advantage of having the engine out : https://www.yotatech.com/forums/f114...motors-245164/
. Any suggestions from actual experience with this? I found a thread here on YT where someone had sucess with this exact thing without even the advantage of having the engine out : https://www.yotatech.com/forums/f114...motors-245164/
03-08-2012, 11:27 PM
#74
I honed mine out on a specialized machine at the machine shop/my machinist did one to show me(The rod and main bearing journals. Installed the caps on both and they were, INDEED, a TEENY bit wacked/out of round, lol.... Ordered the proper bearings for my 10-10 Crank I had done by a good shop for 50$ and slapped it together....... TURNED LIKE FRESH CREAM/HOT BUTTER! lol)
I would at least have them mic'd out in front of you and be sure the Main and Rod journals/caps aren't toast. Drop off the crank, as well, and see if it's even salvageable and go from there? You need to know all this in order to order the right internals for the kit, anyway, ya know?(Unless you're going to mic/dial indicator it out really well?)
I would at least have them mic'd out in front of you and be sure the Main and Rod journals/caps aren't toast. Drop off the crank, as well, and see if it's even salvageable and go from there? You need to know all this in order to order the right internals for the kit, anyway, ya know?(Unless you're going to mic/dial indicator it out really well?)
03-10-2012, 05:30 PM
#75
Registered User

Join Date: Feb 2011
Location: Central Illinois, USA
Posts: 31
Likes: 0
Received 0 Likes
on
0 Posts
Take the crank to a reputable crankshop rebuilder to be ground 10/10. Get the rods resized as well and buy new bolts/nuts. Don't skimp on the bottom end or you'll ventilate another block. If it is a standard shift truck, make sure the end play is within spec too.
03-11-2012, 06:33 PM
#76
Registered User
Thread Starter
I've already dropped the crank off at the machine shop, but here's a theoretical question; If the crank not perfectly smooth polished (Say 2000 grit sandpaper smooth) or WAS out of round a thousandth or two, how much of a difference would it REALLY make? There's a layer of oil separating it from the bearing anyways, wouldn't that account for it? How long would would you think a motor like that would last?
03-11-2012, 06:52 PM
#77
Registered User
Join Date: Feb 2011
Location: Central Illinois, USA
Posts: 31
Likes: 0
Received 0 Likes
on
0 Posts
Think about it: In theory the bearing never touches the journal of the crank, but rides on a microscopic thin film of oil. If the journal is out of round by .001 or .002, then the high spot on the crank will be swiping the oil clean off the bearning. On anything more sophisticated than a Briggs and Stratton lawn mower engine the results will be catastrophic.
Further, the crank rebuilder will also hot tank the crank and get all the old bearing mung out of the internal oil passages.
I might also suggest you have the block hot tanked as well since it is likely that the mung has spread itself throughout the internal oil galleys there too. Pull the oil pump and take it apart and look for scoring.
It doesn't take much to render a rebuild useless. You can cut corners but it usually ends up badly.
Just my opinion, mind you...
Ciao,
kip
03-12-2012, 04:03 AM
#79
Registered User
Join Date: Feb 2011
Location: Central Illinois, USA
Posts: 31
Likes: 0
Received 0 Likes
on
0 Posts
Check the head for straightness. Obviously new rings when you put it back together, maybe just ball hone the cylinders to scuff them up.
Anyone else out there have suggestions for essentials for the bottom end to last?
Anyone else out there have suggestions for essentials for the bottom end to last?
03-12-2012, 10:31 AM
#80
Hey Offcamber, OP, ...
Liked what you posted.... I'd just add the details, if he's taking part/doing the machining......
1. Hot tank, then REALLY ream out the oil galleys/passages and water jackets, thoroughly, after the bore/hone.
2. Then, immediately hot tank again and hit it with the air RIGHT away.
3. Lightly oiled lint free towelettes in the cyl's and journals, stopping any rust from forming and debris removal
4. MAKE SURE you follow the installation instructions of the bearings with assembly lube, then IN ORDER of reassembly, turning the crank over each Cap install. (Before EVERYTHING, label all your caps, and if you don't use new bolts, try to keep them all where they go..... But I agree, I'd replace em, considering the cost)
5. Chase allllllll the threads out well for the caps/head bolts, etc.,(I would do it before you hot tank and ream out the oil galleys, water jackets, etc.,.... flushing those out well, also.
6. DO NOT soak the cyl's with oil for ring/piston install. Do a lil research, but I just lightly rubbed oil over the rings and a light coat in the holes, rubbed in by a lint free towelette.
7. If you're installing a new CAM, get some cam lube and do the break in properly, according to the manufacturer.
I have more for the assembly of the motor on the whole, but that is just some tips.
Round out everything as he suggested, above, and then check them with a dial indicator(most machines that do the bore/honing of rod and crank journals will indicate that by sound/feel/even their own indicators... But you can do it if you're dropping them off for that, too. Do the same in the cyl's.... they CAN be out of round and even larger in the center, etc.... You just want it to be negligible, ya know? (ALL books tell you what is 'acceptable').


