
Broke down in the '86 yesterday...gathering input
 Feb 11, 2008 | 08:30 AM
#101
Thread Starter
Registered User
Joined: Sep 2005
Posts: 8,656
Likes: 16
From: NW Ark on wooded ten acres...Ozarks at large!
Thanks, TN. Everything's going pretty smoothly so far.
Feb 12, 2008 | 04:18 PM
#102
Thread Starter
Registered User
Joined: Sep 2005
Posts: 8,656
Likes: 16
From: NW Ark on wooded ten acres...Ozarks at large!
Tore into the motor some more today. Check all the rod journals and pulled the rest of the pistons. The bearings had normal wear for the most part. Some light scratching undetectable by the fingernail, but smooth as glass on the journals. All the tolerances (which i have written down in my manual still at the shop) checked on the tight end of the specs. When I got to the mains, the thrust washers had normal wear a fell within spec. However, I didn't bother checking the oil clearances because four of the bearings had some decent scoring. Probably....almost positive....came from all the timing chain shrapnel. The main journals are all real smooth, but on the fourth you can see slight scoring. The surface is still smooth, though. Just looks discolored. Maybe it's from oil "concentrated" in that particular area and varnished...as opposed to actually scored. Hell.....I don't know...lol. Didn't have time today, so tomorrow now that it's all apart, I will go down to Don's, get his opinion, and throw some gauges on it.
I got some pics of everything, but the shop light on my side was intermittent. So, the lighting was poor. I'll see how it turns up once they're loaded on the computer.
More tomorrow. I'm bushed.
I got some pics of everything, but the shop light on my side was intermittent. So, the lighting was poor. I'll see how it turns up once they're loaded on the computer.
More tomorrow. I'm bushed.
Last edited by thook; Feb 12, 2008 at 08:25 PM.
 Feb 13, 2008 | 06:27 AM
#104
Thread Starter
Registered User
Joined: Sep 2005
Posts: 8,656
Likes: 16
From: NW Ark on wooded ten acres...Ozarks at large!
Hoho...haha...hehe...engh....
Eh, man....you know how it goes. I'll keep at her......maybe, if I bake her something nice?
Like I said, the pics I got yesterday sucked.....really. I'll get some better ones today while the light is actually working....lol!
Eh, man....you know how it goes. I'll keep at her......maybe, if I bake her something nice?
Like I said, the pics I got yesterday sucked.....really. I'll get some better ones today while the light is actually working....lol!
Feb 16, 2008 | 03:47 PM
#105
"pete f passed away quietly in his sleep on July 13, 2008
Joined: Apr 2007
Posts: 190
Likes: 0
From: Montauk ny/Catskill Mts in winter
how about a progress report?
Did you bake your wife a cake?.... How goes the struggle? Hope things are all good.
Feb 16, 2008 | 06:19 PM
#106
Thread Starter
Registered User
Joined: Sep 2005
Posts: 8,656
Likes: 16
From: NW Ark on wooded ten acres...Ozarks at large!
Hey Pete.....in fact, I did. Chocolate with cream cheese/walnut frosting. As she says,"The cake is just a good excuse to eat the icing!". She likes my icings...
The struggle is going well enough. The only real problem I'm having at the moment is sourcing the bearings I want. I've been doing a lot of research on bearing materials and design and manufacturers. I'm fairly well settled on getting some Clevite 77's, but it's been a bugger trying to find them. NAPA's computer "said" they had them, so they ordered them. Only when I went to pick them up, the box said Federal-Mogul. Turns out NAPA no longer carries Dana Corp. products, but their computer doesn't reflect the change, yet. So, when they ordered the Clevites, their warehouse computer automatically just cross referenced the part #'s over to the Fed-Mog's without notifying the retailer of the switch....hence Fed-Mog's were sent in replacement.
Anyway, there is one place down in Ft. Smith that does have them...the Clevites...but, they're a fair drive down to get them in a town that I'm not too familiar with driving in. It's easy to get lost there. As a result, going Ft. Smith was a last resort. Hell....it looks like I'll be going down there anyway! Lol! Hopefully, early this week. We'll see how activities fall in place. Lots going on around here. Right now, I'm considering modifying my house into a pontoon boat. Lots and lots of rain!!!!
The motor progress....
Tues. through Thurs. I spent my time checking tolerances, cleaning, honing, and taking parts down to Don Clark for him to look at. He said that aside from the scarring on the main bearings, everything looked beautiful....just what he'd expected, really. (He knows he well I treat my machinery.... ) He even said I could actually reuse my old bearings considering the tolerances were so tight and the wear was so even.....if I chose to! But, hey....it's all apart... the bearings are damaged....it's a good idea...so, might as well replace them. The thrust washers hardly have any wear on them, so I won't replace them. I do need a repair sleeve on the flywheel flange. I put a new oil seal on it last Jan....installed it just fine...but, the thing still leaked. The flange (or whatever it's called) wears from constant contact and friction with the seal. Grooves get worn into it, so no amount of new seals will ever stop it from leaking without sleeving it.
Ah...what else? I need a new clutch slave cylinder, a few new coolant hoses, I'm going to paint the motor anyway (biting the financial bullet...dern it!), and...at some point.... a new fan clutch. So far, everything else looks good. And.....we just took in some donations and made some money at our flea market booth! So, it's all working out rather well. This is going to be what I'd call a rather easy rebuild.....not without thanks to the boys at D&S. Air tools, baby!!!
The struggle is going well enough. The only real problem I'm having at the moment is sourcing the bearings I want. I've been doing a lot of research on bearing materials and design and manufacturers. I'm fairly well settled on getting some Clevite 77's, but it's been a bugger trying to find them. NAPA's computer "said" they had them, so they ordered them. Only when I went to pick them up, the box said Federal-Mogul. Turns out NAPA no longer carries Dana Corp. products, but their computer doesn't reflect the change, yet. So, when they ordered the Clevites, their warehouse computer automatically just cross referenced the part #'s over to the Fed-Mog's without notifying the retailer of the switch....hence Fed-Mog's were sent in replacement.
Anyway, there is one place down in Ft. Smith that does have them...the Clevites...but, they're a fair drive down to get them in a town that I'm not too familiar with driving in. It's easy to get lost there. As a result, going Ft. Smith was a last resort. Hell....it looks like I'll be going down there anyway! Lol! Hopefully, early this week. We'll see how activities fall in place. Lots going on around here. Right now, I'm considering modifying my house into a pontoon boat. Lots and lots of rain!!!!
The motor progress....
Tues. through Thurs. I spent my time checking tolerances, cleaning, honing, and taking parts down to Don Clark for him to look at. He said that aside from the scarring on the main bearings, everything looked beautiful....just what he'd expected, really. (He knows he well I treat my machinery....
) He even said I could actually reuse my old bearings considering the tolerances were so tight and the wear was so even.....if I chose to! But, hey....it's all apart... the bearings are damaged....it's a good idea...so, might as well replace them. The thrust washers hardly have any wear on them, so I won't replace them. I do need a repair sleeve on the flywheel flange. I put a new oil seal on it last Jan....installed it just fine...but, the thing still leaked. The flange (or whatever it's called) wears from constant contact and friction with the seal. Grooves get worn into it, so no amount of new seals will ever stop it from leaking without sleeving it.Ah...what else? I need a new clutch slave cylinder, a few new coolant hoses, I'm going to paint the motor anyway (biting the financial bullet...dern it!), and...at some point.... a new fan clutch. So far, everything else looks good. And.....we just took in some donations and made some money at our flea market booth!
So, it's all working out rather well. This is going to be what I'd call a rather easy rebuild.....not without thanks to the boys at D&S. Air tools, baby!!!
Feb 16, 2008 | 06:53 PM
#107
"pete f passed away quietly in his sleep on July 13, 2008
Joined: Apr 2007
Posts: 190
Likes: 0
From: Montauk ny/Catskill Mts in winter
Air tools rule. Sounds good Matthew you sound pleased with the progress. I was at the tank cleaning place Thursday and Friday.I was tinking about you. We got the rain here after the snow . It made the shoveling hard like shoveling cement. It's all be over in a couple of weeks. Yeah !!!!!
Feb 16, 2008 | 06:54 PM
#108
hey Matthew, slow and steady, that is good. are you going to replace those coolant lines under the intake. you know the ones that are out of sight. we here at Yota Tech really, and i mean really appreciate all the pictures, so keep them coming
Feb 18, 2008 | 05:10 AM
#109
Thread Starter
Registered User
Joined: Sep 2005
Posts: 8,656
Likes: 16
From: NW Ark on wooded ten acres...Ozarks at large!
Air tools rule. Sounds good Matthew you sound pleased with the progress. I was at the tank cleaning place Thursday and Friday.I was tinking about you. We got the rain here after the snow . It made the shoveling hard like shoveling cement. It's all be over in a couple of weeks. Yeah !!!!!
Yeah, Spring will be here soon. I'm very much ready for it, too!The air tools were a real boon. I was able to get the block clean enough to even consider painting it. I was doing it all by hand when one of the guys came over with an air tool and scouring attachment and started polishing the oil pan mating surface. I set my razor blade down, looked at him and thought,"Thanks. Now you tell me!"....

 ....lol!
She's going to load them up for me. I swear. Was going to do it yesterday, but we've just been real busy.
Slow and steady is good......agreed.
I'd like to be further along than I am, but this way I'm learning all about the process and making more informed choices as opposed to just following some directions and slappin' it all back together. Not that I really ever do things in that way, but it's true.....having distance from the project here and there really gives you time to think about everything you're doing. I've made it a fun, little mental excercise picturing how everything with the motor works and how it all goes together. I've got pictures taken, but I'm going to rely more on my memory when I go to reassemble everything. I know....I'm a geek. Yes....I'm replacing all but the heater and lower and top rad hoses since they're already new. From the looks of them, I'm betting the old ones are all original from the factory. Squishy....

I have too much to do today to get to the motor, but I've got some nice days ahead starting tomorrow to make a lot of progress. I intend to take more pictures and conclude this thread with a write-up....pics, thoughts, comments, discoveries, etc. I'm sure none of the info is new to folks that have done this all before, but there are those who haven't, of course.
Mar 5, 2008 | 08:04 AM
#111
Thread Starter
Registered User
Joined: Sep 2005
Posts: 8,656
Likes: 16
From: NW Ark on wooded ten acres...Ozarks at large!
Haha....I keep at her. I even baked her another cake last night. I think I'm getting the raw end of the deal, though. She's still not loaded them. You guys must think I'm a real flake...lol. Well, that's okay. I'm corny, too. Just add milk. (Corn flake...get it? Lol....my jokes are as bad as tortis')
I have managed to get the block painted (aluminum....was going to go black, but makes it hard to see leaks, if they should occur) and clean and reinstall the crank along with the new main bearings. Yesterday, I had little time, but got atleast one piston (w/new rings...checked ring end gap, too) with it's new bearings. Within the past couple of days, I've gotten caught up on a few other non-related things, and since the weather's nice I should make good progress today. I'm shooting to get as far as putting the head back on. Then, the timing assembly tomorrow. Got some painting to do before that happens, though. Fortunately, engine paint dries pretty fast. Speeds assembly time a lot.
Thanks for asking, Gary. This hasn't been the most exciting thread, but I've learned a lot (more than imagined I would) about motors so far. So, it's been good. I'll post more updates tonight.
Mar 6, 2008 | 05:19 PM
#113
Thread Starter
Registered User
Joined: Sep 2005
Posts: 8,656
Likes: 16
From: NW Ark on wooded ten acres...Ozarks at large!
NOT FAIR!!!!!!
We are officially snowed in, thank you. So, guess what didn't happen today. No motor work..... And I'm soooo close. I've got the pics....I swear. I'm going to tape her to her chair until she loads them for me.
Yesterday, I did get all the pistons and remaining bearings in. I've got the head sitting atop the deck....gasket, rocker arm, and all....with the head bolts waiting to be torqued down. Then, it's on to the TC assembly and other front end stuff. The going ought to be faster from here on. Maybe I can have her running again next week.....if the weather holds out. Guess I better get those pics, eh? (You evil man!.... )
)
We are officially snowed in, thank you.
So, guess what didn't happen today. No motor work..... And I'm soooo close. I've got the pics....I swear. I'm going to tape her to her chair until she loads them for me. Yesterday, I did get all the pistons and remaining bearings in. I've got the head sitting atop the deck....gasket, rocker arm, and all....with the head bolts waiting to be torqued down. Then, it's on to the TC assembly and other front end stuff. The going ought to be faster from here on. Maybe I can have her running again next week.....if the weather holds out. Guess I better get those pics, eh? (You evil man!....
)
Last edited by thook; Mar 7, 2008 at 05:44 AM.
Mar 7, 2008 | 03:09 AM
#114
i dare you to take pics of her taped to the chair
i know you are a smart guy, but make sure the head gasket is on right. there is an oil return on the back left of the block that will leak. don't ask me how i know, i read about it, yess, thats the ticket. i read about it.
i know you are a smart guy, but make sure the head gasket is on right. there is an oil return on the back left of the block that will leak. don't ask me how i know, i read about it, yess, thats the ticket. i read about it.
Mar 7, 2008 | 06:47 AM
#115
Thread Starter
Registered User
Joined: Sep 2005
Posts: 8,656
Likes: 16
From: NW Ark on wooded ten acres...Ozarks at large!
Oh...there would be blood involved with that.....just to warn you. Like....uh....my blood. Ever seen that movie "Memento"? Yeah....like that.  (She doesn't like having her picture taken)
I payed attention putting it on. Made sure all the holes lined up correctly. But, come to think of it (thank you), I didn't clean the head surface with brake cleaner. There shouldn't be anything on it as it's been sitting in the cab of my truck with the cardboard still taped to it from the machine shop, but an ounce of prevention.... So, I'll pull it back off, clean it, and even get some pics of the new valves.....which I believe I neglected to do. Not like you'll get to see them any time soon...
(Now....where's my gorilla tape?....shuffle, shuffle.... Camera?.....check.....Hmmm....s'pose I oughta grab some suture while I'm at it. Yes, we'll surely need that.. )
(She doesn't like having her picture taken)I payed attention putting it on. Made sure all the holes lined up correctly. But, come to think of it (thank you), I didn't clean the head surface with brake cleaner. There shouldn't be anything on it as it's been sitting in the cab of my truck with the cardboard still taped to it from the machine shop, but an ounce of prevention....
So, I'll pull it back off, clean it, and even get some pics of the new valves.....which I believe I neglected to do. Not like you'll get to see them any time soon... (Now....where's my gorilla tape?....shuffle, shuffle.... Camera?.....check.....Hmmm....s'pose I oughta grab some suture while I'm at it. Yes, we'll surely need that..
)
Mar 27, 2008 | 07:51 PM
#116
Thread Starter
Registered User
Joined: Sep 2005
Posts: 8,656
Likes: 16
From: NW Ark on wooded ten acres...Ozarks at large!
Damn....computer crashed while updating. Rewrite!
As I was saying....
Pics haven't happened, yet.....of course. What can I do?
Anyhow, the motor is pretty much completely assembled on the stand. I have't torqued the complete plenum assembly down to the lower intake....waiting to actually get the motor in so I can run the injector harness and plug everything in. So, it's finger tightened on so as not the mush the gasket.
I spent a lot of time with it this week pretty much telling everything else it will have to wait. It's been long enough. My roof leaks, but .....hey...gotta have my truck back, eh? (The last serious storm did some damage to the housetop.)
I was going to get the motor in today since it was really ready to go in yesterday, but due to timing with the shop business.....towing calls, drive in customers, and appointed repairs....it wasn't going to happen. So, I figured I'd assemble today what I was waiting to do once the motor was in. Glad I did it, though. Some things were tricky to get at and would have been real biotch to do while in the vehicle. Well, I kinda did some bassackwards assemblying, but it's together. The clutch will have to wait when I get the motor off the stand and install it while it's dangling from the tow truck.
Once it's in, I still have to do the fuel line, starter, injector harness, down pipe, etc., but none of this can happen until next week. Hopefully Monday....but, probably Tues. We'll see.
Like I said, I've got the pics. Wish you all could see them now. I chose three colors. Red, black, and aluminum/silver.....keeping in line with the vehicle body and chassis. Looks perty! Ha! This old coot that came into the shop today and looked at my motor whilst I was pluggin' away at it. He said,"Well, atleast you have a clean motor". I looked at his truck....I think he's a Chevy guy.
Later, gents!
As I was saying....
Pics haven't happened, yet.....of course. What can I do?
Anyhow, the motor is pretty much completely assembled on the stand. I have't torqued the complete plenum assembly down to the lower intake....waiting to actually get the motor in so I can run the injector harness and plug everything in. So, it's finger tightened on so as not the mush the gasket.
I spent a lot of time with it this week pretty much telling everything else it will have to wait. It's been long enough. My roof leaks, but .....hey...gotta have my truck back, eh? (The last serious storm did some damage to the housetop.)
I was going to get the motor in today since it was really ready to go in yesterday, but due to timing with the shop business.....towing calls, drive in customers, and appointed repairs....it wasn't going to happen. So, I figured I'd assemble today what I was waiting to do once the motor was in. Glad I did it, though. Some things were tricky to get at and would have been real biotch to do while in the vehicle. Well, I kinda did some bassackwards assemblying, but it's together.
The clutch will have to wait when I get the motor off the stand and install it while it's dangling from the tow truck. Once it's in, I still have to do the fuel line, starter, injector harness, down pipe, etc., but none of this can happen until next week. Hopefully Monday....but, probably Tues. We'll see.
Like I said, I've got the pics. Wish you all could see them now. I chose three colors. Red, black, and aluminum/silver.....keeping in line with the vehicle body and chassis. Looks perty! Ha! This old coot that came into the shop today and looked at my motor whilst I was pluggin' away at it. He said,"Well, atleast you have a clean motor". I looked at his truck....I think he's a Chevy guy.
Later, gents!
Last edited by thook; Mar 29, 2008 at 11:42 AM.
Mar 29, 2008 | 10:31 AM
#117
Thread Starter
Registered User
Joined: Sep 2005
Posts: 8,656
Likes: 16
From: NW Ark on wooded ten acres...Ozarks at large!
You'll never guess what! She loaded them....ha!
I took a lot of reference pics and some are just bad shots. I'll leave out the reference and bad ones and just post the more "interesting" ones.
Here's the TC. You can see down toward the bottom where the crescent shape part of the mold was below where the OP drive gear goes and how it was ripped off by the chain.

The remnants of the recently failed guides and TC pieces plus what was not cleaned out from the original chain:


That was only about half of the broken materials. The other half was on the pick up strainer. I absent mindedly tossed it into the trash before I thought to shoot a pic. But, trust me...it was there and it'weren't perty.
Does this kind of wear look normal for 80-90k miles? Looks bad to me. No wonder I lost chain tension, eh?


This is what carbon soaked pistons with leaking oil rings looks like:
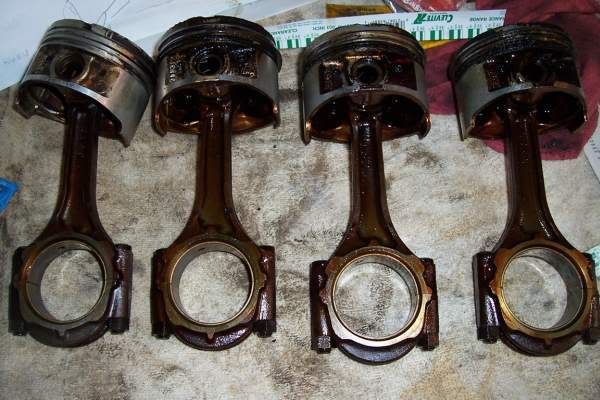

The worst one where the corresponding plug was fouling:

Her private parts...the crankshaft. I tried to get good enough shots to show the surface of the journals, but the lighting was poor:


That's the "let's see how bad she looks" shots. I'd swear I had some of the head before it went to the shop, but none there. Must've gotten deleted.
On to the resurrection phase!
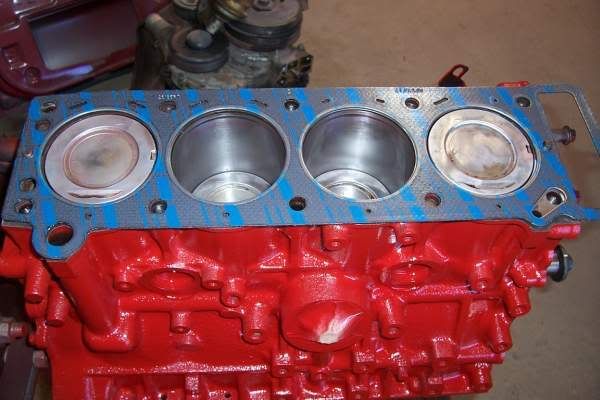
The block.....cleaned, painted, piston/rings, and headgasket:


Head attached:

Diggin' in to the new front end kit and installed:


Wells that's all the time and pics for now. Later!
I took a lot of reference pics and some are just bad shots. I'll leave out the reference and bad ones and just post the more "interesting" ones.
Here's the TC. You can see down toward the bottom where the crescent shape part of the mold was below where the OP drive gear goes and how it was ripped off by the chain.
The remnants of the recently failed guides and TC pieces plus what was not cleaned out from the original chain:
That was only about half of the broken materials. The other half was on the pick up strainer. I absent mindedly tossed it into the trash before I thought to shoot a pic. But, trust me...it was there and it'weren't perty.
Does this kind of wear look normal for 80-90k miles? Looks bad to me. No wonder I lost chain tension, eh?
This is what carbon soaked pistons with leaking oil rings looks like:
The worst one where the corresponding plug was fouling:
Her private parts...the crankshaft. I tried to get good enough shots to show the surface of the journals, but the lighting was poor:
That's the "let's see how bad she looks" shots. I'd swear I had some of the head before it went to the shop, but none there. Must've gotten deleted.
On to the resurrection phase!
The block.....cleaned, painted, piston/rings, and headgasket:
Head attached:
Diggin' in to the new front end kit and installed:
Wells that's all the time and pics for now. Later!
Mar 29, 2008 | 01:25 PM
#118
Registered User
Joined: Nov 2003
Posts: 1,204
Likes: 3
From: Fayetteville, AR
Matthew - Great pics. Hopefully you can get the motor back in the truck soon. Looks great. I'm envious. Wish I had the space/time/willingness to go that far. I think tonight I'm going to be drilling out that damn head bolt and putting in a helicoil kit. At this point, I've spent about as much to get this bolt out as the machine shop said they would charge to remove it for me. If only yanking the engine and putting it in the back of my imaginary pickup were easy.
Anyway, cheers, and hopefully we'll have some fine running machines to take advantage of this Spring weather!
Anyway, cheers, and hopefully we'll have some fine running machines to take advantage of this Spring weather!
Mar 29, 2008 | 09:06 PM
#119
Thread Starter
Registered User
Joined: Sep 2005
Posts: 8,656
Likes: 16
From: NW Ark on wooded ten acres...Ozarks at large!
Thank you very much, Kyle. What you see is the product of a lot of work...ungh. There were days I wanted to blow off the complete cleaning and painting, but once I started it would've looked really funny had I not continued the path. Wait until you see the finished product! I'm pretty pleased.
Anyway, be happy you're doing what you are. My friend Greg....there at the shop not pictured...didn't go nearly as far as I have with detail. He had most of the work done for him. Had the head rebuilt, cylinders bored, deck resurfaced, crank turned, and bought an entire kit with new pistons and such. I think he's kind of proud of me for sticking with it 'cause all he basically did was take his apart and slap it back together. He's seen all that I've gone through with it doing all the work myself. Hell, he didn't even bother with torquing to specs and all. Well.... he does have a lot of experience, so he did know what he was doing. I guess what I'm trying to say is his motor may not look as pretty, but it still runs fine. So, will yours.
Sorry you've had so much trouble with that headbolt. I do know what it's like. When I broke one on my V6.....or was it two?...engh.......I was fried. Totally freaked that the head was going to be damaged and warped from the uneven pressure. But, it didn't and it's holding up fine. I didn't spend a lot of money, but I did spend hours drilling. Those headbolts are tough!
Keep at, Kyle. You'll be quite pleased when you're done. Then, we'll both be enjoying the Spring weather. I'm GOING to have my top off this year....damn it! 
Anyway, be happy you're doing what you are. My friend Greg....there at the shop not pictured...didn't go nearly as far as I have with detail. He had most of the work done for him. Had the head rebuilt, cylinders bored, deck resurfaced, crank turned, and bought an entire kit with new pistons and such. I think he's kind of proud of me for sticking with it 'cause all he basically did was take his apart and slap it back together. He's seen all that I've gone through with it doing all the work myself. Hell, he didn't even bother with torquing to specs and all. Well.... he does have a lot of experience, so he did know what he was doing. I guess what I'm trying to say is his motor may not look as pretty, but it still runs fine. So, will yours.
Sorry you've had so much trouble with that headbolt. I do know what it's like. When I broke one on my V6.....or was it two?...engh...
....I was fried. Totally freaked that the head was going to be damaged and warped from the uneven pressure. But, it didn't and it's holding up fine. I didn't spend a lot of money, but I did spend hours drilling. Those headbolts are tough!Keep at, Kyle. You'll be quite pleased when you're done. Then, we'll both be enjoying the Spring weather.
I'm GOING to have my top off this year....damn it!
Apr 1, 2008 | 08:29 PM
#120
Thread Starter
Registered User
Joined: Sep 2005
Posts: 8,656
Likes: 16
From: NW Ark on wooded ten acres...Ozarks at large!
I got the motor in today, for anyone interested. I forgot the camera, so I didn't take pics. But, I'm not finished hooking everything up and the motor is still quite visible, afterall. Odd..... it seems so much bigger in the engine bay. Probably because there's not much room in there to begin with...
More updates tomorrow. I'm pooped.
More updates tomorrow. I'm pooped.


