
Blower Control Removal-1994 PU
 Dec 13, 2009 | 05:20 PM
#1

Thread Starter
Registered User
Joined: Dec 2009
Posts: 12
Likes: 0
Blower Control Removal-1994 PU
Anyone have a step guide for removing the blower fan control on a 1994 Toyota PU or 4 Runner?
The control REALLY sticks when pushed to high. If you want to push back down to a lower speed you have to put what feels like about 8lbs. of pressure to get it to move. Then it slams to off.
The lights are out in it also. So I want to get it out and repair/replace it.
I've gotten the buttons, faceplate. cupholder, & 3 retaining screws out but they've designed it in such a way that it does not simply slide out like some radios.
The points where the retaining screws are at are in front of the control assembly.
What to take out next? It's loose in there but I cannot get it out.
Thanks for any links or guidance.
P.S. I'm a plumber that sometimes can help with plumbing questions if someone needs them.
Thanks again.
Dec 13, 2009 | 05:50 PM
#2

Registered User
Joined: Sep 2009
Posts: 19
Likes: 0
From: Valdez,AK
Follow this link, the switch is easy.
https://www.yotatech.com/forums/f116...cement-124222/
Once the radio is out of the way, the switch is a piece of cake.
https://www.yotatech.com/forums/f116...cement-124222/
Once the radio is out of the way, the switch is a piece of cake.
Dec 13, 2009 | 05:53 PM
#3
Registered User
Joined: Sep 2009
Posts: 19
Likes: 0
From: Valdez,AK
Dec 13, 2009 | 06:05 PM
#4
Thread Starter
Registered User
Joined: Dec 2009
Posts: 12
Likes: 0
Thanks
Thank you very much for the links and info. It appears that one must remove the majority of the lower dash, glovebox, & radio to get the blower controls to drop out.
I'm thinking of cutting the plastic assembly the screws go in and just slide it out.
Then make some new ones to hold it in place. It seems much, much faster.
Thanks again.
Happy.
I'm thinking of cutting the plastic assembly the screws go in and just slide it out.
Then make some new ones to hold it in place. It seems much, much faster.
Thanks again.
Happy.
Dec 13, 2009 | 06:09 PM
#5

Registered User
Joined: Dec 2006
Posts: 912
Likes: 9
From: Hudson Valley, NY
Thank you very much for the links and info. It appears that one must remove the majority of the lower dash, glovebox, & radio to get the blower controls to drop out.
I'm thinking of cutting the plastic assembly the screws go in and just slide it out.
Then make some new ones to hold it in place. It seems much, much faster.
Thanks again.
Happy.
I'm thinking of cutting the plastic assembly the screws go in and just slide it out.
Then make some new ones to hold it in place. It seems much, much faster.
Thanks again.
Happy.
 Just fix it right the first time...
  Dec 13, 2009 | 06:20 PM
#7
Thread Starter
Registered User
Joined: Dec 2009
Posts: 12
Likes: 0
Might do it the way shown in the second link and that info is GREATLY appreciated.
Unless I missed something the design by the interior dash engineer is the worst hackjob design ever in relation to repairing this item. The only thing that needed to be done is the the brackets threaded vs. slip parts reversed. That's it.
Then-and stay with me on this-you would not have to remove & reinstall:
The glovebox.
The lower dash panel at the drivers side.
The hood release.
The center lower dash panel.
The ignition key panel.
The radio.
And all those fasteners.
Could have missed something though. Maybe they didn't think the rest of the truck would outlast the blower control assembly. About 240,000 miles and counting.
Thanks again. Studying the second link instructions more.
Trending Topics
Dec 13, 2009 | 07:08 PM
#9
Thread Starter
Registered User
Joined: Dec 2009
Posts: 12
Likes: 0
I do understand how some things are assembled and multiple things have to be removed to get to the problem, but this is completely asinine.
Just b!tchin' some.

 Dec 13, 2009 | 07:17 PM
#11
Thread Starter
Registered User
Joined: Dec 2009
Posts: 12
Likes: 0
Just curious....

Thanks.
Dec 13, 2009 | 07:25 PM
#12
Contributing Member
Joined: Feb 2008
Posts: 12,248
Likes: 33
From: Lake City, Fl
just some little plastic peice in there that helps hold the temp control switch assembly in place; I can't remember exactly, it's been a while since I've been in there
Dec 13, 2009 | 07:30 PM
#13
Thread Starter
Registered User
Joined: Dec 2009
Posts: 12
Likes: 0
I think I have a problem there also. Erratic fan behavior from the sticky control.
Thanks.
Dec 13, 2009 | 07:51 PM
#15
Thread Starter
Registered User
Joined: Dec 2009
Posts: 12
Likes: 0
 Dec 14, 2009 | 04:56 AM
#17
Registered User
Joined: Dec 2006
Posts: 912
Likes: 9
From: Hudson Valley, NY
If you're talking about the whole climate control unit, remove the knobs (pull on them), and gently pry the face out from the right side. You'll see the bulb sitting behind the face. It's a five minute job, if that.
Dec 14, 2009 | 02:19 PM
#18
Contributing Member
Joined: Feb 2008
Posts: 12,248
Likes: 33
From: Lake City, Fl
correct you are shaeff
passenger side, under the glove box
look for this

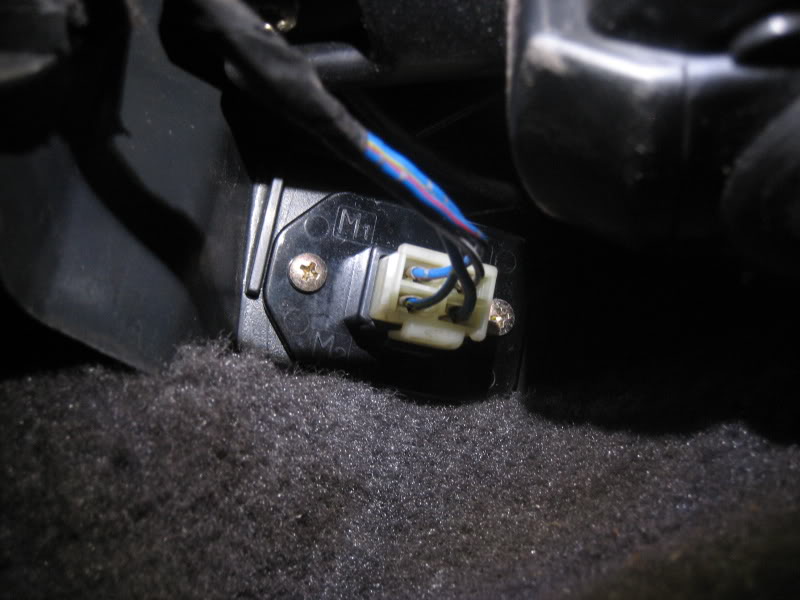
Last edited by iamsuperbleeder; Dec 14, 2009 at 02:21 PM.
Dec 14, 2009 | 04:05 PM
#19

Registered User
Joined: Apr 2009
Posts: 89
Likes: 0
From: Salt Lake City UT
Is the temp control lever a single part, or do you need the assembly of levers. Mine is broke, as in the temp control lever just flops in the dash, and I need to replace it here sooner or latter. Do I have to tear the lower dash off to change it?
Dec 14, 2009 | 04:13 PM
#20


Joined: Jan 2003
Posts: 17,692
Likes: 58
From: Marysville, WA
Instead of taking the dash apart into a million pieces, there is a really simple way to remove the temp control. Once you have the upper instrument cluster shroud up and out of the way, simply remove the ONE screw that holds the upper heater tube to the top of the heater box, and the heater control with cables will come out the top of the dash.


