
94 3.0 no start
 11-17-2009, 12:47 PM
#21
Registered User
Thread Starter
Join Date: Jul 2009
Location: Gary, Indiana ;)
Posts: 157
Likes: 0
Received 0 Likes
on
0 Posts
In my haste I looked at the wrong things in the distro cap. All the pickups are there. Also, the edge of the rotor is pretty smooth ( I think I remember reading through another post during my searches, that bad ones or worn ones feel like sandpaper )
The points themselves have some buildup on them
I do have pics... I hope they came out alright full size.
http://img.photobucket.com/albums/v4...f/S6301726.jpg
And
http://img.photobucket.com/albums/v4...f/S6301727.jpg
I'm going to try and take a bus to walmart.. see if I can find a multimeter.
Last edited by QuickPaws; 11-17-2009 at 12:48 PM.
 11-17-2009, 03:51 PM
#22
Contributing Member
Join Date: Feb 2007
Location: maple ridge, British Columbia, Canada
Posts: 9,055
Likes: 0
Received 9 Likes
on
5 Posts
Sounds like it has no compression!
I bet the timing belt got loose, jumped a few teeth and now there is no compression due to the timing being so far off.
did the tensioner get checked and/or replaced when the belt was done??
I bet the timing belt got loose, jumped a few teeth and now there is no compression due to the timing being so far off.
did the tensioner get checked and/or replaced when the belt was done??
11-17-2009, 06:33 PM
#23
Registered User
Thread Starter
Join Date: Jul 2009
Location: Gary, Indiana ;)
Posts: 157
Likes: 0
Received 0 Likes
on
0 Posts
From the paperwork from the PO.
Here's what was done. (12/07)
HG's, Headbolts, timing belt, Number 2 idler/water inlet, water pump, t stat, MAF AC Belt adjuster/pully assembly, plugs, wires, cap, rotor, fuel filter, Tranny service, and some other things. One thing I did NOT see mentioned in the paperwork is that number 1 idler ( I think that's the one that has that hydraulic tensioner in it ) So I'm guessing no, it was not replaced. I don't see anything about it being checked either. There was additional work done, but it's drive related ( axle boot, brakes,and stuff like that )
Last edited by QuickPaws; 11-17-2009 at 06:39 PM.
11-17-2009, 09:24 PM
#24
Contributing Member
Join Date: Feb 2007
Location: maple ridge, British Columbia, Canada
Posts: 9,055
Likes: 0
Received 9 Likes
on
5 Posts
When you say it sounds like, does that mean the sound you hear in the video?
From the paperwork from the PO.
Here's what was done. (12/07)
HG's, Headbolts, timing belt, Number 2 idler/water inlet, water pump, t stat, MAF AC Belt adjuster/pully assembly, plugs, wires, cap, rotor, fuel filter, Tranny service, and some other things. One thing I did NOT see mentioned in the paperwork is that number 1 idler ( I think that's the one that has that hydraulic tensioner in it ) So I'm guessing no, it was not replaced. I don't see anything about it being checked either. There was additional work done, but it's drive related ( axle boot, brakes,and stuff like that )
Yes, from the sounds of the video, the motor has very little compression. It sounds like its turning over very easily. Try putting a wrench on the crank bolt and try to rotate the motor by hand, see how difficult it is. If its really easy then...
Im not too sure how the hydro tensioners fail, mine uses the spring dealie.
11-17-2009, 09:31 PM
#25
Registered User
Thread Starter
Join Date: Jul 2009
Location: Gary, Indiana ;)
Posts: 157
Likes: 0
Received 0 Likes
on
0 Posts
Yes, from the sounds of the video, the motor has very little compression. It sounds like its turning over very easily. Try putting a wrench on the crank bolt and try to rotate the motor by hand, see how difficult it is. If its really easy then...
Im not too sure how the hydro tensioners fail, mine uses the spring dealie.
Im not too sure how the hydro tensioners fail, mine uses the spring dealie.
Awesome. Someone watched my video! WOOT!
Anyway...I'll give that a go in the morning... I'm not sure if I have anything big enough to attach to the crank bolt I tried buying a crap load of basic tools tonight( some half inch drive BIG sockets, and a half inch drive ratchet, and a set of wrenches ) ( whole 'nother story ) .... Obviously I didn't get them

You think I can wrap my hands around that crank pulley and move it? Also, if I CAN move it with my hands, I'm guessing that means it's ( what'd you say? ) ..."really easy"
Also, I presume that no compression due to a jumped timing belt isn't the end of the world. Sure, it's some work to get at, but it WOULD run again ( new belt, reset cams and crank and all that jazz )..... right? I mean, that's all marked... all I have to do is line stuff up? ( not to make it sound easy, I've read so many threads the last 2 days about people working on something that requires them to remove the timing belt.. I know it's a project, and I don't want to undermine someone )
Also, I'm going BACK to WalMart tomorrow to pick up a multimeter, so I can start testing electrical stuff. I'm also gonna try and get codes tomorrow. ( CEL is on, and has been on/off for months ) The diagnostics port is ..... fubar'd, ( like it when I got it ) so I'm gonna have to cut the wires that lead to the T1 and TE1 terminals and wire a switch in there. It's been suggested to me by another member who I've been working with, and have worked with on my truck, and I've also read it done as a mod here in the forums so it's easier for people to get codes.. they just flip the switch, instead of building/buying a tool or shorting the pins in the port.
Last edited by QuickPaws; 11-17-2009 at 09:35 PM.
11-17-2009, 09:39 PM
#26
Contributing Member
Join Date: Feb 2007
Location: maple ridge, British Columbia, Canada
Posts: 9,055
Likes: 0
Received 9 Likes
on
5 Posts
The crank is 19mm I think, or 17mm. I dont think you would be able to rotate it with your hands, ive never tried 
It should be easy to rotate a motor with little/no compression. In relation to how a motor with good compression feels like...
The best way right now to tell you right away if its the belt, is a compression test.
Yes, the 3vze is a non interferance motor. My belt went and stripped off a 10" section of teeth! Happened in my driveway New belt and it was good to go!
Getting the belt and everything lined up can be a little difficult, but there is a FSM link in the sticky, and a few writeups on the board with great pictures!
Ideally you would want to do the water pump at the same time, if it shows that it needs it. Its hard to get to once everything is put together!
But my mechanic buddy works on 3.0's all the time, has done alot of bare bones timing belt jobs. They hold together well
It should be easy to rotate a motor with little/no compression. In relation to how a motor with good compression feels like...
The best way right now to tell you right away if its the belt, is a compression test.
Yes, the 3vze is a non interferance motor. My belt went and stripped off a 10" section of teeth! Happened in my driveway
New belt and it was good to go!Getting the belt and everything lined up can be a little difficult, but there is a FSM link in the sticky, and a few writeups on the board with great pictures!
Ideally you would want to do the water pump at the same time, if it shows that it needs it. Its hard to get to once everything is put together!
But my mechanic buddy works on 3.0's all the time, has done alot of bare bones timing belt jobs. They hold together well
11-18-2009, 07:50 AM
#28
Registered User
Thread Starter
Join Date: Jul 2009
Location: Gary, Indiana ;)
Posts: 157
Likes: 0
Received 0 Likes
on
0 Posts
The crank is 19mm I think, or 17mm. I dont think you would be able to rotate it with your hands, ive never tried
It should be easy to rotate a motor with little/no compression. In relation to how a motor with good compression feels like...
The best way right now to tell you right away if its the belt, is a compression test.
Yes, the 3vze is a non interferance motor. My belt went and stripped off a 10" section of teeth! Happened in my driveway New belt and it was good to go!
Getting the belt and everything lined up can be a little difficult, but there is a FSM link in the sticky, and a few writeups on the board with great pictures!
Ideally you would want to do the water pump at the same time, if it shows that it needs it. Its hard to get to once everything is put together!
But my mechanic buddy works on 3.0's all the time, has done alot of bare bones timing belt jobs. They hold together well
It should be easy to rotate a motor with little/no compression. In relation to how a motor with good compression feels like...
The best way right now to tell you right away if its the belt, is a compression test.
Yes, the 3vze is a non interferance motor. My belt went and stripped off a 10" section of teeth! Happened in my driveway
New belt and it was good to go!Getting the belt and everything lined up can be a little difficult, but there is a FSM link in the sticky, and a few writeups on the board with great pictures!
Ideally you would want to do the water pump at the same time, if it shows that it needs it. Its hard to get to once everything is put together!
But my mechanic buddy works on 3.0's all the time, has done alot of bare bones timing belt jobs. They hold together well
I almost wonder if this is what it is then. I think I've read EVERY thread about 3.0's and starting issues/cranking issues/crank no start/ you name it. I def don't have ANY tools that big, which means I can't fix it ( I know I know, beat me now ) Maybe today I'll be able to .. obtain the tools I went for last night. I still plan on picking up a multimeter and testing sensors. I have another member willing to help me with that so I don't break it any worse than it already is.
Sounds like when it goes... it just GOES. ( that timing belt that is )
I'd like to do all the work that is suggested to be done when a timing belt is done... I know it's a lot of stuff that's more accessible when it's all torn apart. Unfortunately that's not the case and I can really only afford to do the belt. The waterpump is in pretty good shape though as it WAS -recently- replaced ( a while ago ) I really just need it to run again. I'm looking everywhere for that EFI fuse as suggested in the reply below this one. Can't seem to find the damn thing though, I can't find a fuse layout diagram in either the FSM, Haynes, or google ( yet.. I'm still beating on google )
I'm confident enough in my abilities to RTFM and look't the purdy pictures too. There's one thread I found that is done by a member named buckz,
that I've been reading through a few times.
https://www.yotatech.com/forums/f116...s-pics-183911/
As one more thing. ( forgive me for being repetitive or redundant.. I work(ed) in tech support. so clarity and detail are BIG on my list of things... NOTHING is worse to me than when someone is asking for help, and being very vague or....well... unhelpful. I get that there are people out there who aren't skilled... but.. c'mon ) The sound you heard in the video, is the same sound it made the LAST TIME IT STARTED.( about 3 days ago now I think ) it cranked like that.. I knocked things around some ( the starter trick.. lol ) and it chugged and puttered... cranked again, and it started. Still sound like a timing belt?
11-18-2009, 09:55 AM
#29
Registered User
Thread Starter
Join Date: Jul 2009
Location: Gary, Indiana ;)
Posts: 157
Likes: 0
Received 0 Likes
on
0 Posts
Alright... I slept a little late today.. yesterday was rough.
You were right... you can't move that puppy with yer hands. I don't have anything large enough to attach to it.
Today though, I got the timing belt cover removed ( along with some other stuff ) had a small scare when I got to the alternator to loosen the main bolt on top, and I only had a 13mm 1.4 in drive ratchet.... I got lucky and found a 14 in my box ( 3/8th's to boot! ) lossened and moved the belt... got the timing cover off and have pics... and now is where I can really use some advice. ( not that you all haven't done enough answering my questions anyway )
I got pictures of the notches on the cams, and I tried to get what I think is the timing mark on the belt ( the solid white strip with LCAM next to it.. I've seen it in alot of pictures in threads that I've been reading here in my searches )
Anyway, I don't see any missing teeth, it's definitely NOT broken, and there doesn't seem to be a whole lot of slack in it. Any wetness in the pics is coolant that dripped down when I took the water inlet off and it ran back behind the plate.
***EDIT*** Looks like PB kinda did things backwards.... Labeling now.
So.. pics.
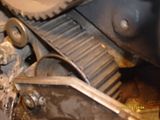
This is a small crack I found in the timing belt. This is just above the top of the number 1 Idler pully.
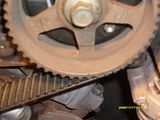
This is the timing notch (I think) on the right cam. It's in about the same position as the left cam.
This is a better shot of the right cam. I think I can make out the timing notch ( again, a guess ) at the bottom, and I think a timing notch at the top of the backing plate for the timing belt. This is again in about the same position as the left cam.
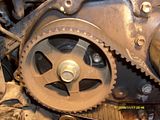
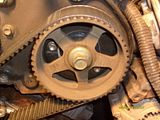
This is the left cam. Normally, when I see this all lined up as a brand new replacement, the timing mark on the belt is lined up WITH the notch. The notch on the cam is at the bottom of the cam, as indicated in the next picture.
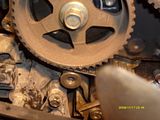
This is the notch at the bottom of the left cam.
Ideas?
You were right... you can't move that puppy with yer hands. I don't have anything large enough to attach to it.
Today though, I got the timing belt cover removed ( along with some other stuff ) had a small scare when I got to the alternator to loosen the main bolt on top, and I only had a 13mm 1.4 in drive ratchet.... I got lucky and found a 14 in my box ( 3/8th's to boot! ) lossened and moved the belt... got the timing cover off and have pics... and now is where I can really use some advice. ( not that you all haven't done enough answering my questions anyway )
I got pictures of the notches on the cams, and I tried to get what I think is the timing mark on the belt ( the solid white strip with LCAM next to it.. I've seen it in alot of pictures in threads that I've been reading here in my searches )
Anyway, I don't see any missing teeth, it's definitely NOT broken, and there doesn't seem to be a whole lot of slack in it. Any wetness in the pics is coolant that dripped down when I took the water inlet off and it ran back behind the plate.
***EDIT*** Looks like PB kinda did things backwards.... Labeling now.
So.. pics.

This is a small crack I found in the timing belt. This is just above the top of the number 1 Idler pully.

This is the timing notch (I think) on the right cam. It's in about the same position as the left cam.

This is a better shot of the right cam. I think I can make out the timing notch ( again, a guess ) at the bottom, and I think a timing notch at the top of the backing plate for the timing belt. This is again in about the same position as the left cam.

This is the left cam. Normally, when I see this all lined up as a brand new replacement, the timing mark on the belt is lined up WITH the notch. The notch on the cam is at the bottom of the cam, as indicated in the next picture.

This is the notch at the bottom of the left cam.
Ideas?
Last edited by QuickPaws; 11-18-2009 at 10:51 AM.
11-18-2009, 09:58 AM
#30
Registered User
Thread Starter
Join Date: Jul 2009
Location: Gary, Indiana ;)
Posts: 157
Likes: 0
Received 0 Likes
on
0 Posts
All the fuses look good. That was one of the first things I checked. I hadn't fully considered it an option because of how it sounded when it was cranking. ( also, not fully sure -which- fuse is that EFI fuse...BUT I checked EVERY fuse I could find, in and out of the truck ( i'm missing all the diagrams and covers that come with the truck.... it didn't come with any. )
11-18-2009, 11:11 AM
#31
Contributing Member
Join Date: Feb 2007
Location: maple ridge, British Columbia, Canada
Posts: 9,055
Likes: 0
Received 9 Likes
on
5 Posts
You need to to able to get the motor to TDC. Then you can see if everything lines up.
If the cam notches dont like up, then they have moved.
In addition, if your belt has cracks, then it should be replaced.
Also, did you get a look at the belt around the crank pully?
p.s the EFI fuse is in the underhood fusebox. Look on the reverse of the lid and it will show you.
If the cam notches dont like up, then they have moved.
In addition, if your belt has cracks, then it should be replaced.
Also, did you get a look at the belt around the crank pully?
p.s the EFI fuse is in the underhood fusebox. Look on the reverse of the lid and it will show you.
Last edited by Jay351; 11-18-2009 at 11:13 AM.
11-18-2009, 11:19 AM
#32
Registered User
Thread Starter
Join Date: Jul 2009
Location: Gary, Indiana ;)
Posts: 157
Likes: 0
Received 0 Likes
on
0 Posts
You need to to able to get the motor to TDC. Then you can see if everything lines up.
If the cam notches dont like up, then they have moved.
In addition, if your belt has cracks, then it should be replaced.
Also, did you get a look at the belt around the crank pully?
p.s the EFI fuse is in the underhood fusebox. Look on the reverse of the lid and it will show you.
If the cam notches dont like up, then they have moved.
In addition, if your belt has cracks, then it should be replaced.
Also, did you get a look at the belt around the crank pully?
p.s the EFI fuse is in the underhood fusebox. Look on the reverse of the lid and it will show you.
lol @ fuse lid. There isn't one

See.... Cam notches... That's where I'm confused. In the pictures, the cam notch is in the middle of the cam on the bottom. Both cams are like this.
However, in the plate behind the belt, I see notches under a bolt hole. I presume that that notch, and the one on the cam should line up. Also though, I notice that the mark on the BELT is NOT lined up with what I believe is the notch on the cam ( again, I'm only able to reference other pictures I've seen after people have done the work. white line on belt, lines up with notch on cam, which lines up with notch under bolt hole on back plate.
I was able to look down at the belt around the pulley. I just looked down behind everything. I don't see anything broken, and it looks to be pretty snug against the gear. I also do not see any missing teeth, or shaved teeth off the belt.
11-18-2009, 12:44 PM
#33
Registered User
Join Date: Feb 2008
Location: the great Maine wilderness
Posts: 2,048
Likes: 0
Received 4 Likes
on
4 Posts
you gotta get a socket big enough to turn the crank, make sure to turn it clockwise... look at the crank pulley, and line up the notch with the 0 on the lower timing cover, the take pix of that and the location of the cam notches, and post them here...then we can see if they are lined up. It's kinda hard to tell from the above pix...but it looks to me as tho the d side cam might be 1 tooth off from the pass side cam.... that would keep it from starting.
11-18-2009, 04:38 PM
#34
Registered User
Thread Starter
Join Date: Jul 2009
Location: Gary, Indiana ;)
Posts: 157
Likes: 0
Received 0 Likes
on
0 Posts
you gotta get a socket big enough to turn the crank, make sure to turn it clockwise... look at the crank pulley, and line up the notch with the 0 on the lower timing cover, the take pix of that and the location of the cam notches, and post them here...then we can see if they are lined up. It's kinda hard to tell from the above pix...but it looks to me as tho the d side cam might be 1 tooth off from the pass side cam.... that would keep it from starting.
That's gonna have to wait until this weekend. I'm as far as I can go with what I have ( save for I do have a multimeter now, so I can test sensors and stuff electrical related )
Fiances dad is coming over this weekend with any extra tools he has ( which I can keep ) and additional things to work on it. I'll have to tell him what to bring. I'm open to suggestions, cause so far all I got to think of is metric wrenches from maybe 8-15 mm, deep well sockets from 11-19mm, shallow well sockets from 8-17mm. All his stuff will be 3/8th's drive or larger. I suppose I should prolly tell him to bring a breaker bar too yeah? ( or cheater bar... whatever y'all call em... the super long extension handle for use on pita nuts/bolts )
I'll keep updating as I have more information. I'll start electrical tests tomorrow.
11-19-2009, 12:20 PM
#35
Registered User
Thread Starter
Join Date: Jul 2009
Location: Gary, Indiana ;)
Posts: 157
Likes: 0
Received 0 Likes
on
0 Posts
Alright.... started testing things this morning... MAF checked out ok as per the specifications in the Haynes book I have.
Ignitor, and coil also check out. Wires are in pretty good shape.. no cracking, kinked or burnt areas ( from being too close to say the EGR, or an exhaust header ) I'm getting good spark.
I'm kinda stuck now, and would like to get a little further.. now that I have a multimeter, I can test relays and stuff. My problem is I have no idea what relay is what and what fuse is what in the underhood box. I looked around, but I don't see any diagrams on the forums. The only one I found was for a model truck that wasn't mine.. I think an 85 or so.
Since I started typing this I went back out and tested some things. Sounds stupid but I checked the battery. It's also putting out at the acceptable levels ( not just the min )
I still CAN NOT get the CEL to blink at me. I was out there for 4 hours this morning testing various parts, and at the end of it, I used some starting fluid ( it's all I have ) to clean out the grease and gunk out of the 2 terminals I needed to short. I could see the contacts in there so I took my home made tool and got them pressed in there. Metal on metal? Good connection, right? No blinks.
Thing that has me worried, is what's the correct way to do it. The Haynes manual says "....Turn the key on, then go short the terminals..."
This leads me to believe that it wants me to have current to the port BEFORE I short the terminals.
However, reading around, on the forums, I've read that you short the terminals then turn the key on.
What else can I test with the multimeter while it's on the truck? I've been slowly building my own paper FSM as I come across sections in it that I think may help ( I'll print them out so I can bring them outside with me )
Thanks!
11-20-2009, 07:50 AM
#37
Registered User
Thread Starter
Join Date: Jul 2009
Location: Gary, Indiana ;)
Posts: 157
Likes: 0
Received 0 Likes
on
0 Posts
Fiances father showed up today instead. Brought me a shiny new mechanics tool kit ( woo craftsman!! )Anyway, Also found out that there is no compression. Got the crank set to 0 degrees and the number one piston is on top ( I can see it down the spark plug hole ) the cam marks DO NOT line up with the notches on the back plate.
11-20-2009, 01:55 PM
#38
Registered User
Thread Starter
Join Date: Jul 2009
Location: Gary, Indiana ;)
Posts: 157
Likes: 0
Received 0 Likes
on
0 Posts
Got timing all set up and all lined up and what not. Still doesn't start. Sounds about the same as it did. We did a compression test on the 2-4-6 side, and have ( get this ) 25 pounds on the number 4 cylinder. Number 3 had about 130. I haven't done the rest of them. I'm pulling all the plugs back out in the morning ( I got Denso Super Titanium ) and I'm going to do a compression test on all 6 cylinders. I didn't get to the ECM today, so the dash is coming apart tomorrow as well so I can get at it to do resistance and voltage checks, at the direction of another member.
I do have all the tools I need now though.
***EDIT*** Oh that reminds me... the cams were at least 2 teeth off, each. They still lined up with each other, just not where they were supposed to be in relation to the crankshaft.
I do have all the tools I need now though.
***EDIT*** Oh that reminds me... the cams were at least 2 teeth off, each. They still lined up with each other, just not where they were supposed to be in relation to the crankshaft.
Last edited by QuickPaws; 11-20-2009 at 01:56 PM.
11-20-2009, 02:20 PM
#39
Registered User
Join Date: Oct 2009
Location: Albuquerque, NM
Posts: 336
Likes: 0
Received 0 Likes
on
0 Posts
I know Im a new member to this site, but Im not new to cars. You are on the right track! Sounds like once you get the crank and cams timed ittl fire right up.


