
3 1/2 hours of hell
 Jul 25, 2008 | 06:22 PM
#21
Thread Starter
Registered User
Joined: Mar 2008
Posts: 4,371
Likes: 6
From: Texas
So? Food? Beer? Hookers???? What do you need?


 Jul 25, 2008 | 06:31 PM
#23
Registered User
Joined: Dec 2006
Posts: 386
Likes: 0
From: Albuquerque, New Mexico
i would, but im stationed at Fort Hood, Tx. So im about 12 hours away.
You are sliding the mounting part of the bumper INSIDE each side the frame, and not trying to squeeze it in between or around the outside of the frame, right?
and the bumper is 3 parts right
1-the bumper
2- left side mount
3- right side mount
bolt the mounts to the frame, but leave them loose.
then bolt the bumper to the mounts.
tighten it all up while making sure its sitting straight.
now im assuming the 4runner and pickup bumpers are made the same.
Jul 25, 2008 | 06:35 PM
#24
i would, but im stationed at Fort Hood, Tx. So im about 12 hours away.
You are sliding the mounting part of the bumper INSIDE each side the frame, and not trying to squeeze it in between or around the outside of the frame, right?
and the bumper is 3 parts right
1-the bumper
2- left side mount
3- right side mount
bolt the mounts to the frame, but leave them loose.
then bolt the bumper to the mounts.
tighten it all up while making sure its sitting straight.
now im assuming the 4runner and pickup bumpers are made the same.
You are sliding the mounting part of the bumper INSIDE each side the frame, and not trying to squeeze it in between or around the outside of the frame, right?
and the bumper is 3 parts right
1-the bumper
2- left side mount
3- right side mount
bolt the mounts to the frame, but leave them loose.
then bolt the bumper to the mounts.
tighten it all up while making sure its sitting straight.
now im assuming the 4runner and pickup bumpers are made the same.
Jul 25, 2008 | 06:43 PM
#25
Contributing Member
Joined: Feb 2007
Posts: 9,055
Likes: 10
From: maple ridge, British Columbia, Canada
My rear fit pretty well. Aside from it being 1" to the drivers side (damn accidents!). The mounts were chopped off and re-welded in the correct position. I hear so many people having problems with the marlin bumpers up front. Im starting to think their jig is off....
Jul 25, 2008 | 07:17 PM
#26
Thread Starter
Registered User
Joined: Mar 2008
Posts: 4,371
Likes: 6
From: Texas


 Jul 25, 2008 | 08:28 PM
#30
Registered User
Joined: Aug 2007
Posts: 115
Likes: 1
From: Washington
Those damn things need to come with directions, I mean there's only what like 3 steps
1. Unbolt attachments from bumper
2. Slide them INSIDE the frame.(That one took me awhile to figure out)
3 Attach Bumper
But without knowing or thinking of those first two it turned a simple install into a PITA
1. Unbolt attachments from bumper
2. Slide them INSIDE the frame.(That one took me awhile to figure out)
3 Attach Bumper
But without knowing or thinking of those first two it turned a simple install into a PITA
Jul 25, 2008 | 08:29 PM
#31
Contributing Member
Joined: Apr 2004
Posts: 5,464
Likes: 6
From: Arvada, Colorado
Jul 25, 2008 | 08:39 PM
#35
Registered User
Joined: Dec 2006
Posts: 386
Likes: 0
From: Albuquerque, New Mexico
Jul 25, 2008 | 08:44 PM
#36
 Do what you have to do right?
There were NO instructions with this. I had no idea I'd need to cut the rear quarters and that really pisses me off. If I have to start cutting a lot of sheet metal I'm going to lose my mind. I know that a straight body isn't important to most folks but I bought these to save that metal.
5 inches of the rear quarters??? WTF!!!!! Might as well make a flat bed out of it and throw a 99% rust free factory bed in the trash.
5 inches of the rear quarters??? WTF!!!!! Might as well make a flat bed out of it and throw a 99% rust free factory bed in the trash.
From what AxleIke posted maybe you won't need to trim yours, but the pic shown is from a 3rd gen truck (i think)
I don't have a picture of mine, but I also mounted mine on the outside of the frame.
I would have loved to get one of Marlin's bumpers for the front but after 3-4 months of emails and calls and not being able to get a date when one was going to be available I said forget it...
Once you get it worked out you will be very happy with it, especially the first time you hit a rock or something with it, you will be happy you went it the Marlin bumpers...
Jul 26, 2008 | 07:11 AM
#37
Thread Starter
Registered User
Joined: Mar 2008
Posts: 4,371
Likes: 6
From: Texas
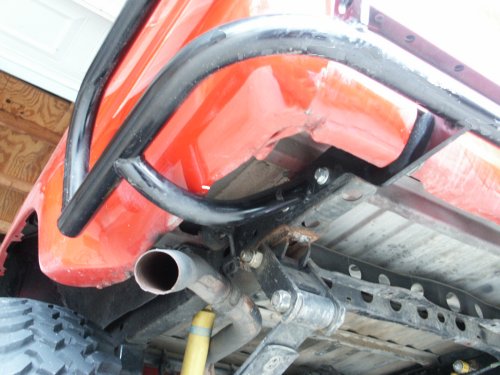
Update right quick. On the 4runners the rear bumper goes inside, on a truck it goes outside. I have a truck.
I also know I have to trim the roll pan a little, I'm just trying not to trim the bed sides.
I'm going into the garage to work on this thing. I'll post pics one way or the other.
I also know I have to trim the roll pan a little, I'm just trying not to trim the bed sides.
I'm going into the garage to work on this thing. I'll post pics one way or the other.
Jul 26, 2008 | 03:17 PM
#40
Thread Starter
Registered User
Joined: Mar 2008
Posts: 4,371
Likes: 6
From: Texas


