
How To: 1985 4Runner Heater Core Removal
 Dec 23, 2012 | 04:53 PM
#1
Thread Starter
Registered User
Joined: Jun 2011
Posts: 18
Likes: 0
From: Reno, NV
How To: 1985 4Runner Heater Core Removal
I managed to find a free day and finally replace my leaking heater core in my 1985 4Runner w/ AC. Since I hadn�t found any write-ups for a heater core replacement on a 1st gen w/ AC, I thought I�d throw together a quick how-to. I took pics at every chance I remembered to. Hopefully this helps a few people wondering if they should attempt this fix. No need to touch the AC system at all if you go for the heater core by this remove-everything-in-sight method.
Took me 3 hours to pull the core and I was taking my time to stay organized and trying not to break anything. Don�t know how long it takes to reassemble yet because my parts place delivered the wrong core�so the truck�s out of commission for a few days now.
So here�s how I did it:
1. Remove glovebox, radio/ashtray, instrument cluster, panel below steering wheel.
2. Remove dashpad
3. Remove entire dash assembly
4. Drop steering wheel
5. Remove metal crossbar
6. Drain coolant/remove heaterhoses from firewall
7. Pull heaterbox and remove core
Full version:
1. Get the easy stuff out of the way. Disconnect battery.
Remove:
Glovebox (2 screws at base),
Radio/ashtray assembly (2 screws on each side and one hiding behind the ashtray),
Instrument cluster/shield (5 screws to get off shield, then 4 screws, wiring harness, and speedo cable for actual cluster),
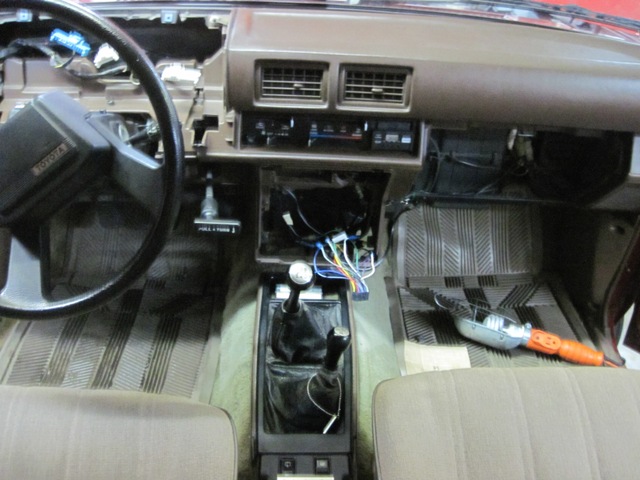
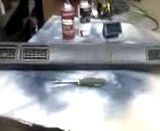
Panel below steering wheel (a few screws, two wiring connectors (light dimmer and cargo light), and hood-release lever). Here�s what you should be left with at this stage (crap pic, sorry).
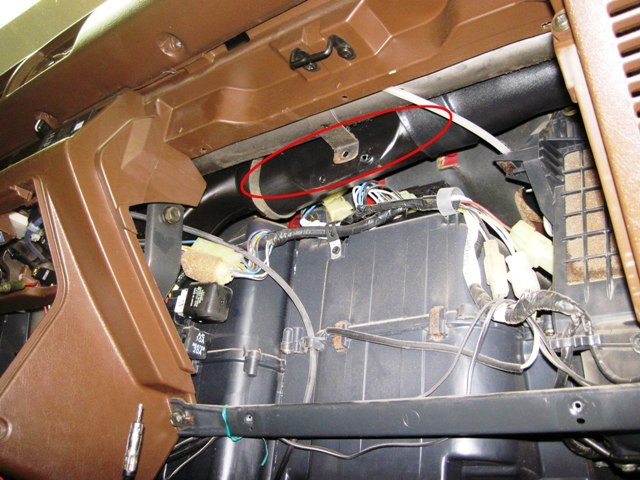
2. Remove the dashpad. Two tricks to this. 1. There is a screw behind the air vent on the far right, so you have to yank that vent out. The vent itself is held in with four clips (two top, two bottom) and you have to pop that thing out without scratching/gouging anything. I found the bottom clips hard to remove, but with some coaxing from fancy-dancy trim removing tools and some firm pulling on the outside edge, it came out alright. A small flathead (with some ducttape on it for protection) would be fine to help release the clips. 2. There is a hidden nut up underneath the pad. You have to remove an air vent tube to get to it, but the vent pulls out easily. I used a socket on a super-long extension I have. May be able to loosen it without extension, but it�d be tough. Here is the vent tube you have to remove, circled in red, and the nut is easily visible once vent tube is removed.
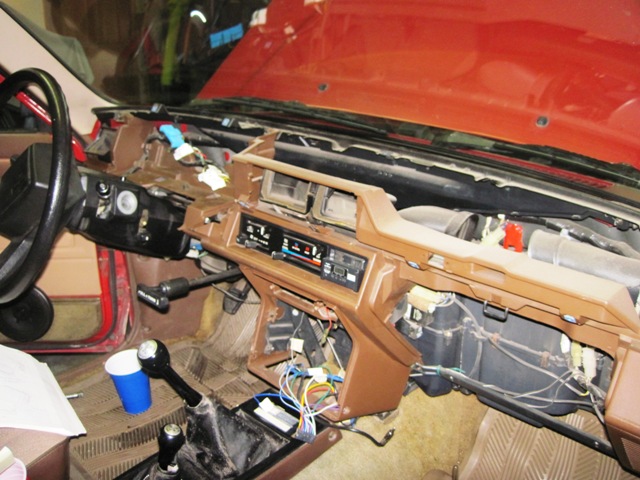
3. Remove dash assembly. Here�s what it should look like with the dashpad removed:
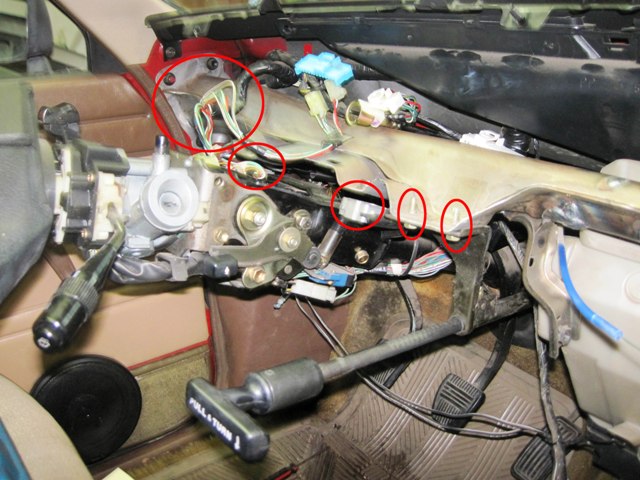
Now you have to take out the entire console/dash assembly. General procedure- remove speakers (or just disconnect wires), remove all screws and bolts holding console in (~10 if I recall), and disconnect control cables/wiring going to climate control panel. You have to disconnect the cables for fresh/recirc, temp select, and vent selection (vent, bilevel, heat, defrost�). A total of 4 cables. I left all the cables connected at the control levers (except for the temp select) and disconnected them at their �active� ends. Make note of their routing. Fresh/recirc cable disconnects just above passenger kick panel, below speaker. One of the two temp select cables routes (a white cable) to foot vent of left side of passenger footwell. The other (it�s blue) routes through the firewall, so I just disconnected that one at the control lever and left the cable in place. Vent select disconnected to right of gas pedal. There also should be two wiring connectors that need disconnecting where the glove box used to be. Where the instrument cluster was, there is a wiring harness routed through some clips that you will have to disconnect.
Once you think you have everything disconnected, start gently pulling it out to make sure nothing is still hanging up.
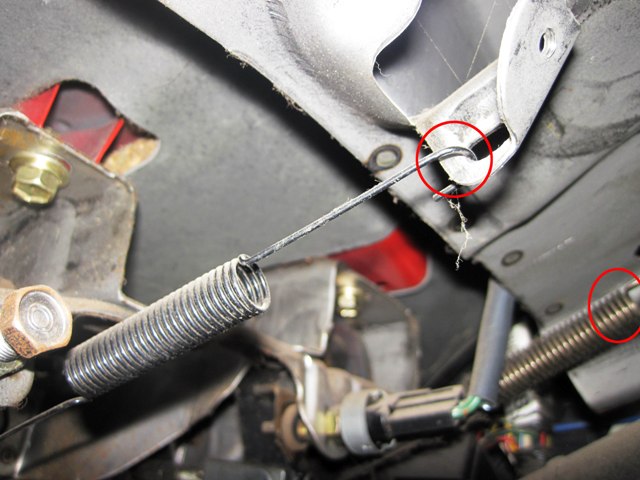
4. Remove metal cross bar that supports steering column. First take off all the ventilation pieces. Most are only secured by one screw and they all just fit together. Two springs attach to the crossbar near the steering column- just disconnect them.
Take out these two metal braces (two bolts each) and unbolt ebrake bracket (two bolts).
Then support your steering wheel on the driver seat using a tool box/wood so the entire column doesn�t drop 6� directly onto the seat (not sure if it�s actually bad to rest wheel directly on seat, but I didn�t want to bend/break any steering components). Remove these two big bolts to free the steering column from the crossbar.

Now your crossbar should just be attached at either end. 3 bolts and a nut on driver side. One bolt, one nut on passenger side. Remove them all and pull the cross bar.
5. Drain coolant from radiator and disconnect heater hoses going through firewall. Be warned that coolant will come out of hoses.
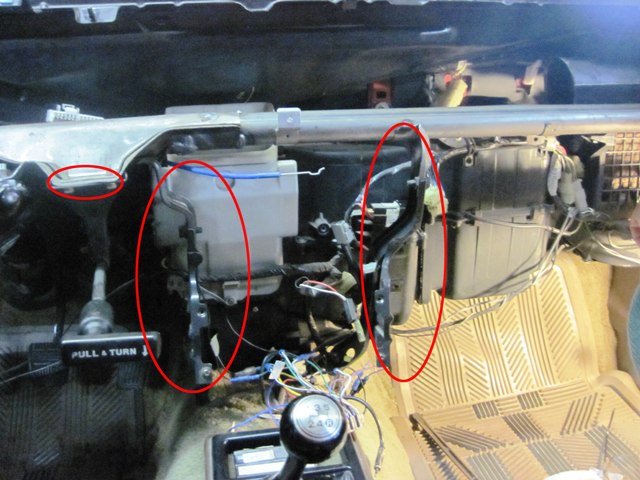
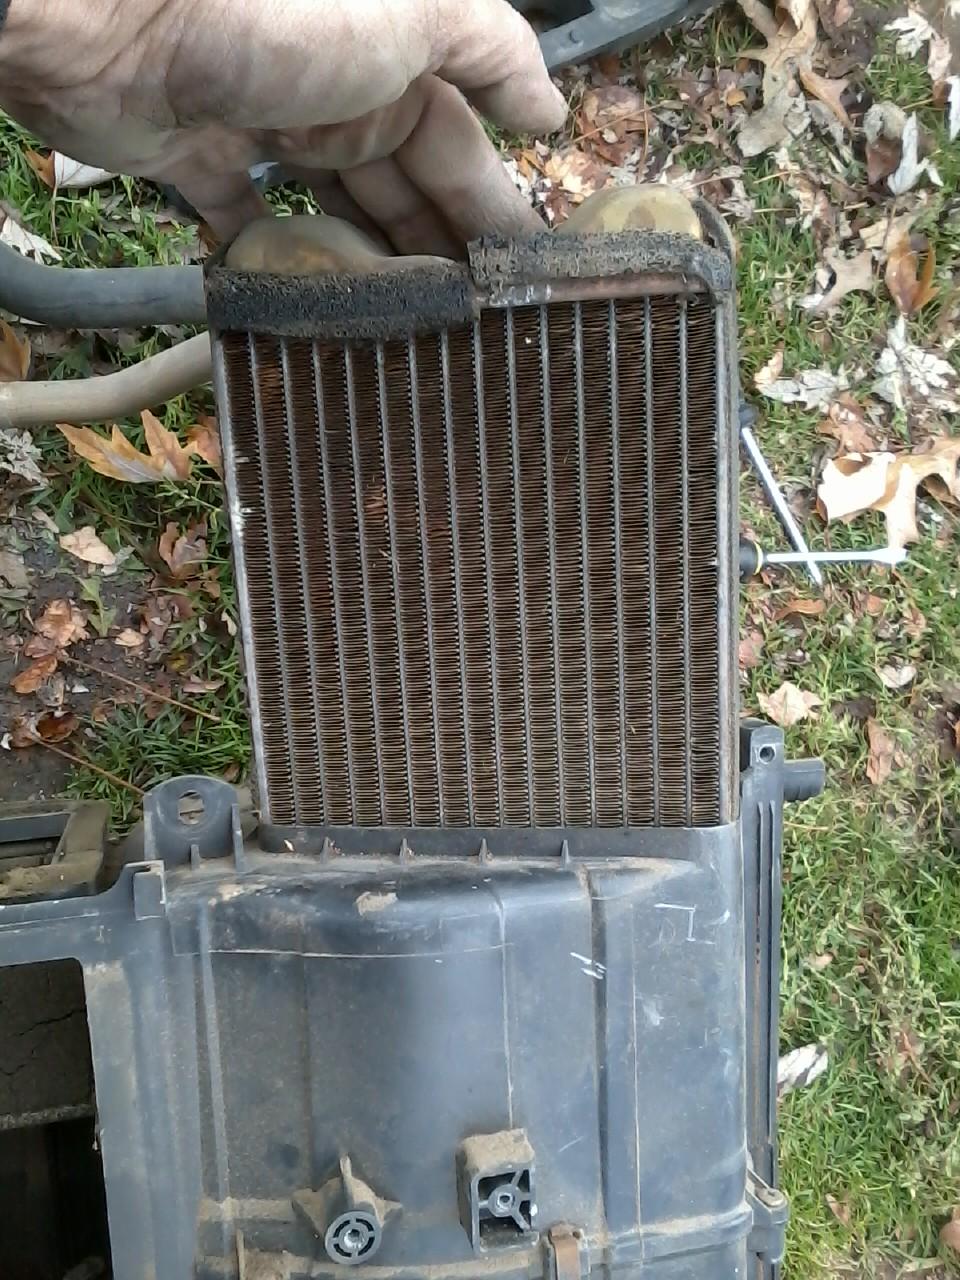
6. Remove heater box. You should now have plenty of room to wiggle the big ol� heater box out of place now. The box is held to the truck via three bolts. Two other screws secure it to the AC condenser box to the right. There�s a wiring assembly mounted to the front (remove it�). Not many bolts left now, so just poke around until you find them. I also loosened the AC condenser box to have some more free play to separate the two. Work out the heater box gently.
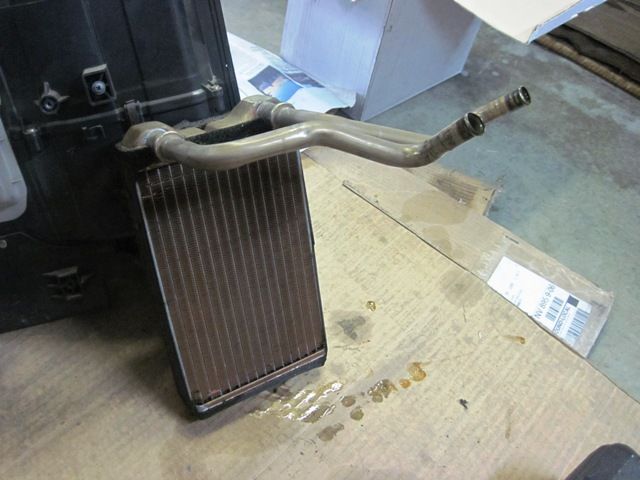
7. The box is gone! Remove the braces holding heater core in place and it should just slide out the top of the box. It was immediately clear that mine was leaking coolant from the bottom.

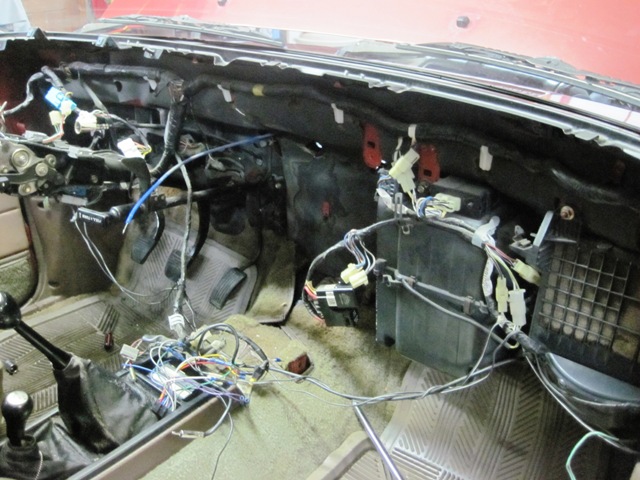
Where the box used to be:
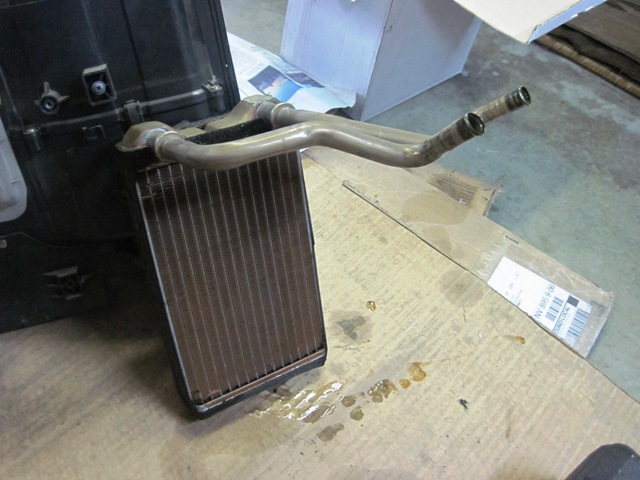
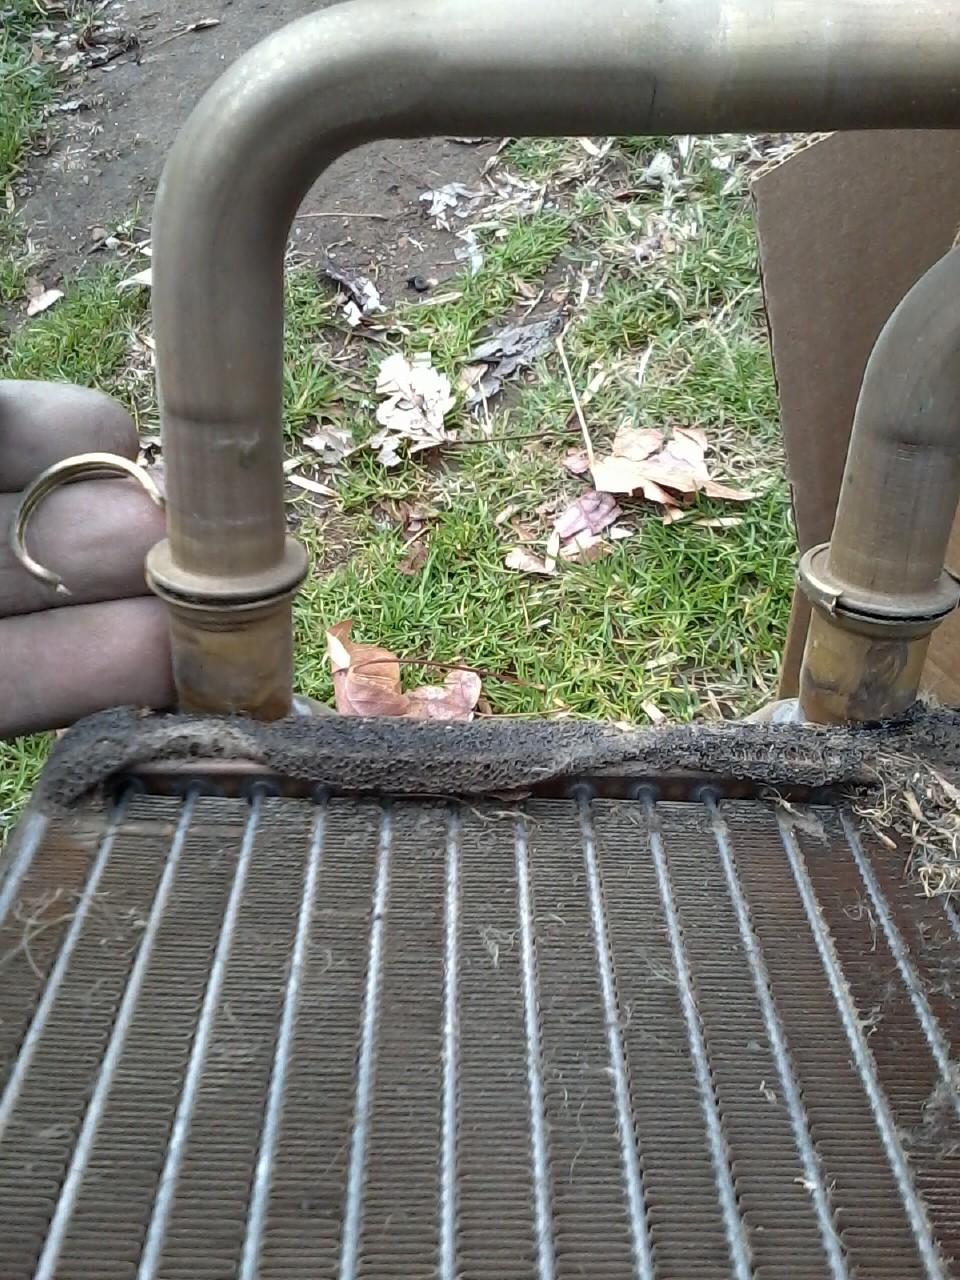
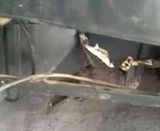
The heater core:
So that�s how you take the darn thing out. Really not too bad if you keep track of everything. I have a few days till my new core gets here, so if you want any more pics of the disassembled dash, let me know.
Took me 3 hours to pull the core and I was taking my time to stay organized and trying not to break anything. Don�t know how long it takes to reassemble yet because my parts place delivered the wrong core�so the truck�s out of commission for a few days now.
So here�s how I did it:
1. Remove glovebox, radio/ashtray, instrument cluster, panel below steering wheel.
2. Remove dashpad
3. Remove entire dash assembly
4. Drop steering wheel
5. Remove metal crossbar
6. Drain coolant/remove heaterhoses from firewall
7. Pull heaterbox and remove core
Full version:
1. Get the easy stuff out of the way. Disconnect battery.
Remove:
Glovebox (2 screws at base),
Radio/ashtray assembly (2 screws on each side and one hiding behind the ashtray),
Instrument cluster/shield (5 screws to get off shield, then 4 screws, wiring harness, and speedo cable for actual cluster),
Panel below steering wheel (a few screws, two wiring connectors (light dimmer and cargo light), and hood-release lever). Here�s what you should be left with at this stage (crap pic, sorry).
2. Remove the dashpad. Two tricks to this. 1. There is a screw behind the air vent on the far right, so you have to yank that vent out. The vent itself is held in with four clips (two top, two bottom) and you have to pop that thing out without scratching/gouging anything. I found the bottom clips hard to remove, but with some coaxing from fancy-dancy trim removing tools and some firm pulling on the outside edge, it came out alright. A small flathead (with some ducttape on it for protection) would be fine to help release the clips. 2. There is a hidden nut up underneath the pad. You have to remove an air vent tube to get to it, but the vent pulls out easily. I used a socket on a super-long extension I have. May be able to loosen it without extension, but it�d be tough. Here is the vent tube you have to remove, circled in red, and the nut is easily visible once vent tube is removed.
3. Remove dash assembly. Here�s what it should look like with the dashpad removed:
Now you have to take out the entire console/dash assembly. General procedure- remove speakers (or just disconnect wires), remove all screws and bolts holding console in (~10 if I recall), and disconnect control cables/wiring going to climate control panel. You have to disconnect the cables for fresh/recirc, temp select, and vent selection (vent, bilevel, heat, defrost�). A total of 4 cables. I left all the cables connected at the control levers (except for the temp select) and disconnected them at their �active� ends. Make note of their routing. Fresh/recirc cable disconnects just above passenger kick panel, below speaker. One of the two temp select cables routes (a white cable) to foot vent of left side of passenger footwell. The other (it�s blue) routes through the firewall, so I just disconnected that one at the control lever and left the cable in place. Vent select disconnected to right of gas pedal. There also should be two wiring connectors that need disconnecting where the glove box used to be. Where the instrument cluster was, there is a wiring harness routed through some clips that you will have to disconnect.
Once you think you have everything disconnected, start gently pulling it out to make sure nothing is still hanging up.
4. Remove metal cross bar that supports steering column. First take off all the ventilation pieces. Most are only secured by one screw and they all just fit together. Two springs attach to the crossbar near the steering column- just disconnect them.
Take out these two metal braces (two bolts each) and unbolt ebrake bracket (two bolts).
Then support your steering wheel on the driver seat using a tool box/wood so the entire column doesn�t drop 6� directly onto the seat (not sure if it�s actually bad to rest wheel directly on seat, but I didn�t want to bend/break any steering components). Remove these two big bolts to free the steering column from the crossbar.
Now your crossbar should just be attached at either end. 3 bolts and a nut on driver side. One bolt, one nut on passenger side. Remove them all and pull the cross bar.
5. Drain coolant from radiator and disconnect heater hoses going through firewall. Be warned that coolant will come out of hoses.
6. Remove heater box. You should now have plenty of room to wiggle the big ol� heater box out of place now. The box is held to the truck via three bolts. Two other screws secure it to the AC condenser box to the right. There�s a wiring assembly mounted to the front (remove it�). Not many bolts left now, so just poke around until you find them. I also loosened the AC condenser box to have some more free play to separate the two. Work out the heater box gently.
7. The box is gone! Remove the braces holding heater core in place and it should just slide out the top of the box. It was immediately clear that mine was leaking coolant from the bottom.
Where the box used to be:
The heater core:
So that�s how you take the darn thing out. Really not too bad if you keep track of everything. I have a few days till my new core gets here, so if you want any more pics of the disassembled dash, let me know.
 Dec 23, 2012 | 06:11 PM
#3


This is what I used:
http://forum.ih8mud.com/79-95-toyota...re-change.html
Of course my A/C system hasn't worked in years considering my A/C compressor is my OBA now
http://forum.ih8mud.com/79-95-toyota...re-change.html
Of course my A/C system hasn't worked in years considering my A/C compressor is my OBA now
Dec 23, 2012 | 06:21 PM
#4
Thread Starter
Registered User
Joined: Jun 2011
Posts: 18
Likes: 0
From: Reno, NV
Big Blue Pile-
That was a pretty good writeup too, but he could pull the heater core out under the dash since he didn't have AC. Of course, if you depressurize the AC system, you could remove the evaporator and do it that way but my AC works fine and I didn't want to touch it.
Plus removing the entire dash gives you plenty of room to work with- valuable for me to prevent mistakes and be able to 'see' what I was doing instead of blindly yanking on something.
Dec 23, 2012 | 06:28 PM
#5
Indeed. Since my A/C system is shot I wasn't worried. Doing this job is a pain regardless. I had ordered my heater core thru Napa which ended up being the right one. However, the same brand thru rockauto.com was more than half the price  .
.
Also, pro tip, make sure to leak check the coolant lines before putting that all back together. Mine was leaking like crazy. Ended up using a hi-temp/pressure sealant on the lines.
. Also, pro tip, make sure to leak check the coolant lines before putting that all back together. Mine was leaking like crazy. Ended up using a hi-temp/pressure sealant on the lines.
Dec 23, 2012 | 10:03 PM
#6
Great write up. I added your thread to a favorites for future reference. Seen you were waiting for your core to come in and wanted to let you know ahead of time, the flange on the heater core is soft. They will bend easily and the c clip that holds it on is a poor design but works when installed right. The way that I get the hoses into the core again is push from the core and the pipe. Dont try and squeeze the flanges with your fingers to close the gap. Your fingers are strong enough bend the flanges. I didnt get any new c clips with my core so take care not to lose one or bend it as I dont know where you could get any more clips to replace them right off without ordering new ones from Toyota. Great write again.
Trending Topics
Mar 24, 2013 | 06:41 AM
#9

Registered User
Joined: Jul 2012
Posts: 47
Likes: 0
Well since smelling and noticing allot of wetness on both sides of my truck I'm sure its the heater core. This write up is awsome. But since I'm only a 6 month old 85 4x4 pickup owner there isnt anything else it could be right? Just want to make sure before I dive in that this is what it is. Mine does not have ac, but should be same right. Also If I wanted to add ac would this be the time to do it? Thanks allot for any info.
Oct 5, 2014 | 12:31 PM
#11
Registered User
Joined: May 2009
Posts: 578
Likes: 11
From: Southern NH
Great writeup, I was hoping not to have to depressurized the AC system and deal with changing over the refrigerants. Anyone done that themselves out of curiosity? I wonder what it would involve.
Rockauto lists two different sizes made by Spectra for around $100. Toyotapartsoverstock or similar could probably find one for you also, but of course they're around $350.
What's the consensus on using an old but still good heater core? I've got a working one in my other 1990, but it's quite a bit of labor to get at. Any success/horror stories?
What's the consensus on using an old but still good heater core? I've got a working one in my other 1990, but it's quite a bit of labor to get at. Any success/horror stories?
May 28, 2015 | 06:13 PM
#12
Registered User
Joined: Oct 2009
Posts: 47
Likes: 0
I managed to find a free day and finally replace my leaking heater core in my 1985 4Runner w/ AC. Since I hadn’t found any write-ups for a heater core replacement on a 1st gen w/ AC, I thought I’d throw together a quick how-to. I took pics at every chance I remembered to. Hopefully this helps a few people wondering if they should attempt this fix. No need to touch the AC system at all if you go for the heater core by this remove-everything-in-sight method.
Took me 3 hours to pull the core and I was taking my time to stay organized and trying not to break anything. Don’t know how long it takes to reassemble yet because my parts place delivered the wrong core…so the truck’s out of commission for a few days now.
So here’s how I did it:
1. Remove glovebox, radio/ashtray, instrument cluster, panel below steering wheel.
2. Remove dashpad
3. Remove entire dash assembly
4. Drop steering wheel
5. Remove metal crossbar
6. Drain coolant/remove heaterhoses from firewall
7. Pull heaterbox and remove core
Full version:
1. Get the easy stuff out of the way. Disconnect battery.
Remove:
Glovebox (2 screws at base),
Radio/ashtray assembly (2 screws on each side and one hiding behind the ashtray),
Instrument cluster/shield (5 screws to get off shield, then 4 screws, wiring harness, and speedo cable for actual cluster),
Panel below steering wheel (a few screws, two wiring connectors (light dimmer and cargo light), and hood-release lever). Here’s what you should be left with at this stage (crap pic, sorry).
The heater core:
So that’s how you take the darn thing out. Really not too bad if you keep track of everything. I have a few days till my new core gets here, so if you want any more pics of the disassembled dash, let me know.
Resurrection...
Great write up thanks... and curious if the two long pipes that go from the heater core to the firewall transfer over or are those part of the replacement?
Reason I ask is I picked up a core from my LPS and it's a Murray PN 94662 and it does not have those long tubes, it's just the core. The part I have looks identical to the core you have with the exception of the long tubes.
Thanks
Last edited by TheeMikeB; May 28, 2015 at 06:15 PM.
Jun 2, 2015 | 08:05 AM
#13
Thread Starter
Registered User
Joined: Jun 2011
Posts: 18
Likes: 0
From: Reno, NV
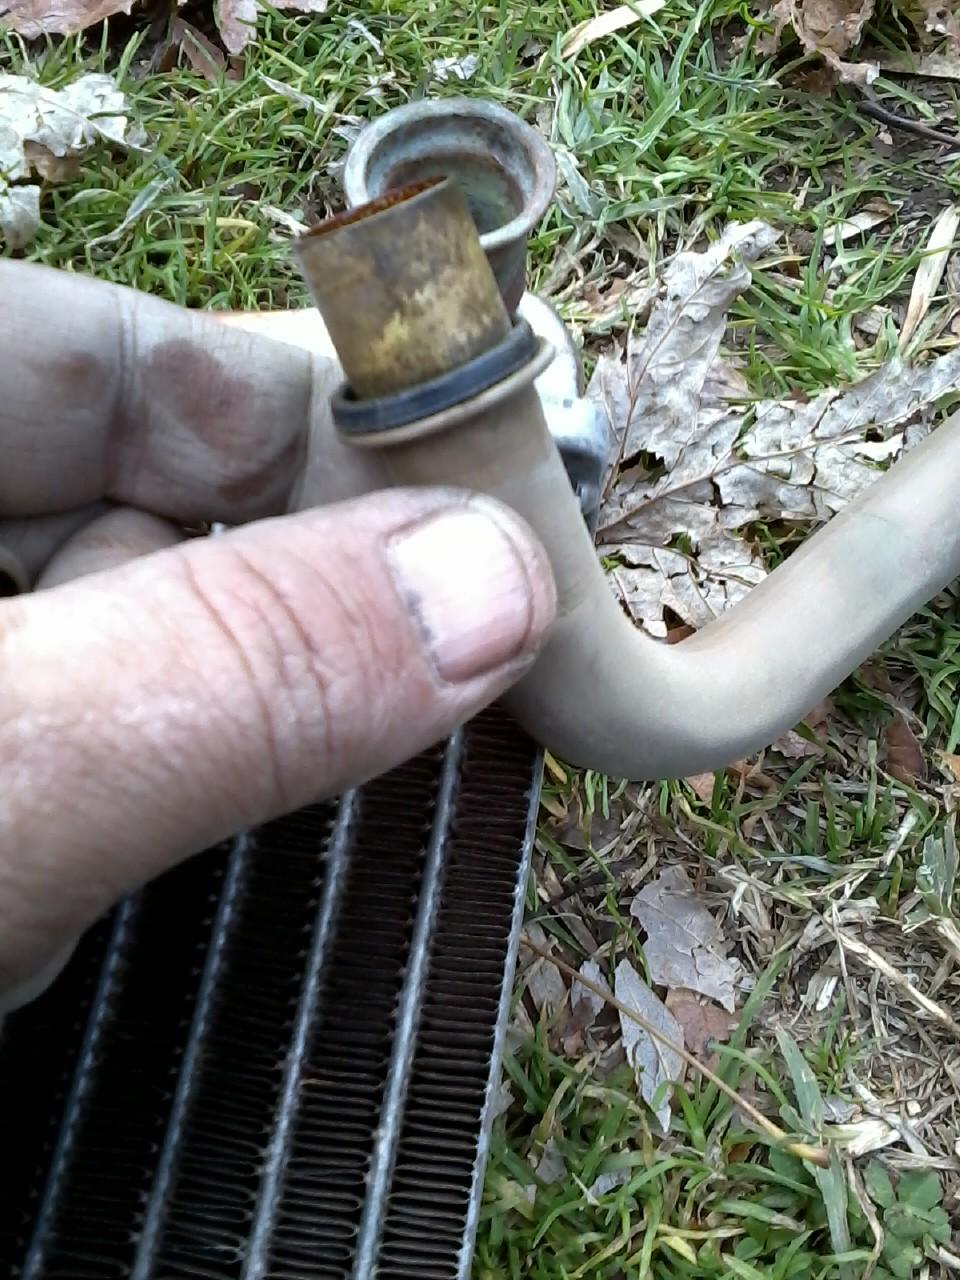
Those long tubes are reusable. They are just held on with a metal clip. Replace the O ring before putting them on the new core.
Also, is that Murray core an exact match? I couldn't find the same size heater core anywhere new so ended up getting a used one...
Also, is that Murray core an exact match? I couldn't find the same size heater core anywhere new so ended up getting a used one...
Jun 2, 2015 | 09:26 AM
#14
You will not get the tubes when you buy a new core. Be gentle with the C-clips that hold the pipes to the core and make sure they seated well. 2nd picture shows one seated the correct way.
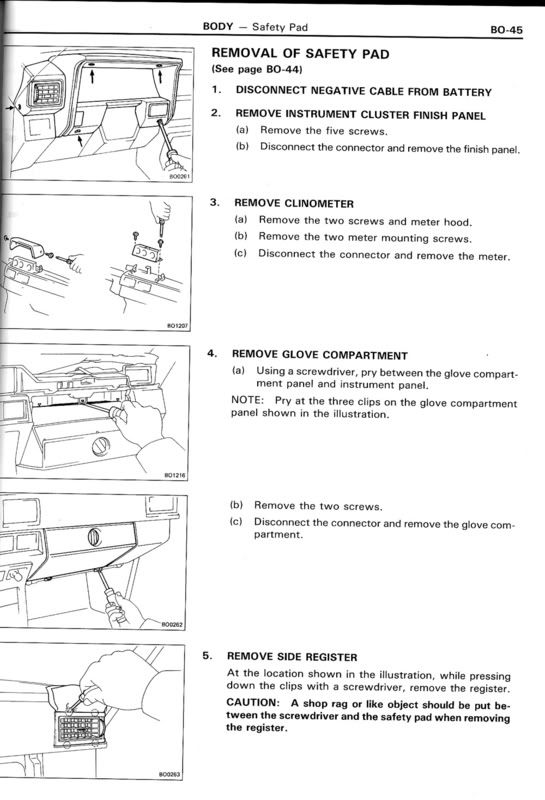
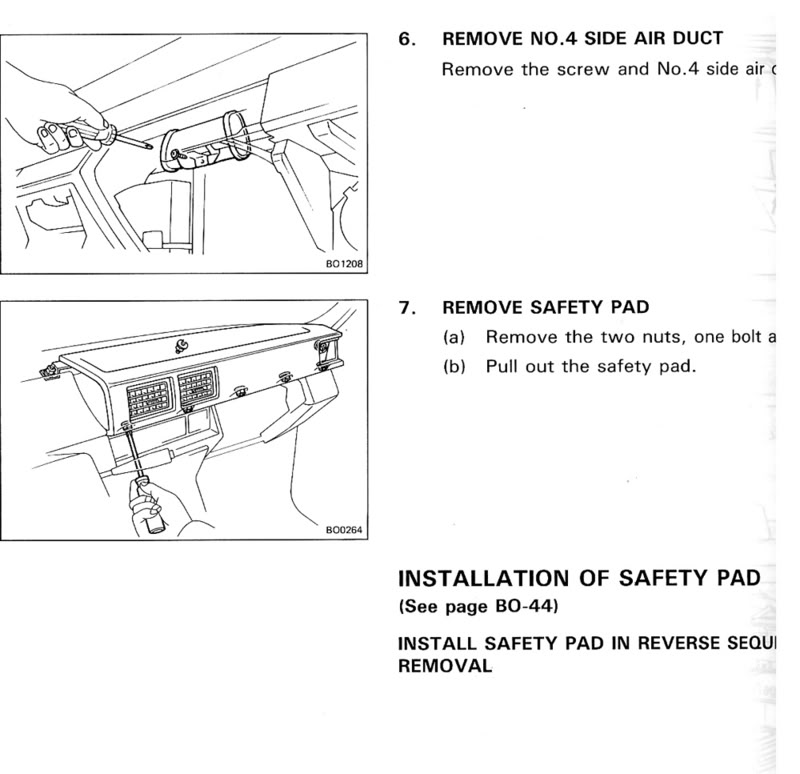
Here is a step by step to remove the dash on an 84-88 https://www.yotatech.com/forums/f116...4-88-a-278925/
Here is the Core Assembly. You will have 4 clamps on top that are held by phillips screws. Remove and slide the core up and out.
Seperate the pipes from the core. My replacement core didnt come with new seals or the c clips. Be gentle with these as you will need to reuse them. When you stick the old pipes into the new core (you use your old pipes) do NOT try to squeeze them with pliers to try and close the gap. The edge will bend and then you have to straighten it out. I found it easier to have someone to push the two pieces together while I put on the clip.
The oring you will need to reuse. I should of went to the store and got a new one, but we didnt have any leaks when done.
Last edited by Terrys87; Jun 2, 2015 at 09:28 AM.
Jun 3, 2015 | 12:55 PM
#16
Registered User
Joined: Oct 2009
Posts: 47
Likes: 0
You will not get the tubes when you buy a new core. Be gentle with the C-clips that hold the pipes to the core and make sure they seated well. 2nd picture shows one seated the correct way.
Here is a step by step to remove the dash on an 84-88 https://www.yotatech.com/forums/f116...4-88-a-278925/
Here is the Core Assembly. You will have 4 clamps on top that are held by phillips screws. Remove and slide the core up and out.
Seperate the pipes from the core. My replacement core didnt come with new seals or the c clips. Be gentle with these as you will need to reuse them. When you stick the old pipes into the new core (you use your old pipes) do NOT try to squeeze them with pliers to try and close the gap. The edge will bend and then you have to straighten it out. I found it easier to have someone to push the two pieces together while I put on the clip.
The oring you will need to reuse. I should of went to the store and got a new one, but we didnt have any leaks when done.
Thanks that is exactly what I was looking for,
Jun 3, 2015 | 04:08 PM
#17
Thanks guys, here is some more information that might help as well. The paint trick for the heater control cables in my previous post makes it a lot easier for reassembly. The heater control cables and passenger vent is the most difficult part.
If you want to do your AC while in there>>> https://www.yotatech.com/forums/f116...trucks-286766/
Video I made to get the passenger vent out.
Video to get the PE pipe out and the center dash pad nut.
Factory Manual.
If you want to do your AC while in there>>> https://www.yotatech.com/forums/f116...trucks-286766/
Video I made to get the passenger vent out.
Video to get the PE pipe out and the center dash pad nut.
Factory Manual.
 Jun 7, 2015 | 06:08 AM
#19
Go thru this thread a few times. The paint trick makes it reassembly a lot easier. The hardest part is getting the passenger vent out and getting the heater cables to function correctly. The AC cleaning thread is best at explaining the heater cables. It really isnt as bad as it is let on. I can usally have the dash out in 45 minutes but reassembly takes me an hour and a half. If you are going to do it all and since it is your first time, I would allow 4-6 hours. Most of that time will be spent cleaning, it really is not a bad job with the information provided up above.
Jun 24, 2015 | 04:51 PM
#20
Registered User
Joined: Apr 2014
Posts: 82
Likes: 0
From: Palmer, Alaska
So we know WHERE to find the parts but the question is which part actually matches up? I've been through two already that didn't work. Murray was too big all around. Spectra was too small at the pipe connections. So who has actually bought and used one that works? Must have part numbers!


