
83 Hilux 22r NO SPARK ~ PLEASE HELP!!
 Sep 29, 2019 | 09:27 PM
#1
Thread Starter
Registered User
Joined: Sep 2019
Posts: 7
Likes: 1
From: Landers, California
83 Hilux 22r NO SPARK ~ PLEASE HELP!!
My 83 Toyota Hilux 22r started cutting out when I was going up a hill on a dirt road and died, I eventually got it started again but it did the same thing so I had my brother pull me with his truck and I tried to pop the clutch multiple times with no good results coming of it.. So for the last month it's been sitting in my yard while I try to get it running again but I'm about to the point of giving up..
It cranks and cranks and cranks until eventually the battery dies or I stop trying but it won't start. When I took the coil wire off of the distributor I realized it has no spark..
I've tried multiple ignition control modules, igniters, and coils from other Toyotas. I've even purchased a brand new gm 4 pin hei igniter and tried that with a gm coil. I've changed plug wires and all for nothing. Please someone help me!!! I love this truck and just want her to start so we can mob!
Any and all help is very much appreciated!
Thank you everyone for your time!
Sep 30, 2019 | 12:25 AM
#2
Registered User


Joined: Jun 2016
Posts: 94
Likes: 16
From: Oakland, CA
Did you check that the ignition coil / igniter are receiving the proper amount of power? If they are not, then all the coils / igniters in the world won't help. Are the original fusible links still installed at the battery? If so, I would check those out. I don't have the wiring diagram in front of me but I do remember there is also and "engine" fuse in the fuse box. Can't remember what exactly it controls off the top of my head though. If you don't have the Factory Service Manual (FSM) there is one available for free download somewhere on this site. You've found part of the problem but now you just have to trace it back until you reach the point of failure. Follow the flow of electricity my friend.
Best of luck,
Sam
Best of luck,
Sam
Last edited by FourEyes; Sep 30, 2019 at 09:37 PM.
Sep 30, 2019 | 06:01 AM
#3
Registered User
Joined: May 2008
Posts: 4,591
Likes: 126
From: Montana
Yeah, FSM and a voltmeter. I'm still learning to use one myself, but they're great for this sort of thing. Find out what's not getting power, or not getting enough power, with the volt meter. I had a similar problem and at the time was more interested in throwing parts at it than with actually diagnosing the problem. I put a new coil, distributer cap, rotor, plugs and wires before finally spending the big bucks on a new ignitor. That was the problem. But with some testing I could have had the problem figured out in an afternoon instead of waiting for parts that didn't need to be replaced.
Sep 30, 2019 | 11:50 AM
#4
I would start by doing checking the condition of the fusible link going to the igniton switch, probably a black/red wire off the battery. Do a continuity check between the black/yellow wire from ignition switch to the Igniter. Check continuity between the Eng Fuse and the Ign post on the ignition switch, black/yellow wire. Not much in the system that would keep power from the Igniter.
Oct 1, 2019 | 07:33 AM
#5
Registered User

Joined: Jun 2016
Posts: 718
Likes: 189
From: Florida
All of the above are very good things to check out, but I want to add one more thing that hasn't been mentioned yet. Check the resistance & air gap on the pickup coil in the distributor. The pickup coil is what generates and sends the signal to the Ignitor/Ignition Control Module to fire & if that part is bad, no brand new parts "downstream" of it will work.
Check resistance of the pickup coil. Disconnect the plug on the wire(s) coming out of the distributor & probe both terminals in the plug. A good pickup coil should read between 130-190 Ohms cold. Just IMO but any pickup coil that reads over 160 ohms cold I replace. As these coils age & heat cycle in the engine compartment, they can develop higher resistance than spec when hot, due to fatigue in the windings & magnetic core. This can lead to a VERY frustrating "hot-no start" problem, but will restart when cooled off. If the pickup coil reads no resistance at all or as an open circuit, the windings have probably failed (broken wire in windings). Replace the pickup coil.
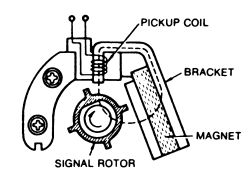
On rare occasions the pickup coil could come loose in the distributor and be too far away from the signal rotor to generate any signal. Use feeler gauges to check the air gap between the signal rotor vane & the magnet (see pic above). The vane needs to be lined up square to the magnet to check this properly so you will either have to "bump" the engine with the starter to line it up, or use a 19mm socket & ratchet on the crank bolt to rotate the engine. The spec is .008" to .016", or 0.2mm to 0.4mm. The air gap can be adjusted by loosening the pickup coils mounting screws. I set mine at .008" but any gap within the spec should work if the coil is good.
If you need a new pickup coil I suggest Rock Auto for best price: https://www.rockauto.com/en/catalog/...ckup+coil,7176
Looks like local stores want nearly double the price & it's a non-stock, special order item. Toyota OEM is even more at $200(!) Reference original Toyota Part # 19250-37080 - Distributor Ignition Pickup, Generator, Signal, Pick Up Coil.
Check resistance of the pickup coil. Disconnect the plug on the wire(s) coming out of the distributor & probe both terminals in the plug. A good pickup coil should read between 130-190 Ohms cold. Just IMO but any pickup coil that reads over 160 ohms cold I replace. As these coils age & heat cycle in the engine compartment, they can develop higher resistance than spec when hot, due to fatigue in the windings & magnetic core. This can lead to a VERY frustrating "hot-no start" problem, but will restart when cooled off. If the pickup coil reads no resistance at all or as an open circuit, the windings have probably failed (broken wire in windings). Replace the pickup coil.
On rare occasions the pickup coil could come loose in the distributor and be too far away from the signal rotor to generate any signal. Use feeler gauges to check the air gap between the signal rotor vane & the magnet (see pic above). The vane needs to be lined up square to the magnet to check this properly so you will either have to "bump" the engine with the starter to line it up, or use a 19mm socket & ratchet on the crank bolt to rotate the engine. The spec is .008" to .016", or 0.2mm to 0.4mm. The air gap can be adjusted by loosening the pickup coils mounting screws. I set mine at .008" but any gap within the spec should work if the coil is good.
If you need a new pickup coil I suggest Rock Auto for best price: https://www.rockauto.com/en/catalog/...ckup+coil,7176
Looks like local stores want nearly double the price & it's a non-stock, special order item. Toyota OEM is even more at $200(!) Reference original Toyota Part # 19250-37080 - Distributor Ignition Pickup, Generator, Signal, Pick Up Coil.
Oct 7, 2019 | 11:25 PM
#6
Thread Starter
Registered User
Joined: Sep 2019
Posts: 7
Likes: 1
From: Landers, California
Thank you everyone for all the help, I finally got spark! Turns out the 2 wires going from the igniter to the distributor were broke inside. Even though I now have spark the truck still won't start for some reason.. I did the GM hei igniter and coil swap and now when I go to start the truck even with the battery charger connected and on the engine start setting the truck will cranks a few times and then the battery is killed.. Please let me know what to try next, any and all suggestions are very much appreciated, thank you everyone for your time! ��
Oct 8, 2019 | 12:31 AM
#7
Registered User
Joined: Jun 2016
Posts: 94
Likes: 16
From: Oakland, CA
Glad you are making progress!
Are you sure that the battery you are using is still good? Is more than 3 years old? Has it been completely (or mostly) discharged on multiple occasions? If you charge it to full does it hold it's charge overnight? How about over a few days? I would check / test for all of these things. If possible, I would also try starting the truck with a known good battery. You can also take the battery in to almost any auto parts store and have it tested for free (not sure that I completely trust their tests but it can be somewhat informative).
Hope this helps,
Sam
Trending Topics
Oct 8, 2019 | 04:14 AM
#8
Thread Starter
Registered User
Joined: Sep 2019
Posts: 7
Likes: 1
From: Landers, California
I'm currently using an optima red top that is charged to a little over 13v and is just barely 3 months old, I've tried 2 other batteries as well thinking the same thing only to have the same end result. 😳
Oct 8, 2019 | 06:02 AM
#9
Registered User
Joined: Jun 2016
Posts: 718
Likes: 189
From: Florida
Time to double check, test. clean & tighten all of your battery connections, ground cables'straps (most likely culprit) & connections on the starter itself. If any of those connections are loose, dirty, corroded or damaged you might be drawing a lot more power than normal, draining the battery quicker. It would also be wise to install a known good battery and do voltage drop tests on your battery cable and ground cable(s)/strap to see if you have extra resistance in any of those. Those cables/straps, if original, are now 36 years old & may need replacing. On these trucks there should also be a secondary ground cable from the back of the engine head to the firewall so don't forget to check that one too.
You can also use an Ohm meter to just check the resistance in a battery cable itself, by probing the ends of the cable (not the connectors, which could also have their own resistance problems). My rule of thumb is anything over 0.3 Ohm resistance in a battery cable it gets replaced with new. If you have a cheap Ohm meter without automatic zeroing, make sure you touch the probes together first to check the resistance in your test leads, so you can subtract that value from your reading on the item you are testing. That way you can get an accurate idea of the actual resistance reading.
Info on Voltage Drop tests: https://www.aa1car.com/library/volta...%20or%20less).
Oct 8, 2019 | 12:59 PM
#10
Thread Starter
Registered User
Joined: Sep 2019
Posts: 7
Likes: 1
From: Landers, California
Time to double check, test. clean & tighten all of your battery connections, ground cables'straps (most likely culprit) & connections on the starter itself. If any of those connections are loose, dirty, corroded or damaged you might be drawing a lot more power than normal, draining the battery quicker. It would also be wise to install a known good battery and do voltage drop tests on your battery cable and ground cable(s)/strap to see if you have extra resistance in any of those. Those cables/straps, if original, are now 36 years old & may need replacing. On these trucks there should also be a secondary ground cable from the back of the engine head to the firewall so don't forget to check that one too.
You can also use an Ohm meter to just check the resistance in a battery cable itself, by probing the ends of the cable (not the connectors, which could also have their own resistance problems). My rule of thumb is anything over 0.3 Ohm resistance in a battery cable it gets replaced with new. If you have a cheap Ohm meter without automatic zeroing, make sure you touch the probes together first to check the resistance in your test leads, so you can subtract that value from your reading on the item you are testing. That way you can get an accurate idea of the actual resistance reading.
Info on Voltage Drop tests: https://www.aa1car.com/library/volta...%20or%20less).
You can also use an Ohm meter to just check the resistance in a battery cable itself, by probing the ends of the cable (not the connectors, which could also have their own resistance problems). My rule of thumb is anything over 0.3 Ohm resistance in a battery cable it gets replaced with new. If you have a cheap Ohm meter without automatic zeroing, make sure you touch the probes together first to check the resistance in your test leads, so you can subtract that value from your reading on the item you are testing. That way you can get an accurate idea of the actual resistance reading.
Info on Voltage Drop tests: https://www.aa1car.com/library/volta...%20or%20less).
Oct 8, 2019 | 05:44 PM
#11
Registered User
Joined: May 2008
Posts: 4,591
Likes: 126
From: Montana
Yep, what he said. My 98 has had the same battery since I don't know when. I bought the truck in 2015 with this battery, and it looked old then. When I was in Utah in the spring of last year (2018), I was pulling out of a parking lot and the truck died. Thought I just stalled it, but it wouldn't start. Wouldn't crank, wouldn't make a noise that I could tell. Just dead.
Luckily a nice guy jumped out of his truck and asked if I needed jumper cables. I said "well I don't think it's the battery, but since you're here and offering, why not?". Jumper cables got it started. I went to my friends house and let it run out front for 20 minutes. Turned it off. Dead. No start. No crank. Nothing.
Brought it to a parts store the next day after another jump start to have the battery tested. Battery was fine! I cleaned all the connections really well and that did it. There wasn't even any visible corrosion. But a good cleaning of all the connection points, and I still have that battery today.
Oct 9, 2019 | 03:23 AM
#12
Thread Starter
Registered User
Joined: Sep 2019
Posts: 7
Likes: 1
From: Landers, California
Well I was pretty much completely going through everything and seeing what I could see..
When I checked the timing I noticed that it was off quite a bit and continued investigation led me to notice that the timing chain had a lot of slack on one side so I took off the valve cover and when I went to put it on top dead center right there in front of me and my brother the damn thing jumped a tooth.. It seems to me that the gear on the cam shaft that drives the distributor and the gear in the distributor are both really worn and have play where there shouldn't be, and plus it seems the previous owner way over tightened the first rocker on the cam shaft because there is a flat cam.. So now I'm trying to figure out where I go from here and how to proceed..
When I checked the timing I noticed that it was off quite a bit and continued investigation led me to notice that the timing chain had a lot of slack on one side so I took off the valve cover and when I went to put it on top dead center right there in front of me and my brother the damn thing jumped a tooth.. It seems to me that the gear on the cam shaft that drives the distributor and the gear in the distributor are both really worn and have play where there shouldn't be, and plus it seems the previous owner way over tightened the first rocker on the cam shaft because there is a flat cam.. So now I'm trying to figure out where I go from here and how to proceed..
Oct 11, 2019 | 07:34 AM
#14

Registered User
Joined: Aug 2019
Posts: 175
Likes: 19
From: Ventura county Calif
83 Hilux
Well at least you found it. Redline cams is having a sale. I just ordered a new 268 grind from him. 125+25 shipping. The best timing chain kit is from Yota shop and is OEM, OSK brand for under 100.00. Easy to change.
In rebuilding my engine I have discovered some very odd things that are happening to these older rigs. All cam makers say you need Zink in the oil. No Zink and it ruins the engines. Zink was removed from almost all oils a few years back. And some of these new oils will not blend well with a Zink additive. So I'm going to use a truck oil such as Rotela or the Dello brand as they still have Zink. Something to consider.
In rebuilding my engine I have discovered some very odd things that are happening to these older rigs. All cam makers say you need Zink in the oil. No Zink and it ruins the engines. Zink was removed from almost all oils a few years back. And some of these new oils will not blend well with a Zink additive. So I'm going to use a truck oil such as Rotela or the Dello brand as they still have Zink. Something to consider.
Last edited by Mwhite49; Oct 11, 2019 at 07:36 AM.
Oct 11, 2019 | 07:46 AM
#15

Registered User

Joined: Apr 2017
Posts: 964
Likes: 197
Time to tear it open!
Theres lots of good threads out there and this engine is pretty easy to do. Just think about what other parts probly need to get replaced.
Head gasket. Water pump. Head bolts etc.
And get a good torque wrench! Some of those bolts have very low torque #s and you can easily strip threads in your t cover. Dont ask how i know.
Take your time. Dont skip "little" details.
Last edited by swampedout; Oct 11, 2019 at 07:47 AM.
Oct 11, 2019 | 08:07 AM
#16
Registered User
Joined: Aug 2019
Posts: 175
Likes: 19
From: Ventura county Calif
83 Hilux
Time to tear it open!
Theres lots of good threads out there and this engine is pretty easy to do. Just think about what other parts probly need to get replaced.
Head gasket. Water pump. Head bolts etc.
And get a good torque wrench! Some of those bolts have very low torque #s and you can easily strip threads in your t cover. Dont ask how i know.
Take your time. Dont skip "little" details.
Theres lots of good threads out there and this engine is pretty easy to do. Just think about what other parts probly need to get replaced.
Head gasket. Water pump. Head bolts etc.
And get a good torque wrench! Some of those bolts have very low torque #s and you can easily strip threads in your t cover. Dont ask how i know.
Take your time. Dont skip "little" details.
Oct 12, 2019 | 07:27 AM
#17
Registered User
Joined: Jun 2016
Posts: 718
Likes: 189
From: Florida
Well at least you found it. Redline cams is having a sale. I just ordered a new 268 grind from him. 125+25 shipping. The best timing chain kit is from Yota shop and is OEM, OSK brand for under 100.00. Easy to change.
In rebuilding my engine I have discovered some very odd things that are happening to these older rigs. All cam makers say you need Zink in the oil. No Zink and it ruins the engines. Zink was removed from almost all oils a few years back. And some of these new oils will not blend well with a Zink additive. So I'm going to use a truck oil such as Rotela or the Dello brand as they still have Zink. Something to consider.
In rebuilding my engine I have discovered some very odd things that are happening to these older rigs. All cam makers say you need Zink in the oil. No Zink and it ruins the engines. Zink was removed from almost all oils a few years back. And some of these new oils will not blend well with a Zink additive. So I'm going to use a truck oil such as Rotela or the Dello brand as they still have Zink. Something to consider.
There are 2 forms of Zinc found in modern motor oils. Zinc dialkyldithiophosphate, or ZDDP, in conventional motor oils, and Zinc Dialkyldithiophosphate, or ZDTP, in synthetic motor oils. Either one is oil soluble so it will blend with either type of oil, no problem. How it works is at high-stress points like the cams, valves, and tappets, heat & friction breaks down the Zinc into it's chemical components, causing a film to form on the metal, reducing metal-to-metal contact. This provides a "cushioning effect" that helps to distribute the force. So this gives you longer wear on these parts.
Zinc content in motor oil is usually measured in Parts Per Million (PPM), for older engines 1000 PPM or higher will do the job for you. Most "break-in", racing or high performance motor oils have levels of Zinc around 2000 PPM or higher.
It all depends on the API Service Grade or Service Rating of the oil as to how much Zinc is in the oil. You can usually find this grade or rating on any container of motor oil, on the label, inside a circle. While it is true that more recent service grades have reduced Zinc levels, it has not been totally removed. They did reduce the level as it was found that higher levels of Zinc that may find their way into your exhaust system reduce the lifespan of catalytic converters.
What to use? Any high performance or racing motor oil will have more than 1000 PPM of Zinc additive. The Rotella & Dello Mr White mentions should be OK as well, as these are intended for diesel truck use & have higher Zinc content; just make sure you get the right viscosity (original spec for 20R is 10W-30). "Regular" motor oils (not racing or high performance) Service Grades SJ, SL and possibly SM should be ok. Here are the numbers:
Service Grade Zinc in PPM
SJ 1280
SL 1182
SM 939
You CAN use the most modern SN Service Grade, but you'd need to buy a Zinc additive & add it in to get the proper level of Zinc. These additives are still sold at parts stores and will blend just fine with the modern oils.
Nov 6, 2019 | 06:27 PM
#18
Thread Starter
Registered User
Joined: Sep 2019
Posts: 7
Likes: 1
From: Landers, California
Now after I finally got all the parts I needed and got my truck put back together first I checked and made sure the coil has spark, then next I made sure the #1 spark plug had spark. Then I connected everything expecting, or not really expecting but more like rather hoping it would start right up but when I tried, (the 3rd crank after getting it all put back together) the starter clicks...
Now it won't crank or turn over at all, it just clicks, clicks, clicks...
Now it won't crank or turn over at all, it just clicks, clicks, clicks...


