navyredneck's 1995 4Runner Build-Up Thread
 01-02-2007, 01:26 PM
#1
Contributing Member
Thread Starter
Join Date: May 2006
Location: South Carolina
Posts: 377
Likes: 0
Received 0 Likes
on
0 Posts
navyredneck's 1995 4Runner Build-Up Thread
Ok, this build-up will be a looong time in the making. Doing stuff takes me a long time as I have to do a lot of research to figure out what to do (not to mention the typical 2nd generation owner lack-of-cash thing). I had never even changed my own oil a year ago. Of course buying a 3.0 has forced me to learn all sorts of new mechanical skills...
I bought my 4runner in April 2006 because I wanted a reliable hunting truck that would double as a daily driver. I've also always loved Toyota because of their reliability. I bought the 4runner in awesome condition with 136k from a USMC pilot. Here's a pic with my wife posing. Too bad that nice paint job is about to go into the woods!
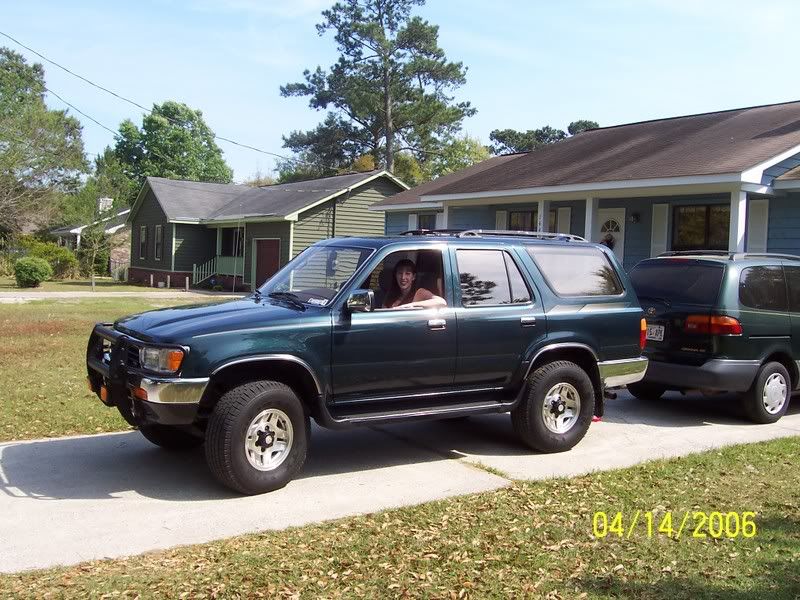
I bought my 4runner in April 2006 because I wanted a reliable hunting truck that would double as a daily driver. I've also always loved Toyota because of their reliability. I bought the 4runner in awesome condition with 136k from a USMC pilot. Here's a pic with my wife posing.
Too bad that nice paint job is about to go into the woods!
 01-02-2007, 01:34 PM
#2
Contributing Member
Thread Starter
Join Date: May 2006
Location: South Carolina
Posts: 377
Likes: 0
Received 0 Likes
on
0 Posts
First thing I did was change all of the fluids and switch to manual Aisin hubs (which helped my gas mileage about 1 mph).
Next I discovered some oil leaks (probably from all the bouncing around in the woods). That led me to replace all my valve cover gaskets and cam seals. Took me about 12 hours and I was beat but I cut my oil leak in half.
Replaced a cv axle joint. Autozone has those for pretty cheap and of course, I LOVE the lifetime free replacement thing. If they only knew the beating these joints are getting in the woods...
Decided on the Sonoran steel rear truss over the Downey one. This thing is heavy and solid! Took me about an hour and went smoothly. Now I can sail over large bumps offroad without worrying about my IFS front end messing up my frame...
Next was an option 2 OME lift kit (1.5") from strap22. Only problem there was the lack of instructions resulted in me putting the wrong springs on the wrong sides. I called strap22 and he told me a different method using the tires which allowed me to switch the springs in about an hour instead of the 6 it originally took me.
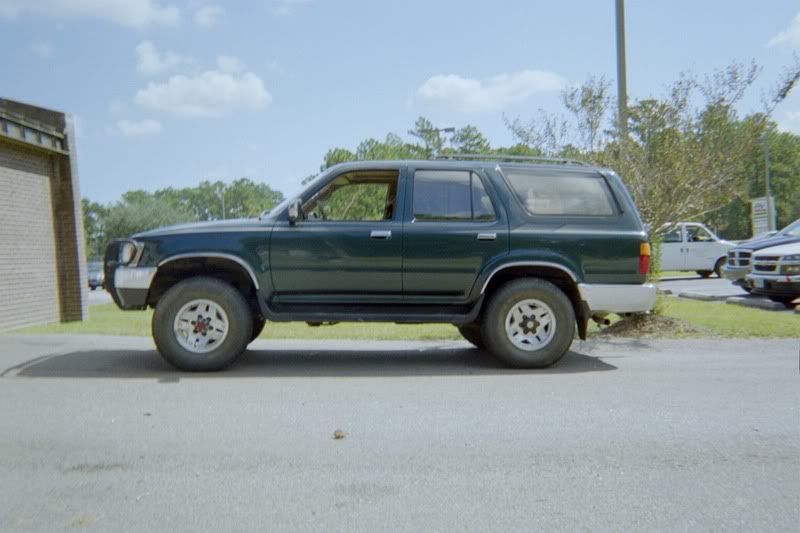
Pre-kit picture. Notice the saggy rear end...
The balljoint spacers required a LOT of cutting (at least in my opinion as I had never cut metal off of a car before). Other than that it went pretty easily. I also fabbed up my own LPSV bracket from some spare stock steel laying around.
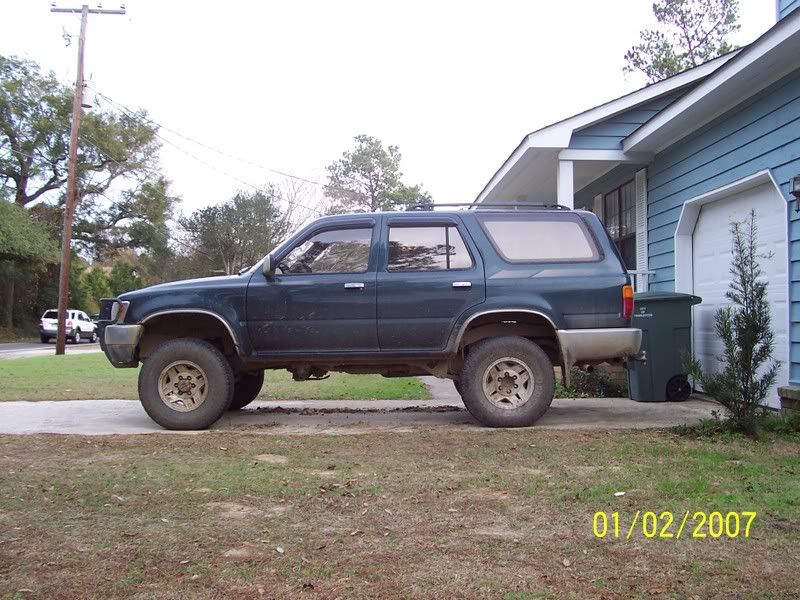
Post-kit picture with new vent visors and the running boards removed.
Next I discovered some oil leaks (probably from all the bouncing around in the woods). That led me to replace all my valve cover gaskets and cam seals. Took me about 12 hours and I was beat but I cut my oil leak in half.
Replaced a cv axle joint. Autozone has those for pretty cheap and of course, I LOVE the lifetime free replacement thing. If they only knew the beating these joints are getting in the woods...
Decided on the Sonoran steel rear truss over the Downey one. This thing is heavy and solid! Took me about an hour and went smoothly. Now I can sail over large bumps offroad without worrying about my IFS front end messing up my frame...
Next was an option 2 OME lift kit (1.5") from strap22. Only problem there was the lack of instructions resulted in me putting the wrong springs on the wrong sides. I called strap22 and he told me a different method using the tires which allowed me to switch the springs in about an hour instead of the 6 it originally took me.
Pre-kit picture. Notice the saggy rear end...
The balljoint spacers required a LOT of cutting (at least in my opinion as I had never cut metal off of a car before). Other than that it went pretty easily. I also fabbed up my own LPSV bracket from some spare stock steel laying around.
Post-kit picture with new vent visors and the running boards removed.
Last edited by navyredneck; 01-02-2007 at 01:51 PM. Reason: forgot the sonoran steel rear truss!
01-02-2007, 01:48 PM
#3
Contributing Member
Thread Starter
Join Date: May 2006
Location: South Carolina
Posts: 377
Likes: 0
Received 0 Likes
on
0 Posts
This brings me to my current 151k mileage. The truck is due soon for a timing belt. Last one was changed at 88k but to be honest I think I am done putting money into this engine. If the engine can hold out until I am in a different job/car situation where the truck is not my DD I hope to drop a 1uz into the 4runner. I'm basically hoping to copy Cebby and Twisty.
In the meantime I'm planning on:
1" BL to set me up for the engine swap. I'm also gonna put in new polyurethane body mounts. Every rubber mount I've pulled off so far has looked decent but I like to use good materials if I'm gonna do something...
Sliders. Don't know what kind but I want to get sliders on as soon as possible after the BL (probably depend on money flow).
New tires. Hope to go the 33x10.5 BFG route. Don't know whether AT's or MT's will be better. I'll keep my current Michelin 31's for use on steelies around town outside of hunting season. The problem here is I'm not sure that I won't end up in a Northern climate after this year which would mean that I would need a tire better than the MT's for snow traction...
In the far, far future I'm hoping for:
New bumper by either Warn, ARB, or TJM. I know the tube bumpers are probably stronger but I really like the look of those 3. Probably will boil down to whatever used bumper I can find at the time.
8k or better winch. I've already gotten stuck twice now that a winch would have saved me the embarassment of having to call my buddies to haul me out...
fender flares to replace the chrome stuff I have right now
1uz engine but this will get put off until my current engine dies. I'm really hoping to do this myself which is why I need a different car as a DD while I spend the month or whatever it will take me to do this.
rear locker
rear bumper
01-02-2007, 02:12 PM
#5
Contributing Member
Join Date: Dec 2005
Location: San Antonio, TX
Posts: 1,072
Likes: 0
Received 0 Likes
on
0 Posts
Keep up the good work! I'm going to do my 1UZ engine swap in June so maybe I can pass some info along as well. Check out uzswap.com
Last edited by 91_4x4runner; 01-02-2007 at 02:18 PM.
01-02-2007, 02:17 PM
#6
Contributing Member
Thread Starter
Join Date: May 2006
Location: South Carolina
Posts: 377
Likes: 0
Received 0 Likes
on
0 Posts
01-03-2007, 07:46 AM
#7
Contributing Member

Trending Topics
05-28-2007, 01:56 PM
#8
Contributing Member
Thread Starter
Join Date: May 2006
Location: South Carolina
Posts: 377
Likes: 0
Received 0 Likes
on
0 Posts
This truck has been put on the back burner lately as I've been working on a project 85 pickup. I developed a really bad pinion seal leak (diff breather got clogged and made it go from bad to really bad). I put this mod off for a while and it definitely cost me as I could have driven for a while with the mild pinion seal leak that I had originally. I also developed a noise from the rear drivetrain which ended up being the rear U-joint which has now been replaced along with the pinion seal.
I also fixed the rear window which had stopped working. Problem was the window channel guides which I replaced. Sorry for the lack of pictures at the end as the pictures I took got deleted before I could post them up.
https://www.yotatech.com/forums/f116/rear-window-issues-caused-rusted-channel-guides-113259/
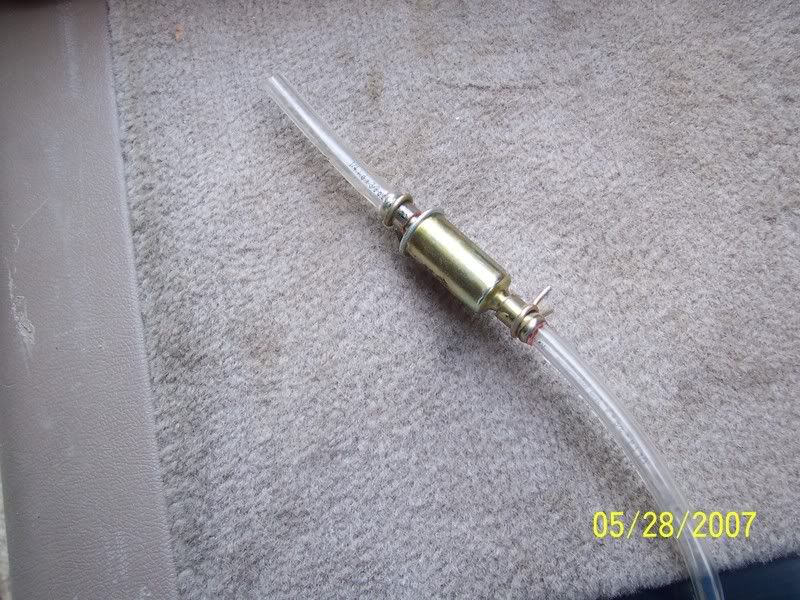
So today I installed the rear diff breather. I was gonna order toyota parts until I saw how expensive they were. So I went to the hardware store and bought:
$3.97 fuel filter by Purolator from Advance Autoparts
$.45 1/4" x 1/8" MPT barb insert from hardware store (thanks 4crawler!)
$1.35 12' long plastic tube from hardware store. Inner diameter is 1/4"
$.90 of clips to hold it all together
total of $6.67 plus tax for my rear breather!
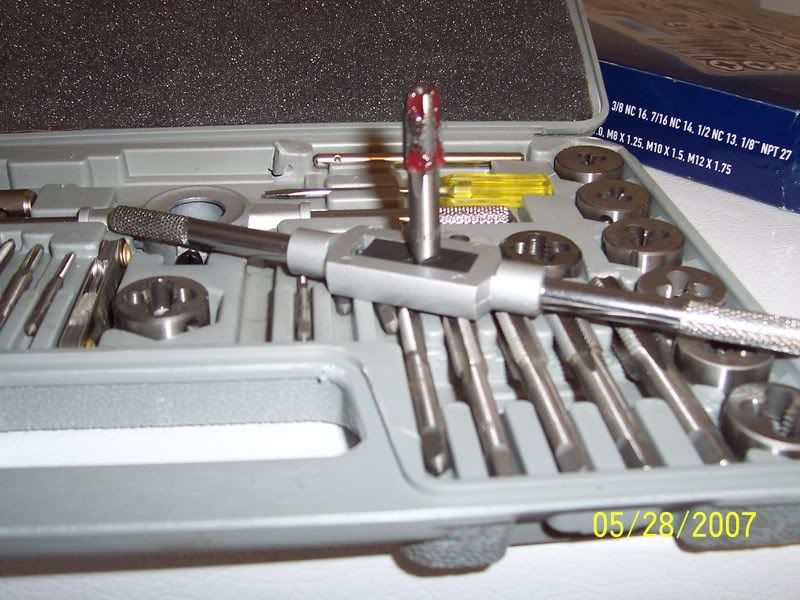
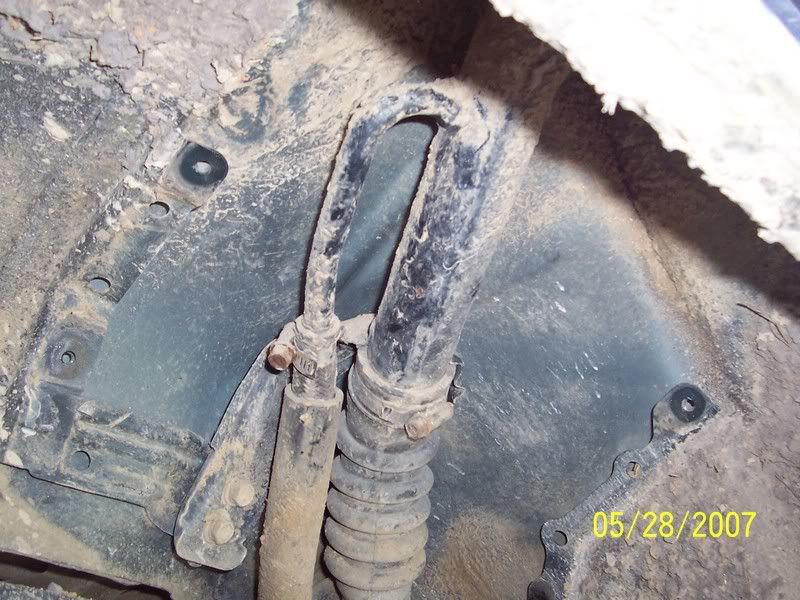
First I tapped the hole using 1/8" tap per 4crawler write-up:
http://www.4crawler.com/4x4/CheapTri...Proofing.shtml
I also used some grease here like he said and it picked up a lot of shavings that would have fallen into my diff. Then I installed the barb fitting and tightened it just a bit using a wrench.
Next I connected up the fuel filter into the hose. I left this part at the end so I can plug it with a golf tee in case I'm washing the gas fill neck with a hose. (also allows me to extend the hose to the luggage rack with a connecter for those hardcore offroad types)
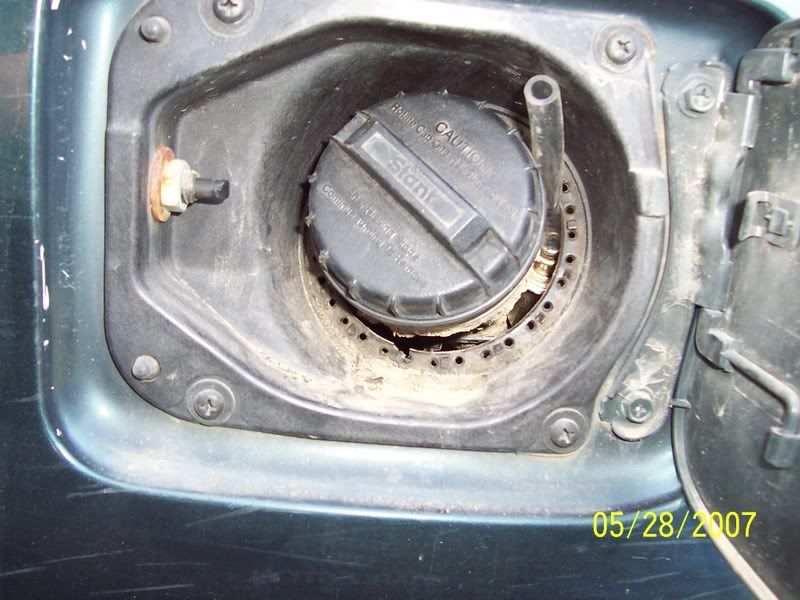
Next I removed the gas filler neck access panel (4 screws)
Pulled the rubber thingie from around the gas cap using pliers

Zip-tied the hose to my lpsv as that can't change length

Zip-tied and connected it to the barb fitting

Positioned the vent end above the gas cap so rainwater doesn't get in it (hopefully)
My current plans are to make this more of a DD and less of an offroad truck. I'd really like to use the 85 for the offroad and this for more of a DD/offroad when I have to. Currently I still need to replace the busted front CV axle and I still hope to put in a new high flow cat.
In the meantime, until my 85 is running like I want it, this truck goes offroad maybe once or twice a week. I also figured that with hurrican season approaching, it would be nice to cross 2 feet of water and not worry about the rear diff breather sucking in a bunch of water. Currently I'm on the essential personnel list for the base so if a hurricane comes, I'll have to button down and wait it out.
I also fixed the rear window which had stopped working. Problem was the window channel guides which I replaced. Sorry for the lack of pictures at the end as the pictures I took got deleted before I could post them up.
https://www.yotatech.com/forums/f116/rear-window-issues-caused-rusted-channel-guides-113259/
So today I installed the rear diff breather. I was gonna order toyota parts until I saw how expensive they were. So I went to the hardware store and bought:
$3.97 fuel filter by Purolator from Advance Autoparts
$.45 1/4" x 1/8" MPT barb insert from hardware store (thanks 4crawler!)
$1.35 12' long plastic tube from hardware store. Inner diameter is 1/4"
$.90 of clips to hold it all together
total of $6.67 plus tax for my rear breather!
First I tapped the hole using 1/8" tap per 4crawler write-up:
http://www.4crawler.com/4x4/CheapTri...Proofing.shtml
I also used some grease here like he said and it picked up a lot of shavings that would have fallen into my diff. Then I installed the barb fitting and tightened it just a bit using a wrench.
Next I connected up the fuel filter into the hose. I left this part at the end so I can plug it with a golf tee in case I'm washing the gas fill neck with a hose. (also allows me to extend the hose to the luggage rack with a connecter for those hardcore offroad types)
Next I removed the gas filler neck access panel (4 screws)
Pulled the rubber thingie from around the gas cap using pliers
Zip-tied the hose to my lpsv as that can't change length
Zip-tied and connected it to the barb fitting
Positioned the vent end above the gas cap so rainwater doesn't get in it (hopefully)
My current plans are to make this more of a DD and less of an offroad truck. I'd really like to use the 85 for the offroad and this for more of a DD/offroad when I have to. Currently I still need to replace the busted front CV axle and I still hope to put in a new high flow cat.
In the meantime, until my 85 is running like I want it, this truck goes offroad maybe once or twice a week. I also figured that with hurrican season approaching, it would be nice to cross 2 feet of water and not worry about the rear diff breather sucking in a bunch of water. Currently I'm on the essential personnel list for the base so if a hurricane comes, I'll have to button down and wait it out.
05-28-2007, 03:37 PM
#10
Contributing Member
Thread Starter
Join Date: May 2006
Location: South Carolina
Posts: 377
Likes: 0
Received 0 Likes
on
0 Posts
Well, it's zip-tied at the top of the fuel filter to the filler neck so it may move some but not much. I'll have to see what it does over the next few months or so.
05-28-2007, 09:02 PM
#11
Registered User
Join Date: Aug 2005
Location: Springs, Colorado
Posts: 1,671
Likes: 0
Received 0 Likes
on
0 Posts
Nice, i actually went out and bought toyota parts because i was too lazy to search for other options And spent too much on hose, only not to get enough for the rear so that will be another thing i need to do now THANKS!
And spent too much on hose, only not to get enough for the rear so that will be another thing i need to do now THANKS!
05-29-2007, 12:07 PM
#12
Registered User
Join Date: Feb 2007
Location: fl
Posts: 1,171
Likes: 0
Received 0 Likes
on
0 Posts
looks like a great build thus far. on both. i like the whole idea about the rear diff breather, but im still not exactly sure what it does or how it helps. or how to do it. i'll have to check it out more later this week when im doin my install of my new shackles. great find on the parts for it though. i can almost afford that. lol
05-29-2007, 06:17 PM
#13
Contributing Member
Thread Starter
Join Date: May 2006
Location: South Carolina
Posts: 377
Likes: 0
Received 0 Likes
on
0 Posts
Haha, well, breathers exist because the inside of your diff heats up as you drive which would build up pressure if it were not vented and blow out your seals (why my pinion seal leak got worse - because it was clogged by mud).
What happens is that your stock diff breather gets clogged by dirt or mud and it stops working. If you submerge your axle in water say at a water crossing you could also vacuum water into your axle.
Anyway, the extended breather takes the air inlet (or outlet) to a high point protected from water or mud.
07-05-2007, 12:04 PM
#14
Contributing Member
Thread Starter
Join Date: May 2006
Location: South Carolina
Posts: 377
Likes: 0
Received 0 Likes
on
0 Posts
Well, my wheel bearings started making noise a month ago or so. I've mainly been driving the 85 pickup so I let it sit for a while. Last week I finally bought the $100 in bearings and bearing races.
Took me 8 hours to do the right hand side as I had never even done brakes, much less bearings before. I used this awesome writeup here:
http://www.4x4wire.com/toyota/maintenance/front_end/
I bought some brass punches that allowed me to knock out the races easy. Getting them back in pretty much destroyed the tips of 2 of my brass punches due to the small lip on the races. Here's the idea that I used to get them back in: (warning - this might damage your own bearings, need more mileage to say its okay)
I greased up the new race and put the old bearing into the new race. Then I took my 5 lb sledge and hit it (only from a foot and a half away) squarely in the old bearing. With a few hits this placed the new race all the way into the rotor. It did leave skid marks on the new race but my fingernail didn't find a groove or anything. I think the marks were from the oil squishing out between the race and bearings. So far, no noise from the bearings.
The left side took me 6 hours with half of that going into getting the old mangled cv joint out and the new (free bc of warranty) cv axle in. So far I've gone through 3 cv axles with the one from Advanced Autoparts holding up better than the axle from Autozone (probably same manufacturer but I'm doing a test anyway )
I also did some sanding, priming, and painting while I was in before putting my wheels back on.
15 hours to do all wheel bearings and a new cv axle. Not too great unless your hourly wage is for free like mine
Anyone with comments on the sledge method?
Took me 8 hours to do the right hand side as I had never even done brakes, much less bearings before. I used this awesome writeup here:
http://www.4x4wire.com/toyota/maintenance/front_end/
I bought some brass punches that allowed me to knock out the races easy. Getting them back in pretty much destroyed the tips of 2 of my brass punches due to the small lip on the races. Here's the idea that I used to get them back in: (warning - this might damage your own bearings, need more mileage to say its okay)
I greased up the new race and put the old bearing into the new race. Then I took my 5 lb sledge and hit it (only from a foot and a half away) squarely in the old bearing. With a few hits this placed the new race all the way into the rotor. It did leave skid marks on the new race but my fingernail didn't find a groove or anything. I think the marks were from the oil squishing out between the race and bearings. So far, no noise from the bearings.
The left side took me 6 hours with half of that going into getting the old mangled cv joint out and the new (free bc of warranty) cv axle in. So far I've gone through 3 cv axles with the one from Advanced Autoparts holding up better than the axle from Autozone (probably same manufacturer but I'm doing a test anyway
)I also did some sanding, priming, and painting while I was in before putting my wheels back on.
15 hours to do all wheel bearings and a new cv axle. Not too great unless your hourly wage is for free like mine
Anyone with comments on the sledge method?

Thread
Thread Starter
Forum
Replies
Last Post
RedRunner_87
95.5-2004 Tacomas & 96-2002 4Runners (Build-Up Section)
84
06-01-2021 01:51 PM
jon.r
General Vehicle Related Topics (Non Year Related)
8
07-11-2015 03:34 PM


